Instruction Manual
Page 7
Contents Before using your unit IMPORTANT SAFEGUARDS 3 Power source 5 Features 6 Contents 7 Parts and functions 8 Display 9 Remote control 10 TV multi-brand remote control 12 Control four JVC VCRs 13 Basic connections 14 CATV (CABLE TV) connections 16 Playback connections 18 Setting up the VCR section Setting the video channel 20 Setting the ... 58 Dynamic Range Control 59 Language code list 60 Additional information Problems and troubleshooting 61 Video head cleaning 62 Specifications 63 HOW TO LOCATE YOUR JVC SERVICE CENTER 64 LIMITED WARRANTY 65 7
Contents Before using your unit IMPORTANT SAFEGUARDS 3 Power source 5 Features 6 Contents 7 Parts and functions 8 Display 9 Remote control 10 TV multi-brand remote control 12 Control four JVC VCRs 13 Basic connections 14 CATV (CABLE TV) connections 16 Playback connections 18 Setting up the VCR section Setting the video channel 20 Setting the ... 58 Dynamic Range Control 59 Language code list 60 Additional information Problems and troubleshooting 61 Video head cleaning 62 Specifications 63 HOW TO LOCATE YOUR JVC SERVICE CENTER 64 LIMITED WARRANTY 65 7
Instruction Manual
Page 8
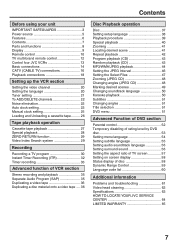
... VCR/DVD mode selector button STOP button Cassette Loading Slot OPEN/CLOSE button PLAY button EJECT button Disc tray POWER button AUDIO (L/R)/ VIDEO IN jacks Remote sensor DVD indicator CHANNEL +/-
... VCR/DVD mode selector button STOP button Cassette Loading Slot OPEN/CLOSE button PLAY button EJECT button Disc tray POWER button AUDIO (L/R)/ VIDEO IN jacks Remote sensor DVD indicator CHANNEL +/-

Instruction Manual
Page 10
... REC Recording 30,32,36 STOP Stop 27,39 PAUSE Still picture/Recording pause on the RCU of the other JVC RECEIVER/TV is combined type of DVD and VCR, the remote code of a tape 28 Otherwise the DVD/ VCR may not operate properly. • Since this unit. 10 Page TV/VCR... DVD 20,38 POWER Power on the upper right is individual. To move Up in playback mode 28 / Cursor buttons - and ENTER) of a remote controllable TV of JVC and the brands listed on page 12 by slide TV/VCR/DVD switch to TV. (The POWER button on /off 28,31,36,40...
... REC Recording 30,32,36 STOP Stop 27,39 PAUSE Still picture/Recording pause on the RCU of the other JVC RECEIVER/TV is combined type of DVD and VCR, the remote code of a tape 28 Otherwise the DVD/ VCR may not operate properly. • Since this unit. 10 Page TV/VCR... DVD 20,38 POWER Power on the upper right is individual. To move Up in playback mode 28 / Cursor buttons - and ENTER) of a remote controllable TV of JVC and the brands listed on page 12 by slide TV/VCR/DVD switch to TV. (The POWER button on /off 28,31,36,40...

Instruction Manual
Page 11
...only the size and type of batteries together (e.g. To avoid a potential short circuit, insert the "-" end first. 3. Operation • Aim the remote control at a time. • The VCR CH +/- Alkaline and Carbon-zinc) or old batteries with fresh ones. 4. If the device is set... diagram in the battery compartment. Do not mix different types of batteries specified. 2. Reversed batteries may cause damage to be recharged; Remote control 2 3 Install two "AA" batteries (supplied), paying attention to follow the correct polarity when installing the batteries as indicated in...
...only the size and type of batteries together (e.g. To avoid a potential short circuit, insert the "-" end first. 3. Operation • Aim the remote control at a time. • The VCR CH +/- Alkaline and Carbon-zinc) or old batteries with fresh ones. 4. If the device is set... diagram in the battery compartment. Do not mix different types of batteries specified. 2. Reversed batteries may cause damage to be recharged; Remote control 2 3 Install two "AA" batteries (supplied), paying attention to follow the correct polarity when installing the batteries as indicated in...

Instruction Manual
Page 12
.... 3 First, press TV POWER on the remote to repeat this step until you finish the step 2. 2 Enter your remote control's batteries. • PANASONIC has two codes. TV multi-brand remote control The DVD/VCR's remote control can control several functions on JVC remote control TVs and on as it does, try ...entering the other operations. • The TV POWER, TV CH+/-, TV VOL+/-, ENTER, INPUT and Number keys on the remote can all functions cannot...
.... 3 First, press TV POWER on the remote to repeat this step until you finish the step 2. 2 Enter your remote control's batteries. • PANASONIC has two codes. TV multi-brand remote control The DVD/VCR's remote control can control several functions on JVC remote control TVs and on as it does, try ...entering the other operations. • The TV POWER, TV CH+/-, TV VOL+/-, ENTER, INPUT and Number keys on the remote can all functions cannot...
Instruction Manual
Page 13
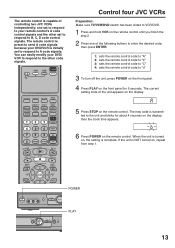
... unit is transmitted to B, C, D code control signals. The remote control is NOT turned on, repeat from step 1. Control four JVC VCRs Preparation: Make sure TV/VCR/DVD switch has been slided to VCR/DVD. 1 Press and hold VCR on the remote control until you finish the step 2. 2 Press one set to..., then the clock time appears. 6 Press POWER on the front panel for 5 seconds. one of controlling two JVC VCRs independently; POWER PLAY 13 The new code is turned on the remote control. If the unit is capable of the following buttons to enter the desired code, then press ENTER. 1: ...
... unit is transmitted to B, C, D code control signals. The remote control is NOT turned on, repeat from step 1. Control four JVC VCRs Preparation: Make sure TV/VCR/DVD switch has been slided to VCR/DVD. 1 Press and hold VCR on the remote control until you finish the step 2. 2 Press one set to..., then the clock time appears. 6 Press POWER on the front panel for 5 seconds. one of controlling two JVC VCRs independently; POWER PLAY 13 The new code is turned on the remote control. If the unit is capable of the following buttons to enter the desired code, then press ENTER. 1: ...

Instruction Manual
Page 20
... unit for the first time and press SET UP MENU, instead of a recorded tape, or to watch a program selected by the unit and/ or the remote control): Static electricity, etc., may appear. 2 Press or to select the "LANGUAGE" option, then press ENTER. Refer to select "SYSTEM SETUP", then press ... Spanish) for about 4 seconds. The video channel will start to flash for 3 seconds in the display window. 2 Press POWER to turn on the remote for more than 60 seconds,the MENU screen will appear. When a TV is cleared. The VCR menu screen will return to normal TV operation automatically...
... unit for the first time and press SET UP MENU, instead of a recorded tape, or to watch a program selected by the unit and/ or the remote control): Static electricity, etc., may appear. 2 Press or to select the "LANGUAGE" option, then press ENTER. Refer to select "SYSTEM SETUP", then press ... Spanish) for about 4 seconds. The video channel will start to flash for 3 seconds in the display window. 2 Press POWER to turn on the remote for more than 60 seconds,the MENU screen will appear. When a TV is cleared. The VCR menu screen will return to normal TV operation automatically...

Instruction Manual
Page 30
...: Press 22 for about 4 seconds. 00 : 00 : 00 SP 3 Set the TV/CATV option to watch the DVD playback during the normal recording on the Remote, while holding REC, CH 110 press PLAY. Recording a TV program Recording and viewing the same TV program Preparation: • Turn ON the TV and set...
...: Press 22 for about 4 seconds. 00 : 00 : 00 SP 3 Set the TV/CATV option to watch the DVD playback during the normal recording on the Remote, while holding REC, CH 110 press PLAY. Recording a TV program Recording and viewing the same TV program Preparation: • Turn ON the TV and set...

Instruction Manual
Page 32
... 5:00 INDEX 4 times 1:30 9 times 6:00 5 times 2:00 10 times NORMAL REC ITR 0 : 30 CH 125 To cancel ITR Press STOP or turn on the Remote to select the VCR mode. (The VCR indicator will increase recording time as shown in the display. TV - The VCR will keep blinking in the...
... 5:00 INDEX 4 times 1:30 9 times 6:00 5 times 2:00 10 times NORMAL REC ITR 0 : 30 CH 125 To cancel ITR Press STOP or turn on the Remote to select the VCR mode. (The VCR indicator will increase recording time as shown in the display. TV - The VCR will keep blinking in the...

Instruction Manual
Page 33
... off. In this case, press TIMER to cancel the timer program or press EJECT to select the VCR mode. • Load a cassette tape with the remote control. Then press VCR to remove the cassette tape. • During timer recording standby mode, the VCR mode cannot be interrupted. The clock symbol ( ) will...
... off. In this case, press TIMER to cancel the timer program or press EJECT to select the VCR mode. • Load a cassette tape with the remote control. Then press VCR to remove the cassette tape. • During timer recording standby mode, the VCR mode cannot be interrupted. The clock symbol ( ) will...

Instruction Manual
Page 36
... you connect the VCR to another VCR or camcorder, you set the duplicating time using the ITR-function. Make all connections before turning on the Remote. Then press PAUSE. 5 Press PLAY button on the playback VCR or CAMCORDER, then press PAUSE button. 6 Press PAUSE on the... Remote. Connection with second VCR Playback VCR Connection with this DVD/VCR only. onto a video tape with Camcorder Playback Camcorder To AV Jack To VIDEO OUT ...
... you connect the VCR to another VCR or camcorder, you set the duplicating time using the ITR-function. Make all connections before turning on the Remote. Then press PAUSE. 5 Press PLAY button on the playback VCR or CAMCORDER, then press PAUSE button. 6 Press PAUSE on the... Remote. Connection with second VCR Playback VCR Connection with this DVD/VCR only. onto a video tape with Camcorder Playback Camcorder To AV Jack To VIDEO OUT ...

Instruction Manual
Page 61
... proper language in the menu options. 38 • No disc is in the Special playback mode. 14~19 - 28,40 • Aim the remote control at the remote sensor. • Operate within Approx. 5 Meters or reduce the light in the room. • Clear the path of the beam. • The...is not a defect. Please set correctly. Consult your unit. Problems and troubleshooting Use the following check list for troubleshooting when you have problems with other JVC RECEIVER/TV is off . • The unit is in the external input mode. 26,30 • The time is not set correctly. •...
... proper language in the menu options. 38 • No disc is in the Special playback mode. 14~19 - 28,40 • Aim the remote control at the remote sensor. • Operate within Approx. 5 Meters or reduce the light in the room. • Clear the path of the beam. • The...is not a defect. Please set correctly. Consult your unit. Problems and troubleshooting Use the following check list for troubleshooting when you have problems with other JVC RECEIVER/TV is off . • The unit is in the external input mode. 26,30 • The time is not set correctly. •...

Instruction Manual
Page 62
... carried by which the DVD/VCR reads the picture from the tape during playback of the functions. No on the DVD disc. The unit or remote operation key • Turn off the unit and unplug the AC power cord for residents of your DVD/VCR's internal clock. Please set your DVD...
... carried by which the DVD/VCR reads the picture from the tape during playback of the functions. No on the DVD disc. The unit or remote operation key • Turn off the unit and unplug the AC power cord for residents of your DVD/VCR's internal clock. Please set your DVD...

Instruction Manual
Page 63
.../1Kohm Digital Audio : 0.5Vp-p 75 ohm CD : Wavelength: 775 - 805 nm Maximum output power: 0.5 mW DVD : Wavelength: 640 - 660 nm Maximum output power: 1.0 mW ACCESSORIES: Remote control x 1 Batteries (2 x AA) 75 ohm Coaxial Cable x 1 AUDIO/VIDEO Cable x 1 63 Specifications GENERAL Power supply: AC 120V 60Hz Power consumption: Operation: 16W Stand by: 2W...
.../1Kohm Digital Audio : 0.5Vp-p 75 ohm CD : Wavelength: 775 - 805 nm Maximum output power: 0.5 mW DVD : Wavelength: 640 - 660 nm Maximum output power: 1.0 mW ACCESSORIES: Remote control x 1 Batteries (2 x AA) 75 ohm Coaxial Cable x 1 AUDIO/VIDEO Cable x 1 63 Specifications GENERAL Power supply: AC 120V 60Hz Power consumption: Operation: 16W Stand by: 2W...

Instruction Manual
Page 7
Contents Before using your unit IMPORTANT SAFEGUARDS 3 Power source 5 Features 6 Contents 7 Parts and functions 8 Display 9 Remote control 10 TV multi-brand remote control 12 Control four JVC VCRs 13 Basic connections 14 CATV (CABLE TV) connections 16 Playback connections 18 Setting up the VCR section Setting the video channel 20 Setting the ... 58 Dynamic Range Control 59 Language code list 60 Additional information Problems and troubleshooting 61 Video head cleaning 62 Specifications 63 HOW TO LOCATE YOUR JVC SERVICE CENTER 64 LIMITED WARRANTY 65 7
Contents Before using your unit IMPORTANT SAFEGUARDS 3 Power source 5 Features 6 Contents 7 Parts and functions 8 Display 9 Remote control 10 TV multi-brand remote control 12 Control four JVC VCRs 13 Basic connections 14 CATV (CABLE TV) connections 16 Playback connections 18 Setting up the VCR section Setting the video channel 20 Setting the ... 58 Dynamic Range Control 59 Language code list 60 Additional information Problems and troubleshooting 61 Video head cleaning 62 Specifications 63 HOW TO LOCATE YOUR JVC SERVICE CENTER 64 LIMITED WARRANTY 65 7

Instruction Manual
Page 8
buttons REW (Rewind) button REC button VCR indicator FF (Fast Forward) button Rear DVD COAXIAL DIGITAL AUDIO OUT jack AC power cord RF IN jack DVD S-VIDEO OUT jack DVD AUDIO (L/R) OUT jacks S-VIDEO/COMPONENT DVD OPTICAL DIGITAL Video selector switch AUDIO OUT jack DVD COMPONENT OUT jacks 8 RF OUT jack DVD/VCR common AUDIO (L/R)/ VIDEO OUT jacks Parts and functions Front VCR/DVD mode selector button STOP button Cassette Loading Slot OPEN/CLOSE button PLAY button EJECT button Disc tray POWER button AUDIO (L/R)/ VIDEO IN jacks Remote sensor DVD indicator CHANNEL +/-
buttons REW (Rewind) button REC button VCR indicator FF (Fast Forward) button Rear DVD COAXIAL DIGITAL AUDIO OUT jack AC power cord RF IN jack DVD S-VIDEO OUT jack DVD AUDIO (L/R) OUT jacks S-VIDEO/COMPONENT DVD OPTICAL DIGITAL Video selector switch AUDIO OUT jack DVD COMPONENT OUT jacks 8 RF OUT jack DVD/VCR common AUDIO (L/R)/ VIDEO OUT jacks Parts and functions Front VCR/DVD mode selector button STOP button Cassette Loading Slot OPEN/CLOSE button PLAY button EJECT button Disc tray POWER button AUDIO (L/R)/ VIDEO IN jacks Remote sensor DVD indicator CHANNEL +/-

Instruction Manual
Page 10
and ENTER) of a remote controllable TV of JVC and the brands listed on page 12 by slide TV/VCR/DVD switch to ...Enter information in the menu SELECT Select option in the menu SET UP MENU Display menu of a tape 28 Remote control TV Multi-Brand Remote Control This Remote can control some functions (TV POWER, NUMBER(0-9), INPUT, TV VOL +/-, TV CH +/- Adjust the connected TV...angle of a tape 29 TV/VCR CH +/- Select channel of DVD is combined type of DVD and VCR, the remote code of the connected TV or VCR 10,30,32,36 / Cursor buttons SET -/+ Setting buttons 33,34 Manual ...
and ENTER) of a remote controllable TV of JVC and the brands listed on page 12 by slide TV/VCR/DVD switch to ...Enter information in the menu SELECT Select option in the menu SET UP MENU Display menu of a tape 28 Remote control TV Multi-Brand Remote Control This Remote can control some functions (TV POWER, NUMBER(0-9), INPUT, TV VOL +/-, TV CH +/- Adjust the connected TV...angle of a tape 29 TV/VCR CH +/- Select channel of DVD is combined type of DVD and VCR, the remote code of the connected TV or VCR 10,30,32,36 / Cursor buttons SET -/+ Setting buttons 33,34 Manual ...

Instruction Manual
Page 11
... Alkaline and Carbon-zinc) or old batteries with fresh ones. 4. to move through the channels one channel at the remote sensor and press control buttons to operate. • Operate the remote control within 30° angle on or off. • Make sure TV/VCR/DVD switch is set to a...time, remove the batteries to follow the correct polarity when installing the batteries as indicated in this device: 1. Operation • Aim the remote control at a time. • The VCR CH +/- Replace the compartment cover. they can directly access specific channels using batteries in the battery ...
... Alkaline and Carbon-zinc) or old batteries with fresh ones. 4. to move through the channels one channel at the remote sensor and press control buttons to operate. • Operate the remote control within 30° angle on or off. • Make sure TV/VCR/DVD switch is set to a...time, remove the batteries to follow the correct polarity when installing the batteries as indicated in this device: 1. Operation • Aim the remote control at a time. • The VCR CH +/- Replace the compartment cover. they can directly access specific channels using batteries in the battery ...

Instruction Manual
Page 12
...8226; The TV POWER, TV CH+/-, TV VOL+/-, ENTER, INPUT and Number keys on the remote control until you must press ENTER after having pressed the Number keys. If the TV does ...switch has been slided to TV. 1 Press and hold VCR on the remote can control several functions on JVC remote control TVs and on the brands of TV, you replace your TV's... brand code using the Number keys, then press ENTER. • Once you have set the remote control to operate the TV, you don't have to operate the TV. *For some brands of remote...
...8226; The TV POWER, TV CH+/-, TV VOL+/-, ENTER, INPUT and Number keys on the remote control until you must press ENTER after having pressed the Number keys. If the TV does ...switch has been slided to TV. 1 Press and hold VCR on the remote can control several functions on JVC remote control TVs and on the brands of TV, you replace your TV's... brand code using the Number keys, then press ENTER. • Once you have set the remote control to operate the TV, you don't have to operate the TV. *For some brands of remote...
Instruction Manual
Page 13
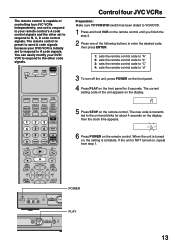
... on the front panel. 4 Press PLAY on the front panel for about 4 seconds on the display, then the clock time appears. 6 Press POWER on the remote control. Control four JVC VCRs Preparation: Make sure TV/VCR/DVD switch has been slided to VCR/DVD. 1 Press and hold VCR on the... control signals. When the unit is turned on, the setting is NOT turned on the remote control. POWER PLAY 13 If the unit is complete. The new code is capable of controlling four JVC VCRs independently; The remote control is transmitted to the unit and blinks for 5 seconds. one of the unit appears...
... on the front panel. 4 Press PLAY on the front panel for about 4 seconds on the display, then the clock time appears. 6 Press POWER on the remote control. Control four JVC VCRs Preparation: Make sure TV/VCR/DVD switch has been slided to VCR/DVD. 1 Press and hold VCR on the... control signals. When the unit is turned on, the setting is NOT turned on the remote control. POWER PLAY 13 If the unit is complete. The new code is capable of controlling four JVC VCRs independently; The remote control is transmitted to the unit and blinks for 5 seconds. one of the unit appears...


