Instructions
Page 6
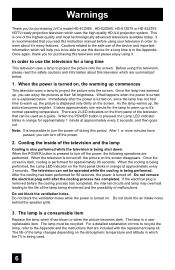
... , the picture on , since the lamp has not had time to project the picture onto the screen. Warnings Thank you for purchasing JVC's model HD-61Z585 , HD-52Z585, HD-61Z575 or HD-52Z575 HDTV-ready projection television which the TV is being used as a guide. When the power is pressed, the ...many features. The lamp is removed before the cooling process has completed, the internal circuits and lamp may overheat leading to use this instruction manual before using it 's normal operating temperature. Cautions related to the safe use the television for a long time This television uses a lamp...
... , the picture on , since the lamp has not had time to project the picture onto the screen. Warnings Thank you for purchasing JVC's model HD-61Z585 , HD-52Z585, HD-61Z575 or HD-52Z575 HDTV-ready projection television which the TV is being used as a guide. When the power is pressed, the ...many features. The lamp is removed before the cooling process has completed, the internal circuits and lamp may overheat leading to use this instruction manual before using it 's normal operating temperature. Cautions related to the safe use the television for a long time This television uses a lamp...
Instructions
Page 10
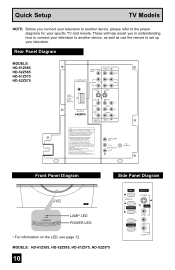
..., Inc. MODELS: HD-61Z585, HD-52Z585, HD-61Z575, HD-52Z575 10 MENU OPERATE + CHANNEL - Une fois le couvercle arrière déposé suivez l procédure « ATTENTION LORS DU DÉMONTAGE » décrite dans une prise c.a. Failure to follow "CAUTION AT DISASSEMBLY" procedure in the service manual before plugging the TV's power cord...
..., Inc. MODELS: HD-61Z585, HD-52Z585, HD-61Z575, HD-52Z575 10 MENU OPERATE + CHANNEL - Une fois le couvercle arrière déposé suivez l procédure « ATTENTION LORS DU DÉMONTAGE » décrite dans une prise c.a. Failure to follow "CAUTION AT DISASSEMBLY" procedure in the service manual before plugging the TV's power cord...
Instructions
Page 12
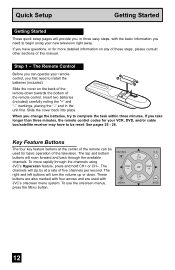
...will scan forward and back through the channels using your new television right away. See pages 25 - 28. These CH buttons are also marked with JVC's onscreen menu system. Key Feature Buttons The four key feature buttons at a rate of the television. To move rapidly through the available CH C.C....Started These quick setup pages will provide you, in the unit first. buttons will turn the volume up or down towards the bottom of this manual. If you take longer than three minutes, the remote control codes for more detailed information on the back of the remote down . The ...
...will scan forward and back through the channels using your new television right away. See pages 25 - 28. These CH buttons are also marked with JVC's onscreen menu system. Key Feature Buttons The four key feature buttons at a rate of the television. To move rapidly through the available CH C.C....Started These quick setup pages will provide you, in the unit first. buttons will turn the volume up or down towards the bottom of this manual. If you take longer than three minutes, the remote control codes for more detailed information on the back of the remote down . The ...
Instructions
Page 13
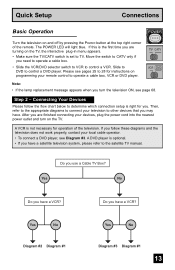
... player. A DVD player is the first time you need to operate a cable box. • Slide the VCR/DVD selector switch to VCR to the satellite TV manual. TV CATV VCR DVD A Note: • If the lamp replacement message appears when you have . If this is optional. • If you turn on the... the top right corner of the television. If you follow the flow chart below to other devices that you have a VCR? Slide to DVD to TV. Step 2 - Connecting Your Devices Please follow these diagrams and the television does not work properly, contact your devices, plug the power cord into the ...
... player. A DVD player is the first time you need to operate a cable box. • Slide the VCR/DVD selector switch to VCR to the satellite TV manual. TV CATV VCR DVD A Note: • If the lamp replacement message appears when you have . If this is optional. • If you turn on the... the top right corner of the television. If you follow the flow chart below to other devices that you have a VCR? Slide to DVD to TV. Step 2 - Connecting Your Devices Please follow these diagrams and the television does not work properly, contact your devices, plug the power cord into the ...
Instructions
Page 15
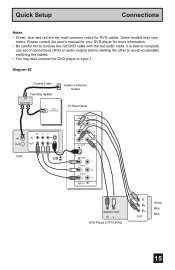
Diagram #3 Coaxial Cable Two-Way Splitter IN OUT OUT 75Ω (VHF/UHF) Cable or Antenna Output TV Rear Panel INPUT-2 Y VIDEO IN OUT R L V IN OUT Pb Pr S-VIDEO L AUDIO R VCR OR OVER Y VIDEO L Pb I AUDIO I R Pr INPUT-1 AUDIO OUT R L DVD Player (OPTIONAL) Y PB ... Red 15 Some models may also connect the DVD player to confuse the red DVD cable with the red audio cable. Please consult the user's manual for your DVD player for DVD cables. It is best to complete one set of connections (DVD or audio output) before starting the other to...
Diagram #3 Coaxial Cable Two-Way Splitter IN OUT OUT 75Ω (VHF/UHF) Cable or Antenna Output TV Rear Panel INPUT-2 Y VIDEO IN OUT R L V IN OUT Pb Pr S-VIDEO L AUDIO R VCR OR OVER Y VIDEO L Pb I AUDIO I R Pr INPUT-1 AUDIO OUT R L DVD Player (OPTIONAL) Y PB ... Red 15 Some models may also connect the DVD player to confuse the red DVD cable with the red audio cable. Please consult the user's manual for your DVD player for DVD cables. It is best to complete one set of connections (DVD or audio output) before starting the other to...
Instructions
Page 18
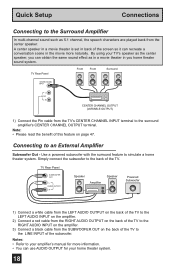
...using your home theater system. 18 Use a powered subwoofer with the surround feature to the surround amplifier's CENTER CHANNEL OUTPUT terminal. TV Rear Panel Front Front Surround CENTER CHANNEL INPUT L AUDIO R CENTER CHANNEL OUTPUT (VARIABLE OUTPUT) 1) Connect the Pin cable from the SUBWOOFER ... Connections Connecting to the LINE INPUT of the subwoofer. Connecting to the back of the TV. Simply connect the subwoofer to an External Amplifier Subwoofer Out - Notes: • Refer to your amplifier's manual for your TV's speaker as the center speaker, you home theater sound system.
...using your home theater system. 18 Use a powered subwoofer with the surround feature to the surround amplifier's CENTER CHANNEL OUTPUT terminal. TV Rear Panel Front Front Surround CENTER CHANNEL INPUT L AUDIO R CENTER CHANNEL OUTPUT (VARIABLE OUTPUT) 1) Connect the Pin cable from the SUBWOOFER ... Connections Connecting to the LINE INPUT of the subwoofer. Connecting to the back of the TV. Simply connect the subwoofer to an External Amplifier Subwoofer Out - Notes: • Refer to your amplifier's manual for your TV's speaker as the center speaker, you home theater sound system.
Instructions
Page 21
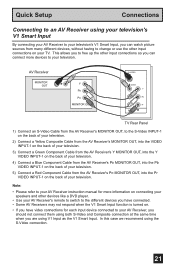
AV Receiver MONITOR OUT Y PB PR MONITOR OUT S-VIDEO OVER Y VIDEO L Pb I AUDIO I R Pr INPUT-1 TV Rear Panel 1) Connect an S-Video Cable from the AV Receiver's MONITOR OUT, to the S-Video INPUT-1 on the back of your television. 2) Connect a Yellow Composite ...back of your television. 5) Connect a Red Component Cable from the AV Receiver's PB MONITOR OUT, into the Pr VIDEO INPUT-1 on your TV. Note: • Please refer to your AV Receiver instruction manual for each input device connected to your AV Receiver, you should not connect them using the S-Video connection. 21
AV Receiver MONITOR OUT Y PB PR MONITOR OUT S-VIDEO OVER Y VIDEO L Pb I AUDIO I R Pr INPUT-1 TV Rear Panel 1) Connect an S-Video Cable from the AV Receiver's MONITOR OUT, to the S-Video INPUT-1 on the back of your television. 2) Connect a Yellow Composite ...back of your television. 5) Connect a Red Component Cable from the AV Receiver's PB MONITOR OUT, into the Pr VIDEO INPUT-1 on your TV. Note: • Please refer to your AV Receiver instruction manual for each input device connected to your AV Receiver, you should not connect them using the S-Video connection. 21

Instructions
Page 22
You can choose "AUTO" or "MANUAL" for the first time the interactive plug-in menu, it . The plug-in menu...231;ais) or Spanish (Español). You can choose to perform these settings. See pages 41, 52, 32. • If you turn your TV has been turned on for setting the clock. • The auto tuner setup of which you wish ... setting up the interactive plug-in menu will skip over it will appear. Language After the "JVC INTERACTIVE PLUG IN MENU" has been displayed, the TV automatically switches to receive. Notes: • The interactive plug-in which channels you want the ...
You can choose "AUTO" or "MANUAL" for the first time the interactive plug-in menu, it . The plug-in menu...231;ais) or Spanish (Español). You can choose to perform these settings. See pages 41, 52, 32. • If you turn your TV has been turned on for setting the clock. • The auto tuner setup of which you wish ... setting up the interactive plug-in menu will skip over it will appear. Language After the "JVC INTERACTIVE PLUG IN MENU" has been displayed, the TV automatically switches to receive. Notes: • The interactive plug-in which channels you want the ...
Instructions
Page 23
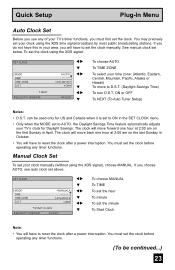
... minute To Start Clock Note: • You will have to set the clock manually. can be continued...) 23 You must first set the clock. Quick Setup Plug-In Menu Auto Clock Set Before you use any of your TV's timer functions, you must set the clock before operating any timer functions. If... you do not have this in April. Manual Clock Set To set above. You must set below. If you will move to reset...
... minute To Start Clock Note: • You will have to set the clock manually. can be continued...) 23 You must first set the clock. Quick Setup Plug-In Menu Auto Clock Set Before you use any of your TV's timer functions, you must set the clock before operating any timer functions. If... you do not have this in April. Manual Clock Set To set above. You must set below. If you will move to reset...
Instructions
Page 47
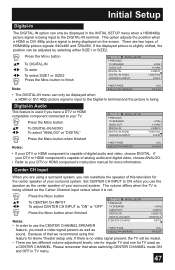
... ON VARI SIZE1 DIGITAL OFF Note: NEXT PAGE SELECT OPERATE (1/4) MENU EXIT • The DIGITAL-IN menu can only be displayed in TV menu. 47 Center CH Input When you are using this television for Home Theater setup only. Because of that when switching CENTER CHANNEL mode...CENTER CH INPUT NEXT PAGE SELECT OPERATE ON VARI SIZE1 DIGITAL OFF (1/4) MENU EXIT • If your DTV or HDMI component's instruction manual for TV used if you have a DTV or HDMI compatible component connected to your TV. There are two different volume adjustment levels, one for regular...
... ON VARI SIZE1 DIGITAL OFF Note: NEXT PAGE SELECT OPERATE (1/4) MENU EXIT • The DIGITAL-IN menu can only be displayed in TV menu. 47 Center CH Input When you are using this television for Home Theater setup only. Because of that when switching CENTER CHANNEL mode...CENTER CH INPUT NEXT PAGE SELECT OPERATE ON VARI SIZE1 DIGITAL OFF (1/4) MENU EXIT • If your DTV or HDMI component's instruction manual for TV used if you have a DTV or HDMI compatible component connected to your TV. There are two different volume adjustment levels, one for regular...
Instructions
Page 52
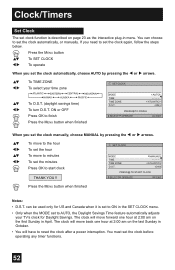
... √® To move to the hour To set the minutes Press OK to set the clock before operating any timer functions. 52 You must set the clock automatically, or manually. If you set the clock again, follow the steps below. SET CLOCK MODE TIME TIME ZONE D.S.T. can choose to start clock... button when finished SET CLOCK MODE TIME TIME ZONE D.S.T. ATLANTIC ON PRESS OK TO FINISH SELECT OPERATE MENU EXIT When you set the clock manually, choose MANUAL by pressing the √ or ® arrows. π† √® π† √® To TIME ZONE To select your...
... √® To move to the hour To set the minutes Press OK to set the clock before operating any timer functions. 52 You must set the clock automatically, or manually. If you set the clock again, follow the steps below. SET CLOCK MODE TIME TIME ZONE D.S.T. can choose to start clock... button when finished SET CLOCK MODE TIME TIME ZONE D.S.T. ATLANTIC ON PRESS OK TO FINISH SELECT OPERATE MENU EXIT When you set the clock manually, choose MANUAL by pressing the √ or ® arrows. π† √® π† √® To TIME ZONE To select your...

Instructions
Page 68
... a replacement kit, part number TS-CL110U. See page 69 on the TV when the lamp needs to www.jvc.com. The replacement kit will include the following: 1 High-Pressure Mercury Lamp 1 Instruction Manual Because the lamp contains a small amount of mercury, it cannot be replaced.... REFER TO OWNER'S MANUAL FOR REPLACEMENT INSTRUCTIONS. To purchase this message appears when...
... a replacement kit, part number TS-CL110U. See page 69 on the TV when the lamp needs to www.jvc.com. The replacement kit will include the following: 1 High-Pressure Mercury Lamp 1 Instruction Manual Because the lamp contains a small amount of mercury, it cannot be replaced.... REFER TO OWNER'S MANUAL FOR REPLACEMENT INSTRUCTIONS. To purchase this message appears when...


