Instructions
Page 6
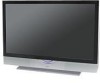
...picture on the front panel of malfunctions. Do not block the air intake holes behind the speaker grills. 3. For a detailed explanation on . After the cooling has been performed for 90...for approximately 90 seconds. Before using this television, please read this television which the TV is removed before using it has blown or when the picture becomes dark. If the... item Replace the lamp when it . Warnings Thank you for purchasing JVC's model HD-61Z585 , HD-52Z585, HD-61Z575 or HD-52Z575 HDTV-ready projection television which will help you to be able to use the television for...
...picture on the front panel of malfunctions. Do not block the air intake holes behind the speaker grills. 3. For a detailed explanation on . After the cooling has been performed for 90...for approximately 90 seconds. Before using this television, please read this television which the TV is removed before using it has blown or when the picture becomes dark. If the... item Replace the lamp when it . Warnings Thank you for purchasing JVC's model HD-61Z585 , HD-52Z585, HD-61Z575 or HD-52Z575 HDTV-ready projection television which will help you to be able to use the television for...
Instructions
Page 8
... 42 XDS ID 43 Noise Muting 43 Front Panel Lock 43 V1 Smart Input 44 Video Input Label 44 Position Adjustment 45 Power Indicator 45 TV Speaker 46 Audio Out 46 Digital-In 47 Digital-In Audio 47 Center CH Input 47 Picture Adjust 48 Picture Settings 48 Adjust Picture Settings 48... Reset 50 8 Table of Contents Sound Adjust 51 Sound Settings 51 Adjust Sound Settings 51 MTS (Multi-channel Sound 51 Reset 51 Clock Timers 52 Set Clock 52 On/Off Timer 53 Lamp Reset 54 Button Functions 55 Multi Screen Function 55 Index 55 Twin 55 Freeze 56 Swap 56 Select 56...
... 42 XDS ID 43 Noise Muting 43 Front Panel Lock 43 V1 Smart Input 44 Video Input Label 44 Position Adjustment 45 Power Indicator 45 TV Speaker 46 Audio Out 46 Digital-In 47 Digital-In Audio 47 Center CH Input 47 Picture Adjust 48 Picture Settings 48 Adjust Picture Settings 48... Reset 50 8 Table of Contents Sound Adjust 51 Sound Settings 51 Adjust Sound Settings 51 MTS (Multi-channel Sound 51 Reset 51 Clock Timers 52 Set Clock 52 On/Off Timer 53 Lamp Reset 54 Button Functions 55 Multi Screen Function 55 Index 55 Twin 55 Freeze 56 Swap 56 Select 56...
Instructions
Page 18
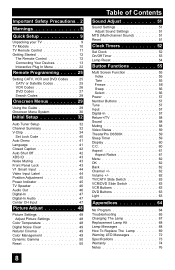
... to the surround amplifier's CENTER CHANNEL OUTPUT terminal. By using your home theater system. 18 TV Rear Panel SUBWOOFER OUT L AUDIO OUTPUT R Speaker Amplifier Speaker Powered Subwoofer 1) Connect a white cable from the LEFT AUDIO OUTPUT on the back of the TV to the LEFT AUDIO INPUT on the amplifier. 2) Connect a red cable from the RIGHT...
... to the surround amplifier's CENTER CHANNEL OUTPUT terminal. By using your home theater system. 18 TV Rear Panel SUBWOOFER OUT L AUDIO OUTPUT R Speaker Amplifier Speaker Powered Subwoofer 1) Connect a white cable from the LEFT AUDIO OUTPUT on the back of the TV to the LEFT AUDIO INPUT on the amplifier. 2) Connect a red cable from the RIGHT...
Instructions
Page 21
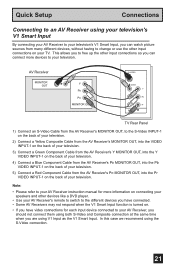
... Receiver to your television's V1 Smart Input, you can connect more information on connecting your speakers and other input connections on your TV. AV Receiver MONITOR OUT Y PB PR MONITOR OUT S-VIDEO OVER Y VIDEO L Pb I AUDIO I R Pr INPUT-1 TV Rear Panel 1) Connect an S-Video Cable from the AV Receiver's MONITOR OUT, to the S-Video...
... Receiver to your television's V1 Smart Input, you can connect more information on connecting your speakers and other input connections on your TV. AV Receiver MONITOR OUT Y PB PR MONITOR OUT S-VIDEO OVER Y VIDEO L Pb I AUDIO I R Pr INPUT-1 TV Rear Panel 1) Connect an S-Video Cable from the AV Receiver's MONITOR OUT, to the S-Video...
Instructions
Page 31
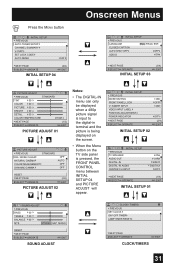
... SMART INPUT VIDEO INPUT LABEL POSITION ADJUSTMENT POWER INDICATOR NEXT PAGE SELECT OPERATE ON OFF ON OFF (2/4) MENU EXIT INITIAL SETUP 02 INITIAL SETUP PREVIOUS TV SPEAKER AUDIO OUT DIGITAL-IN DIGITAL-IN AUDIO CENTER CH INPUT ON VARI SIZE1 DIGITAL OFF NEXT PAGE SELECT OPERATE (1/4) MENU EXIT INITIAL SETUP 01 SOUND... picture signal is input to the digital-in terminal and the picture is being displayed on the screen. • When the Menu button on the TV side panel is pressed, the FRONT PANEL CONTROL menu between INITIAL SETUP 04 and PICTURE ADJUST will appear. FRAN.
... SMART INPUT VIDEO INPUT LABEL POSITION ADJUSTMENT POWER INDICATOR NEXT PAGE SELECT OPERATE ON OFF ON OFF (2/4) MENU EXIT INITIAL SETUP 02 INITIAL SETUP PREVIOUS TV SPEAKER AUDIO OUT DIGITAL-IN DIGITAL-IN AUDIO CENTER CH INPUT ON VARI SIZE1 DIGITAL OFF NEXT PAGE SELECT OPERATE (1/4) MENU EXIT INITIAL SETUP 01 SOUND... picture signal is input to the digital-in terminal and the picture is being displayed on the screen. • When the Menu button on the TV side panel is pressed, the FRONT PANEL CONTROL menu between INITIAL SETUP 04 and PICTURE ADJUST will appear. FRAN.
Instructions
Page 46
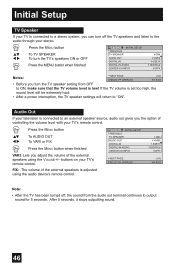
...SIZE1 DIGITAL OFF (1/4) MENU EXIT Note: • After the TV has been turned off the TV speakers and listen to the audio through your stereo. π† √® Press the MENU button To TV SPEAKER To turn the TV's speakers ON or OFF Press the MENU button when finished INITIAL SETUP PREVIOUS... TV SPEAKER AUDIO OUT DIGITAL-IN DIGITAL-IN AUDIO CENTER CH INPUT ON VARI SIZE1 DIGITAL OFF Notes: ...
...SIZE1 DIGITAL OFF (1/4) MENU EXIT Note: • After the TV has been turned off the TV speakers and listen to the audio through your stereo. π† √® Press the MENU button To TV SPEAKER To turn the TV's speakers ON or OFF Press the MENU button when finished INITIAL SETUP PREVIOUS... TV SPEAKER AUDIO OUT DIGITAL-IN DIGITAL-IN AUDIO CENTER CH INPUT ON VARI SIZE1 DIGITAL OFF Notes: ...
Instructions
Page 47
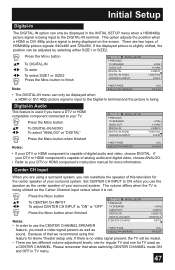
...; √® To DIGITAL-IN AUDIO To select "ANALOG" or "DIGITAL" Press the Menu button when finished Notes: INITIAL SETUP PREVIOUS TV SPEAKER AUDIO OUT DIGITAL-IN DIGITAL-IN AUDIO CENTER CH INPUT NEXT PAGE SELECT OPERATE ON VARI SIZE1 DIGITAL OFF (1/4) MENU EXIT • If your DTV...finished AUDIO OUT DIGITAL-IN VARI SIZE1 DIGITAL-IN AUDIO DIGITAL Notes: CENTER CH INPUT OFF • In order to finish INITIAL SETUP PREVIOUS TV SPEAKER AUDIO OUT DIGITAL-IN DIGITAL-IN AUDIO CENTER CH INPUT ON VARI SIZE1 DIGITAL OFF Note: NEXT PAGE SELECT OPERATE (1/4) MENU EXIT •...
...; √® To DIGITAL-IN AUDIO To select "ANALOG" or "DIGITAL" Press the Menu button when finished Notes: INITIAL SETUP PREVIOUS TV SPEAKER AUDIO OUT DIGITAL-IN DIGITAL-IN AUDIO CENTER CH INPUT NEXT PAGE SELECT OPERATE ON VARI SIZE1 DIGITAL OFF (1/4) MENU EXIT • If your DTV...finished AUDIO OUT DIGITAL-IN VARI SIZE1 DIGITAL-IN AUDIO DIGITAL Notes: CENTER CH INPUT OFF • In order to finish INITIAL SETUP PREVIOUS TV SPEAKER AUDIO OUT DIGITAL-IN DIGITAL-IN AUDIO CENTER CH INPUT ON VARI SIZE1 DIGITAL OFF Note: NEXT PAGE SELECT OPERATE (1/4) MENU EXIT •...

Instructions
Page 51
... finished Notes: SOUND ADJUST PREVIOUS BASS 00 TREBLE 00 BALANCE 00 MTS STEREO SAP MONO RESET NEXT PAGE SELECT OPERATE MENU EXIT • Keep the TV in input 1, 2, 3 or 4 mode, as the default setting when you if a broadcast is off. is in mono sound only. • Choose the ... get the best sound quality. In addition to adjust the level of sound between the TV's left and right speakers with the balance setting. Sound Adjust Sound Settings These settings allow you wish to hear with a TV program. Use treble to mono or stereo sound, an MTS broadcast may also include a...
... finished Notes: SOUND ADJUST PREVIOUS BASS 00 TREBLE 00 BALANCE 00 MTS STEREO SAP MONO RESET NEXT PAGE SELECT OPERATE MENU EXIT • Keep the TV in input 1, 2, 3 or 4 mode, as the default setting when you if a broadcast is off. is in mono sound only. • Choose the ... get the best sound quality. In addition to adjust the level of sound between the TV's left and right speakers with the balance setting. Sound Adjust Sound Settings These settings allow you wish to hear with a TV program. Use treble to mono or stereo sound, an MTS broadcast may also include a...

Instructions
Page 66
...to worry. • The lamp may make a noise when it has been turned off. The AUTO DEMO finished automatically • The TV recieved a signal from the TV's speaker Static electricity CHECK • The Center CH Input may be turned off . Use the television when the temperature is 0ºC or higher.... • Although the HD-ILA element is blocked by V-Chip. • The Auto Shut Off that some noise when the television ...
...to worry. • The lamp may make a noise when it has been turned off. The AUTO DEMO finished automatically • The TV recieved a signal from the TV's speaker Static electricity CHECK • The Center CH Input may be turned off . Use the television when the temperature is 0ºC or higher.... • Although the HD-ILA element is blocked by V-Chip. • The Auto Shut Off that some noise when the television ...
Instructions
Page 69
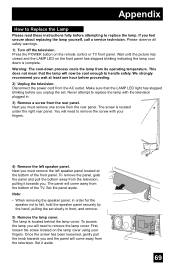
...rear panel. The screw is located behind the lamp cover. Appendix How to Replace the Lamp Please read these instructions fully before proceeding. 2) Unplug the television. Wait until the picture has closed and the LAMP LED on the remote control or TV front panel. Note: • When removing the speaker... panel, in order for the speaker not to fall, hold the speaker panel securely by the hand, pulling the set . Never attempt to handle safely. If...
...rear panel. The screw is located behind the lamp cover. Appendix How to Replace the Lamp Please read these instructions fully before proceeding. 2) Unplug the television. Wait until the picture has closed and the LAMP LED on the remote control or TV front panel. Note: • When removing the speaker... panel, in order for the speaker not to fall, hold the speaker panel securely by the hand, pulling the set . Never attempt to handle safely. If...
Instructions
Page 71
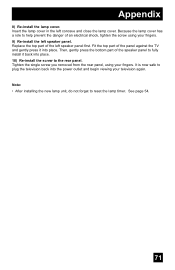
...screw using your television again. Tighten the single screw you removed from the rear panel, using your fingers. 9) Re-install the left speaker panel. It is now safe to plug the television back into place. ...10) Re-install the screw to fully install it into place. Insert the lamp cover in the left speaker panel first. See page 54. 71 Appendix 8) Re-install the lamp cover. Note: • After... and close the lamp cover. Then, gently press the bottom part of the panel against the TV and gently press it back into the power outlet and begin viewing your fingers. Because the lamp...
...screw using your television again. Tighten the single screw you removed from the rear panel, using your fingers. 9) Re-install the left speaker panel. It is now safe to plug the television back into place. ...10) Re-install the screw to fully install it into place. Insert the lamp cover in the left speaker panel first. See page 54. 71 Appendix 8) Re-install the lamp cover. Note: • After... and close the lamp cover. Then, gently press the bottom part of the panel against the TV and gently press it back into the power outlet and begin viewing your fingers. Because the lamp...
Instructions
Page 73
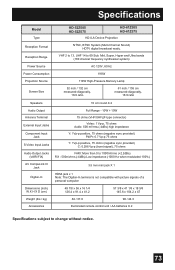
...HD-52Z585 HD-52Z575 HD-61Z585 HD-61Z575 HD-ILA Device Projection Reception Format NTSC, BTSC System (Multi-Channel Sound) HDTV digital broadcast ready. Reception Range Power Source VHF 2 to 13, UHF 14 to 69 Sub, Mid, Super, Hyper and Ultra bands (180 channel frequency synthesizer system) AC 120V, 60 Hz Power Consumption Projection... Source 195W 110W High-Pressure Mercury Lamp Screen Size 52 inch / 132 cm measured diagonally, 16:9 ratio 61 inch / 155 cm measured diagonally, 16:9 ratio Speakers 10 cm round X 2 Audio Output Antenna ...
...HD-52Z585 HD-52Z575 HD-61Z585 HD-61Z575 HD-ILA Device Projection Reception Format NTSC, BTSC System (Multi-Channel Sound) HDTV digital broadcast ready. Reception Range Power Source VHF 2 to 13, UHF 14 to 69 Sub, Mid, Super, Hyper and Ultra bands (180 channel frequency synthesizer system) AC 120V, 60 Hz Power Consumption Projection... Source 195W 110W High-Pressure Mercury Lamp Screen Size 52 inch / 132 cm measured diagonally, 16:9 ratio 61 inch / 155 cm measured diagonally, 16:9 ratio Speakers 10 cm round X 2 Audio Output Antenna ...


