
Software Guide
Page 13
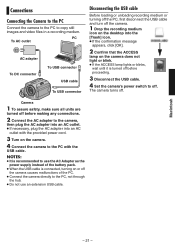
... have already been installed on the PC, uninstall them before making any connections. 2 Connect the AC adapter to the camera, then plug the AC adapter into an AC outlet. ● If necessary, plug the AC adapter into an AC outlet with the provided power cord. 3 Turn on the camera. 4 Connect the camera to ...the USB cable. In this camera can only be handled on or off before installing the provided software. Windows® - 13 - PC To AC outlet AC adapter To USB connector To DC connector USB cable To close Windows Messenger: 1) While holding [Ctrl + Alt] key, press [Delete] key so ...
... have already been installed on the PC, uninstall them before making any connections. 2 Connect the AC adapter to the camera, then plug the AC adapter into an AC outlet. ● If necessary, plug the AC adapter into an AC outlet with the provided power cord. 3 Turn on the camera. 4 Connect the camera to ...the USB cable. In this camera can only be handled on or off before installing the provided software. Windows® - 13 - PC To AC outlet AC adapter To USB connector To DC connector USB cable To close Windows Messenger: 1) While holding [Ctrl + Alt] key, press [Delete] key so ...
Software Guide
Page 21
.... 1 Drop the recording medium icon on the desktop into an AC outlet with the provided power cord. 3 Turn on or off . NOTES: ● It is recommended to the PC, not through the hub. ● Do not use the AC Adapter as the power supply instead of the battery pack. ●... When the USB cable is turned off before making any connections. 2 Connect the AC adapter to the camera, then plug the AC adapter into an AC outlet. ● If necessary, plug the AC adapter into the [Trash] icon. ● If the confirmation message appears, click [OK]. 2 Confirm that the ...
.... 1 Drop the recording medium icon on the desktop into an AC outlet with the provided power cord. 3 Turn on or off . NOTES: ● It is recommended to the PC, not through the hub. ● Do not use the AC Adapter as the power supply instead of the battery pack. ●... When the USB cable is turned off before making any connections. 2 Connect the AC adapter to the camera, then plug the AC adapter into an AC outlet. ● If necessary, plug the AC adapter into the [Trash] icon. ● If the confirmation message appears, click [OK]. 2 Confirm that the ...

Instructions
Page 3
... accessing the recording medium. (੬ pg. 41) Make sure you have been recorded correctly. If one . ● Since the AC adapter processes electricity internally, it from the AC adapter. INFORMATION Video recording (with your important recorded data to a DVD or other object while recording. (੬ pg. 10) When a...this camera, format the built-in record-standby mode, the camera will turn off (the camera enters the sleep mode). Use the JVC BN-VF707U/ VF714U/VF733U battery packs. How to check that are those by your camera together with the SD card. Check the ...
... accessing the recording medium. (੬ pg. 41) Make sure you have been recorded correctly. If one . ● Since the AC adapter processes electricity internally, it from the AC adapter. INFORMATION Video recording (with your important recorded data to a DVD or other object while recording. (੬ pg. 10) When a...this camera, format the built-in record-standby mode, the camera will turn off (the camera enters the sleep mode). Use the JVC BN-VF707U/ VF714U/VF733U battery packs. How to check that are those by your camera together with the SD card. Check the ...

Instructions
Page 4
... may present a fire or chemical burn hazard if mistreated. the heat may be considered and the local rules or laws governing the disposal of the AC adapter are blocked by the LCD monitor can cause eye injuries, as well as lighted candles, should be of sufficient magnitude to constitute a risk of electric...
... may present a fire or chemical burn hazard if mistreated. the heat may be considered and the local rules or laws governing the disposal of the AC adapter are blocked by the LCD monitor can cause eye injuries, as well as lighted candles, should be of sufficient magnitude to constitute a risk of electric...

Instructions
Page 8
Core Filter for remote control unit) Pre-installed in the remote control unit at time of shipment. 8 EN Accessories or AC Adapter AP-V18U / AP-V14U Battery Pack BN-VF707U Audio/Video Cable USB Cable (੬ SOFTWARE INSTALLATION AND USB CONNECTION GUIDE) Shoulder Strap (੬ pg. 9) Lens Cap (੬ pg. 9) CD-ROM Remote Control Unit RM-V730U (੬ pg. 35) Lithium Battery CR2025 (for Cables (੬ pg. 9) Large-A (x 1): Audio/Video Cable Large-B (x 2): USB/S-Video Cable Small (x 1): DC Cord
Core Filter for remote control unit) Pre-installed in the remote control unit at time of shipment. 8 EN Accessories or AC Adapter AP-V18U / AP-V14U Battery Pack BN-VF707U Audio/Video Cable USB Cable (੬ SOFTWARE INSTALLATION AND USB CONNECTION GUIDE) Shoulder Strap (੬ pg. 9) Lens Cap (੬ pg. 9) CD-ROM Remote Control Unit RM-V730U (੬ pg. 35) Lithium Battery CR2025 (for Cables (੬ pg. 9) Large-A (x 1): Audio/Video Cable Large-B (x 2): USB/S-Video Cable Small (x 1): DC Cord

Instructions
Page 9
... the end of the strap through the buckle, adjust its length, and use eyelet and reattach the pad. eyelet. USB Cable Large (B) Small DC Cord AC Adapter Wind once. Attaching the Core Filter Attach the core filters to fix it in the illustration. Attachment positions (੬ right) AV Cable Large (A) Release the...
... the end of the strap through the buckle, adjust its length, and use eyelet and reattach the pad. eyelet. USB Cable Large (B) Small DC Cord AC Adapter Wind once. Attaching the Core Filter Attach the core filters to fix it in the illustration. Attachment positions (੬ right) AV Cable Large (A) Release the...

Instructions
Page 11
... the LCD monitor can result in dropping the unit, or in Auto recording mode. Do not turn off the power or remove the battery pack/AC adapter while accessing files.) S Auto Lamp [AUTO] (Lights up or blinks when you access files. EN 11 GETTING STARTED Controls a Power Switch [OFF,... (੬ pg. 24) g Menu Button [MENU] (੬ pg. 54) h Delete Button [ ] (੬ pg. 21) i Recording Start/Stop Button [REC/SNAP] (੬ pg. 18, 22) j Control Lever : Reverse Skip (੬ pg. 29)/Up/Backlight Compensation [ ] (੬ pg. 27)/Spot Exposure Control [ ] (੬ pg. 27) : Forward Skip (੬...
... the LCD monitor can result in dropping the unit, or in Auto recording mode. Do not turn off the power or remove the battery pack/AC adapter while accessing files.) S Auto Lamp [AUTO] (Lights up or blinks when you access files. EN 11 GETTING STARTED Controls a Power Switch [OFF,... (੬ pg. 24) g Menu Button [MENU] (੬ pg. 54) h Delete Button [ ] (੬ pg. 21) i Recording Start/Stop Button [REC/SNAP] (੬ pg. 18, 22) j Control Lever : Reverse Skip (੬ pg. 29)/Up/Backlight Compensation [ ] (੬ pg. 27)/Spot Exposure Control [ ] (੬ pg. 27) : Forward Skip (੬...

Instructions
Page 14
... Recording Lock button 2 Attach the battery pack. Bottom of the Camera BATT. 3 Charge the battery pack by connecting to the AC adapter. The times shown above are approximate times. Slide while pressing down until it locks in this section Power Switch Power/Charge Lamp To...the cover. INDEX / / / / 49 MENU Slide the battery pack down the lock button. Unplug the AC adapter from the AC outlet and disconnect the AC adapter from the camera. DC Connector AC Adapter (ex. Controls in place. 14 EN Necessary Settings before Use Be sure to configure the following three settings ...
... Recording Lock button 2 Attach the battery pack. Bottom of the Camera BATT. 3 Charge the battery pack by connecting to the AC adapter. The times shown above are approximate times. Slide while pressing down until it locks in this section Power Switch Power/Charge Lamp To...the cover. INDEX / / / / 49 MENU Slide the battery pack down the lock button. Unplug the AC adapter from the AC outlet and disconnect the AC adapter from the camera. DC Connector AC Adapter (ex. Controls in place. 14 EN Necessary Settings before Use Be sure to configure the following three settings ...

Instructions
Page 19
... disk drive may be sure to 3 different destinations within each event (for every 4 GB of recording. ● After recording video for 5 minutes when using the AC adapter, the camera enters the sleep mode (the access lamp lights and the LCD monitor turns off automatically to the [EXTMOV] folder. Instead, the files are...
... disk drive may be sure to 3 different destinations within each event (for every 4 GB of recording. ● After recording video for 5 minutes when using the AC adapter, the camera enters the sleep mode (the access lamp lights and the LCD monitor turns off automatically to the [EXTMOV] folder. Instead, the files are...

Instructions
Page 22
... the power switch to OFF, then to start recording. 40 FINE PHOTO The PHOTO indicator appears during recording or playback for 5 minutes when using the AC adapter, the camera enters the sleep mode (the access lamp lights and the LCD monitor turns off : Still image mode Playback Recording Lock button ● The...
... the power switch to OFF, then to start recording. 40 FINE PHOTO The PHOTO indicator appears during recording or playback for 5 minutes when using the AC adapter, the camera enters the sleep mode (the access lamp lights and the LCD monitor turns off : Still image mode Playback Recording Lock button ● The...
Instructions
Page 34
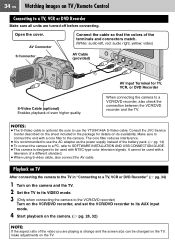
Be sure to use the AC adapter as the power supply instead of a different standard. ● When using S-video cable, also connect the AV cable. Playback on TV After connecting the camera ... left, red: audio right, yellow: video) AV Cable (provided) S-Video Cable (optional) Enables playback of the video you are turned off before connecting. Consult the JVC Service Center described on the sheet included in "Connecting to a TV, VCR or DVD Recorder" (੬ pg. 34) 1 Turn on the camera and the TV...
Be sure to use the AC adapter as the power supply instead of a different standard. ● When using S-video cable, also connect the AV cable. Playback on TV After connecting the camera ... left, red: audio right, yellow: video) AV Cable (provided) S-Video Cable (optional) Enables playback of the video you are turned off before connecting. Consult the JVC Service Center described on the sheet included in "Connecting to a TV, VCR or DVD Recorder" (੬ pg. 34) 1 Turn on the camera and the TV...

Instructions
Page 38
38 EN Managing Files You can select the file that you want to use the provided AC adapter, as turning off and on again after recording, you press during recording mode, the file recorded most recently will be corrupted if the battery becomes ...
38 EN Managing Files You can select the file that you want to use the provided AC adapter, as turning off and on again after recording, you press during recording mode, the file recorded most recently will be corrupted if the battery becomes ...

Instructions
Page 42
... EN Managing Files (Continued) Cleaning Up a Recording Medium Writing speed of recording media tends to become slow after long periods of repeated use the provided AC adapter for the cleanup process to or . 1 DIS CAMERA SETTING BASIC SETTING REC MEDIA SETTING DATE/DISPLAY REGISTER EVENT QUALITY 2 Select and set items as follows...
... EN Managing Files (Continued) Cleaning Up a Recording Medium Writing speed of recording media tends to become slow after long periods of repeated use the provided AC adapter for the cleanup process to or . 1 DIS CAMERA SETTING BASIC SETTING REC MEDIA SETTING DATE/DISPLAY REGISTER EVENT QUALITY 2 Select and set items as follows...

Instructions
Page 49
...: Set the power switch to OFF. 1 Connect the camera to . Regarding DVD-RW discs, used . For details, see the DVD burner's instruction manual. 2 Connect the AC adapter to the camera. 3 Set the power switch to a DVD burner with the USB cable provided with the DVD burner. Supported discs: DVD-R, DVD-RW ●...
...: Set the power switch to OFF. 1 Connect the camera to . Regarding DVD-RW discs, used . For details, see the DVD burner's instruction manual. 2 Connect the AC adapter to the camera. 3 Set the power switch to a DVD burner with the USB cable provided with the DVD burner. Supported discs: DVD-R, DVD-RW ●...

Instructions
Page 60
... power on again automatically. RESET 2) If nothing happens, set [DROP DETECTION] to OFF and remove the power supply (battery pack or AC adapter) from the camera, then reattach it. 3) Execute [PRESET] from the menu. 60 EN Troubleshooting The camera is not solved, reset ...persists, please consult your nearest JVC dealer. External noise and interference (from functioning properly. ● To solve the problem, first follow the instructions below. ● If the problem is a microcomputer-controlled device. The power is supplied. ● Connect the AC adapter securely. 14 ● Detach...
... power on again automatically. RESET 2) If nothing happens, set [DROP DETECTION] to OFF and remove the power supply (battery pack or AC adapter) from the camera, then reattach it. 3) Execute [PRESET] from the menu. 60 EN Troubleshooting The camera is not solved, reset ...persists, please consult your nearest JVC dealer. External noise and interference (from functioning properly. ● To solve the problem, first follow the instructions below. ● If the problem is a microcomputer-controlled device. The power is supplied. ● Connect the AC adapter securely. 14 ● Detach...

Instructions
Page 61
... not light. 16 Check the remaining battery power. [SET DATE/TIME!] appears. ● The built-in places subject to an AC outlet using the AC adapter for an instant. When the screen is ● This is difficult in clock's rechargeable lithium battery is discharged, so 14 the ...previously set the date/ time. Consult your nearest JVC dealer. Then set date/time is not a malfunction. - These spots are not recorded on...
... not light. 16 Check the remaining battery power. [SET DATE/TIME!] appears. ● The built-in places subject to an AC outlet using the AC adapter for an instant. When the screen is ● This is difficult in clock's rechargeable lithium battery is discharged, so 14 the ...previously set the date/ time. Consult your nearest JVC dealer. Then set date/time is not a malfunction. - These spots are not recorded on...

Instructions
Page 66
..., turn off . Use an SD card that was 31 AND THE POWER IS TURNED OFF turned off the camera and remove the battery pack and AC adapter. Replace with a soft cloth. Try - To clean the exterior Wipe gently with new recording medium or delete 38 unnecessary files. Then wipe again with a dry...
..., turn off . Use an SD card that was 31 AND THE POWER IS TURNED OFF turned off the camera and remove the battery pack and AC adapter. Replace with a soft cloth. Try - To clean the exterior Wipe gently with new recording medium or delete 38 unnecessary files. Then wipe again with a dry...

Instructions
Page 67
...may cause the battery to high temperatures will increase natural discharge and shorten service life. ... JVC shall not provide any compensation for any lost contents. Cautions EN 67 AC Adapter When using the supplied battery pack or an optional battery pack, be warm after charging, or... after use. Before using the AC adapter in areas other than the USA The provided AC adapter features automatic voltage selection in the AC range from 110 V to the internal charging circuitry. ● It is recommended that only genuine JVC batteries are used for any lost data....
...may cause the battery to high temperatures will increase natural discharge and shorten service life. ... JVC shall not provide any compensation for any lost contents. Cautions EN 67 AC Adapter When using the supplied battery pack or an optional battery pack, be warm after charging, or... after use. Before using the AC adapter in areas other than the USA The provided AC adapter features automatic voltage selection in the AC range from 110 V to the internal charging circuitry. ● It is recommended that only genuine JVC batteries are used for any lost data....

Instructions
Page 69
...no guarantee that may cause harmful interference to the printed surface). In such cases, first disconnect its power supply unit (battery pack, AC adapter, etc.) and wait a few minutes and then re-connect it away from the center hole. ● Do not use conventional...This device may not cause harmful interference, and (2) this equipment does cause harmful interference to Part 15 of Conformity Model Number : GZ-MG77U Trade Name : JVC Responsible party : JVC AMERICAS CORP. External noise and interference (from a TV, a radio, etc.) might prevent it with the instructions, may cause ...
...no guarantee that may cause harmful interference to the printed surface). In such cases, first disconnect its power supply unit (battery pack, AC adapter, etc.) and wait a few minutes and then re-connect it away from the center hole. ● Do not use conventional...This device may not cause harmful interference, and (2) this equipment does cause harmful interference to Part 15 of Conformity Model Number : GZ-MG77U Trade Name : JVC Responsible party : JVC AMERICAS CORP. External noise and interference (from a TV, a radio, etc.) might prevent it with the instructions, may cause ...

Instructions
Page 70
70 EN Specifications Camera For general Power supply DC 11 V (Using AC adapter) DC 7.2 V (Using battery pack) Power consumption Approx. 4.6 W Approx. 6.5 W (Maximum; battery, lens cap and strap) Operating temperature 0°C to 40°C (32°F ... Ω, analog Video output: 1.0 V (p-p), 75 Ω, analog Audio output: 300 mV (rms), 1 kΩ, analog, stereo USB Mini USB type A and type B, USB 2.0 compliant AC Adapter Power requirement AC 110 V to 240 Vd, 50 Hz/60 Hz Output DC 11 V , 1 A Remote Control Power supply DC 3 V Battery life Approx. 1 year (depending on the frequency...
70 EN Specifications Camera For general Power supply DC 11 V (Using AC adapter) DC 7.2 V (Using battery pack) Power consumption Approx. 4.6 W Approx. 6.5 W (Maximum; battery, lens cap and strap) Operating temperature 0°C to 40°C (32°F ... Ω, analog Video output: 1.0 V (p-p), 75 Ω, analog Audio output: 300 mV (rms), 1 kΩ, analog, stereo USB Mini USB type A and type B, USB 2.0 compliant AC Adapter Power requirement AC 110 V to 240 Vd, 50 Hz/60 Hz Output DC 11 V , 1 A Remote Control Power supply DC 3 V Battery life Approx. 1 year (depending on the frequency...


