
Software Guide
Page 13
... video files in a recording medium to use the provided software (PowerDirector Express NE, PowerProducer 2 Gold NE, PowerDVD 5 NE). ● If you perform installation of the battery pack. ● When the USB cable is already installed, uninstallation will start. USB cable To USB connector 1 To assure safety, make sure all units are...
... video files in a recording medium to use the provided software (PowerDirector Express NE, PowerProducer 2 Gold NE, PowerDVD 5 NE). ● If you perform installation of the battery pack. ● When the USB cable is already installed, uninstallation will start. USB cable To USB connector 1 To assure safety, make sure all units are...

Software Guide
Page 28
...: ● It is recommended to the PC, not through the hub. ● Do not use the AC Adapter as the power supply instead of the battery pack. ● When the USB cable is finished and eject the CD-ROM. Finish Up screen appears. PC ● If you the installation has been...
...: ● It is recommended to the PC, not through the hub. ● Do not use the AC Adapter as the power supply instead of the battery pack. ● When the USB cable is finished and eject the CD-ROM. Finish Up screen appears. PC ● If you the installation has been...

Instructions
Page 1
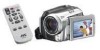
Serial No. EN LYT1468-001C HARD DISK CAMCORDER GZ-MG50U GZ-MG40U GZ-MG30U GZ-MG20U GETTING STARTED ENGLISH 7 VIDEO RECORDING & PLAYBACK 22 28 STILL IMAGE RECORDING & PLAYBACK 31 ADVANCED OPERATIONS MENU SETTINGS 48 REFERENCES 52 INSTRUCTIONS To deactivate the demonstration, set "DEMO MODE" to "OFF". (੬ pg. 48) For Customer Use: Enter below the Model No. (located on the bottom of the camera) and Serial No. (located on the battery pack mount of the camera). Model No. Retain this information for future reference.
Serial No. EN LYT1468-001C HARD DISK CAMCORDER GZ-MG50U GZ-MG40U GZ-MG30U GZ-MG20U GETTING STARTED ENGLISH 7 VIDEO RECORDING & PLAYBACK 22 28 STILL IMAGE RECORDING & PLAYBACK 31 ADVANCED OPERATIONS MENU SETTINGS 48 REFERENCES 52 INSTRUCTIONS To deactivate the demonstration, set "DEMO MODE" to "OFF". (੬ pg. 48) For Customer Use: Enter below the Model No. (located on the bottom of the camera) and Serial No. (located on the battery pack mount of the camera). Model No. Retain this information for future reference.

Instructions
Page 4
...the apparatus. The exclamation point within an equilateral triangle, is on the battery pack mount. ● The rating information and safety caution of the AC adapter are possible anywhere. ● Use the JVC BN-VF707U battery pack and, to recharge it has sufficient space on all sides to... the presence of these batteries must be regulated in the literature accompanying the appliance. Disposal of important operating and ...
...the apparatus. The exclamation point within an equilateral triangle, is on the battery pack mount. ● The rating information and safety caution of the AC adapter are possible anywhere. ● Use the JVC BN-VF707U battery pack and, to recharge it has sufficient space on all sides to... the presence of these batteries must be regulated in the literature accompanying the appliance. Disposal of important operating and ...
Instructions
Page 7
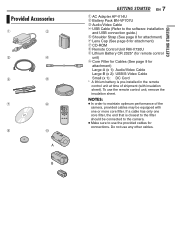
... e Shoulder Strap (See page 8 for attachment) f Lens Cap (See page 8 for attachment) g CD-ROM h Remote Control Unit RM-V730U i Lithium Battery CR 2025* (for remote control unit) j Core Filter for Cables (See page 9 for connections. To use any other cables. GETTING STARTED NOTES: ●... to use the provided cables for attachment) Large-A (x 1): Audio/Video Cable Large-B (x 2): USB/S-Video Cable Small (x 1): DC Cord * A lithium battery is closest to the filter should be connected to the camera. ● Make sure to maintain optimum performance of shipment (with one core filter, the...
... e Shoulder Strap (See page 8 for attachment) f Lens Cap (See page 8 for attachment) g CD-ROM h Remote Control Unit RM-V730U i Lithium Battery CR 2025* (for remote control unit) j Core Filter for Cables (See page 9 for connections. To use any other cables. GETTING STARTED NOTES: ●... to use the provided cables for attachment) Large-A (x 1): Audio/Video Cable Large-B (x 2): USB/S-Video Cable Small (x 1): DC Cord * A lithium battery is closest to the filter should be connected to the camera. ● Make sure to maintain optimum performance of shipment (with one core filter, the...
Instructions
Page 11
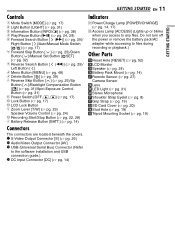
... LCD Lock Button n Zoom Lever [T/W] (੬ pg. 23) Speaker Volume Control (੬ pg. 24) o Recording Start/Stop Button (੬ pg. 22, 28) p Battery Release Button [BATT.] (੬ pg. 14) Connectors The connectors are located beneath the covers. Do not turn off the power or remove the... when you access to files during recording or playback.) Other Parts W Reset Hole [RESET] (੬ pg. 52) X LCD Monitor Y Speaker (੬ pg. 24) a Battery Pack Mount (੬ pg. 14) b Remote Sensor (੬ pg. 27) Camera Sensor c Lens d LED Light (੬ pg. 31) e Stereo Microphone f Shoulder Strap...
... LCD Lock Button n Zoom Lever [T/W] (੬ pg. 23) Speaker Volume Control (੬ pg. 24) o Recording Start/Stop Button (੬ pg. 22, 28) p Battery Release Button [BATT.] (੬ pg. 14) Connectors The connectors are located beneath the covers. Do not turn off the power or remove the... when you access to files during recording or playback.) Other Parts W Reset Hole [RESET] (੬ pg. 52) X LCD Monitor Y Speaker (੬ pg. 24) a Battery Pack Mount (੬ pg. 14) b Remote Sensor (੬ pg. 27) Camera Sensor c Lens d LED Light (੬ pg. 31) e Stereo Microphone f Shoulder Strap...
Instructions
Page 12
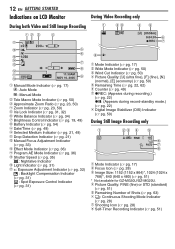
... Indicator (੬ pg. 23, 50) e Iris Lock Indicator (੬ pg. 31, 32) f White Balance Indicator (੬ pg. 34) g Brightness Control Indicator (੬ pg. 19, 49) h Battery Indicator (੬ pg. 54) i Date/Time (੬ pg. 49) j Selected Medium Indicator (੬ pg. 21, 49) k Drop Detection Indicator (੬ pg. 21) l Manual Focus Adjustment... (੬ pg. 17) b Focus Icon (੬ pg. 28) c Image Size: 1152 (1152 x 864)*, 1024 (1024 x 768)*, 640 (640 x 480) (੬ pg. 51) * Not available for GZ-MG30U/GZ-MG20U.
... Indicator (੬ pg. 23, 50) e Iris Lock Indicator (੬ pg. 31, 32) f White Balance Indicator (੬ pg. 34) g Brightness Control Indicator (੬ pg. 19, 49) h Battery Indicator (੬ pg. 54) i Date/Time (੬ pg. 49) j Selected Medium Indicator (੬ pg. 21, 49) k Drop Detection Indicator (੬ pg. 21) l Manual Focus Adjustment... (੬ pg. 17) b Focus Icon (੬ pg. 28) c Image Size: 1152 (1152 x 864)*, 1024 (1024 x 768)*, 640 (640 x 480) (੬ pg. 51) * Not available for GZ-MG30U/GZ-MG20U.

Instructions
Page 13
... High-Speed Search 9U : Forward Slow-Motion Y9 : Reverse Slow-Motion (The number on the left shows speed.) e Counter (੬ pg. 49) f Volume Level Indicator g Battery Indicator (੬ pg. 54) h Date (੬ pg. 49) i Selected Medium Indicator (੬ pg. 21, 49) j Effect Mode Indicator (੬ pg. 37) k Wipe/Fader Effect ... (੬ pg. 37, 50) 11:30AM NOV 10. 2005 a Mode Indicator (੬ pg. 17) b Folder/File Number c Slide Show Playback Indicator (੬ pg. 29) d Battery Indicator (੬ pg. 54) e Date/Time (੬ pg. 49) f Selected Medium Indicator (੬ pg. 21, 49)
... High-Speed Search 9U : Forward Slow-Motion Y9 : Reverse Slow-Motion (The number on the left shows speed.) e Counter (੬ pg. 49) f Volume Level Indicator g Battery Indicator (੬ pg. 54) h Date (੬ pg. 49) i Selected Medium Indicator (੬ pg. 21, 49) j Effect Mode Indicator (੬ pg. 37) k Wipe/Fader Effect ... (੬ pg. 37, 50) 11:30AM NOV 10. 2005 a Mode Indicator (੬ pg. 17) b Folder/File Number c Slide Show Playback Indicator (੬ pg. 29) d Battery Indicator (੬ pg. 54) e Date/Time (੬ pg. 49) f Selected Medium Indicator (੬ pg. 21, 49)

Instructions
Page 14
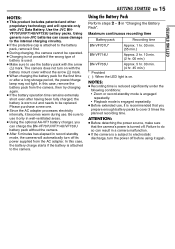
...place. 4 Connect the AC adapter to OFF. 2 With the arrow on the battery pack pointing downward, push the battery pack slightly against the battery pack mount. ● If the battery mount cover is finished. Battery Pack Arrow Battery Pack Mount AC Adapter To AC outlet 1 Set the power switch to the camera.... 5 Plug the AC adapter into an AC outlet. BATT. Do not use provided power supply units with other equipment. Required charging time Battery pack BN-VF707U* BN-VF714U BN-VF733U * Provided Charging time Approx. 1 hr. 30 min. Approx. 2 hr. 40 min. 14 EN ...
...place. 4 Connect the AC adapter to OFF. 2 With the arrow on the battery pack pointing downward, push the battery pack slightly against the battery pack mount. ● If the battery mount cover is finished. Battery Pack Arrow Battery Pack Mount AC Adapter To AC outlet 1 Set the power switch to the camera.... 5 Plug the AC adapter into an AC outlet. BATT. Do not use provided power supply units with other equipment. Required charging time Battery pack BN-VF707U* BN-VF714U BN-VF733U * Provided Charging time Approx. 1 hr. 30 min. Approx. 2 hr. 40 min. 14 EN ...
Instructions
Page 15
GETTING STARTED Using generic non-JVC batteries can cause damage to the internal charging circuitry. ● If the protective cap is attached to the battery pack, remove it first. ● During charging, the camera cannot be replaced. NOTES: ● Recording time is ... and other proprietary technology and will automatically turn the power off before using it becomes warm during use the battery pack with JVC Data Battery. Use the JVC BNVF707U/VF714U/VF733U battery packs. Please purchase a new one. ● Since the AC adapter processes electricity internally, it again....
GETTING STARTED Using generic non-JVC batteries can cause damage to the internal charging circuitry. ● If the protective cap is attached to the battery pack, remove it first. ● During charging, the camera cannot be replaced. NOTES: ● Recording time is ... and other proprietary technology and will automatically turn the power off before using it becomes warm during use the battery pack with JVC Data Battery. Use the JVC BNVF707U/VF714U/VF733U battery packs. Please purchase a new one. ● Since the AC adapter processes electricity internally, it again....

Instructions
Page 16
...if the button is displayed in 10 minute units. To resume the original function of the accurate battery power indication If the battery power indication differs from 110 V to come in contact with your nearest JVC dealer. ● The recordable time display should only be a problem with metals, as this... function may cause a fire or explosion. It is pressed and held for a long period of the battery status even though you tried to flame or ...
...if the button is displayed in 10 minute units. To resume the original function of the accurate battery power indication If the battery power indication differs from 110 V to come in contact with your nearest JVC dealer. ● The recordable time display should only be a problem with metals, as this... function may cause a fire or explosion. It is pressed and held for a long period of the battery status even though you tried to flame or ...

Instructions
Page 18
... COUNTER LANGUAGE CLOCK ADJUST BRIGHT DATE/TIME 5 Press / to the normal screen. When this occurs, first connect the camera to charge the clock's rechargeable lithium battery. Then perform the date/time setting before using the AC adapter for approx. 3 months, the clock's lithium... battery will become discharged and the date/time stored in Clock's Rechargeable Lithium Battery If the camera is recorded on the display can be used for over 24 hours to an AC outlet using the camera...
... COUNTER LANGUAGE CLOCK ADJUST BRIGHT DATE/TIME 5 Press / to the normal screen. When this occurs, first connect the camera to charge the clock's rechargeable lithium battery. Then perform the date/time setting before using the AC adapter for approx. 3 months, the clock's lithium... battery will become discharged and the date/time stored in Clock's Rechargeable Lithium Battery If the camera is recorded on the display can be used for over 24 hours to an AC outlet using the camera...
Instructions
Page 20
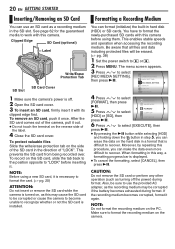
... appears. 3 Press / to or . 2 Press MENU. You can format (initialize) the built-in this camera. Be aware that is difficult to be corrupted if the battery becomes exhausted during format. Moreover, by repeating this SD card, slide the tab back to the position opposite to select VIDEO MODE IMAGE MODE FORMAT...
... appears. 3 Press / to or . 2 Press MENU. You can format (initialize) the built-in this camera. Be aware that is difficult to be corrupted if the battery becomes exhausted during format. Moreover, by repeating this SD card, slide the tab back to the position opposite to select VIDEO MODE IMAGE MODE FORMAT...

Instructions
Page 22
... up , shooting may be created for every 4 GB of contiuous shooting. If the camera continues to heat up , the 7REC indicator flashes. When using the battery pack, the camera is left without any operation such as sequential hexadecimal numbers. NOTES: ● If the camera is turned off ).
... up , shooting may be created for every 4 GB of contiuous shooting. If the camera continues to heat up , the 7REC indicator flashes. When using the battery pack, the camera is left without any operation such as sequential hexadecimal numbers. NOTES: ● If the camera is turned off ).

Instructions
Page 26
..., stop recording on the VCR, then stop playback on /off . 2 Connect the camera to a TV, VCR or VDR as the power supply instead of the battery pack. (੬ pg. 16) ● Make sure you adjust the TV sound volume to its availability. In this case, it is optional. Make sure to... Open the cover. If not, go to connect the yellow video cable.) * Not required for details on the sheet included in the illustration. Consult the JVC Service Center described on its minimum level to avoid a sudden burst of sound when the camera is recommended to [ON] or [OFF]. (੬ pg. 48...
..., stop recording on the VCR, then stop playback on /off . 2 Connect the camera to a TV, VCR or VDR as the power supply instead of the battery pack. (੬ pg. 16) ● Make sure you adjust the TV sound volume to its availability. In this case, it is optional. Make sure to... Open the cover. If not, go to connect the yellow video cable.) * Not required for details on the sheet included in the illustration. Consult the JVC Service Center described on its minimum level to avoid a sudden burst of sound when the camera is recommended to [ON] or [OFF]. (੬ pg. 48...
Instructions
Page 27
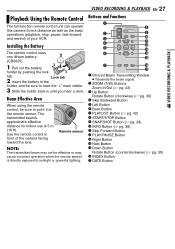
... well as the basic operations (playback, stop, pause, fast-forward and rewind) of the camera facing toward the lens. Lock tab 2 Insert the battery in the holder, and be sure to sunlight or powerful lighting. B ZOOM (T/W) Buttons Zoom In/Out (੬ pg. 23) C Up Button Rotate...PLAY/PAUSE Button M Right Button N Next Button O Down Button Rotate Button (counterclockwise) (੬ pg. 30) P INDEX Button Q DATE Button Installing the Battery VIDEO RECORDING & PLAYBACK The remote control uses one lithium battery 2 (CR2025). 1 Pull out the battery 1 holder by pushing the lock 1 tab.
... well as the basic operations (playback, stop, pause, fast-forward and rewind) of the camera facing toward the lens. Lock tab 2 Insert the battery in the holder, and be sure to sunlight or powerful lighting. B ZOOM (T/W) Buttons Zoom In/Out (੬ pg. 23) C Up Button Rotate...PLAY/PAUSE Button M Right Button N Next Button O Down Button Rotate Button (counterclockwise) (੬ pg. 30) P INDEX Button Q DATE Button Installing the Battery VIDEO RECORDING & PLAYBACK The remote control uses one lithium battery 2 (CR2025). 1 Pull out the battery 1 holder by pushing the lock 1 tab.
Instructions
Page 34
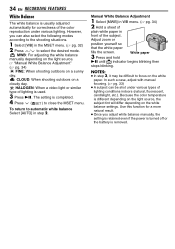
...: When shooting outdoors on a cloudy day. However, you adjust white balance manually, the setting is retained even if the power is turned off or the battery is removed. CLOUD: When shooting outdoors on a sunny day. To return to automatic white balance Select [AUTO] in the MSET menu. (੬ pg. 32) 2 Press...
...: When shooting outdoors on a cloudy day. However, you adjust white balance manually, the setting is retained even if the power is turned off or the battery is removed. CLOUD: When shooting outdoors on a sunny day. To return to automatic white balance Select [AUTO] in the MSET menu. (੬ pg. 32) 2 Press...

Instructions
Page 39
... still image) is switched or the power is turned off the power) during recording mode, the file recorded most recently will be corrupted if the battery becomes exhausted during protection. To delete the currently displayed file 5 Press / to select [CURRENT], then press 49. 6 Press / to select [EXECUTE], then press 49. ●...
... still image) is switched or the power is turned off the power) during recording mode, the file recorded most recently will be corrupted if the battery becomes exhausted during protection. To delete the currently displayed file 5 Press / to select [CURRENT], then press 49. 6 Press / to select [EXECUTE], then press 49. ●...

Instructions
Page 40
.... 7 Press MENU. 8 Press / to delete, then press 49. ● To select other files, repeat step 6. ● The scroll bar can also be corrupted if the battery becomes exhausted during deletion. Check files before deleting. CAUTION: Do not remove the recording medium or perform any other operation (such as the recording medium...
.... 7 Press MENU. 8 Press / to delete, then press 49. ● To select other files, repeat step 6. ● The scroll bar can also be corrupted if the battery becomes exhausted during deletion. Check files before deleting. CAUTION: Do not remove the recording medium or perform any other operation (such as the recording medium...

Instructions
Page 48
Power Switch Lock Button INFO/ 49 MODE MENU 1 Select the operation mode. The menu screen appears. 4 Select the desired sub menu and menu item with battery. ● If an SD card is in the following the steps below, then change the menu settings to the normal screen, press MENU. ● To ...
Power Switch Lock Button INFO/ 49 MODE MENU 1 Select the operation mode. The menu screen appears. 4 Select the desired sub menu and menu item with battery. ● If an SD card is in the following the steps below, then change the menu settings to the normal screen, press MENU. ● To ...


