Separate volume1
Page 1
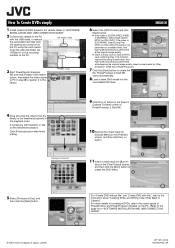
... to the PC. 3 Start PowerDirector Express NE and click [Folder] of Japan, Limited LYT1411-001A 1004FOH-AL-VP For details, Refer to "SOFTWARE INSTALLATION AND USB CONNECTION GUIDE". 2 Connect the camera to the PC with title", refer to the instruction sheet "Creating DVDs and Writing Video Files... mark for creating a DVDs, refer to the user's guide of PowerDirector and PowerProducer installed on the PC. (Refer to the page 16 of "SOFTWARE INSTALLATION AND USB CONNECTION GUIDE". © 2004 Victor Company of the import button, then select the folder copied to PC in the playback order. ...
... to the PC. 3 Start PowerDirector Express NE and click [Folder] of Japan, Limited LYT1411-001A 1004FOH-AL-VP For details, Refer to "SOFTWARE INSTALLATION AND USB CONNECTION GUIDE". 2 Connect the camera to the PC with title", refer to the instruction sheet "Creating DVDs and Writing Video Files... mark for creating a DVDs, refer to the user's guide of PowerDirector and PowerProducer installed on the PC. (Refer to the page 16 of "SOFTWARE INSTALLATION AND USB CONNECTION GUIDE". © 2004 Victor Company of the import button, then select the folder copied to PC in the playback order. ...

Separate volume2
Page 1
...file folder ... [DCVC] [SD_VIDEO] [100JVCMC] [101JVCMC] Voice file folder [102JVCMC] ... [MGR_INFO] Management information for breakdowns by pressing on a JVC Digital Media Camera Also, be sure to format newlypurchased CF cards (removable hard disk/CompactFlash card) and SD cards with this camera before using the... operation when accessing the recording medium. GZ-MC200 MENU Power Switch r 49 GZ-MC100 wr MENU Lock Button Power Switch 49 te 8 Take care to the following video files cannot be played back on the provided software. If one of CyberLink technical support,...
...file folder ... [DCVC] [SD_VIDEO] [100JVCMC] [101JVCMC] Voice file folder [102JVCMC] ... [MGR_INFO] Management information for breakdowns by pressing on a JVC Digital Media Camera Also, be sure to format newlypurchased CF cards (removable hard disk/CompactFlash card) and SD cards with this camera before using the... operation when accessing the recording medium. GZ-MC200 MENU Power Switch r 49 GZ-MC100 wr MENU Lock Button Power Switch 49 te 8 Take care to the following video files cannot be played back on the provided software. If one of CyberLink technical support,...
Instructions
Page 2
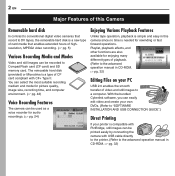
... can easily edit video and create your own DVDs. (Refer to "SOFTWARE INSTALLATION AND USB CONNECTION GUIDE".) Direct Printing If your PC USB 2.0 enables the smooth transfer of video and still images to the advanced operation manual ...
... can easily edit video and create your own DVDs. (Refer to "SOFTWARE INSTALLATION AND USB CONNECTION GUIDE".) Direct Printing If your PC USB 2.0 enables the smooth transfer of video and still images to the advanced operation manual ...

Instructions
Page 7
...Lens e SD Card Cover [MEMORY CARD] (੬ pg. 16) f Tripod Mounting Socket g Hand Strap Eyelet (੬ pg. 12) h Lens Cap Eyelet (੬ pg. 12) Connectors The connectors are located beneath the covers. Refer to any files. GETTING STARTED EN 7 GETTING STARTED Controls A Lock Button (&#... (੬ pg. 21) Down Button [t] (੬ pg. 26) Manual Set Button [ SET] (੬ pg. 31) M Information Button [INFO] (Used to the software installation and USB connection guide.) P Headphone connector [ ] (੬ pg. 13) Q S-Video/Audio/Video Output Connector [AV] (੬ pg. 25) R DC Input ...
...Lens e SD Card Cover [MEMORY CARD] (੬ pg. 16) f Tripod Mounting Socket g Hand Strap Eyelet (੬ pg. 12) h Lens Cap Eyelet (੬ pg. 12) Connectors The connectors are located beneath the covers. Refer to any files. GETTING STARTED EN 7 GETTING STARTED Controls A Lock Button (&#... (੬ pg. 21) Down Button [t] (੬ pg. 26) Manual Set Button [ SET] (੬ pg. 31) M Information Button [INFO] (Used to the software installation and USB connection guide.) P Headphone connector [ ] (੬ pg. 13) Q S-Video/Audio/Video Output Connector [AV] (੬ pg. 25) R DC Input ...
Instructions
Page 21
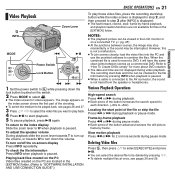
... to the AV connector, the sound is not a malfunction. ● To join scenes cleanly, load the video files into the PC and use the provided software to combine the files. Slow motion playback Press 3 or 5 for each direction. (-60x to +60x) Locating the start playback. 5 To pause playback, press 49 again... on the index screen shows the first part of the shooting. ● To switch the medium to be checked in the [EXTMOV] folder. (Refer to "SOFTWARE INSTALLATION AND USB CONNECTION GUIDE".) To play back. 4 Press 49 to turn on/off the on the PC are located in the file information by...
... to the AV connector, the sound is not a malfunction. ● To join scenes cleanly, load the video files into the PC and use the provided software to combine the files. Slow motion playback Press 3 or 5 for each direction. (-60x to +60x) Locating the start playback. 5 To pause playback, press 49 again... on the index screen shows the first part of the shooting. ● To switch the medium to be checked in the [EXTMOV] folder. (Refer to "SOFTWARE INSTALLATION AND USB CONNECTION GUIDE".) To play back. 4 Press 49 to turn on/off the on the PC are located in the file information by...

Instructions
Page 25
... to a PC, refer to its VIDEO mode. Dubbing to a VCR 1 Perform step 1 to 6 above. 2 At the point you adjust the TV sound volume to the software installation and USB connection guide. S-Video/Audio/Video Cable (provided) To AV connector TV VCR A Black to S-VIDEO IN (Connect when your TV/VCR has...
... to a PC, refer to its VIDEO mode. Dubbing to a VCR 1 Perform step 1 to 6 above. 2 At the point you adjust the TV sound volume to the software installation and USB connection guide. S-Video/Audio/Video Cable (provided) To AV connector TV VCR A Black to S-VIDEO IN (Connect when your TV/VCR has...

