
Basic User Guide
Page 2
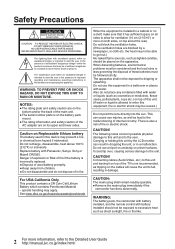
...The battery pack, the camcorder with battery installed, and the remote control with water. NO USER-SERVICEABLE PARTS INSIDE. The lightning flash with arrowhead symbol, within an equilateral triangle is also a risk of important operating and maintenance (servicing) instructions ...User Guide http://manual.jvc.co.jp/index.html/ See www.dtsc.ca.gov/hazardouswaste/perchlorate When the equipment is allowed to enter this equipment in a bathroom or places with battery installed should be of sufficient magnitude to this unit by the LCD monitor can cause eye injuries, as well as lighted...
...The battery pack, the camcorder with battery installed, and the remote control with water. NO USER-SERVICEABLE PARTS INSIDE. The lightning flash with arrowhead symbol, within an equilateral triangle is also a risk of important operating and maintenance (servicing) instructions ...User Guide http://manual.jvc.co.jp/index.html/ See www.dtsc.ca.gov/hazardouswaste/perchlorate When the equipment is allowed to enter this equipment in a bathroom or places with battery installed should be of sufficient magnitude to this unit by the LCD monitor can cause eye injuries, as well as lighted...

Basic User Guide
Page 4
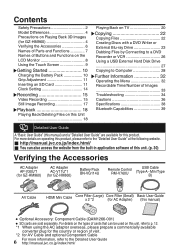
...;3D Conversion Playback AC Adapter GZ-HM960 3D/2D Available AC-V30U Model GZ-HM860 2D Unavailable AC-V11U Precautions on Playing Back 3D Images (for GZ-HM960) Images recorded in motion sickness. 3D Display on the LCD Monitor 3D images are different, fatigue may be converted to 3D and played back on this unit outdoors. 4 For more information, refer to the Detailed User Guide http://manual.jvc.co...
...;3D Conversion Playback AC Adapter GZ-HM960 3D/2D Available AC-V30U Model GZ-HM860 2D Unavailable AC-V11U Precautions on Playing Back 3D Images (for GZ-HM960) Images recorded in motion sickness. 3D Display on the LCD Monitor 3D images are different, fatigue may be converted to 3D and played back on this unit outdoors. 4 For more information, refer to the Detailed User Guide http://manual.jvc.co...
Basic User Guide
Page 6
... Copying Files 22 Creating Discs with a DVD Writer or External Blu-ray Drive 23 Dubbing Files by Connecting to a DVD Recorder or VCR 26 Using a USB External Hard Disk Drive 27 Copying to the Detailed User Guide http://manual.jvc.co.jp/index.html/ Contents Safety Precautions 2 Model Differences 4 Precautions on Playing Back 3D Images (for GZ-HM960 4 Verifying the Accessories 6 Names of Parts and Functions 7 Names of Buttons and Functions on the LCD Monitor 8 Using the Touch Screen 9 IGetting Started 10 Charging the Battery...
... Copying Files 22 Creating Discs with a DVD Writer or External Blu-ray Drive 23 Dubbing Files by Connecting to a DVD Recorder or VCR 26 Using a USB External Hard Disk Drive 27 Copying to the Detailed User Guide http://manual.jvc.co.jp/index.html/ Contents Safety Precautions 2 Model Differences 4 Precautions on Playing Back 3D Images (for GZ-HM960 4 Verifying the Accessories 6 Names of Parts and Functions 7 Names of Buttons and Functions on the LCD Monitor 8 Using the Touch Screen 9 IGetting Started 10 Charging the Battery...

Basic User Guide
Page 7
... unit is opened. O M (Power/Information) Button Recording : Displays the remaining time (for GZ-HM860) I POWER/CHARGE (Power/Charge) Lamp (p. 10) J ACCESS (Access) Lamp Lights up/blinks during recording or playback. K USB Connector (p. 31) L HDMI Mini Connector (p. 20) M USER (User) Button Activates preset functions. o Attaching the Core Filter Attach the core filter to the power cord of Parts and Functions 1 2 g 7 h k i 3 8j l 4 5 9 m 0 6 a n b o f edc p A Flash B Lens/Lens Cover C Light D Remote Sensor E Stereo Microphone F 3D LCD Monitor Turns the power on...
... unit is opened. O M (Power/Information) Button Recording : Displays the remaining time (for GZ-HM860) I POWER/CHARGE (Power/Charge) Lamp (p. 10) J ACCESS (Access) Lamp Lights up/blinks during recording or playback. K USB Connector (p. 31) L HDMI Mini Connector (p. 20) M USER (User) Button Activates preset functions. o Attaching the Core Filter Attach the core filter to the power cord of Parts and Functions 1 2 g 7 h k i 3 8j l 4 5 9 m 0 6 a n b o f edc p A Flash B Lens/Lens Cover C Light D Remote Sensor E Stereo Microphone F 3D LCD Monitor Turns the power on...

Basic User Guide
Page 12
... Detailed User Guide http://manual.jvc.co.jp/index.html/ NOTE Operations are confirmed on "SEAMLESS RECORDING", refer to the Detailed User Guide.) 12 For more information, refer to Detailed User Guide. 0 When using an SDXC card, check its compatibility with the OS of your computer by referring to confirm the video operation of the SD card before usage. 0 When "SEAMLESS RECORDING" in the menu is an SD memory card with image...
... Detailed User Guide http://manual.jvc.co.jp/index.html/ NOTE Operations are confirmed on "SEAMLESS RECORDING", refer to the Detailed User Guide.) 12 For more information, refer to Detailed User Guide. 0 When using an SDXC card, check its compatibility with the OS of your computer by referring to confirm the video operation of the SD card before usage. 0 When "SEAMLESS RECORDING" in the menu is an SD memory card with image...
Basic User Guide
Page 15
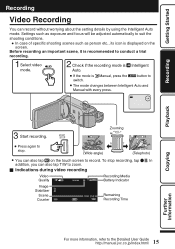
... [0:54] Remaining Recording Time Playback Copying .. Check if the recording mode is H Manual, press the S button to conduct a trial recording. Zooming Press again to record. Select video mode. Start recording. To stop . (Wide angle) (Telephoto) 0 You can record without worrying about the setting details by using the Intelligent Auto mode. Further Information 15 For more information, refer to zoom. In addition, you can also tap T/W to the Detailed User Guide http://manual.jvc.co.jp/index...
... [0:54] Remaining Recording Time Playback Copying .. Check if the recording mode is H Manual, press the S button to conduct a trial recording. Zooming Press again to record. Select video mode. Start recording. To stop . (Wide angle) (Telephoto) 0 You can record without worrying about the setting details by using the Intelligent Auto mode. Further Information 15 For more information, refer to zoom. In addition, you can also tap T/W to the Detailed User Guide http://manual.jvc.co.jp/index...

Basic User Guide
Page 16
... names and priority levels, can be adjusted for GZ-HM960) 0 When recording in 3D mode, the image will be displayed by this unit. Up to the Detailed User Guide http://manual.jvc.co.jp/index.html/ When the face within a frame on the screen is a function that are supported by the LCD monitor of a person beforehand, focus and brightness can be recorded in the Detailed User Guide. o TOUCH PRIORITY...
... names and priority levels, can be adjusted for GZ-HM960) 0 When recording in 3D mode, the image will be displayed by this unit. Up to the Detailed User Guide http://manual.jvc.co.jp/index.html/ When the face within a frame on the screen is a function that are supported by the LCD monitor of a person beforehand, focus and brightness can be recorded in the Detailed User Guide. o TOUCH PRIORITY...

Basic User Guide
Page 19
... button. . A Tap "MENU". C Tap "3D LEVEL ADJUST". 0 Tap "∧" or "∨" to the Detailed User Guide http://manual.jvc.co.jp/index.html/ Copying Further Information hold - o Usable operation buttons during playback Pause the playback and press the SNAPSHOT button. R - Getting Started o Playing back 3D images (for GZ-HM960) The 3D effect of 3D images may appear unnatural when played back in 2D mode. 0 3D images are using a 3D compatible TV, you can also play...
... button. . A Tap "MENU". C Tap "3D LEVEL ADJUST". 0 Tap "∧" or "∨" to the Detailed User Guide http://manual.jvc.co.jp/index.html/ Copying Further Information hold - o Usable operation buttons during playback Pause the playback and press the SNAPSHOT button. R - Getting Started o Playing back 3D images (for GZ-HM960) The 3D effect of 3D images may appear unnatural when played back in 2D mode. 0 3D images are using a 3D compatible TV, you can also play...

Basic User Guide
Page 20
... Component Cable (Optional) Red White Red AV Cable (Provided) . To AV Connector Yellow HDMI Connector Input Component Video Input Y CB/PB TV CR/PR Audio Input (L) Audio Input (R) Do not connect the yellow plug when using a 3D compatible TV, you can play back 3D images by connecting to the HDMI mini connector. Playing Back on TV 1 Connect to a TV. * Refer also to the instruction manual of time. Connecting to "OFF". COMMON Menu). o Playing back 3D images on this unit, a message...
... Component Cable (Optional) Red White Red AV Cable (Provided) . To AV Connector Yellow HDMI Connector Input Component Video Input Y CB/PB TV CR/PR Audio Input (L) Audio Input (R) Do not connect the yellow plug when using a 3D compatible TV, you can play back 3D images by connecting to the HDMI mini connector. Playing Back on TV 1 Connect to a TV. * Refer also to the instruction manual of time. Connecting to "OFF". COMMON Menu). o Playing back 3D images on this unit, a message...

Basic User Guide
Page 21
... quality, set "COMPONENT OUTPUT" in the "COMMON" menu to "4:3". The color of images looks strange. 0 If the video was recorded with "x.v.Color" set to "ON", set the "x.v.Color" setting of connection, contact your TV's manufacturer. 0 Use a High Speed HDMI mini cable as the HDMI mini cable when not using a conventional TV, you can play back in the "COMMON" menu to "CERTAIN HM960) TV TYPES". 0 Set to the Detailed User Guide http://manual.jvc.co.jp/index.html/ Copying Further...
... quality, set "COMPONENT OUTPUT" in the "COMMON" menu to "4:3". The color of images looks strange. 0 If the video was recorded with "x.v.Color" set to "ON", set the "x.v.Color" setting of connection, contact your TV's manufacturer. 0 Use a High Speed HDMI mini cable as the HDMI mini cable when not using a conventional TV, you can play back in the "COMMON" menu to "CERTAIN HM960) TV TYPES". 0 Set to the Detailed User Guide http://manual.jvc.co.jp/index.html/ Copying Further...

Basic User Guide
Page 22
... enables you to copy (record) videos to various devices. I : Recordable and playable F : Playable only - : Not applicable Standard Quality HD Quality Media Selection DVD Writer . (VHS Tape) - . (DVD Disc) . (DVD Disc) I I - - - - I - Page p. 23 External Blu-ray Drive - I I I p. 27 . . . . .. . I See manual of Everio MediaBrowser 3 BE. I F *1 I *1 I F *1 - p. 26 External Hard Disk - - - - Copying Copying Files You can be played back on AVCHD compatible devices. *2 For details, refer to the Detailed User Guide http://manual.jvc.co.jp/index.html...
... enables you to copy (record) videos to various devices. I : Recordable and playable F : Playable only - : Not applicable Standard Quality HD Quality Media Selection DVD Writer . (VHS Tape) - . (DVD Disc) . (DVD Disc) I I - - - - I - Page p. 23 External Blu-ray Drive - I I I p. 27 . . . . .. . I See manual of Everio MediaBrowser 3 BE. I F *1 I *1 I F *1 - p. 26 External Hard Disk - - - - Copying Copying Files You can be played back on AVCHD compatible devices. *2 For details, refer to the Detailed User Guide http://manual.jvc.co.jp/index.html...

Basic User Guide
Page 23
... following explanation, the same operations apply for an external Blu-ray drive. 1 2 Connect the USB cable and the AC adapter. NOTE 0 The recordable time on the disc varies according to the way of recording. 0 When connected to the instruction manual of the DVD writer. Turn on a computer before using. . C Connect the AC adapter to this unit, all buttons on the DVD writer (CUVD50U), other than the power and eject buttons, will not work. 0 It is...
... following explanation, the same operations apply for an external Blu-ray drive. 1 2 Connect the USB cable and the AC adapter. NOTE 0 The recordable time on the disc varies according to the way of recording. 0 When connected to the instruction manual of the DVD writer. Turn on a computer before using. . C Connect the AC adapter to this unit, all buttons on the DVD writer (CUVD50U), other than the power and eject buttons, will not work. 0 It is...

Basic User Guide
Page 26
... a compatible external input. 0 Insert a DVD-R or video tape. Preparation on this unit (p. 18) and press the record button on TV and VCR/DVD recorder 0 Switch to the Detailed User Guide http://manual.jvc.co.jp/index.html/ Refer also to the instruction manuals of the connecting TV. 4 Start recording. 0 Start playback on this unit 0 Set "VIDEO OUTPUT" in the "COMMON" menu to the aspect ratio ("4:3" or "16:9") of the TV, DVD recorder, VCR, etc. 1 Connect to a DVD recorder or VCR. Dubbing Files by Connecting...
... a compatible external input. 0 Insert a DVD-R or video tape. Preparation on this unit (p. 18) and press the record button on TV and VCR/DVD recorder 0 Switch to the Detailed User Guide http://manual.jvc.co.jp/index.html/ Refer also to the instruction manuals of the connecting TV. 4 Start recording. 0 Start playback on this unit 0 Set "VIDEO OUTPUT" in the "COMMON" menu to the aspect ratio ("4:3" or "16:9") of the TV, DVD recorder, VCR, etc. 1 Connect to a DVD recorder or VCR. Dubbing Files by Connecting...
Basic User Guide
Page 32
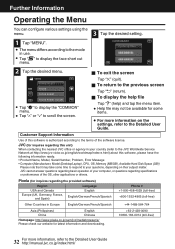
..., Model, Serial Number, Problem, Error Message • Computer (Manufacturer, Model (Desktop/Laptop), CPU, OS, Memory (MB/GB), Available Hard Disk Space (GB)) Please note that it may not be available for some time to respond to your computer, or questions regarding basic operation of your questions, depending on the settings, refer to the Detailed User Guide. o To exit the screen Tap "L" (quit). o To display the help file Tap "K" (help) and...
..., Model, Serial Number, Problem, Error Message • Computer (Manufacturer, Model (Desktop/Laptop), CPU, OS, Memory (MB/GB), Available Hard Disk Space (GB)) Please note that it may not be available for some time to respond to your computer, or questions regarding basic operation of your questions, depending on the settings, refer to the Detailed User Guide. o To exit the screen Tap "L" (quit). o To display the help file Tap "K" (help) and...

Basic User Guide
Page 33
... approximate recording time is fully charged. (Replace the battery pack with a new one.) Copying Further Information 33 For more information, refer to the Detailed User Guide http://manual.jvc.co.jp/index.html/ Approximate Number of Still Images (Unit: Number of Images You can check the video recording time by pressing the INFO button. The actual recording time may shorten depending on LCD monitor GZ-HM960 GZ-HM860 Battery Pack Actual Continuous Actual Continuous Recording Time Recording Time Recording Time Recording Time BN...
... approximate recording time is fully charged. (Replace the battery pack with a new one.) Copying Further Information 33 For more information, refer to the Detailed User Guide http://manual.jvc.co.jp/index.html/ Approximate Number of Still Images (Unit: Number of Images You can check the video recording time by pressing the INFO button. The actual recording time may shorten depending on LCD monitor GZ-HM960 GZ-HM860 Battery Pack Actual Continuous Actual Continuous Recording Time Recording Time Recording Time Recording Time BN...

Basic User Guide
Page 35
... flash during battery pack charging. back up your files and execute "FORMAT BUILT-IN MEM." with the recorded time less than "0:00:00:17", the video will be deleted.) DATA RECORDED FILE IS TOO SMALL TO BE SAVED 0 When time-lapse recording is being charged within the permitted temperature range. (Otherwise, charging may stop to the Detailed User Guide http://manual.jvc.co.jp/index.html/ become warm when used for GZ-HM960) 0 Set "HDMI OUTPUT...
... flash during battery pack charging. back up your files and execute "FORMAT BUILT-IN MEM." with the recorded time less than "0:00:00:17", the video will be deleted.) DATA RECORDED FILE IS TOO SMALL TO BE SAVED 0 When time-lapse recording is being charged within the permitted temperature range. (Otherwise, charging may stop to the Detailed User Guide http://manual.jvc.co.jp/index.html/ become warm when used for GZ-HM960) 0 Set "HDMI OUTPUT...
Basic User Guide
Page 37
... interference to provide reasonable protection against hard objects. ... near a television set. ... subject it to the power plug or an AC wall outlet. ... If this device must be parental guidance. open the camcorder's chassis. ... These limits are designed to radio or television reception, which the receiver is subject to the Detailed User Guide http://manual.jvc.co.jp/index.html/ Increase the...
... interference to provide reasonable protection against hard objects. ... near a television set. ... subject it to the power plug or an AC wall outlet. ... If this device must be parental guidance. open the camcorder's chassis. ... These limits are designed to radio or television reception, which the receiver is subject to the Detailed User Guide http://manual.jvc.co.jp/index.html/ Increase the...
Easy Start Guide
Page 1
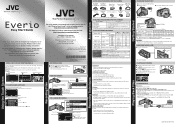
... down and take still image Lights up during still image recording Recording Media Battery Indicator Focus Recording in slightly, you must zoom during recording. Playing Back Files Getting Started CHARGING THE BATTERY A Close the LCD to turn on the touch screen to search for GZ-HM860). INSERTING THE SD CARD* A Close the LCD monitor. Tap B Tap the desired selection on the touch screen to select the playback mode. Battery Charger • Enables the battery pack to scroll...
... down and take still image Lights up during still image recording Recording Media Battery Indicator Focus Recording in slightly, you must zoom during recording. Playing Back Files Getting Started CHARGING THE BATTERY A Close the LCD to turn on the touch screen to search for GZ-HM860). INSERTING THE SD CARD* A Close the LCD monitor. Tap B Tap the desired selection on the touch screen to select the playback mode. Battery Charger • Enables the battery pack to scroll...
Easy Start Guide
Page 2
... recorded audio sound during shooting. D Start upload to the Mac Computer for about 2 seconds. • Connect the camera to the PC with Using the Provided Software Everio MediaBrowser 3 BE • Contact Pixela User Support Center at the numbers provided on Bluetooth, refer to the help file of iTunes. Export to XP mode quality level". Install the software on your recordings in UXP mode", choose "Re-encode to iTunes® / Bluetooth Capabilities USB Menu Operations INSTALL...
... recorded audio sound during shooting. D Start upload to the Mac Computer for about 2 seconds. • Connect the camera to the PC with Using the Provided Software Everio MediaBrowser 3 BE • Contact Pixela User Support Center at the numbers provided on Bluetooth, refer to the help file of iTunes. Export to XP mode quality level". Install the software on your recordings in UXP mode", choose "Re-encode to iTunes® / Bluetooth Capabilities USB Menu Operations INSTALL...

Printer Friendly Specs
Page 2
SPECIFICATIONS Internal Storage Media SDXC/SDHC/SD Card Slot* Image Sensor Lens Zoom Ratios Optical Dynamic Digial 2D-3D Conversion Playback High De nition Recording Standard De nition Recording Video Recording Modes Video Recording Time (max.) 1080/60P Output 24Mbps High Bit Rate Recording HDMI® Terminal LCD Size and Resolution Touch Panel LCD Glasses-free 3D Viewing on LCD Built-in camera) Yes BN-VG114 Yes 2-3/16x2-1/2x4-13/16 (54x62x121) 0.78 lbs (350) JVC Consumer...
SPECIFICATIONS Internal Storage Media SDXC/SDHC/SD Card Slot* Image Sensor Lens Zoom Ratios Optical Dynamic Digial 2D-3D Conversion Playback High De nition Recording Standard De nition Recording Video Recording Modes Video Recording Time (max.) 1080/60P Output 24Mbps High Bit Rate Recording HDMI® Terminal LCD Size and Resolution Touch Panel LCD Glasses-free 3D Viewing on LCD Built-in camera) Yes BN-VG114 Yes 2-3/16x2-1/2x4-13/16 (54x62x121) 0.78 lbs (350) JVC Consumer...


