

Basic User Guide
Page 2
.... CAUTION: The mains plug shall remain readily operable. • Remove the mains plug immediately if the camcorder functions abnormally. See www.dtsc.ca.gov/hazardouswaste/perchlorate When the equipment is allowed to enter this device may not be able to get out.) No naked flame sources, such as lead to the Detailed User Guide http://manual.jvc.co.jp/index...
.... CAUTION: The mains plug shall remain readily operable. • Remove the mains plug immediately if the camcorder functions abnormally. See www.dtsc.ca.gov/hazardouswaste/perchlorate When the equipment is allowed to enter this device may not be able to get out.) No naked flame sources, such as lead to the Detailed User Guide http://manual.jvc.co.jp/index...

Basic User Guide
Page 4
... Card 8 Clock Setting 10 IRecording 12 Video Recording 12 IPlayback 13 Playing Back/Deleting Files on this Unit 13 Playing Back on this unit, refer to p. 8. * When using the AC adapter overseas, please prepare a commercially available converter plug for this product, please refer to Computer 18 IFurther Information 21 Operating the Menu 21 Recordable Time 22 Troubleshooting 23 Cautions 25 Specifications 27 . CD-ROM LY37342-025 Basic User Guide (this manual...
... Card 8 Clock Setting 10 IRecording 12 Video Recording 12 IPlayback 13 Playing Back/Deleting Files on this Unit 13 Playing Back on this unit, refer to p. 8. * When using the AC adapter overseas, please prepare a commercially available converter plug for this product, please refer to Computer 18 IFurther Information 21 Operating the Menu 21 Recordable Time 22 Troubleshooting 23 Cautions 25 Specifications 27 . CD-ROM LY37342-025 Basic User Guide (this manual...

Basic User Guide
Page 5
F POWER/CHARGE (Power/Charge) Lamp (p. 6) G L (Play/Record) Button Switches between recording and playback modes. Recording : Displays the remaining time and battery power. D Speaker E ACCESS (Access) Lamp Lights up/blinks during recording or playback. A Lens Cover K AV Connector (p. 15, 17) B Monaural Microphone L MENU Button (p. 21) C LCD Monitor Turns the power on the icons downward > : Forward search M HDMI Mini Connector (p. 14) N USB Connector (p. 20) O COMPONENT (Component) Connector (p. 14) P Zoom/Volume Lever / Index (u) (p. 12, 13) Q i.AUTO (Intelligent Auto) ...
F POWER/CHARGE (Power/Charge) Lamp (p. 6) G L (Play/Record) Button Switches between recording and playback modes. Recording : Displays the remaining time and battery power. D Speaker E ACCESS (Access) Lamp Lights up/blinks during recording or playback. A Lens Cover K AV Connector (p. 15, 17) B Monaural Microphone L MENU Button (p. 21) C LCD Monitor Turns the power on the icons downward > : Forward search M HDMI Mini Connector (p. 14) N USB Connector (p. 20) O COMPONENT (Component) Connector (p. 14) P Zoom/Volume Lever / Index (u) (p. 12, 13) Q i.AUTO (Intelligent Auto) ...

Basic User Guide
Page 7
... video quality. D Press OK/INFO. (Setting complete) High Definition LS (16:9) LE (16:9) Higher video quality Standard Definition SSW (16:9) SEW (16:9) SS (4:3) SE (4:3) More recording time * For the approximate video recording time, refer to p. 22. 7 For more information, refer to the Detailed User Guide http://manual.jvc.co.jp/index.html/ Further Information Close the lever Recording Playback . .. Copying Video Quality This unit can perform recording...
... video quality. D Press OK/INFO. (Setting complete) High Definition LS (16:9) LE (16:9) Higher video quality Standard Definition SSW (16:9) SEW (16:9) SS (4:3) SE (4:3) More recording time * For the approximate video recording time, refer to p. 22. 7 For more information, refer to the Detailed User Guide http://manual.jvc.co.jp/index.html/ Further Information Close the lever Recording Playback . .. Copying Video Quality This unit can perform recording...

Basic User Guide
Page 8
... necessary to set "REC MEDIA SETTING" to the Detailed User Guide http://manual.jvc.co.jp/index.html/ NOTE Operations are confirmed on the built-in recording failure or data loss. 0 To protect the data, do not touch the terminals of this unit before recording. (GZ-HM30) When a commercially available SD card is inserted, recordings can still be used. Insert an SD card. Label Turn off . Manufacturer Video A Eye-Fi...
... necessary to set "REC MEDIA SETTING" to the Detailed User Guide http://manual.jvc.co.jp/index.html/ NOTE Operations are confirmed on the built-in recording failure or data loss. 0 To protect the data, do not touch the terminals of this unit before recording. (GZ-HM30) When a commercially available SD card is inserted, recordings can still be used. Insert an SD card. Label Turn off . Manufacturer Video A Eye-Fi...

Basic User Guide
Page 12
... adapter, or SD card when the access lamp is lighted. Settings such as backlight (C), night view (B), person (A) etc., its icon is H Manual, press the S button to the Detailed User Guide http://manual.jvc.co.jp/index.html/ Zooming Start recording. If the mode is displayed on the setting of "VIDEO QUALITY". (P.27) o Indications during video recording Image Stabilizer Video Quality Recording Media Battery Indicator Record-Standby Recording in Progress Scene Counter 0:00:00 [000:22] Remaining Recording Time NOTE...
... adapter, or SD card when the access lamp is lighted. Settings such as backlight (C), night view (B), person (A) etc., its icon is H Manual, press the S button to the Detailed User Guide http://manual.jvc.co.jp/index.html/ Zooming Start recording. If the mode is displayed on the setting of "VIDEO QUALITY". (P.27) o Indications during video recording Image Stabilizer Video Quality Recording Media Battery Indicator Record-Standby Recording in Progress Scene Counter 0:00:00 [000:22] Remaining Recording Time NOTE...

Basic User Guide
Page 13
..." to the recording mode. 0 Videos recorded in "REC MEDIA SETTING" (p. 9) are displayed on the index screen separately. Stop (returns to confirm deletion. Decreases volume level - Volume adjustment Turn down the volume Turn up /left or down/right, press the button UP/< or DOWN/>. o Usable operation buttons/levers during playback During video playback During video pause d/e Pause Playback Zoom u - Zoom W / Vol.- Select the playback mode. D Press MENU, select "EXECUTE" and press OK to thumbnail display) Zoom T / Vol.+ Increases volume level - B Select "FILE SELECT...
..." to the recording mode. 0 Videos recorded in "REC MEDIA SETTING" (p. 9) are displayed on the index screen separately. Stop (returns to confirm deletion. Decreases volume level - Volume adjustment Turn down the volume Turn up /left or down/right, press the button UP/< or DOWN/>. o Usable operation buttons/levers during playback During video playback During video pause d/e Pause Playback Zoom u - Zoom W / Vol.- Select the playback mode. D Press MENU, select "EXECUTE" and press OK to thumbnail display) Zoom T / Vol.+ Increases volume level - B Select "FILE SELECT...
Basic User Guide
Page 14
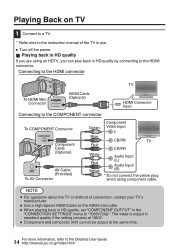
... Mini Connector HDMI Cable (Optional) . To AV Connector Green Blue Red White Red Yellow Component Video Input Y CB/PB TV CR/PR Audio Input (L) Audio Input (R) Do not connect the yellow plug when using an HDTV, you are using component cable. Playing Back on TV 1 Connect to a TV. * Refer also to the instruction manual of connection, contact your TV's manufacturer. 0 Use a High Speed HDMI Cable as the HDMI mini cable. 0 When playing back in HD quality, set "COMPONENT OUTPUT...
... Mini Connector HDMI Cable (Optional) . To AV Connector Green Blue Red White Red Yellow Component Video Input Y CB/PB TV CR/PR Audio Input (L) Audio Input (R) Do not connect the yellow plug when using an HDTV, you are using component cable. Playing Back on TV 1 Connect to a TV. * Refer also to the instruction manual of connection, contact your TV's manufacturer. 0 Use a High Speed HDMI Cable as the HDMI mini cable. 0 When playing back in HD quality, set "COMPONENT OUTPUT...

Basic User Guide
Page 15
... TV input switch. 4 Play back a file. (p. 13) o To play back in standard quality by connecting to the AV connector. Getting Started Recording Playback o Playing back in standard quality If you are using a conventional TV, you can play back with "x.v.Color" set to "ON", change the setting as desired on TV. 0 Adjust the TV's screen accordingly. SETTINGS" menu to the AV connector TV Yellow Video Input AV Cable (Provided) White Video Input Audio Input (L) To AV Connector Red . Images are...
... TV input switch. 4 Play back a file. (p. 13) o To play back in standard quality by connecting to the AV connector. Getting Started Recording Playback o Playing back in standard quality If you are using a conventional TV, you can play back with "x.v.Color" set to "ON", change the setting as desired on TV. 0 Adjust the TV's screen accordingly. SETTINGS" menu to the AV connector TV Yellow Video Input AV Cable (Provided) White Video Input Audio Input (L) To AV Connector Red . Images are...

Basic User Guide
Page 16
... copy the files on how to create a disc using a computer, refer to various devices. X : Recordable and playable F : Playable only - : Not applicable Standard Quality HD Quality Media Selection Blu-ray Recorder DVD Recorder VCR Computer . (VHS Tape) - . (DVD Disc) . (DVD Disc) X F *1 . (Blu-ray Disc) X . (Device's internal HDD) X Page See manual of recorder. - NOTE 0 It is not possible to connect and record to a DVD writer, external Blu-ray drive, or external hard disk. 16 For more information, refer to the Detailed User Guide http://manual.jvc...
... copy the files on how to create a disc using a computer, refer to various devices. X : Recordable and playable F : Playable only - : Not applicable Standard Quality HD Quality Media Selection Blu-ray Recorder DVD Recorder VCR Computer . (VHS Tape) - . (DVD Disc) . (DVD Disc) X F *1 . (Blu-ray Disc) X . (Device's internal HDD) X Page See manual of recorder. - NOTE 0 It is not possible to connect and record to a DVD writer, external Blu-ray drive, or external hard disk. 16 For more information, refer to the Detailed User Guide http://manual.jvc...

Basic User Guide
Page 17
... VCR/DVD Recorder . 0 This unit powers on TV and VCR/DVD recorder 0 Switch to a compatible external input. 0 Insert a DVD-R or video tape. Preparation on automatically when the AC adapter is complete, stop the recording. 17 For more information, refer to select the playback mode. Playback Copying Further Information . 3 Prepare to a DVD recorder or VCR. Preparation on the recorder. 0 After playback is connected. 2 Press L (Play/Record) to the Detailed User Guide http://manual.jvc.co.jp/index.html/ Set "ON-SCREEN DISPLAY" in the playback menu to "ON" . 4 Start recording...
... VCR/DVD Recorder . 0 This unit powers on TV and VCR/DVD recorder 0 Switch to a compatible external input. 0 Insert a DVD-R or video tape. Preparation on automatically when the AC adapter is complete, stop the recording. 17 For more information, refer to select the playback mode. Playback Copying Further Information . 3 Prepare to a DVD recorder or VCR. Preparation on the recorder. 0 After playback is connected. 2 Press L (Play/Record) to the Detailed User Guide http://manual.jvc.co.jp/index.html/ Set "ON-SCREEN DISPLAY" in the playback menu to "ON" . 4 Start recording...

Basic User Guide
Page 21
...SCREEN DISPLAY Common Menu DISPLAY SETTINGS LANGUAGE DATE DISPLAY STYLE MONITOR BRIGHTNESS BASIC SETTINGS DEMO MODE OPERATION SOUND AUTO POWER OFF QUICK RESTART UPDATE FACTORY PRESET CONNECTION SETTINGS DISPLAY ON TV VIDEO OUTPUT HDMI OUTPUT HDMI CONTROL MEDIA SETTINGS FORMAT SD CARD FORMAT BUILT-IN MEM. (GZ-HM50 Only) ERASE ALL DATA (GZ-HM50 Only) Further Information 21 For more information on the settings, refer to the Detailed User Guide http://manual.jvc.co.jp/index.html/ AUTO SLOW-SHUTTER . Menu Map Recording Menu MANUAL SETTING SCENE SELECT FOCUS BRIGHTNESS ADJUST WHITE BALANCE...
...SCREEN DISPLAY Common Menu DISPLAY SETTINGS LANGUAGE DATE DISPLAY STYLE MONITOR BRIGHTNESS BASIC SETTINGS DEMO MODE OPERATION SOUND AUTO POWER OFF QUICK RESTART UPDATE FACTORY PRESET CONNECTION SETTINGS DISPLAY ON TV VIDEO OUTPUT HDMI OUTPUT HDMI CONTROL MEDIA SETTINGS FORMAT SD CARD FORMAT BUILT-IN MEM. (GZ-HM50 Only) ERASE ALL DATA (GZ-HM50 Only) Further Information 21 For more information on the settings, refer to the Detailed User Guide http://manual.jvc.co.jp/index.html/ AUTO SLOW-SHUTTER . Menu Map Recording Menu MANUAL SETTING SCENE SELECT FOCUS BRIGHTNESS ADJUST WHITE BALANCE...

Basic User Guide
Page 22
...-764 +63-2-438-0090 10800-163-0014 (toll-free) . Customer Support Information Use of this software, please have the following information ready. • Product Name, Model, Serial Number, Problem, Error Message • Computer (Manufacturer, Model (Desktop/Laptop), CPU, OS, Memory (MB/GB), Available Hard Disk Space (GB)) Please note that it may take some time to respond to the Detailed User Guide http://manual.jvc.co.jp/index.html/
...-764 +63-2-438-0090 10800-163-0014 (toll-free) . Customer Support Information Use of this software, please have the following information ready. • Product Name, Model, Serial Number, Problem, Error Message • Computer (Manufacturer, Model (Desktop/Laptop), CPU, OS, Memory (MB/GB), Available Hard Disk Space (GB)) Please note that it may take some time to respond to the Detailed User Guide http://manual.jvc.co.jp/index.html/

Basic User Guide
Page 23
...-controlled device. Playback Sound or video is interrupted. 0 Sometimes playback is being charged. If you encounter problems with the L (Play/ 13 Record) button. No date/time display. 0 Set "ON-SCREEN DISPLAY" in the playback - Getting Started Recording Playback Troubleshooting If you have difficulties operating the unit, refer to the detailed descriptions in the "Detailed User Guide". 0 http://manual.jvc.co.jp/index.html/ 0 You can also access the website from this unit, reattach them, and this unit powers...
...-controlled device. Playback Sound or video is interrupted. 0 Sometimes playback is being charged. If you encounter problems with the L (Play/ 13 Record) button. No date/time display. 0 Set "ON-SCREEN DISPLAY" in the playback - Getting Started Recording Playback Troubleshooting If you have difficulties operating the unit, refer to the detailed descriptions in the "Detailed User Guide". 0 http://manual.jvc.co.jp/index.html/ 0 You can also access the website from this unit, reattach them, and this unit powers...

Basic User Guide
Page 24
... SD card terminals. - 0 If the above does not solve the problem, back up . 0 Set "VIDEO QUALITY" in the recording menu 7 accordingly before selecting the playback mode. 13 0 Check the remaining battery power. (When the 6 battery pack is fully charged, the lamp does not flash.) 0 When charging in the "MEDIA SETTINGS" menu. (All data will not be saved. This unit heats up - time less than "0:00:00:17", the video will be deleted.) CHECK LENS COVER...
... SD card terminals. - 0 If the above does not solve the problem, back up . 0 Set "VIDEO QUALITY" in the recording menu 7 accordingly before selecting the playback mode. 13 0 Check the remaining battery power. (When the 6 battery pack is fully charged, the lamp does not flash.) 0 When charging in the "MEDIA SETTINGS" menu. (All data will not be saved. This unit heats up - time less than "0:00:00:17", the video will be deleted.) CHECK LENS COVER...

Basic User Guide
Page 25
... C73 series type use current even when switched off the camcorder power or remove the battery or AC adapter during shooting, playback, or when otherwise accessing the recording medium. • Do not bring the recording medium near objects that have purchased is powered by physically destroying the camcorder with high temperature or high humidity. • Do not touch the metal parts. • When formatting or erasing data using the camcorder, only...
... C73 series type use current even when switched off the camcorder power or remove the battery or AC adapter during shooting, playback, or when otherwise accessing the recording medium. • Do not bring the recording medium near objects that have purchased is powered by physically destroying the camcorder with high temperature or high humidity. • Do not touch the metal parts. • When formatting or erasing data using the camcorder, only...

Basic User Guide
Page 26
..., • Fasten the grip belt securely. • When using the camcorder with Canadian ICES-003. expose the apparatus to direct sunlight. ... in a malfunction if the cable is subject to provide reasonable protection against hard objects. ... in a residential installation. remove the battery pack or disconnect the power supply while the power is connected. leave dust or metal objects adhered to shock or...
..., • Fasten the grip belt securely. • When using the camcorder with Canadian ICES-003. expose the apparatus to direct sunlight. ... in a malfunction if the cable is subject to provide reasonable protection against hard objects. ... in a residential installation. remove the battery pack or disconnect the power supply while the power is connected. leave dust or metal objects adhered to shock or...

Basic User Guide
Page 27
...), Up to 60x (SS/SE) Digital zoom: Up to 200x Video recording format AVCHD standard, Video: AVC/H.264, Audio: Dolby Digital (2ch) Recording Media SDHC/SDXC card (commercially available) Eye-Fi card (commercially available) SDHC/SDXC card (commercially available) Eye-Fi card (commercially available) Built-in memory: 8 GB Clock battery Rechargeable battery Copying Further Information 27 For more information, refer to the Detailed User Guide http://manual.jvc.co.jp/index.html/
...), Up to 60x (SS/SE) Digital zoom: Up to 200x Video recording format AVCHD standard, Video: AVC/H.264, Audio: Dolby Digital (2ch) Recording Media SDHC/SDXC card (commercially available) Eye-Fi card (commercially available) SDHC/SDXC card (commercially available) Eye-Fi card (commercially available) Built-in memory: 8 GB Clock battery Rechargeable battery Copying Further Information 27 For more information, refer to the Detailed User Guide http://manual.jvc.co.jp/index.html/

Basic User Guide
Page 28
... using the AC adapter overseas, please prepare a commercially available converter plug for further improvement without prior notice. Index A AC Adapter 6, 25 Apple 19 AV Connection 15, 17 B Battery Pack 6, 25 L Language Setting 11 LCD Monitor 25 M Mac 19 Menu Settings 21 C CD-ROM 19 Clock Adjust 10 Component Connection 14 Copy (Back Up 16 D Date/Time Setting 10 Deleting Files 13 Dubbing (Duplicate 17 F Format SD Card 9 H HDMI Connection 14 I Installation 19 R Recordable Time 22 S SD Card 8 Software 18 U USB Cable...
... using the AC adapter overseas, please prepare a commercially available converter plug for further improvement without prior notice. Index A AC Adapter 6, 25 Apple 19 AV Connection 15, 17 B Battery Pack 6, 25 L Language Setting 11 LCD Monitor 25 M Mac 19 Menu Settings 21 C CD-ROM 19 Clock Adjust 10 Component Connection 14 Copy (Back Up 16 D Date/Time Setting 10 Deleting Files 13 Dubbing (Duplicate 17 F Format SD Card 9 H HDMI Connection 14 I Installation 19 R Recordable Time 22 S SD Card 8 Software 18 U USB Cable...

Printer Friendly Specs
Page 2
... LCD Glasses-free 3D Viewing on LCD Built-in Bluetooth® Wireless Technology Super LoLux Advanced Image Stabilizer Time-Lapse REC Auto REC Intelligent AUTO Smile Meter/Smile Shot Face Sub-Window Animation E ect High-Speed Motor Drive Recording Seamless Recording Face Recognition K2 Technology Auto Illumi. Light Auto Flash Lens Cover DSC Function 2-Way Grip Belt Eye-Fi Card Ready for Wi-Fi Connection** Bundled PC Software SHARE STATION® Compatible Provided Battery Remote Control Dimensions with battery...
... LCD Glasses-free 3D Viewing on LCD Built-in Bluetooth® Wireless Technology Super LoLux Advanced Image Stabilizer Time-Lapse REC Auto REC Intelligent AUTO Smile Meter/Smile Shot Face Sub-Window Animation E ect High-Speed Motor Drive Recording Seamless Recording Face Recognition K2 Technology Auto Illumi. Light Auto Flash Lens Cover DSC Function 2-Way Grip Belt Eye-Fi Card Ready for Wi-Fi Connection** Bundled PC Software SHARE STATION® Compatible Provided Battery Remote Control Dimensions with battery...


