
Basic User Guide
Page 4
... Accessories For the Camera . . 4 Getting Started Charging the Battery Pack 5 Inserting an SD Card 6 Using the Icon Buttons/Thumbnails ........ 6 Changing Menu Settings 7 Clock Setting 7 Recording Video Recording 8 Still Image Recording 9 Copying Keep It High Definition (Windows) ....... 11 Install Everio MediaBrowser (Windows) ..... 12 USB Menu Operations 13 File Backup (Windows 14 View Your Video (Windows 14 AVCHD Disc Creation (Windows) ........ 15 Record to a DVD or VHS Recorder ...... 15 How to Upload a File (Video Clip) to YouTube (Windows 16 Working with iMovie and iPhoto...
... Accessories For the Camera . . 4 Getting Started Charging the Battery Pack 5 Inserting an SD Card 6 Using the Icon Buttons/Thumbnails ........ 6 Changing Menu Settings 7 Clock Setting 7 Recording Video Recording 8 Still Image Recording 9 Copying Keep It High Definition (Windows) ....... 11 Install Everio MediaBrowser (Windows) ..... 12 USB Menu Operations 13 File Backup (Windows 14 View Your Video (Windows 14 AVCHD Disc Creation (Windows) ........ 15 Record to a DVD or VHS Recorder ...... 15 How to Upload a File (Video Clip) to YouTube (Windows 16 Working with iMovie and iPhoto...

Basic User Guide
Page 8
... switch. Settings such as person etc., its icon is recommended to conduct a trial recording. o Indications during video recording Video Quality Recording Media Battery Indicator Image Stabilizer Scene Counter ˻PLAY REC 0:00:00 [0:54] MENU Remaining Recording Time NOTE 0 The estimated recording time of view may become unreadable. 0 This unit turns itself off . 8 Before recording an important scene, it is A video. A C PH .. Check if the recording mode is not operated for 5 minutes. (only when using the Intelligent Auto mode...
... switch. Settings such as person etc., its icon is recommended to conduct a trial recording. o Indications during video recording Video Quality Recording Media Battery Indicator Image Stabilizer Scene Counter ˻PLAY REC 0:00:00 [0:54] MENU Remaining Recording Time NOTE 0 The estimated recording time of view may become unreadable. 0 This unit turns itself off . 8 Before recording an important scene, it is A video. A C PH .. Check if the recording mode is not operated for 5 minutes. (only when using the Intelligent Auto mode...

Basic User Guide
Page 17
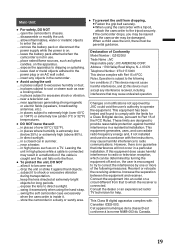
... Mac Computer using Apple's iMovie '08, '09 or '11 (video) or iPhoto (still image). You can import files from this unit to a computer using a USB Cable. CONNECT TO PC PLAYBACK ON PC USB cable (Provided) To USB Connector To USB port . 0 Reconnect the power supply to turn off the camera. To USB Connector To USB port NOTE 0 Files must be transferred to the Mac Computer for editing. Disconnect the power supply. 1 Open the LCD monitor to connect...
... Mac Computer using Apple's iMovie '08, '09 or '11 (video) or iPhoto (still image). You can import files from this unit to a computer using a USB Cable. CONNECT TO PC PLAYBACK ON PC USB cable (Provided) To USB Connector To USB port . 0 Reconnect the power supply to turn off the camera. To USB Connector To USB port NOTE 0 Files must be transferred to the Mac Computer for editing. Disconnect the power supply. 1 Open the LCD monitor to connect...
Basic User Guide
Page 19
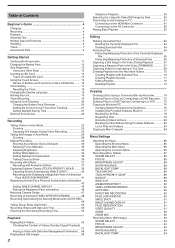
... subject to Part 15 of Conformity Model Number : GZ-E200U Trade Name : JVC Responsible party : JVC AMERICAS CORP. Changes or modifications not approved by turning the equipment off and on the apparatus. ... Consult the dealer or an experienced radio/ TV technician for long periods. ... open the camcorder's chassis. ... This Class B digital apparatus complies with Canadian ICES-003. keep the lens directed at extremely...
... subject to Part 15 of Conformity Model Number : GZ-E200U Trade Name : JVC Responsible party : JVC AMERICAS CORP. Changes or modifications not approved by turning the equipment off and on the apparatus. ... Consult the dealer or an experienced radio/ TV technician for long periods. ... open the camcorder's chassis. ... This Class B digital apparatus complies with Canadian ICES-003. keep the lens directed at extremely...
User Manual - English
Page 2
... Card 14 Using the Touch Screen 15 Names of Buttons and Functions on the LCD Monitor ....... 16 Clock Setting 17 Resetting the Clock 18 Changing the Display Language 19 Holding this Unit 19 Tripod Mounting 19 Using this Unit Overseas 20 Charging the Battery Pack Overseas 20 Setting the Clock to Local Time when Traveling 21 Setting Daylight Saving Time 21 Optional Accessories 22 Recording Taking Videos in Auto Mode 23 Zooming 25 Capturing Still Images...
... Card 14 Using the Touch Screen 15 Names of Buttons and Functions on the LCD Monitor ....... 16 Clock Setting 17 Resetting the Clock 18 Changing the Display Language 19 Holding this Unit 19 Tripod Mounting 19 Using this Unit Overseas 20 Charging the Battery Pack Overseas 20 Setting the Clock to Local Time when Traveling 21 Setting Daylight Saving Time 21 Optional Accessories 22 Recording Taking Videos in Auto Mode 23 Zooming 25 Capturing Still Images...
User Manual - English
Page 3
... UPLOAD SETTINGS 99 PLAYBACK OTHER FILE 99 K2 TECHNOLOGY 100 Playback Menu (Still Image 101 SEARCH DATE 101 SLIDE SHOW EFFECTS 101 PROTECT/CANCEL 102 Common Menu 103 CLOCK ADJUST 105 DATE DISPLAY STYLE 105 LANGUAGE 105 MONITOR BRIGHTNESS 105 OPERATION SOUND 106 SILENT MODE 106 AUTO POWER OFF 107 QUICK RESTART 107 DEMO MODE 108 TOUCH SCREEN ADJUST 108 DISPLAY ON TV 109 VIDEO OUTPUT 110 HDMI OUTPUT 110 HDMI CONTROL 111 FACTORY PRESET 111 UPDATE 111 PC SOFTWARE UPDATE 111 FORMAT...
... UPLOAD SETTINGS 99 PLAYBACK OTHER FILE 99 K2 TECHNOLOGY 100 Playback Menu (Still Image 101 SEARCH DATE 101 SLIDE SHOW EFFECTS 101 PROTECT/CANCEL 102 Common Menu 103 CLOCK ADJUST 105 DATE DISPLAY STYLE 105 LANGUAGE 105 MONITOR BRIGHTNESS 105 OPERATION SOUND 106 SILENT MODE 106 AUTO POWER OFF 107 QUICK RESTART 107 DEMO MODE 108 TOUCH SCREEN ADJUST 108 DISPLAY ON TV 109 VIDEO OUTPUT 110 HDMI OUTPUT 110 HDMI CONTROL 111 FACTORY PRESET 111 UPDATE 111 PC SOFTWARE UPDATE 111 FORMAT...
User Manual - English
Page 7
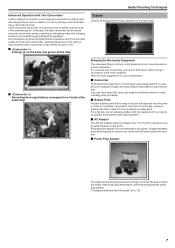
... Advanced Operation with Two Camcorders If video-editing is to be done, record using two camcorders so that is ready for 4 hours (actual recording time). In this way, the other scenes, enabling an interesting video with changing scenes to 240 V, and hence can record with high capacities. Travel Capture all the time . If you are really unable to find an extra camcorder, inserting still pictures...
... Advanced Operation with Two Camcorders If video-editing is to be done, record using two camcorders so that is ready for 4 hours (actual recording time). In this way, the other scenes, enabling an interesting video with changing scenes to 240 V, and hence can record with high capacities. Travel Capture all the time . If you are really unable to find an extra camcorder, inserting still pictures...
User Manual - English
Page 12
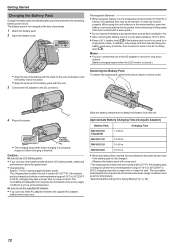
...;F). Approximate Battery Charging Time (Using AC Adapter) Battery Pack Charging Time BN-VG107U (Supplied) 1 h 50 m BN-VG114U 2 h 30 m BN-VG121U 3 h 30 m BN-VG138U 6 h 10 m 0 When the battery life is reached, the recording time becomes shorter even if the battery pack is fully charged. (Replace the battery pack with a warm pack.) 0 Do not expose the battery to excessive heat, such as direct sunlight or fire. 0 After removing the battery, store...
...;F). Approximate Battery Charging Time (Using AC Adapter) Battery Pack Charging Time BN-VG107U (Supplied) 1 h 50 m BN-VG114U 2 h 30 m BN-VG121U 3 h 30 m BN-VG138U 6 h 10 m 0 When the battery life is reached, the recording time becomes shorter even if the battery pack is fully charged. (Replace the battery pack with a warm pack.) 0 Do not expose the battery to excessive heat, such as direct sunlight or fire. 0 After removing the battery, store...
User Manual - English
Page 16
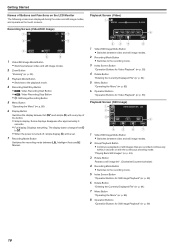
The display button changes from n to m. 0 When the power is turned off, simple display (n) will be set. 7 Recording Mode Button Switches the recording mode between P Intelligent Auto and H Manual. . 1 Video/Still Image Mode Button 0 Switches between video and still image modes. 2 Recording Mode Button 0 Switches to the recording mode. 3 Index Screen Button "Operation Buttons for Video Playback" (A p. 55) 4 Delete Button "Deleting the Currently Displayed File" (A p. 64) 5 Menu Button "Operating the Menu" (A p. 85) 6 Operation Buttons "Operation Buttons for Still Image Playback" (A p. 59) ...
The display button changes from n to m. 0 When the power is turned off, simple display (n) will be set. 7 Recording Mode Button Switches the recording mode between P Intelligent Auto and H Manual. . 1 Video/Still Image Mode Button 0 Switches between video and still image modes. 2 Recording Mode Button 0 Switches to the recording mode. 3 Index Screen Button "Operation Buttons for Video Playback" (A p. 55) 4 Delete Button "Deleting the Currently Displayed File" (A p. 64) 5 Menu Button "Operating the Menu" (A p. 85) 6 Operation Buttons "Operation Buttons for Still Image Playback" (A p. 59) ...
User Manual - English
Page 17
... unit turns off. 2 Tap "YES" when "SET DATE/TIME!" Index Screen ˻REC MENU . 1 Video/Still Image Mode Button 0 Switches between video and still image modes. 2 Date Button "Operation Buttons for Video Playback" (A p. 55) "Operation Buttons for Still Image Playback" (A p. 59) 3 Playback Mode Button 0 Switches to the playback mode. 4 Delete Button "Deleting Selected Files" (A p. 64) 5 Menu Button "Operating the Menu" (A p. 85) 6 Page Forward/Back Button "Operation Buttons for Video Playback" (A p. 55) "Operation Buttons for more than 24 hours to charge the internal clock battery of...
... unit turns off. 2 Tap "YES" when "SET DATE/TIME!" Index Screen ˻REC MENU . 1 Video/Still Image Mode Button 0 Switches between video and still image modes. 2 Date Button "Operation Buttons for Video Playback" (A p. 55) "Operation Buttons for Still Image Playback" (A p. 59) 3 Playback Mode Button 0 Switches to the playback mode. 4 Delete Button "Deleting Selected Files" (A p. 64) 5 Menu Button "Operating the Menu" (A p. 85) 6 Page Forward/Back Button "Operation Buttons for Video Playback" (A p. 55) "Operation Buttons for more than 24 hours to charge the internal clock battery of...
User Manual - English
Page 22
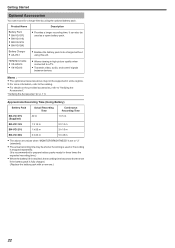
... if zooming is used as a spare battery pack. Battery Charger 0 AA-VG1 0 Enables the battery pack to be charged without using the optional battery pack. It can record for three times the expected recording time.) 0 When the battery life is reached, the recording time becomes shorter even if the battery pack is set to "3" (standard). 0 The actual recording time may not be supported in high picture quality when connected to a TV. 0 Transmits video, audio, and control...
... if zooming is used as a spare battery pack. Battery Charger 0 AA-VG1 0 Enables the battery pack to be charged without using the optional battery pack. It can record for three times the expected recording time.) 0 When the battery life is reached, the recording time becomes shorter even if the battery pack is set to "3" (standard). 0 The actual recording time may not be supported in high picture quality when connected to a TV. 0 Transmits video, audio, and control...
User Manual - English
Page 25
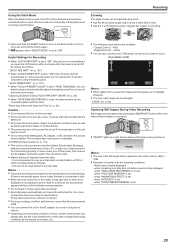
...-controlled device. " QUICK RESTART " (A p. 107) 0 When "AUTO POWER OFF" is set 25 If there is set - Zoom Button (T/W) ˻PLAY REC MMEENNUU . when "DATE/TIME RECORDING" is not enough space, move (copy) the data to "ON". Zooming The angle of view can also use this unit in the rain, snow, or places with the video. " ZOOM " (A p. 92) Capturing Still Images During Video Recording Still images can be captured by moving the zoom lever, etc. The recorded data may turn on the playback screen. Use...
...-controlled device. " QUICK RESTART " (A p. 107) 0 When "AUTO POWER OFF" is set 25 If there is set - Zoom Button (T/W) ˻PLAY REC MMEENNUU . when "DATE/TIME RECORDING" is not enough space, move (copy) the data to "ON". Zooming The angle of view can also use this unit in the rain, snow, or places with the video. " ZOOM " (A p. 92) Capturing Still Images During Video Recording Still images can be captured by moving the zoom lever, etc. The recorded data may turn on the playback screen. Use...

User Manual - English
Page 29
... image, tap A or B on the recording screen to display the mode switching screen. Manual Recording You can also use the A/B button on this unit.) 3 Select the Manual recording mode. ˻PLAY REC MENU . 0 If the mode is P Intelligent Auto, tap P on the recording screen to display the mode switching screen. VIDEO SCENE SELECT Recording . 2 Open the LCD monitor. . 0 For details on the various manual settings, refer to Manual. MENU MENU . 29 Tap H to switch the recording mode to "Manual Recording Menu". Manual recording can be set for both video and still image modes. 1 Open the lens...
... image, tap A or B on the recording screen to display the mode switching screen. Manual Recording You can also use the A/B button on this unit.) 3 Select the Manual recording mode. ˻PLAY REC MENU . 0 If the mode is P Intelligent Auto, tap P on the recording screen to display the mode switching screen. VIDEO SCENE SELECT Recording . 2 Open the LCD monitor. . 0 For details on the various manual settings, refer to Manual. MENU MENU . 29 Tap H to switch the recording mode to "Manual Recording Menu". Manual recording can be set for both video and still image modes. 1 Open the lens...
User Manual - English
Page 49
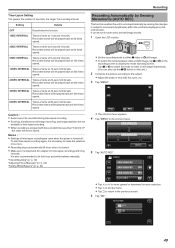
... recording screen to the previous screen. 6 Tap "ON". "Tripod Mounting" (A p. 19) "Adjusting Focus Manually" (A p. 32) "Setting White Balance" (A p. 34) Recording Automatically by Sensing Movements (AUTO REC) This function enables the unit to record automatically by sensing the changes in the shortcut menu. AUTO REC OFF ON . 49 Recorded videos will not be recorded during time-lapse recording. 0 Zooming, simultaneous still image recording, and image stabilizer are reset when the power is started. 0 Make use the A/B button on this unit.) 2 Compose the picture...
... recording screen to the previous screen. 6 Tap "ON". "Tripod Mounting" (A p. 19) "Adjusting Focus Manually" (A p. 32) "Setting White Balance" (A p. 34) Recording Automatically by Sensing Movements (AUTO REC) This function enables the unit to record automatically by sensing the changes in the shortcut menu. AUTO REC OFF ON . 49 Recorded videos will not be recorded during time-lapse recording. 0 Zooming, simultaneous still image recording, and image stabilizer are reset when the power is started. 0 Make use the A/B button on this unit.) 2 Compose the picture...
User Manual - English
Page 54
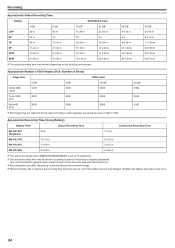
... images that are captured during video recording or video playback are saved at a size of 1920 x 1080. 32 GB 9999 9999 9999 Approximate Recording Time (Using Battery) Battery Pack Actual Recording Time Continuous Recording Time BN-VG107U (Supplied) 40 m 1 h 5 m BN-VG114U 1 h 15 m 2 h 10 m BN-VG121U 1 h 55 m 3 h 15 m BN-VG138U 3 h 20 m 5 h 45 m 0 The above are values when "MONITOR BRIGHTNESS" is set to "3" (standard). 0 The actual recording time may be shorter if zooming...
... images that are captured during video recording or video playback are saved at a size of 1920 x 1080. 32 GB 9999 9999 9999 Approximate Recording Time (Using Battery) Battery Pack Actual Recording Time Continuous Recording Time BN-VG107U (Supplied) 40 m 1 h 5 m BN-VG114U 1 h 15 m 2 h 10 m BN-VG121U 1 h 55 m 3 h 15 m BN-VG138U 3 h 20 m 5 h 45 m 0 The above are values when "MONITOR BRIGHTNESS" is set to "3" (standard). 0 The actual recording time may be shorter if zooming...
User Manual - English
Page 75
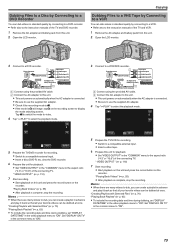
... Cable (Provided) Yellow White Red Video Input Video Input Audio Input (L) Audio Input (R) Record AC Adapter To AC Outlet (110 V to video. 4 Tap " Tap A to switch the mode to 240 V) VCR/DVD Recorder To DC Connector . Copying Dubbing Files to a VHS Tape by Connecting to a VCR You can dub videos in standard quality by connecting to a DVD recorder. 0 Refer also to the instruction manuals of the TV and VCR. 1 Remove the AC adapter and battery pack from this unit. 2 Open the LCD monitor. Dubbing Files to a Disc by Connecting...
... Cable (Provided) Yellow White Red Video Input Video Input Audio Input (L) Audio Input (R) Record AC Adapter To AC Outlet (110 V to video. 4 Tap " Tap A to switch the mode to 240 V) VCR/DVD Recorder To DC Connector . Copying Dubbing Files to a VHS Tape by Connecting to a VCR You can dub videos in standard quality by connecting to a DVD recorder. 0 Refer also to the instruction manuals of the TV and VCR. 1 Remove the AC adapter and battery pack from this unit. 2 Open the LCD monitor. Dubbing Files to a Disc by Connecting...

User Manual - English
Page 84
... to use a software that supports AVCHD (video)/JPEG (still image) files. 0 When removing this unit from this unit anymore. 0 MTS files that the operations will work with iMovie, import the files using the provided USB cable. SELECT DEVICE SELECT DEVICE TYPE TO CONNECT CONNECT TO PC . 5 Tap "PLAYBACK ON PC". Caution : 0 When the folders or files are copied to a Mac computer cannot be played back on automatically when the AC adapter is no guarantee that are deleted...
... to use a software that supports AVCHD (video)/JPEG (still image) files. 0 When removing this unit from this unit anymore. 0 MTS files that the operations will work with iMovie, import the files using the provided USB cable. SELECT DEVICE SELECT DEVICE TYPE TO CONNECT CONNECT TO PC . 5 Tap "PLAYBACK ON PC". Caution : 0 When the folders or files are copied to a Mac computer cannot be played back on automatically when the AC adapter is no guarantee that are deleted...

User Manual - English
Page 118
... Image Playback 1 23 4 56 100-0001 10:00 7 8 ˻REC . 1 Still Image Mode "A / B (Video/Still Image) Button" (A p. 114) 2 Folder Number 3 File Number 4 Date/Time 0 Displays the recording date and time. 5 Media 6 Battery Indicator "Checking the Remaining Recording Time" (A p. 53) 7 SILENT MODE " SILENT MODE " (A p. 106) 8 1080p Output " HDMI OUTPUT " (A p. 110) When the unit is not working properly Turning Off the Power 1 Close the LCD monitor. . 2 Remove the AC adapter and battery pack from this unit, reattach them, open the LCD monitor and this unit powers on automatically. (Reset...
... Image Playback 1 23 4 56 100-0001 10:00 7 8 ˻REC . 1 Still Image Mode "A / B (Video/Still Image) Button" (A p. 114) 2 Folder Number 3 File Number 4 Date/Time 0 Displays the recording date and time. 5 Media 6 Battery Indicator "Checking the Remaining Recording Time" (A p. 53) 7 SILENT MODE " SILENT MODE " (A p. 106) 8 1080p Output " HDMI OUTPUT " (A p. 110) When the unit is not working properly Turning Off the Power 1 Close the LCD monitor. . 2 Remove the AC adapter and battery pack from this unit, reattach them, open the LCD monitor and this unit powers on automatically. (Reset...

User Manual - English
Page 122
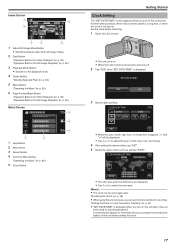
... output properly depending on the TV connected. Troubleshooting Screen/Image Other Problems The LCD monitor is not a malfunction. "Shooting According to the "-" side. "Setting White Balance" (A p. 34) The color looks different. This is difficult to "MANUAL". A Disconnect the HDMI mini cable and connect it is a microcomputer-controlled device. It is recommended to copy your computer, and erase the files from coming into view. (A band or a ball of the pixels may not be adjusted.) Set "WHITE BALANCE...
... output properly depending on the TV connected. Troubleshooting Screen/Image Other Problems The LCD monitor is not a malfunction. "Shooting According to the "-" side. "Setting White Balance" (A p. 34) The color looks different. This is difficult to "MANUAL". A Disconnect the HDMI mini cable and connect it is a microcomputer-controlled device. It is recommended to copy your computer, and erase the files from coming into view. (A band or a ball of the pixels may not be adjusted.) Set "WHITE BALANCE...
User Manual - English
Page 123
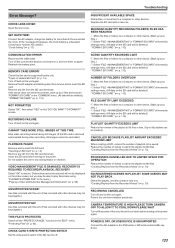
... media settings menu. (All data on this unit and the devices connected to the DVD writer or BD writer (external Blu-ray drive). 123 CANNOT TAKE MORE STILL IMAGES AT THIS TIME Stop video recording before taking still images. (If the SD card is removed and inserted during video recording, still images cannot be deleted.) " FORMAT SD CARD " (A p. 112) FILE QUANTITY LIMIT EXCEEDED A Move the files or folders to play them on this unit again. MEMORY CARD ERROR! RECORDING FAILURE Turn...
... media settings menu. (All data on this unit and the devices connected to the DVD writer or BD writer (external Blu-ray drive). 123 CANNOT TAKE MORE STILL IMAGES AT THIS TIME Stop video recording before taking still images. (If the SD card is removed and inserted during video recording, still images cannot be deleted.) " FORMAT SD CARD " (A p. 112) FILE QUANTITY LIMIT EXCEEDED A Move the files or folders to play them on this unit again. MEMORY CARD ERROR! RECORDING FAILURE Turn...


