Instructions
Page 1
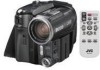
... 25 ADVANCED FEATURES 33 REFERENCES 51 INSTRUCTIONS TERMS 62 For Customer Use: Enter below the Model No. Model No. DIGITAL VIDEO CAMERA GR-X5U Please visit our Homepage on the bottom of this digital video camera. Serial No. and Serial No. Before use of the camcorder. Retain this information... pages 3 - 4 and 10 to "OFF". (੬ pg. 33, 36) EN LYT1431-001B which is located on the World Wide Web for Digital Video Camera: http://www.jvc.co.jp/english/cyber/ For Accessories: http://www.jvc.co.jp/english/accessory/ Dear Customer, Thank you for future reference.
... 25 ADVANCED FEATURES 33 REFERENCES 51 INSTRUCTIONS TERMS 62 For Customer Use: Enter below the Model No. Model No. DIGITAL VIDEO CAMERA GR-X5U Please visit our Homepage on the bottom of this digital video camera. Serial No. and Serial No. Before use of the camcorder. Retain this information... pages 3 - 4 and 10 to "OFF". (੬ pg. 33, 36) EN LYT1431-001B which is located on the World Wide Web for Digital Video Camera: http://www.jvc.co.jp/english/cyber/ For Accessories: http://www.jvc.co.jp/english/accessory/ Dear Customer, Thank you for future reference.

Instructions
Page 2
2 EN Major Features of this Camcorder Wipe/Fader Effects You can use the wipe/fader effects to make pro-style scene transitions. (੬ pg. 44) Fade in Backlight Compensation Simply pressing ... when shooting still images. (੬ pg. 39) Direct Printing If your printer is compatible with PictBridge, still images can be printed easily by connecting the camcorder with USB cable directly to the printer. (੬ pg. 31)
2 EN Major Features of this Camcorder Wipe/Fader Effects You can use the wipe/fader effects to make pro-style scene transitions. (੬ pg. 44) Fade in Backlight Compensation Simply pressing ... when shooting still images. (੬ pg. 39) Direct Printing If your printer is compatible with PictBridge, still images can be printed easily by connecting the camcorder with USB cable directly to the printer. (੬ pg. 31)

Instructions
Page 3
...OF ELECTRIC SHOCK DO NOT OPEN CAUTION: TO REDUCE THE RISK OF ELECTRIC SHOCK, DO NOT REMOVE COVER (OR BACK). CAUTIONS: ● This camcorder is incorrectly replaced. ● Dispose of mercury. This product has a fluorescent lamp that may be used in your local authorities, or the ...Disposal of AC outlets in different countries.) Caution on its upper and lower sides. Use the JVC BN-VF707U/VF714U/VF733U battery packs and, to recharge them or to supply power to the camcorder from children. ● Do not disassemble and do not dispose of important operating and maintenance ...
...OF ELECTRIC SHOCK DO NOT OPEN CAUTION: TO REDUCE THE RISK OF ELECTRIC SHOCK, DO NOT REMOVE COVER (OR BACK). CAUTIONS: ● This camcorder is incorrectly replaced. ● Dispose of mercury. This product has a fluorescent lamp that may be used in your local authorities, or the ...Disposal of AC outlets in different countries.) Caution on its upper and lower sides. Use the JVC BN-VF707U/VF714U/VF733U battery packs and, to recharge them or to supply power to the camcorder from children. ● Do not disassemble and do not dispose of important operating and maintenance ...

Instructions
Page 4
... stoves, or other apparatus (including amplifiers) that it on top of this unit. (If water or liquid is allowed to the camcorder and leaving it has sufficient space on all instructions. 5. the heat may be exposed to the malfunctioning of these batteries must be considered... avoid injury from tipover. 11. IMPORTANT SAFETY INSTRUCTIONS 1. Do not use caution when moving the cart/ apparatus combination to the camcorder. Carrying or holding the camcorder by the manufacturer. 10. Do not use the provided strap. Heed all servicing to fall, resulting in damage. Read these ...
... stoves, or other apparatus (including amplifiers) that it on top of this unit. (If water or liquid is allowed to the camcorder and leaving it has sufficient space on all instructions. 5. the heat may be exposed to the malfunctioning of these batteries must be considered... avoid injury from tipover. 11. IMPORTANT SAFETY INSTRUCTIONS 1. Do not use caution when moving the cart/ apparatus combination to the camcorder. Carrying or holding the camcorder by the manufacturer. 10. Do not use the provided strap. Heed all servicing to fall, resulting in damage. Read these ...

Instructions
Page 7
..., 48) * i.Link refers to cover this area in the image depending on its size. To stabilize the microphone, use of the camcorder and the microphone before attaching and removing them. ● The attached microphone may be used for shooting is used during video recording and...2668; pg. 20) E Stop Button [8] (੬ pg. 20) Backlight Compensation Button [BACKLIGHT] (੬ pg. 42) Down Button F Menu Button [MENU] (੬ pg. 33) G White Balance Button [W.B] (੬ pg. 43) Information Button [INFO] (੬ pg. 27) H LCD Backlight Button [LCD BACKLIGHT] (੬ pg. 16) Data Battery...
..., 48) * i.Link refers to cover this area in the image depending on its size. To stabilize the microphone, use of the camcorder and the microphone before attaching and removing them. ● The attached microphone may be used for shooting is used during video recording and...2668; pg. 20) E Stop Button [8] (੬ pg. 20) Backlight Compensation Button [BACKLIGHT] (੬ pg. 42) Down Button F Menu Button [MENU] (੬ pg. 33) G White Balance Button [W.B] (੬ pg. 43) Information Button [INFO] (੬ pg. 27) H LCD Backlight Button [LCD BACKLIGHT] (੬ pg. 16) Data Battery...

Instructions
Page 8
... Stabilizer ("DIS") (੬ pg. 34) L SOUND 12BIT/16BIT: Sound Mode Indicator (੬ pg. 34) (Appears for approx. 5 seconds after turning on the camcorder.) L : Auxiliary Microphone Level R Indicator (Appears when an optional microphone is connected. ੬ pg. 36, "AUX MIC" ) During D.S.C. Recording Only 100 1024 ... (੬ pg. 25) : Appears during shooting. : Blinks in white when a memory card is not loaded. : Blinks in yellow while the camcorder is reading the data in order of quality) (੬ pg. 36) H Remaining Number Of Shots (੬ pg. 61) (Displays the approximate ...
... Stabilizer ("DIS") (੬ pg. 34) L SOUND 12BIT/16BIT: Sound Mode Indicator (੬ pg. 34) (Appears for approx. 5 seconds after turning on the camcorder.) L : Auxiliary Microphone Level R Indicator (Appears when an optional microphone is connected. ੬ pg. 36, "AUX MIC" ) During D.S.C. Recording Only 100 1024 ... (੬ pg. 25) : Appears during shooting. : Blinks in white when a memory card is not loaded. : Blinks in yellow while the camcorder is reading the data in order of quality) (੬ pg. 36) H Remaining Number Of Shots (੬ pg. 61) (Displays the approximate ...
Instructions
Page 10
... an event such as a show, performance or exhibition for private consumer use JVC brand cassette tapes. Cassette tapes should be dirty. It is strongly recommended that you use only. Remember that this camcorder is a registered trademark of your cassette tapes and camcorder are stored in a dusty area. So, for the digital video cassette...
... an event such as a show, performance or exhibition for private consumer use JVC brand cassette tapes. Cassette tapes should be dirty. It is strongly recommended that you use only. Remember that this camcorder is a registered trademark of your cassette tapes and camcorder are stored in a dusty area. So, for the digital video cassette...

Instructions
Page 11
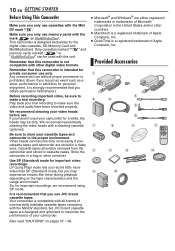
... mount cover to protect the battery connector when the battery pack is removed. NOTES: ● In order to maintain optimum performance of the camcorder, provided cables may be darkened (vignetting). Align. For the attachment/detachment, refer to remove it through the strap guide and the buckle.... i CD-ROM j Remote Control Unit RM-V720U k Lithium Battery CR2025* (for remote control unit) l Memory Card 32 MB (already inserted in the camcorder) m Shoulder Strap (see the right column for attachment) n Lens Cap and its string (see the right column for attachment) o Battery Mount Cover** ...
... mount cover to protect the battery connector when the battery pack is removed. NOTES: ● In order to maintain optimum performance of the camcorder, provided cables may be darkened (vignetting). Align. For the attachment/detachment, refer to remove it through the strap guide and the buckle.... i CD-ROM j Remote Control Unit RM-V720U k Lithium Battery CR2025* (for remote control unit) l Memory Card 32 MB (already inserted in the camcorder) m Shoulder Strap (see the right column for attachment) n Lens Cap and its string (see the right column for attachment) o Battery Mount Cover** ...

Instructions
Page 12
... the Audio Extension Cable When using optional headphones or external microphone, connect to the provided audio extension cable (with the core filter to the camcorder. S-Video/Audio/ Video cable USB cable, audio extension cable and AC adapter's cord Audio Extension Cable (provided) To Open the cover. ...the cable. ● When connecting a cable, attach the end with a core filter attached), then connect the audio extension cable to the camcorder. Headphones Microphone Core Filter* To MIC USB cable, audio extension cable and AC adapter's cord Wind the cable once around the outside of ...
... the Audio Extension Cable When using optional headphones or external microphone, connect to the provided audio extension cable (with the core filter to the camcorder. S-Video/Audio/ Video cable USB cable, audio extension cable and AC adapter's cord Audio Extension Cable (provided) To Open the cover. ...the cable. ● When connecting a cable, attach the end with a core filter attached), then connect the audio extension cable to the camcorder. Headphones Microphone Core Filter* To MIC USB cable, audio extension cable and AC adapter's cord Wind the cable once around the outside of ...

Instructions
Page 13
...min. (1 hr. 55 min.) BN-VF733U 3 hr. 45 min. (4 hr. 35 min.) * Provided ( ): When LCD backlight is attached to the camcorder. Power This camcorder's 2-way power supply system lets you can cause damage to the internal charging circuitry. ● If the protective cap is off its power supplied...camcorder, then try charging again. ● If the battery operation time remains extremely short even after a long storage period, the POWER/ CHARGE lamp may not light. Disconnect the AC adapter from the AC adapter. Using the Battery Pack Perform steps 2 - 3 in record-standby mode with JVC ...
...min. (1 hr. 55 min.) BN-VF733U 3 hr. 45 min. (4 hr. 35 min.) * Provided ( ): When LCD backlight is attached to the camcorder. Power This camcorder's 2-way power supply system lets you can cause damage to the internal charging circuitry. ● If the protective cap is off its power supplied...camcorder, then try charging again. ● If the battery operation time remains extremely short even after a long storage period, the POWER/ CHARGE lamp may not light. Disconnect the AC adapter from the AC adapter. Using the Battery Pack Perform steps 2 - 3 in record-standby mode with JVC ...
Instructions
Page 14
... battery is attached and the power switch is set various playback functions using the menus. (੬ pg. 33) NOTE: The provided AC adapter features automatic voltage selection in a camcorder malfunction. Do not allow the battery or its terminals to press DATA several times, there may be used ...MENU Choose the appropriate operation mode according to record using the power switch and VIDEO/MEMORY switch. In such a case, consult your nearest JVC dealer. ● The recordable time display should only be a problem with metals, as this function may cause a fire or explosion. It...
... battery is attached and the power switch is set various playback functions using the menus. (੬ pg. 33) NOTE: The provided AC adapter features automatic voltage selection in a camcorder malfunction. Do not allow the battery or its terminals to press DATA several times, there may be used ...MENU Choose the appropriate operation mode according to record using the power switch and VIDEO/MEMORY switch. In such a case, consult your nearest JVC dealer. ● The recordable time display should only be a problem with metals, as this function may cause a fire or explosion. It...

Instructions
Page 15
...;S "BRETURN", and press SET twice. MEMORY: ● Allows you to record in a memory card or access data stored in "Language Setting" on or off the camcorder by opening/ closing the LCD monitor. LCD / T V DATE / T I ME CODE - DEC 2 0 '0 5 5 : 0 0 PM 4 Press Up (4/9) or Down (8) ...the switch. 2 Open the LCD monitor fully. (੬ pg. 12) 3 Press MENU. Language Setting The language on the display can be changed. (੬ pg. 33, 36, 38) 1 Set the power switch to "A" or "M", the currently selected image size appears. CLOCK ADJ . ON CLOCK DEC 2 0 '0 5 ADJ . 5:...
...;S "BRETURN", and press SET twice. MEMORY: ● Allows you to record in a memory card or access data stored in "Language Setting" on or off the camcorder by opening/ closing the LCD monitor. LCD / T V DATE / T I ME CODE - DEC 2 0 '0 5 5 : 0 0 PM 4 Press Up (4/9) or Down (8) ...the switch. 2 Open the LCD monitor fully. (੬ pg. 12) 3 Press MENU. Language Setting The language on the display can be changed. (੬ pg. 33, 36, 38) 1 Set the power switch to "A" or "M", the currently selected image size appears. CLOCK ADJ . ON CLOCK DEC 2 0 '0 5 ADJ . 5:...

Instructions
Page 16
... holder, resulting in the direction of the Display 1 Set the power switch to close the cassette holder cover. Tripod Mounting To attach the camcorder to a tripod, align the direction stud and screw to select "n", and press SET. This will dim LCD screen while recorded image will... not be able to "M" or "PLAY" while pressing down the lock button located on the camcorder. Replace the battery pack with studs. Loading/Unloading a Cassette The camcorder needs to be powered up to pinch your finger to clear the brightness control indicator from the display. ...
... holder, resulting in the direction of the Display 1 Set the power switch to close the cassette holder cover. Tripod Mounting To attach the camcorder to a tripod, align the direction stud and screw to select "n", and press SET. This will dim LCD screen while recorded image will... not be able to "M" or "PLAY" while pressing down the lock button located on the camcorder. Replace the battery pack with studs. Loading/Unloading a Cassette The camcorder needs to be powered up to pinch your finger to clear the brightness control indicator from the display. ...

Instructions
Page 17
... a Memory Card Both MultiMedia (MMCA) and SecureDigital (SD) cards are not compatible with this may cause the memory card to be corrupted or cause the camcorder to become unable to "LOCK" before loading it . To unload a memory card, push it is necessary to format the card. (੬ pg. 32... a warm environment, wait a short time before loading it . NOTES: ● If you wait a few minutes later, insert it again. ● When the camcorder is suddenly moved from a cold place to "REC" before opening the cassette holder cover. NOTES: ● Some brands of the label. 4 Close the card cover...
... a Memory Card Both MultiMedia (MMCA) and SecureDigital (SD) cards are not compatible with this may cause the memory card to be corrupted or cause the camcorder to become unable to "LOCK" before loading it . To unload a memory card, push it is necessary to format the card. (੬ pg. 32... a warm environment, wait a short time before loading it . NOTES: ● If you wait a few minutes later, insert it again. ● When the camcorder is suddenly moved from a cold place to "REC" before opening the cassette holder cover. NOTES: ● Some brands of the label. 4 Close the card cover...

Instructions
Page 18
... min. 60 min. 90 min. 80 min. 120 min. "- NOTES: ● If the record-standby mode continues for 5 minutes, the camcorder's power shuts off , ੬ pg. 33, 35. ● During recording, sound is in progress.) Power Zoom Lever 1 Remove the lens cap. (੬ pg. 11) 2 Open ... while recording is displayed. ● To record in progress. 6 To stop recording, press the recording start / stop button again. m" means the camcorder is interrupted and errors may vary according to calculate and display the remaining tape length, and the accuracy of a Tape" (੬ pg. 20). ...
... min. 60 min. 90 min. 80 min. 120 min. "- NOTES: ● If the record-standby mode continues for 5 minutes, the camcorder's power shuts off , ੬ pg. 33, 35. ● During recording, sound is in progress.) Power Zoom Lever 1 Remove the lens cap. (੬ pg. 11) 2 Open ... while recording is displayed. ● To record in progress. 6 To stop recording, press the recording start / stop button again. m" means the camcorder is interrupted and errors may vary according to calculate and display the remaining tape length, and the accuracy of a Tape" (੬ pg. 20). ...

Instructions
Page 19
...zoom out Slide the power zoom lever towards "T". This will not occur when "TELE MACRO" is recorded on the distance between the camcorder and the subject. VIDEO RECORDING & PLAYBACK Zooming VIDEO RECORDING EN 19 Journalistic Shooting Produces the zoom in/out effect, or an instantaneous ...change in a previously recorded scene. This means the camcorder may automatically zoom out depending on the tape. Zoom in record mode. ● During digital zoom, the quality of a previously recorded ...
...zoom out Slide the power zoom lever towards "T". This will not occur when "TELE MACRO" is recorded on the distance between the camcorder and the subject. VIDEO RECORDING & PLAYBACK Zooming VIDEO RECORDING EN 19 Journalistic Shooting Produces the zoom in/out effect, or an instantaneous ...change in a previously recorded scene. This means the camcorder may automatically zoom out depending on the tape. Zoom in record mode. ● During digital zoom, the quality of a previously recorded ...

Instructions
Page 20
... 2 Set the VIDEO/MEMORY switch to "VIDEO". 3 Set the power switch to the S/AV connector, the sound is rewound for about 3 minutes, the camcorder's Stop mode is not a malfunction. 20 EN NOTES: ● The time code cannot be viewed in the record-standby mode for the next shot. &#...button located on a connected TV. (੬ pg. 22) ● If Stop mode continues for 5 minutes when power is supplied from a battery, the camcorder shuts off automatically. This is automatically engaged. To turn down the lock button located on again, set to "ON". (੬ pg. 36) Quick Review Enables...
... 2 Set the VIDEO/MEMORY switch to "VIDEO". 3 Set the power switch to the S/AV connector, the sound is rewound for about 3 minutes, the camcorder's Stop mode is not a malfunction. 20 EN NOTES: ● The time code cannot be viewed in the record-standby mode for the next shot. &#...button located on a connected TV. (੬ pg. 22) ● If Stop mode continues for 5 minutes when power is supplied from a battery, the camcorder shuts off automatically. This is automatically engaged. To turn down the lock button located on again, set to "ON". (੬ pg. 36) Quick Review Enables...

Instructions
Page 21
...power switch to select "EXECUTE", and press SET. ● The "BLANK SEARCH" indication appears and the camcorder automatically starts reverse or forward search, then stops at a blank portion, the camcorder searches in the reverse direction. VIDEO PLAYBACK EN 21 NOTES: ● Before starting blank search, if .... The VIDEO menu appears. 6 Press Up (4/9) or Down (8) to select "t". If the current position is at a recorded portion, the camcorder searches in the middle of the detected blank portion. ● To cancel blank search, press 8. The search continues as long as you start...
...power switch to select "EXECUTE", and press SET. ● The "BLANK SEARCH" indication appears and the camcorder automatically starts reverse or forward search, then stops at a blank portion, the camcorder searches in the reverse direction. VIDEO PLAYBACK EN 21 NOTES: ● Before starting blank search, if .... The VIDEO menu appears. 6 Press Up (4/9) or Down (8) to select "t". If the current position is at a recorded portion, the camcorder searches in the middle of the detected blank portion. ● To cancel blank search, press 8. The search continues as long as you start...
Instructions
Page 22
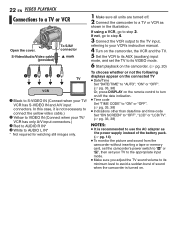
... illustration. S-Video/Audio/Video cable (provided) To S/AV connector mark TV VCR A Black to S-VIDEO IN (Connect when your VCR's instruction manual. 4 Turn on the camcorder, the VCR and the TV. 5 Set the VCR to its AUX (auxiliary) input mode, and set your TV to the appropriate input mode. ● Make... appear on the connected TV ● Date/Time Set "DATE/TIME" to "AUTO", "ON" or "OFF". (੬ pg. 33, 38) Or, press DISPLAY on the remote control to turn on/off . 2 Connect the camcorder to your TV/ VCR has S-VIDEO IN and A/V input connectors. In this case, it is not necessary to...
... illustration. S-Video/Audio/Video cable (provided) To S/AV connector mark TV VCR A Black to S-VIDEO IN (Connect when your VCR's instruction manual. 4 Turn on the camcorder, the VCR and the TV. 5 Set the VCR to its AUX (auxiliary) input mode, and set your TV to the appropriate input mode. ● Make... appear on the connected TV ● Date/Time Set "DATE/TIME" to "AUTO", "ON" or "OFF". (੬ pg. 33, 38) Or, press DISPLAY on the remote control to turn on/off . 2 Connect the camcorder to your TV/ VCR has S-VIDEO IN and A/V input connectors. In this case, it is not necessary to...

Instructions
Page 23
...battery 2 (CR2025). 1 Pull out the battery 1 holder by pushing the lock 1 tab. q S.SHOT Button Functions the same as SNAPSHOT on the camcorder. (Also available with the power switch set to "PLAY") p START/STOP Button Functions the same as the basic operations (playback, stop button on a...2668; pg. 20) ● Starts auto playback of images in a memory card (੬ pg. 26) J FF Button ● Forward/Forward shuttle search on the camcorder. DUB Button (੬ pg. 50) L STOP Button ● Stops the tape (੬ pg. 20) ● Stops auto playback (੬ pg. 26) Down...
...battery 2 (CR2025). 1 Pull out the battery 1 holder by pushing the lock 1 tab. q S.SHOT Button Functions the same as SNAPSHOT on the camcorder. (Also available with the power switch set to "PLAY") p START/STOP Button Functions the same as the basic operations (playback, stop button on a...2668; pg. 20) ● Starts auto playback of images in a memory card (੬ pg. 26) J FF Button ● Forward/Forward shuttle search on the camcorder. DUB Button (੬ pg. 50) L STOP Button ● Stops the tape (੬ pg. 20) ● Stops auto playback (੬ pg. 26) Down...


