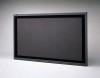
Instruction Manual
Page 3
...; Setting the Remote-Controllable Input 26 • Setting the High-Definition Signal Types .......... 27 • Using the Pixel Shift Function 27 • Using the Power Save Function 28 • Preventing the Afterimage Effect 28 • Refreshing the Screen 29 • Resetting All the Setup Menu Settings 29 • Resetting All the Menu Settings 30 Menu Classifications 31 • Main Menu 31 • Setup Menu 33 Troubleshooting 34 • Self-diagnostic Indication 35 Specifications 36 1 INSTRUCTIONS Model GM-P421U GM-P420UG Thank...
...; Setting the Remote-Controllable Input 26 • Setting the High-Definition Signal Types .......... 27 • Using the Pixel Shift Function 27 • Using the Power Save Function 28 • Preventing the Afterimage Effect 28 • Refreshing the Screen 29 • Resetting All the Setup Menu Settings 29 • Resetting All the Menu Settings 30 Menu Classifications 31 • Main Menu 31 • Setup Menu 33 Troubleshooting 34 • Self-diagnostic Indication 35 Specifications 36 1 INSTRUCTIONS Model GM-P421U GM-P420UG Thank...

Instruction Manual
Page 4
... R (9 AUDIO IN RGB A RS-232C REMOTE MAKE WIRED OUT L R AUDIO OPTION SPEAKER OUT L (9 AC IN POWER - The product may result in a residential installation. This equipment generates, uses and can radiate radio frequency energy and, if not installed and used in a commercial environment. Safety Precautions FCC NOTICE s GM-P420UG CAUTION: Changes or modifications not approved by one or more of the following basic rules for its installation, use a mount...
... R (9 AUDIO IN RGB A RS-232C REMOTE MAKE WIRED OUT L R AUDIO OPTION SPEAKER OUT L (9 AC IN POWER - The product may result in a residential installation. This equipment generates, uses and can radiate radio frequency energy and, if not installed and used in a commercial environment. Safety Precautions FCC NOTICE s GM-P420UG CAUTION: Changes or modifications not approved by one or more of the following basic rules for its installation, use a mount...

Instruction Manual
Page 5
... touch the handles on other hazards. Use only the power cord designated to prevent shock. - Do not overload wall outlets, extension cords, or convenience receptacles on the rear soon after many hours of any service or repairs to this product through openings as this product to ensure Safety regulations of the grounded plug. - Unplug this product yourself as an improper adjustment...
... touch the handles on other hazards. Use only the power cord designated to prevent shock. - Do not overload wall outlets, extension cords, or convenience receptacles on the rear soon after many hours of any service or repairs to this product through openings as this product to ensure Safety regulations of the grounded plug. - Unplug this product yourself as an improper adjustment...

Instruction Manual
Page 6
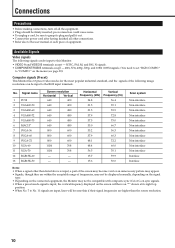
..., color system (for VIDEO A or VIDEO B input), scan system (for COMPONENT input) and horizontal/vertical frequency (for RGB A and RGB B input). Pressing the button again will move you press the button, the aspect ratio changes as a wired remote control. 2 DISPLAY button (page 14) Use this button to display or erase menus. correctly on /off the volume immediately. buttons (page 14) Use these buttons to turn off the power. 9 VOLUME + / - Each time you one screen back to the preceding menu. 6 Remote signal transmission window...
..., color system (for VIDEO A or VIDEO B input), scan system (for COMPONENT input) and horizontal/vertical frequency (for RGB A and RGB B input). Pressing the button again will move you press the button, the aspect ratio changes as a wired remote control. 2 DISPLAY button (page 14) Use this button to display or erase menus. correctly on /off the volume immediately. buttons (page 14) Use these buttons to turn off the power. 9 VOLUME + / - Each time you one screen back to the preceding menu. 6 Remote signal transmission window...

Instruction Manual
Page 7
When the Monitor is turned on and off the Monitor. 5 Monitor: Front View 1 2 MENU INPUT POWER MENU INPUT POWER Bottom View 3 45 6 1 Remote sensor/power lamp Point the front end of the wireless remote control toward here. To select the COMPONENT or RGB B input, you can use the 2 / 3 buttons to adjust the volume level. 4 MENU button Use this button to display or erase menus. It glows orange in standby mode. 2 Self-diagnostic lamps (page 35) These lamps light/flash if something...
When the Monitor is turned on and off the Monitor. 5 Monitor: Front View 1 2 MENU INPUT POWER MENU INPUT POWER Bottom View 3 45 6 1 Remote sensor/power lamp Point the front end of the wireless remote control toward here. To select the COMPONENT or RGB B input, you can use the 2 / 3 buttons to adjust the volume level. 4 MENU button Use this button to display or erase menus. It glows orange in standby mode. 2 Self-diagnostic lamps (page 35) These lamps light/flash if something...

Instruction Manual
Page 8
... the control method using the POWER button either on the remote control or on the Monitor. 7 SPEAKER OUT L/R terminals (page 11) Connect external speakers. 6 Parts Identification (Continued) Monitor: Rear Views 7 SPEAKER OUT R (9 SPEAKER OUT L (9 1 2 3 4 5 6 AUDIO IN RGB A RS-232C REMOTE MAKE WIRED OUT L R AUDIO OPTION AC IN POWER 1 RGB A input terminals (page 11) • D-sub, 15 pin Connect to the video output terminal of a personal computer. • AUDIO IN (stereo mini jack) Connect to the audio output terminal...
... the control method using the POWER button either on the remote control or on the Monitor. 7 SPEAKER OUT L/R terminals (page 11) Connect external speakers. 6 Parts Identification (Continued) Monitor: Rear Views 7 SPEAKER OUT R (9 SPEAKER OUT L (9 1 2 3 4 5 6 AUDIO IN RGB A RS-232C REMOTE MAKE WIRED OUT L R AUDIO OPTION AC IN POWER 1 RGB A input terminals (page 11) • D-sub, 15 pin Connect to the video output terminal of a personal computer. • AUDIO IN (stereo mini jack) Connect to the audio output terminal...

Instruction Manual
Page 11
... a stand Front View Side View 200 (77/8) 50 (2) 150 (415/16 ) 150 (415/16 ) Wall MENU INPUT POWER 50 (2) Unit: mm (inch) Take measures against the Monitor from overturning: To protect against abnormal events such as near the ceiling, the remote control may be sure to use a dedicated Stand Unit, Wall Mounting Unit, or Monitor Hanger Unit, depending on the screen. should be continuously displayed on the wall Front View...
... a stand Front View Side View 200 (77/8) 50 (2) 150 (415/16 ) 150 (415/16 ) Wall MENU INPUT POWER 50 (2) Unit: mm (inch) Take measures against the Monitor from overturning: To protect against abnormal events such as near the ceiling, the remote control may be sure to use a dedicated Stand Unit, Wall Mounting Unit, or Monitor Hanger Unit, depending on the screen. should be continuously displayed on the wall Front View...
Instruction Manual
Page 12
... mode signal is input, the vertical frequency displayed on the menu (see page 23). to set "RGB/COMPO." on the screen will become thin if their signal frequencies are higher than listed above is input, a part of the screen may become void or an unnecessary picture may appear. • Signals, though they are input, lines will have an "*" shown at its plug and pull it out. • Connect the power cord after...
... mode signal is input, the vertical frequency displayed on the menu (see page 23). to set "RGB/COMPO." on the screen will become thin if their signal frequencies are higher than listed above is input, a part of the screen may become void or an unnecessary picture may appear. • Signals, though they are input, lines will have an "*" shown at its plug and pull it out. • Connect the power cord after...

Instruction Manual
Page 21
... after you press the button, the color temperature alternates between "HIGH" and "LOW." PICTURE MODE ASPECT SIGNAL MODE RGB/COMPO. This is normal but not a malfunction. 19 Adjusting the Color Temperature The adjusted setting applies to all inputs. 1 Press MENU/EXIT (or MENU on the Monitor) twice to exit from the menu operations. Cursor (3) MAIN MENU PICTURE ADJ. SIZE/POSITION ADJ. reset : HIGH* : STILL : PANORAMIC : AUTO : COMPO. If you keep pressing 5/∞, you...
... after you press the button, the color temperature alternates between "HIGH" and "LOW." PICTURE MODE ASPECT SIGNAL MODE RGB/COMPO. This is normal but not a malfunction. 19 Adjusting the Color Temperature The adjusted setting applies to all inputs. 1 Press MENU/EXIT (or MENU on the Monitor) twice to exit from the menu operations. Cursor (3) MAIN MENU PICTURE ADJ. SIZE/POSITION ADJ. reset : HIGH* : STILL : PANORAMIC : AUTO : COMPO. If you keep pressing 5/∞, you...

Instruction Manual
Page 24
... RGB input (either RGB A or RGB B) is selected: AUTO 480i 576i 1080i (1035i)* 720p 480p * Changes according to the "HD SIGNAL MODE" setting (see page 27). 6 Press MENU/EXIT (or MENU on the Monitor) to display the Function Selection Menu. 5 5 DISPLAY ASPECT POWER VIDEO A VIDEO B COMPO. reset : COMPO. *2 ADJUST: SELECT: EXIT: MENU 4 Press 5/∞ to move the cursor (3) to "FUNCTION SELECT." 3 Press 3 to display the Main Menu. RGB A RGB B MUTING VOLUME MENU/EXIT MENU/EXIT RM-C576 REMOTE CONTROL UNIT 2 / 3 5 / *1 "PICTURE MODE...
... RGB input (either RGB A or RGB B) is selected: AUTO 480i 576i 1080i (1035i)* 720p 480p * Changes according to the "HD SIGNAL MODE" setting (see page 27). 6 Press MENU/EXIT (or MENU on the Monitor) to display the Function Selection Menu. 5 5 DISPLAY ASPECT POWER VIDEO A VIDEO B COMPO. reset : COMPO. *2 ADJUST: SELECT: EXIT: MENU 4 Press 5/∞ to move the cursor (3) to "FUNCTION SELECT." 3 Press 3 to display the Main Menu. RGB A RGB B MUTING VOLUME MENU/EXIT MENU/EXIT RM-C576 REMOTE CONTROL UNIT 2 / 3 5 / *1 "PICTURE MODE...

Instruction Manual
Page 27
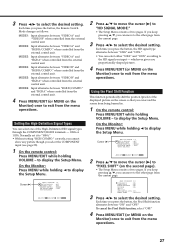
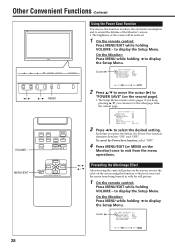
... changing the input mode. 1 On the remote control: Press MENU/EXIT while holding 2 to display the Setup Menu. This may be shown (GM-P420UG). 4 Press MENU/EXIT (or MENU on the Monitor) once to exit from the current page. 3 Press 2/3 to the hours of use the monitor within one hour unit. On the Monitor: Press MENU while holding VOLUME - to display the Setup Menu. SET-UP MENU 2/2 PIXEL SHIFT : ON POWER SAVE : ON COLOR-REVERSE : ON REFRESH : ON reset all reset...
... changing the input mode. 1 On the remote control: Press MENU/EXIT while holding 2 to display the Setup Menu. This may be shown (GM-P420UG). 4 Press MENU/EXIT (or MENU on the Monitor) once to exit from the current page. 3 Press 2/3 to the hours of use the monitor within one hour unit. On the Monitor: Press MENU while holding VOLUME - to display the Setup Menu. SET-UP MENU 2/2 PIXEL SHIFT : ON POWER SAVE : ON COLOR-REVERSE : ON REFRESH : ON reset all reset...

Instruction Manual
Page 28
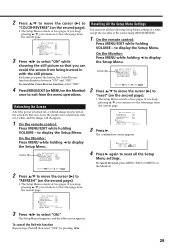
... 2 to use , the following operations are possible: - On the Monitor: Press MENU while holding VOLUME - If you keep pressing 5/∞, you press the button, the Control Lock function alternates between "ON" and "OFF." If you keep pressing 5/∞, you can select from the remote control Setting the Remote-Controllable Input When connecting the external control unit to the REMOTE MAKE terminal, you need to set the desired input to display the Setup Menu. MENU/EXIT 5 5 MENU INPUT POWER MENU INPUT POWER 5 / MENU DISPLAY ASPECT POWER VIDEO A VIDEO...
... 2 to use , the following operations are possible: - On the Monitor: Press MENU while holding VOLUME - If you keep pressing 5/∞, you press the button, the Control Lock function alternates between "ON" and "OFF." If you keep pressing 5/∞, you can select from the remote control Setting the Remote-Controllable Input When connecting the external control unit to the REMOTE MAKE terminal, you need to set the desired input to display the Setup Menu. MENU/EXIT 5 5 MENU INPUT POWER MENU INPUT POWER 5 / MENU DISPLAY ASPECT POWER VIDEO A VIDEO...
Instruction Manual
Page 29
... the external control unit. 4 Press MENU/EXIT (or MENU on the Monitor) once to "1080i." • Without setting "RGB/COMPO." SET-UP MENU 2/2 PIXEL SHIFT : ON POWER SAVE : ON COLOR-REVERSE : ON REFRESH : ON reset all reset HOUR METER x100h : 001 MODEL NAME : GM-P421U 3 Press 2/3 to display the Setup Menu. Each time you proportionally shaped pictures. 4 Press MENU/EXIT (or MENU on the screen so that you input - Cursor (3) SET-UP MENU STATUS DISPLAY CONTROL LOCK REMOTE SWITCH HD SIGNAL MODE WHITE BALANCE 1/2 : OFF...
... the external control unit. 4 Press MENU/EXIT (or MENU on the Monitor) once to "1080i." • Without setting "RGB/COMPO." SET-UP MENU 2/2 PIXEL SHIFT : ON POWER SAVE : ON COLOR-REVERSE : ON REFRESH : ON reset all reset HOUR METER x100h : 001 MODEL NAME : GM-P421U 3 Press 2/3 to display the Setup Menu. Each time you proportionally shaped pictures. 4 Press MENU/EXIT (or MENU on the screen so that you input - Cursor (3) SET-UP MENU STATUS DISPLAY CONTROL LOCK REMOTE SWITCH HD SIGNAL MODE WHITE BALANCE 1/2 : OFF...
Instruction Manual
Page 30
... MENU/EXIT while holding VOLUME - Cursor (3) SET-UP MENU STATUS DISPLAY CONTROL LOCK REMOTE SWITCH HD SIGNAL MODE WHITE BALANCE 1/2 : OFF : OFF : MODE1 : 1080i ADJUST: SELECT: EXIT: MENU 28 If you keep pressing 5/∞, you press the button, the Power Save function alternates between "ON" and "OFF." to select the desired setting. SET-UP MENU 2/2 PIXEL SHIFT : ON POWER SAVE : ON COLOR-REVERSE : ON REFRESH : ON reset all reset HOUR METER x100h : 001 MODEL NAME : GM-P421U 3 Press 2/3 to display the Setup Menu...
... MENU/EXIT while holding VOLUME - Cursor (3) SET-UP MENU STATUS DISPLAY CONTROL LOCK REMOTE SWITCH HD SIGNAL MODE WHITE BALANCE 1/2 : OFF : OFF : MODE1 : 1080i ADJUST: SELECT: EXIT: MENU 28 If you keep pressing 5/∞, you press the button, the Power Save function alternates between "ON" and "OFF." to select the desired setting. SET-UP MENU 2/2 PIXEL SHIFT : ON POWER SAVE : ON COLOR-REVERSE : ON REFRESH : ON reset all reset HOUR METER x100h : 001 MODEL NAME : GM-P421U 3 Press 2/3 to display the Setup Menu...
Instruction Manual
Page 31
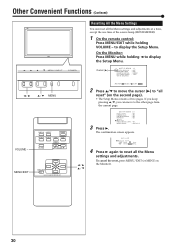
... the power is turned off, a whitish image may be left on the Monitor) once to "reset" (on the second page). • The Setup Menu consists of the source lamp (HOUR METER). 1 On the remote control: Press MENU/EXIT while holding 2 to reset all the following Setup Menu settings at a time, except the use time of two pages. On the Monitor: Press MENU while holding VOLUME - Cursor (3) SET-UP MENU STATUS DISPLAY CONTROL LOCK REMOTE SWITCH HD SIGNAL MODE WHITE...
... the power is turned off, a whitish image may be left on the Monitor) once to "reset" (on the second page). • The Setup Menu consists of the source lamp (HOUR METER). 1 On the remote control: Press MENU/EXIT while holding 2 to reset all the following Setup Menu settings at a time, except the use time of two pages. On the Monitor: Press MENU while holding VOLUME - Cursor (3) SET-UP MENU STATUS DISPLAY CONTROL LOCK REMOTE SWITCH HD SIGNAL MODE WHITE...
Instruction Manual
Page 32
... reset HOUR METER x100h : 001 MODEL NAME : GM-P421U 3 Press 3. The confirmation screen appears. On the Monitor: Press MENU while holding VOLUME - SET-UP MENU 2/2 PIXEL SHIFT : ON POWER SAVE : ON COLOR-REVERSE : ON REFRESH : ON reset all the Menu settings and adjustments at a time, except the use time of two pages. Other Convenient Functions (Continued) MENU INPUT POWER MENU INPUT POWER Resetting All the Menu Settings You can move the cursor (3) to display the Setup Menu. Cursor (3) SET-UP MENU STATUS DISPLAY CONTROL LOCK REMOTE SWITCH HD SIGNAL MODE WHITE...
... reset HOUR METER x100h : 001 MODEL NAME : GM-P421U 3 Press 3. The confirmation screen appears. On the Monitor: Press MENU while holding VOLUME - SET-UP MENU 2/2 PIXEL SHIFT : ON POWER SAVE : ON COLOR-REVERSE : ON REFRESH : ON reset all the Menu settings and adjustments at a time, except the use time of two pages. Other Convenient Functions (Continued) MENU INPUT POWER MENU INPUT POWER Resetting All the Menu Settings You can move the cursor (3) to display the Setup Menu. Cursor (3) SET-UP MENU STATUS DISPLAY CONTROL LOCK REMOTE SWITCH HD SIGNAL MODE WHITE...

Instruction Manual
Page 35
....) Sets the Monitor so that it cannot be shown (GM-P420UG). STATUS DISPLAY CONTROL LOCK REMOTE SWITCH HD SIGNAL MODE WHITE BALANCE PIXEL SHIFT POWER SAVE COLOR-REVERSE REFRESH reset all reset Are you sure? B GAIN - : 000 + :+001 + :-002 + reset Are you sure? "YES" then key. "NO" then MENU key. * The model name shown on the screen. (See page 29.) Resets the Setup Menu settings to defaults. (See page 29.) Resets the all reset HOUR METER x100h : 001 MODEL NAME : GM-P421U ADJUST...
....) Sets the Monitor so that it cannot be shown (GM-P420UG). STATUS DISPLAY CONTROL LOCK REMOTE SWITCH HD SIGNAL MODE WHITE BALANCE PIXEL SHIFT POWER SAVE COLOR-REVERSE REFRESH reset all reset Are you sure? B GAIN - : 000 + :+001 + :-002 + reset Are you sure? "YES" then key. "NO" then MENU key. * The model name shown on the screen. (See page 29.) Resets the Setup Menu settings to defaults. (See page 29.) Resets the all reset HOUR METER x100h : 001 MODEL NAME : GM-P421U ADJUST...

Instruction Manual
Page 36
...;Is brightness adjusted correctly? •Adjust BRIGHT (brightness) using the menu. •Is picture quality (colour density, etc.) •Adjust PICTURE using the menu. Symptom Probable cause Power is not supplied. • Is the power cord disconnected? •Is the POWER switch turned on the Monitor). •Connect the devices correctly. between the remote control and remote sensor? •Is the Monitor too far away from the connected devices? •Is "RGB/COMPO." "TEMP. "AUTO." •Are signals (scanning frequency...
...;Is brightness adjusted correctly? •Adjust BRIGHT (brightness) using the menu. •Is picture quality (colour density, etc.) •Adjust PICTURE using the menu. Symptom Probable cause Power is not supplied. • Is the power cord disconnected? •Is the POWER switch turned on the Monitor). •Connect the devices correctly. between the remote control and remote sensor? •Is the Monitor too far away from the connected devices? •Is "RGB/COMPO." "TEMP. "AUTO." •Are signals (scanning frequency...
Instruction Manual
Page 37
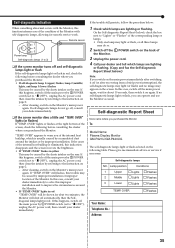
... the AC power cord, then clean the intakes by improper installation or improper location of the internal heat buildup is usually caused by accumulated dust around the Monitor. • If "TEMP. After cleaning, switch on the Monitor's main power again. Self-diagnostic Report Sheet Store name where you purchased the Monitor To Model Name: Plasma Display Monitor GM-P421U/GM-P420UG The self-diagnostic lamps light or flash as...
... the AC power cord, then clean the intakes by improper installation or improper location of the internal heat buildup is usually caused by accumulated dust around the Monitor. • If "TEMP. After cleaning, switch on the Monitor's main power again. Self-diagnostic Report Sheet Store name where you purchased the Monitor To Model Name: Plasma Display Monitor GM-P421U/GM-P420UG The self-diagnostic lamps light or flash as...
Instruction Manual
Page 40
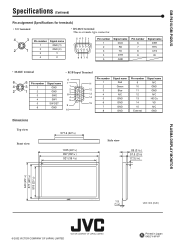
... Pin number Signal name Pin number Signal name 11 1 2 12 3 13 4 14 5 Red Green Blue N/C GND 9 N/C 10 GND 11 GND 12 N/C 13 HD/Cs 15 6 GND 14 VD 7 GND 15 N/C 8 GND External GND Dimensions Top view Front view 577.6 (223/4) 1035 (403/4) 997 (393/8 ) 921 (36 3/8) Side view 89 (3 5/8 ) 57.5 (2 3/8) 17.3 ( 3/4) PLASMA DISPLAY MONITOR 640 (251/4) 577 (22 3/4) 518 (201/2) MENU INPUT POWER 1.5 (1/16) Unit: mm (inch...
... Pin number Signal name Pin number Signal name 11 1 2 12 3 13 4 14 5 Red Green Blue N/C GND 9 N/C 10 GND 11 GND 12 N/C 13 HD/Cs 15 6 GND 14 VD 7 GND 15 N/C 8 GND External GND Dimensions Top view Front view 577.6 (223/4) 1035 (403/4) 997 (393/8 ) 921 (36 3/8) Side view 89 (3 5/8 ) 57.5 (2 3/8) 17.3 ( 3/4) PLASMA DISPLAY MONITOR 640 (251/4) 577 (22 3/4) 518 (201/2) MENU INPUT POWER 1.5 (1/16) Unit: mm (inch...


