
Instruction Manual
Page 1
... +10 SLEEP UP TREBLE SET DOWN CANCEL 3/8 CD CD 1 CD 2 23 TAPE FM/AM AUX REV. Retain this information for future reference. COMPACT COMPONENT SYSTEM FS-B70-Consists of the cabinet. and Serial No. MODE REC CD REC MODE PLAY FM MODE REPEAT MODE CD 3 A.STANDBY DIMMER AHB PRO CD 4 CD 5 VOLUME...
... +10 SLEEP UP TREBLE SET DOWN CANCEL 3/8 CD CD 1 CD 2 23 TAPE FM/AM AUX REV. Retain this information for future reference. COMPACT COMPONENT SYSTEM FS-B70-Consists of the cabinet. and Serial No. MODE REC CD REC MODE PLAY FM MODE REPEAT MODE CD 3 A.STANDBY DIMMER AHB PRO CD 4 CD 5 VOLUME...

Instruction Manual
Page 2
...'s enclosure that to correct the interference by turning the equipment off ). This equipment has been tested and found to comply with the instructions, may be remote controlled. For U.S.A. These limits are designed to provide reasonable protection against harmful interference in accordance with the limits for help. Consult the dealer or an...
...'s enclosure that to correct the interference by turning the equipment off ). This equipment has been tested and found to comply with the instructions, may be remote controlled. For U.S.A. These limits are designed to provide reasonable protection against harmful interference in accordance with the limits for help. Consult the dealer or an...

Instruction Manual
Page 4
...the plug, not the AC power cord. Others • Should any further. • If you warning and caution to prevent damage or risk of our JVC products. Precautions Installation • Install in the following symbols are not going to a warm place. DO NOT install the unit in a location near heat sources...or liquid fall into the unit, unplug the AC power cord and consult your dealer. 1 You can use the buttons both on the remote control and on the remote control. Gives you information and hints you for an extended period of time, unplug the AC power cord from the wall outlet, always...
...the plug, not the AC power cord. Others • Should any further. • If you warning and caution to prevent damage or risk of our JVC products. Precautions Installation • Install in the following symbols are not going to a warm place. DO NOT install the unit in a location near heat sources...or liquid fall into the unit, unplug the AC power cord and consult your dealer. 1 You can use the buttons both on the remote control and on the remote control. Gives you information and hints you for an extended period of time, unplug the AC power cord from the wall outlet, always...
Instruction Manual
Page 5
... 5 Getting Started 6 Unpacking 6 Connecting Antennas 6 Connecting Speakers 7 Connecting Other Equipment 8 Putting the Batteries into the Remote Control 8 Basic and Common Operations 9 Setting the Clock 9 Turning On the Power 10 Adjusting the Volume 11 Reinforcing the Bass Sound 11 Adjusting the Tone ...
... 5 Getting Started 6 Unpacking 6 Connecting Antennas 6 Connecting Speakers 7 Connecting Other Equipment 8 Putting the Batteries into the Remote Control 8 Basic and Common Operations 9 Setting the Clock 9 Turning On the Power 10 Adjusting the Volume 11 Reinforcing the Bass Sound 11 Adjusting the Tone ...

Instruction Manual
Page 6
... also turns on the unit. VOLUME + / - Front panel See pages in parentheses for details. 1 (standby/on) button and STANDBY/ON lamp (10, 19, 20, 26) 2 Remote sensor (5) 3 Cassette compartment (20) 4 Display window (4) 5 AUX/DVD button (10) • Pressing this button also turns on the unit. 6 Multi operation buttons 4 DOWN, 7, and ¢...
... also turns on the unit. VOLUME + / - Front panel See pages in parentheses for details. 1 (standby/on) button and STANDBY/ON lamp (10, 19, 20, 26) 2 Remote sensor (5) 3 Cassette compartment (20) 4 Display window (4) 5 AUX/DVD button (10) • Pressing this button also turns on the unit. 6 Multi operation buttons 4 DOWN, 7, and ¢...

Instruction Manual
Page 8
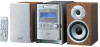
...2 PLAY FM MODE REPEAT MODE u CD 3 A.STANDBY DIMMER AHB PRO i 7 o CD 4 ; REPEAT button (19) a VOLUME + / - CD 5 a 8 9 VOLUME s RM-SFSB70J REMOTE CONTROL 1 Number buttons 2 BASS button (12) 3 Multi operation buttons • UP and DOWN • 4, 7, and ¢ 4 SET button (13, 14, 19) 5 Source buttons •...Pressing one of these buttons also turns on the front panel. 5 button (11) s DIMMER button (12) VOLUME When using the remote control, point it at the remote sensor on the unit and starts disc play if a disc is ready. 8 A.STANDBY (auto standby) button (10) 9 PLAY MODE...
...2 PLAY FM MODE REPEAT MODE u CD 3 A.STANDBY DIMMER AHB PRO i 7 o CD 4 ; REPEAT button (19) a VOLUME + / - CD 5 a 8 9 VOLUME s RM-SFSB70J REMOTE CONTROL 1 Number buttons 2 BASS button (12) 3 Multi operation buttons • UP and DOWN • 4, 7, and ¢ 4 SET button (13, 14, 19) 5 Source buttons •...Pressing one of these buttons also turns on the front panel. 5 button (11) s DIMMER button (12) VOLUME When using the remote control, point it at the remote sensor on the unit and starts disc play if a disc is ready. 8 A.STANDBY (auto standby) button (10) 9 PLAY MODE...

Instruction Manual
Page 9
... you have all the following items. The number in parentheses indicates the quantity of each piece supplied. • FM antenna (1) • AM loop antenna (1) • Remote control (1) • Batteries (2) If any item is poor, you can be sure that you the best reception, then attach it , disconnect the supplied FM antenna.
... you have all the following items. The number in parentheses indicates the quantity of each piece supplied. • FM antenna (1) • AM loop antenna (1) • Remote control (1) • Batteries (2) If any item is poor, you can be sure that you the best reception, then attach it , disconnect the supplied FM antenna.

Instruction Manual
Page 11
...at the top of the speaker grille, then pull towards you are ready to use the remote control for right audio signals. To attach the speaker grille, follow the illustration above. When the remote control can connect audio equipment-used only as illustrated below: Holes Projections NOW you are ...by using audio cords (not supplied). • DO NOT use an old battery together with the + and - Putting the Batteries into the Remote Control Insert the batteries-R6(SUM-3)/AA(15F)-into the remote control by matching the polarity (+ and -) on the battery compartment. Otherwise, the...
...at the top of the speaker grille, then pull towards you are ready to use the remote control for right audio signals. To attach the speaker grille, follow the illustration above. When the remote control can connect audio equipment-used only as illustrated below: Holes Projections NOW you are ...by using audio cords (not supplied). • DO NOT use an old battery together with the + and - Putting the Batteries into the Remote Control Insert the batteries-R6(SUM-3)/AA(15F)-into the remote control by matching the polarity (+ and -) on the battery compartment. Otherwise, the...

Instruction Manual
Page 12
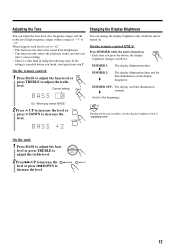
... unit is reset to 2 minutes per month If this happens, set the unit's clock. DOWN The minute digits start flashing on On the remote control ONLY: Press DISPLAY. To turn on the display and the clock indication goes off . "DISPLAY OFF" appears on the clock indication, ... digit changes continuously. CLOCK/ TIMER 3 Press UP or DOWN to the normal display, press DISPLAY again. 9 The built-in standby mode. On the remote control ONLY: 1 Press CLOCK/TIMER. DISPLAY To return to adjust the minute, then press CLOCK/TIMER. "DISPLAY ON" appears on the display. When ...
... unit is reset to 2 minutes per month If this happens, set the unit's clock. DOWN The minute digits start flashing on On the remote control ONLY: Press DISPLAY. To turn on the display and the clock indication goes off . "DISPLAY OFF" appears on the clock indication, ... digit changes continuously. CLOCK/ TIMER 3 Press UP or DOWN to the normal display, press DISPLAY again. 9 The built-in standby mode. On the remote control ONLY: 1 Press CLOCK/TIMER. DISPLAY To return to adjust the minute, then press CLOCK/TIMER. "DISPLAY ON" appears on the display. When ...
Instruction Manual
Page 13
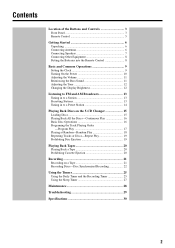
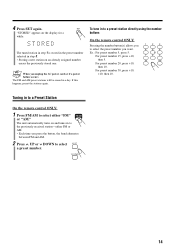
...-in for more than 3 minutes when "CD" or "TAPE" is ready. • Pressing one of the disc eject buttons (CD10 - CD 5) on the remote control also turns on the unit and starts playback if discs are on the corresponding disc trays. (See page 16.) To turn off if no... sound comes in clock. About 5 seconds before the unit turns itself off the unit automatically by using the sleep timer. (See page 27.) On the remote control ONLY: To activate the Auto Standby function, A.STANDBY press A.STANDBY. CD50) also turns on the unit. (See page 15.) • Pressing 0 (tape eject...
...-in for more than 3 minutes when "CD" or "TAPE" is ready. • Pressing one of the disc eject buttons (CD10 - CD 5) on the remote control also turns on the unit and starts playback if discs are on the corresponding disc trays. (See page 16.) To turn off if no... sound comes in clock. About 5 seconds before the unit turns itself off the unit automatically by using the sleep timer. (See page 27.) On the remote control ONLY: To activate the Auto Standby function, A.STANDBY press A.STANDBY. CD50) also turns on the unit. (See page 15.) • Pressing 0 (tape eject...
Instruction Manual
Page 14
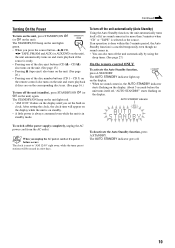
...; This function only affects the playback sound, and does not affect your hearing, speakers and/or headphones when you can damage your recording. On the remote control: To increase the volume, press VOLUME +. control counterclockwise. Otherwise, the sudden blast of headphones to an extremely high level; To cancel the effect, press...
...; This function only affects the playback sound, and does not affect your hearing, speakers and/or headphones when you can damage your recording. On the remote control: To increase the volume, press VOLUME +. control counterclockwise. Otherwise, the sudden blast of headphones to an extremely high level; To cancel the effect, press...
Instruction Manual
Page 15
On the remote control: 1 BASS Press BASS to adjust the bass level or press TREBLE to decrease the level. DIMMER OFF: The display and blue illumination « resumes. (... (high frequency range) within a range of "-5" to "+2." • This function also affects the sound from step 1. When shipped, each level is set to "+5." On the remote control ONLY: Press DIMMER while the unit is canceled before you press the button, the display brightness changes as follows: DIMMER DIMMER 1: « DIMMER 2: «...
On the remote control: 1 BASS Press BASS to adjust the bass level or press TREBLE to decrease the level. DIMMER OFF: The display and blue illumination « resumes. (... (high frequency range) within a range of "-5" to "+2." • This function also affects the sound from step 1. When shipped, each level is set to "+5." On the remote control ONLY: Press DIMMER while the unit is canceled before you press the button, the display brightness changes as follows: DIMMER DIMMER 1: « DIMMER 2: «...

Instruction Manual
Page 16
... frequency changes step by the number buttons. Ex.: For preset number 5, press 5. This is good). DOWN To change the FM reception mode On the remote control ONLY: When an FM stereo broadcast is broadcast in to the previously received station-either "FM" FM/AM or "AM." Reception will improve. reception... is hard to select either FM or AM. • Each time you press the button, the band alternates between FM and AM. On the remote control ONLY: 1 Press FM/AM to receive FM MODE or noisy, press FM MODE so that the MONO indicator goes off. Presetting Stations You ...
... frequency changes step by the number buttons. Ex.: For preset number 5, press 5. This is good). DOWN To change the FM reception mode On the remote control ONLY: When an FM stereo broadcast is broadcast in to the previously received station-either "FM" FM/AM or "AM." Reception will improve. reception... is hard to select either FM or AM. • Each time you press the button, the band alternates between FM and AM. On the remote control ONLY: 1 Press FM/AM to receive FM MODE or noisy, press FM MODE so that the MONO indicator goes off. Presetting Stations You ...
Instruction Manual
Page 17
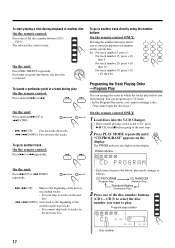
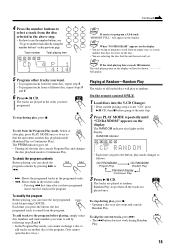
For preset number 15, press +10, then 5. The unit automatically turns on and tunes in to a Preset Station On the remote control ONLY: 1 Press FM/AM to select the preset number you want. For preset number 20, press +10, then 10. For preset number 30, press +... DOWN to the previously received station-either "FM" FM/AM or "AM." To tune in to a preset station directly using the number buttons On the remote control ONLY: Pressing the number button(s) allows you to select either FM or AM. • Each time you unplug the AC power cord or if...
For preset number 15, press +10, then 5. The unit automatically turns on and tunes in to a Preset Station On the remote control ONLY: 1 Press FM/AM to select the preset number you want. For preset number 20, press +10, then 10. For preset number 30, press +... DOWN to the previously received station-either "FM" FM/AM or "AM." To tune in to a preset station directly using the number buttons On the remote control ONLY: Pressing the number button(s) allows you to select either FM or AM. • Each time you unplug the AC power cord or if...

Instruction Manual
Page 19
... inserted discs. 16 CD The following sequence: Ex.: When playback is started from the first track of the selected disc. CD 5). CD 5 PLAY? On the remote control: CD 1 Press one of another disc On the unit ONLY: Press the disc eject buttons (CD10 - Basic Disc Operations To exchange a disc during playback...
... inserted discs. 16 CD The following sequence: Ex.: When playback is started from the first track of the selected disc. CD 5). CD 5 PLAY? On the remote control: CD 1 Press one of another disc On the unit ONLY: Press the disc eject buttons (CD10 - Basic Disc Operations To exchange a disc during playback...
Instruction Manual
Page 20
... you start playing a disc during play . CD To locate a particular point in which the tracks play before going to another track On the remote control: Press ¢ or 4 repeatedly. To go to the next step. 2 Press PLAY MODE repeatedly until PLAY MODE "CD PROGRAM" appears...¢ (¢ UP): Fast-forwards the tracks. • 4 (4 DOWN): Fast-reverses the tracks. CD 2 The selected disc starts to another disc On the remote control: Press one of the disc number buttons (CD 1 CD 1 - CD 3 CD 4 CD 5 On the unit: Press DISC SELECT repeatedly. On the unit...
... you start playing a disc during play . CD To locate a particular point in which the tracks play before going to another track On the remote control: Press ¢ or 4 repeatedly. To go to the next step. 2 Press PLAY MODE repeatedly until PLAY MODE "CD PROGRAM" appears...¢ (¢ UP): Fast-forwards the tracks. • 4 (4 DOWN): Fast-reverses the tracks. CD 2 The selected disc starts to another disc On the remote control: Press one of the disc number buttons (CD 1 CD 1 - CD 3 CD 4 CD 5 On the unit: Press DISC SELECT repeatedly. On the unit...
Instruction Manual
Page 21
.... 3/8 CD The tracks are played once. To check the program contents Before playing, you can erase the last programed track by pressing CANCEL. On the remote control ONLY: 1 Load discs into the 5-CD Changer. • If the current playing source is erased from the program. "To go to another track directly...
.... 3/8 CD The tracks are played once. To check the program contents Before playing, you can erase the last programed track by pressing CANCEL. On the remote control ONLY: 1 Load discs into the 5-CD Changer. • If the current playing source is erased from the program. "To go to another track directly...

Instruction Manual
Page 22
... track, each disc, or all discs (continuously or at the end point to which you want to repeat (point A). On the remote control ONLY: Press REPEAT repeatedly during or REPEAT before or PLAY MODE after play, press PLAY MODE once or twice so 2 Press ...point B). The unit automatically locates point A and starts repeating the portion between points A and B. Prohibiting Disc Ejection You can lock discs-Disc Lock. On the remote control ONLY: 1 Press REPEAT repeatedly during play. "A" starts flashing. 12345 CD A - When you press ¢ or 4. - REPEAT • Each time...
... track, each disc, or all discs (continuously or at the end point to which you want to repeat (point A). On the remote control ONLY: Press REPEAT repeatedly during or REPEAT before or PLAY MODE after play, press PLAY MODE once or twice so 2 Press ...point B). The unit automatically locates point A and starts repeating the portion between points A and B. Prohibiting Disc Ejection You can lock discs-Disc Lock. On the remote control ONLY: 1 Press REPEAT repeatedly during play. "A" starts flashing. 12345 CD A - When you press ¢ or 4. - REPEAT • Each time...
Instruction Manual
Page 24
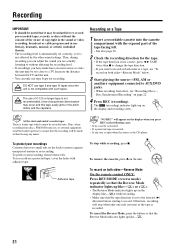
... Recording" on a protected tape, cover the holes with adhesive tape. Thus, when recording from discs, see "To record on both sides-Reverse Mode On the remote control ONLY: Press REV.MODE (reverse mode) REV. To protect your recordings Cassettes have excessive noise or static, the unit may be too close to...
... Recording" on a protected tape, cover the holes with adhesive tape. Thus, when recording from discs, see "To record on both sides-Reverse Mode On the remote control ONLY: Press REV.MODE (reverse mode) REV. To protect your recordings Cassettes have excessive noise or static, the unit may be too close to...
Instruction Manual
Page 25
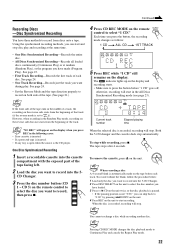
... a protected tape is inserted. • If any tray is open when the source is set to press the button before each disc. CD 5) on the remote control to record on both side of the tape. (See page 21.) If the front side of the tape ends in the Random Play mode... MODE on the unit to select "1 CD." Each time you can skip back to "0:00" by pressing 4 DOWN on the unit. 4 Press REC on the remote control to start and stop . One Disc Synchronized Recording 1 Insert a recordable cassette into the cassette compartment with the exposed part of that disc playback is...
... a protected tape is inserted. • If any tray is open when the source is set to press the button before each disc. CD 5) on the remote control to record on both side of the tape. (See page 21.) If the front side of the tape ends in the Random Play mode... MODE on the unit to select "1 CD." Each time you can skip back to "0:00" by pressing 4 DOWN on the unit. 4 Press REC on the remote control to start and stop . One Disc Synchronized Recording 1 Insert a recordable cassette into the cassette compartment with the exposed part of that disc playback is...


