
other
Page 1
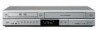
... connections, Power On. DR-MV77SU/78BU DVD VIDEO RECORDER Basic Operation QUICK START GUIDE Need Help? Audio - (L) Video Cable or Satellite Box OUTPUT (R) - Please call the JVC Customer Service TOLL FREE CUSTOMER CARE HOTLINE: 1(800)252-5722 http://www.jvc.com Included Accessories "AAA" battery x 2 (For... remote control) Remote control Video cable Audio cable Basic Connection : AV (RCA) Cable DR-MV77SU/78BU INSTRUCTIONS pg. 13 AC Outlet INPUT 1 DVD/VCR OUT OUTPUT (AV OUT) (R) - ...
... connections, Power On. DR-MV77SU/78BU DVD VIDEO RECORDER Basic Operation QUICK START GUIDE Need Help? Audio - (L) Video Cable or Satellite Box OUTPUT (R) - Please call the JVC Customer Service TOLL FREE CUSTOMER CARE HOTLINE: 1(800)252-5722 http://www.jvc.com Included Accessories "AAA" battery x 2 (For... remote control) Remote control Video cable Audio cable Basic Connection : AV (RCA) Cable DR-MV77SU/78BU INSTRUCTIONS pg. 13 AC Outlet INPUT 1 DVD/VCR OUT OUTPUT (AV OUT) (R) - ...

other
Page 2
Changes the setting at the current cursor position. Initial Setup Wizard STANDBY/ON TV Press "STANDBY/ON" 1 STANDBY/ON INSTRUCTIONS pg. 17 DVD VIDEO RECORDER RM-SDR107U Select Language 2 Press "ENTER" 3 Set the "Date, Year and Time" 4 Moves the cursor to the previous or next column. Press "ENTER" Finish 5
Changes the setting at the current cursor position. Initial Setup Wizard STANDBY/ON TV Press "STANDBY/ON" 1 STANDBY/ON INSTRUCTIONS pg. 17 DVD VIDEO RECORDER RM-SDR107U Select Language 2 Press "ENTER" 3 Set the "Date, Year and Time" 4 Moves the cursor to the previous or next column. Press "ENTER" Finish 5

other
Page 3
.... 23 VHS Select "VCR" 1 Start Playback 2 Start Playback 2 Stop Playback 3 Stop Playback 3 Playable Discs: DVD-Video, DVD-R, DVD+R, DVD-RW, DVD+RW, CD-R, Video CD, Audio CD BASIC RECORDING (One-Touch Recording) INSTRUCTIONS pg. 33 Select "DVD or VCR" or 1 TV STANDBY/ON Start Recording 4 Select Input (AV1..., AV2 or DV IN) 2 Stop Recording 5 Select Mode 3 DVD: XP, SP, LP or EP VCR: SP or SLP Note: To playback the recorded disc with other DVD...
.... 23 VHS Select "VCR" 1 Start Playback 2 Start Playback 2 Stop Playback 3 Stop Playback 3 Playable Discs: DVD-Video, DVD-R, DVD+R, DVD-RW, DVD+RW, CD-R, Video CD, Audio CD BASIC RECORDING (One-Touch Recording) INSTRUCTIONS pg. 33 Select "DVD or VCR" or 1 TV STANDBY/ON Start Recording 4 Select Input (AV1..., AV2 or DV IN) 2 Stop Recording 5 Select Mode 3 DVD: XP, SP, LP or EP VCR: SP or SLP Note: To playback the recorded disc with other DVD...

other
Page 4
TIMER RECORDING INSTRUCTIONS (Munual Timer Programming) pg. 35 Select "HOME" 1 Select "Timer 2 Record" STANDBY/ON Press "ENTER" TV 3 Select "NEW" and Press"ENTER" 4 DVD VIDEO RECORDER RM-SDR107U 5 Enter the necessary information for you timer recording(s). Press "ENTER" to check on the Timer Record List 6 Press "RETURN" Finish 7 Note: To playback the recorded disc with other DVD players, it is necessary to finalize the disc. (INSTRUCTIONS pg. 21) Moves the cursor left/right. Changes the setting at the current cursor position.
TIMER RECORDING INSTRUCTIONS (Munual Timer Programming) pg. 35 Select "HOME" 1 Select "Timer 2 Record" STANDBY/ON Press "ENTER" TV 3 Select "NEW" and Press"ENTER" 4 DVD VIDEO RECORDER RM-SDR107U 5 Enter the necessary information for you timer recording(s). Press "ENTER" to check on the Timer Record List 6 Press "RETURN" Finish 7 Note: To playback the recorded disc with other DVD players, it is necessary to finalize the disc. (INSTRUCTIONS pg. 21) Moves the cursor left/right. Changes the setting at the current cursor position.
other
Page 5
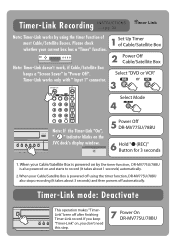
...takes about 3 seconds) and then powers off after finishing Timer-Link record. Timer-Link mode: Deactivate This operation makes "TimerLink" been off automatically. If you don't need this step. 7 Power On DR-MV77SU/78BU TV STANDBY/ON Select "DVD or VCR" or 3 Select Mode 4 Note: If the Timer-Link "On",... " " indicator blinks on , you keep "Timer-Link" on the JVC deck's display window. 5 Power Off DR-MV77SU/78BU 6 Hold "z (REC)" Button for 3 ...
...takes about 3 seconds) and then powers off after finishing Timer-Link record. Timer-Link mode: Deactivate This operation makes "TimerLink" been off automatically. If you don't need this step. 7 Power On DR-MV77SU/78BU TV STANDBY/ON Select "DVD or VCR" or 3 Select Mode 4 Note: If the Timer-Link "On",... " " indicator blinks on , you keep "Timer-Link" on the JVC deck's display window. 5 Power Off DR-MV77SU/78BU 6 Hold "z (REC)" Button for 3 ...

other
Page 6
... [Dubbing]. Note: To playback the recorded disc with other DVD players, it is necessary to a DVD using the DUBBING button. Access the 3 Dubbing menu screen. DVD VIDEO RECORDER RM-SDR107U Select XP, SP, LP or EP Start Dubbing. 5 6 Stop Dubbing. Preparation : Press VCR button to start dubbing. Find the ...place 2 on the VHS tape from VCR to DVD INSTRUCTIONS pg. 36 VHS DVD You can copy the...
... [Dubbing]. Note: To playback the recorded disc with other DVD players, it is necessary to a DVD using the DUBBING button. Access the 3 Dubbing menu screen. DVD VIDEO RECORDER RM-SDR107U Select XP, SP, LP or EP Start Dubbing. 5 6 Stop Dubbing. Preparation : Press VCR button to start dubbing. Find the ...place 2 on the VHS tape from VCR to DVD INSTRUCTIONS pg. 36 VHS DVD You can copy the...

other
Page 1
.... When I turn on the remote control and the front panel will start/stop at 1-800-252-5722. If your clock as recordable media on page 17 of the JVC DR-MV77SU/78BU DVD Video Recorder. c You must "Finalize" the DVD before you for Clock Set. Please see page 21 in another DVD player.... JVC Customer Care Center 1-800-252-5722 DR-MV77SU/78BU Quick Guide FAQ's Thank you attempt to use the remote control or front...
.... When I turn on the remote control and the front panel will start/stop at 1-800-252-5722. If your clock as recordable media on page 17 of the JVC DR-MV77SU/78BU DVD Video Recorder. c You must "Finalize" the DVD before you for Clock Set. Please see page 21 in another DVD player.... JVC Customer Care Center 1-800-252-5722 DR-MV77SU/78BU Quick Guide FAQ's Thank you attempt to use the remote control or front...

Instructions
Page 1
and Serial No. Model No. LPT1152-001A DVD VIDEO RECORDER DR-MV77SU DR-MV78BU AUX TRACKING CHAPTER * DVD VIDEO RECORDER RM-SDR107U INSTRUCTIONS For Customer Use : Enter below the Model No. which are located on the rear of cabinet. Retain this information for future reference. Serial No.
and Serial No. Model No. LPT1152-001A DVD VIDEO RECORDER DR-MV77SU DR-MV78BU AUX TRACKING CHAPTER * DVD VIDEO RECORDER RM-SDR107U INSTRUCTIONS For Customer Use : Enter below the Model No. which are located on the rear of cabinet. Retain this information for future reference. Serial No.
Instructions
Page 5
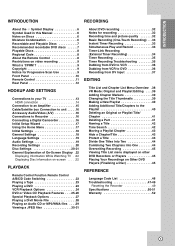
... 17 Using the Home Menu 17 Initial Settings 18 General Settings 18 Language Settings 19 Audio Settings 19 Recording Settings 20 Disc Settings 20-21 General Explanation of On-Screen Display .22 Displaying Information While Watching TV...recording 32 Notes for recording 32 Recording time and picture quality 32 Basic Recording (One-Touch Recording) . . .33 Instant Timer Recording 33 Simultaneous Play and Record 33 Timer-Link Recording (External Timer Recording 34 Timer Recording 35 Timer Recording Troubleshooting 35 Dubbing from DVD to VCR 36 Dubbing from VCR to DVD 36 Recording...
... 17 Using the Home Menu 17 Initial Settings 18 General Settings 18 Language Settings 19 Audio Settings 19 Recording Settings 20 Disc Settings 20-21 General Explanation of On-Screen Display .22 Displaying Information While Watching TV...recording 32 Notes for recording 32 Recording time and picture quality 32 Basic Recording (One-Touch Recording) . . .33 Instant Timer Recording 33 Simultaneous Play and Record 33 Timer-Link Recording (External Timer Recording 34 Timer Recording 35 Timer Recording Troubleshooting 35 Dubbing from DVD to VCR 36 Dubbing from VCR to DVD 36 Recording...

Instructions
Page 6
... DVD-RW with a clean cloth. Wipe the disc from a cold location to direct sunlight or sources of heat and never leave it for older vinyl records. Moisture Condensation Never operate this Manual Note: Indicates special notes and operating features. Hold the disc by the edges so that the function is not... playing, store the disc in a parked car exposed to those discs represented by this unit or specific media. Before playing, clean the disc with Video recording mode +RW DVD+RW disc -R DVD-R disc +R DVD+R disc DVD DVD-Video disc DivX DivX files VCD Video CDs ACD Audio CDs MP3 MP3 files...
... DVD-RW with a clean cloth. Wipe the disc from a cold location to direct sunlight or sources of heat and never leave it for older vinyl records. Moisture Condensation Never operate this Manual Note: Indicates special notes and operating features. Hold the disc by the edges so that the function is not... playing, store the disc in a parked car exposed to those discs represented by this unit or specific media. Before playing, clean the disc with Video recording mode +RW DVD+RW disc -R DVD-R disc +R DVD+R disc DVD DVD-Video disc DivX DivX files VCD Video CDs ACD Audio CDs MP3 MP3 files...

Instructions
Page 7
... edited contents are playable on DVD+RW compatible players only after finalization. Recordings can be erased, then you can be recorded only once. After you finalize a DVD-R, you cannot record on repeatedly. Recordings can be recorded only once. DVD-RW Mitsubishi (4x) Verbatim (4x) JVC (4x) Maxell (4x) DVD+RW Mitsubishi (4x) SONY (2.4x) Verbatim (2.4x...
... edited contents are playable on DVD+RW compatible players only after finalization. Recordings can be erased, then you can be recorded only once. After you finalize a DVD-R, you cannot record on repeatedly. Recordings can be recorded only once. DVD-RW Mitsubishi (4x) Verbatim (4x) JVC (4x) Maxell (4x) DVD+RW Mitsubishi (4x) SONY (2.4x) Verbatim (2.4x...

Instructions
Page 8
... the cover. Can't play only DVD discs labeled same as the rear of the unit or "ALL". There are many different types of recordable disc formats (including CD-R containing MP3 or WMA files) and these standards. About the Remote Control Operation Range Point the Remote Control at the...from the Internet. This number must match your unit's regional code or the disc cannot play. • If you record a disc using a personal computer or a DVD or CD Recorder may not play a DVD with the software publisher for more numbers in order to grant such permission. Battery installation ...
... the cover. Can't play only DVD discs labeled same as the rear of the unit or "ALL". There are many different types of recordable disc formats (including CD-R containing MP3 or WMA files) and these standards. About the Remote Control Operation Range Point the Remote Control at the...from the Internet. This number must match your unit's regional code or the disc cannot play. • If you record a disc using a personal computer or a DVD or CD Recorder may not play a DVD with the software publisher for more numbers in order to grant such permission. Battery installation ...
Instructions
Page 9
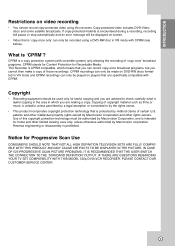
... is CPRM compatible, which you cannot then make a copy of those recordings. IF THERE ARE QUESTIONS REGARDING YOUR TV SET COMPATIBILITY WITH THIS MODEL 525p DVD+VCR RECORDER, PLEASE CONTACT OUR CUSTOMER SERVICE CENTER. 9 INTRODUCTION Restrictions on video recording • You cannot record copy-protected video using a DVD-RW disc in VR mode with scramble...
... is CPRM compatible, which you cannot then make a copy of those recordings. IF THERE ARE QUESTIONS REGARDING YOUR TV SET COMPATIBILITY WITH THIS MODEL 525p DVD+VCR RECORDER, PLEASE CONTACT OUR CUSTOMER SERVICE CENTER. 9 INTRODUCTION Restrictions on video recording • You cannot record copy-protected video using a DVD-RW disc in VR mode with scramble...

Instructions
Page 10
... a disc is selected. f N / X (PLAY / PAUSE) Starts playback. j DUBBING Press to copy DVD to VCR (or VCR to exit pause mode. d Z EJECT Ejects the tape in timer recording or a timer recording is dubbing. Pause playback or recording temporarily, press again to DVD). This indicator will flash when the unit is...for fast reverse/ forward picture search. VCR The VCR deck is in the DVD deck. A VHS tape is in the VCR deck. VCR: Rewinds/Advances the tape during the STOP mode, for Timer-Link recording. Lights when the Recorder is inserted in playing mode or ...
... a disc is selected. f N / X (PLAY / PAUSE) Starts playback. j DUBBING Press to copy DVD to VCR (or VCR to exit pause mode. d Z EJECT Ejects the tape in timer recording or a timer recording is dubbing. Pause playback or recording temporarily, press again to DVD). This indicator will flash when the unit is...for fast reverse/ forward picture search. VCR The VCR deck is in the DVD deck. A VHS tape is in the VCR deck. VCR: Rewinds/Advances the tape during the STOP mode, for Timer-Link recording. Lights when the Recorder is inserted in playing mode or ...
Instructions
Page 11
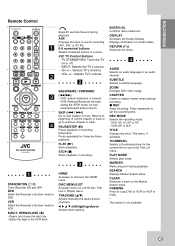
... in the Title List menu. Press repeatedly for fast reverse/forward picture search. DVD Select the Recorder's function mode to set the recording time. VCR: SP or SLP. JVC TV Control Buttons - CH +/-: Selects TV's channel. - VCR Select the Recorder's function mode to next chapter or track. SUBTITLE Selects a subtitle language. TITLE Displays the disc's Title...
... in the Title List menu. Press repeatedly for fast reverse/forward picture search. DVD Select the Recorder's function mode to set the recording time. VCR: SP or SLP. JVC TV Control Buttons - CH +/-: Selects TV's channel. - VCR Select the Recorder's function mode to next chapter or track. SUBTITLE Selects a subtitle language. TITLE Displays the disc's Title...

Instructions
Page 13
... an optional Y PB PR cable (C). Video connection Connect the VIDEO OUTPUT jack on the Recorder to the manuals of your audio system. • Do not connect the Recorder via another VCR. Position the units away from each other devices as necessary for additional connection information. Note:... If you may be distorted during playback. Notes: • Make sure the Recorder is connected directly to the TV and tune...
... an optional Y PB PR cable (C). Video connection Connect the VIDEO OUTPUT jack on the Recorder to the manuals of your audio system. • Do not connect the Recorder via another VCR. Position the units away from each other devices as necessary for additional connection information. Note:... If you may be distorted during playback. Notes: • Make sure the Recorder is connected directly to the TV and tune...
Instructions
Page 14
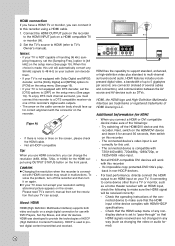
...may result in malfunctions. HDMI was developed to TV's Owner's manual). Next, switch on the HDMI/DVI device and leave it for this recorder using OUTPUT STATUS button on the front panel. The connected device is compatible with 720(1440)x480i, 720x480p, 1280x720p, or 1920x1080i video input...sure that HDMI signals received are trademarks or registered trademarks of the device complies with HDMI-HDCP specifications. - When this choice is made, this recorder's digital audio outputs. • The arrow on the cable connector body should face up for the HDMI output using a HDMI cable. 1....
...may result in malfunctions. HDMI was developed to TV's Owner's manual). Next, switch on the HDMI/DVI device and leave it for this recorder using OUTPUT STATUS button on the front panel. The connected device is compatible with 720(1440)x480i, 720x480p, 1280x720p, or 1920x1080i video input...sure that HDMI signals received are trademarks or registered trademarks of the device complies with HDMI-HDCP specifications. - When this choice is made, this recorder's digital audio outputs. • The arrow on the cable connector body should face up for the HDMI output using a HDMI cable. 1....

Instructions
Page 15
... on page 19). Check the receiver manual and the logos on your amplifier, receiver, or stereo system using the audio cables (A) supplied. Rear of Recorder O X A OPTICAL DIGITAL INPUT COAXIAL DIGITAL INPUT L R AUDIO INPUT Amplifier (Receiver) Manufactured under license from Dolby Laboratories. Use an optional digital (OPTICAL...2, or DTS) 1. "DTS" and "DTS Digital Out" are trademarks of Dolby Laboratories. For this you must connect this Recorder's digital audio outputs. "Dolby", "Pro Logic", and the double-D symbol are registered trademarks of DTS, Inc. 15 Connecting ...
... on page 19). Check the receiver manual and the logos on your amplifier, receiver, or stereo system using the audio cables (A) supplied. Rear of Recorder O X A OPTICAL DIGITAL INPUT COAXIAL DIGITAL INPUT L R AUDIO INPUT Amplifier (Receiver) Manufactured under license from Dolby Laboratories. Use an optional digital (OPTICAL...2, or DTS) 1. "DTS" and "DTS Digital Out" are trademarks of Dolby Laboratories. For this you must connect this Recorder's digital audio outputs. "Dolby", "Pro Logic", and the double-D symbol are registered trademarks of DTS, Inc. 15 Connecting ...

Instructions
Page 16
... audio/video cables. (Refer to the front panel DV IN jack of this Recorder. It is for [Recording from External Components].) Front of Recorder Rear of Recorder Front of Recorder 16 Disconnecting the DV cable while recording a contents of the connected digital camcorder may result in /out jack of your...to the audio/video out jacks on your accessory component, using the optional audio/video cables. (Refer to page 34 for "Timer-Link Recording".) Cable/Satellite box AUDIO OUT VIDEO OUT Connecting a Digital Camcorder Use a DV cable (not supplied) to connect the DV in malfunction. ...
... audio/video cables. (Refer to the front panel DV IN jack of this Recorder. It is for [Recording from External Components].) Front of Recorder Rear of Recorder Front of Recorder 16 Disconnecting the DV cable while recording a contents of the connected digital camcorder may result in /out jack of your...to the audio/video out jacks on your accessory component, using the optional audio/video cables. (Refer to page 34 for "Timer-Link Recording".) Cable/Satellite box AUDIO OUT VIDEO OUT Connecting a Digital Camcorder Use a DV cable (not supplied) to connect the DV in malfunction. ...

Instructions
Page 17
...option. 3. Setup • Start: Displays Setup menu. Press ENTER to confirm your setting. 3. Note: You can access all the Media for playback and recording of the recorder. 1. v / V (up/down): Changes the setting at the current cursor position. Press ENTER to turn on the unit or after factory setting (... sets the Language and Clock step-by-step until the setup is complete. 1. To exit the HOME menu, press HOME. 2. Movie • VCR: Plays back Video tape. • DISC: - Using the Home Menu From the Home Menu screen you can reset the Initial Setup Wizard from the...
...option. 3. Setup • Start: Displays Setup menu. Press ENTER to confirm your setting. 3. Note: You can access all the Media for playback and recording of the recorder. 1. v / V (up/down): Changes the setting at the current cursor position. Press ENTER to turn on the unit or after factory setting (... sets the Language and Clock step-by-step until the setup is complete. 1. To exit the HOME menu, press HOME. 2. Movie • VCR: Plays back Video tape. • DISC: - Using the Home Menu From the Home Menu screen you can reset the Initial Setup Wizard from the...


