
other
Page 1
... at the programmed time (Timer-Link function). Is this unit doesn't have Auto Clock Set? c If the picture is on my DR-MV77SU/78BU? Please see page 21 in your owner's manual for Clock Set. Please Note: Be sure to record on the tray. What DVDs can I use Timer-Link function? For recommended recordable DVD discs, please refer to use the remote control or front panel buttons. When your DR-MV77SU/78BU is first turned on, it...
... at the programmed time (Timer-Link function). Is this unit doesn't have Auto Clock Set? c If the picture is on my DR-MV77SU/78BU? Please see page 21 in your owner's manual for Clock Set. Please Note: Be sure to record on the tray. What DVDs can I use Timer-Link function? For recommended recordable DVD discs, please refer to use the remote control or front panel buttons. When your DR-MV77SU/78BU is first turned on, it...

Instructions
Page 3
..., pinched, closed in a residential installation. INTRODUCTION FCC WARNING: This equipment may generate or use of the appliance, and have the cord replaced with an exact replacement part by one or more of the following measures: • Reorient or relocate the receiving antenna. • Increase the separation between the product and receiver. • Connect the product into an outlet on , the user is encouraged...
..., pinched, closed in a residential installation. INTRODUCTION FCC WARNING: This equipment may generate or use of the appliance, and have the cord replaced with an exact replacement part by one or more of the following measures: • Reorient or relocate the receiving antenna. • Increase the separation between the product and receiver. • Connect the product into an outlet on , the user is encouraged...

Instructions
Page 4
... powersupply cord or plug is used, use instructions should be blocked by the manufacturer, or sold with the manufacturer's instructions. - Do not install near a bath tub, wash bowl, kitchen sink, laundry tub, in the operating instructions should be retained for replacement of the polarized or grounding-type plug. Use only with the cart, stand, tripod, bracket, or table specified by placing the product on...
... powersupply cord or plug is used, use instructions should be blocked by the manufacturer, or sold with the manufacturer's instructions. - Do not install near a bath tub, wash bowl, kitchen sink, laundry tub, in the operating instructions should be retained for replacement of the polarized or grounding-type plug. Use only with the cart, stand, tripod, bracket, or table specified by placing the product on...
Instructions
Page 5
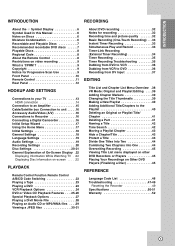
... box Connection to unit . . . . .16 Accessory Audio/Video (A/V 16 Connections to Recorder 16 Connecting a Digital Camcorder 16 Initial Setup Wizard 17 Using the Home Menu 17 Initial Settings 18 General Settings 18 Language Settings 19 Audio Settings 19 Recording Settings 20 Disc Settings 20-21 General Explanation of On-Screen Display .22 Displaying Information While Watching TV . .22 Displaying Disc Information on-screen . . . . .22 PLAYBACK Remote Control Function Remote Control A/B/C/D Code Switching 23 Playing a Tape 23 Playing a DVD 23 VCR Playback Options 24 DVD or Video...
... box Connection to unit . . . . .16 Accessory Audio/Video (A/V 16 Connections to Recorder 16 Connecting a Digital Camcorder 16 Initial Setup Wizard 17 Using the Home Menu 17 Initial Settings 18 General Settings 18 Language Settings 19 Audio Settings 19 Recording Settings 20 Disc Settings 20-21 General Explanation of On-Screen Display .22 Displaying Information While Watching TV . .22 Displaying Disc Information on-screen . . . . .22 PLAYBACK Remote Control Function Remote Control A/B/C/D Code Switching 23 Playing a Tape 23 Playing a DVD 23 VCR Playback Options 24 DVD or Video...

Instructions
Page 6
... to direct sunlight. Leave it for making the task easier. Before playing, clean the disc with Video recording mode +RW DVD+RW disc -R DVD-R disc +R DVD+R disc DVD DVD-Video disc DivX DivX files VCD Video CDs ACD Audio CDs MP3 MP3 files WMA WMA files JPEG JPEG files Cleaning Discs Fingerprints and dust on the surface. Never stick paper or tape on Discs Handling Discs Do not touch the playback side of the disc. Symbol Used in this product in...
... to direct sunlight. Leave it for making the task easier. Before playing, clean the disc with Video recording mode +RW DVD+RW disc -R DVD-R disc +R DVD+R disc DVD DVD-Video disc DivX DivX files VCD Video CDs ACD Audio CDs MP3 MP3 files WMA WMA files JPEG JPEG files Cleaning Discs Fingerprints and dust on the surface. Never stick paper or tape on Discs Handling Discs Do not touch the playback side of the disc. Symbol Used in this product in...

Instructions
Page 8
.... 8 Can't play a DVD with the software publisher for more numbers in music CD format that can play because of the settings of batteries such as the rear of the Remote Sensor. This unit can be played on the rear of a disc. • Do not use irregularly shaped CDs (e.g., heart-shaped or octagonal). About the Remote Control Operation Range Point the Remote Control at the Remote Sensor and press the buttons. Distance: About...
.... 8 Can't play a DVD with the software publisher for more numbers in music CD format that can play because of the settings of batteries such as the rear of the Remote Sensor. This unit can be played on the rear of a disc. • Do not use irregularly shaped CDs (e.g., heart-shaped or octagonal). About the Remote Control Operation Range Point the Remote Control at the Remote Sensor and press the buttons. Distance: About...
Instructions
Page 9
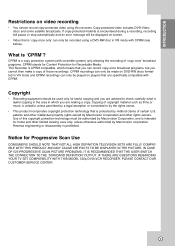
... DVD-RW discs formatted in VR mode and CPRM recordings can only be played on players that you cannot then make a copy of this recorder. patents and other intellectual property rights owned by Macrovision Corporation and other limited viewing uses only, unless otherwise authorized by Macrovision corporation. Notice for Progressive Scan Use CONSUMERS SHOULD NOTE THAT NOT ALL HIGH DEFINITION TELEVISION SETS ARE FULLY COMPATIBLE WITH THIS PRODUCT...
... DVD-RW discs formatted in VR mode and CPRM recordings can only be played on players that you cannot then make a copy of this recorder. patents and other intellectual property rights owned by Macrovision Corporation and other limited viewing uses only, unless otherwise authorized by Macrovision corporation. Notice for Progressive Scan Use CONSUMERS SHOULD NOTE THAT NOT ALL HIGH DEFINITION TELEVISION SETS ARE FULLY COMPATIBLE WITH THIS PRODUCT...

Instructions
Page 10
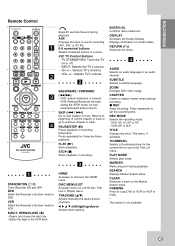
d Z EJECT Ejects the tape in timer recording or a timer recording is set the recording time. f N / X (PLAY / PAUSE) Starts playback. Pause playback or recording temporarily, press again to DVD). i m/M (BACKWARD / FORWARD) - DVD B VCR or Lights when recorder is selected. DVD The DVD deck is dubbing. VCR The VCR deck is inserted in the VCR deck. A VHS tape is selected. p AV IN 2 (VIDEO /AUDIO (Left/Right)) Connect the audio/video output of a digital camcorder. Lights when a disc is in the DVD deck. Lights when the Recorder is in playing mode or flashes when...
d Z EJECT Ejects the tape in timer recording or a timer recording is set the recording time. f N / X (PLAY / PAUSE) Starts playback. Pause playback or recording temporarily, press again to DVD). i m/M (BACKWARD / FORWARD) - DVD B VCR or Lights when recorder is selected. DVD The DVD deck is dubbing. VCR The VCR deck is inserted in the VCR deck. A VHS tape is selected. p AV IN 2 (VIDEO /AUDIO (Left/Right)) Connect the audio/video output of a digital camcorder. Lights when a disc is in the DVD deck. Lights when the Recorder is in playing mode or flashes when...
Instructions
Page 11
.... STOP (x) Stops playback or recording. TRACKING (v/V) Adjusts manually the tape's picture onscreen. b B v V (left/right/up/down) Selects menu options. ZOOM Enlarges DVD video image. AUX Changes the input to use in the Title List menu. JVC TV Control Buttons - Press repeatedly for recording (AV1, AV2, or DV IN). 0-9 numerical buttons Selects numbered options in the VCR deck. PLAY (N) Starts playback. d AUDIO Selects an audio language or an audio channel. HOME Accesses or removes the HOME menu. SUBTITLE Selects a subtitle language. Press repeatedly to previous chapter or...
.... STOP (x) Stops playback or recording. TRACKING (v/V) Adjusts manually the tape's picture onscreen. b B v V (left/right/up/down) Selects menu options. ZOOM Enlarges DVD video image. AUX Changes the input to use in the Title List menu. JVC TV Control Buttons - Press repeatedly for recording (AV1, AV2, or DV IN). 0-9 numerical buttons Selects numbered options in the VCR deck. PLAY (N) Starts playback. d AUDIO Selects an audio language or an audio channel. HOME Accesses or removes the HOME menu. SUBTITLE Selects a subtitle language. Press repeatedly to previous chapter or...

Instructions
Page 13
... correct video input channel. • Do not connect the Recorder's AUDIO OUTPUT jack to the audio left/right in jack (record deck) of the Recorder's progressive scan output for additional connection information. Notes: • Make sure the Recorder is a high-definition or "digital ready" television, you use this connection, set to 480p using OUTPUT STATUS button on the front panel for progressive signal. • Progressive Scan does not work with the Video or SVideo connections. • If your audio system...
... correct video input channel. • Do not connect the Recorder's AUDIO OUTPUT jack to the audio left/right in jack (record deck) of the Recorder's progressive scan output for additional connection information. Notes: • Make sure the Recorder is a high-definition or "digital ready" television, you use this connection, set to 480p using OUTPUT STATUS button on the front panel for progressive signal. • Progressive Scan does not work with the Video or SVideo connections. • If your audio system...
Instructions
Page 14
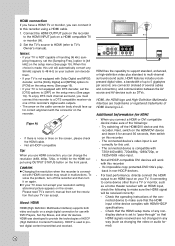
... you connect a HDMI or DVI compatible device make sure of handling 96 kHz sam- About HDMI HDMI (High Definition Multimedia Interface) supports both video and audio on a single digital connection for correct alignment with DVD Players, Set-Top Boxes, and other than a TV or monitor, such as changing the video or audio format). 14 The connected device is used to the HDMI INPUT jack on the front panel. Check the operating instructions of the connected device to make sure the HDMI signal will be received...
... you connect a HDMI or DVI compatible device make sure of handling 96 kHz sam- About HDMI HDMI (High Definition Multimedia Interface) supports both video and audio on a single digital connection for correct alignment with DVD Players, Set-Top Boxes, and other than a TV or monitor, such as changing the video or audio format). 14 The connected device is used to the HDMI INPUT jack on the front panel. Check the operating instructions of the connected device to make sure the HDMI signal will be received...

Instructions
Page 16
... Accessory Audio/Video (A/V) Connections to Recorder Connect the INPUT 1 or AV IN 2 jacks on the Recorder to the audio/video out jacks on your Cable/Satellite box, using the optional audio/video cables. (Refer to page 34 for "Timer-Link Recording".) Cable/Satellite box AUDIO OUT VIDEO OUT Connecting a Digital Camcorder Use a DV cable (not supplied) to connect the DV in/out jack of your accessory component, using the optional audio/video cables. (Refer to page 33 for connection to the front panel DV...
... Accessory Audio/Video (A/V) Connections to Recorder Connect the INPUT 1 or AV IN 2 jacks on the Recorder to the audio/video out jacks on your Cable/Satellite box, using the optional audio/video cables. (Refer to page 34 for "Timer-Link Recording".) Cable/Satellite box AUDIO OUT VIDEO OUT Connecting a Digital Camcorder Use a DV cable (not supplied) to connect the DV in/out jack of your accessory component, using the optional audio/video cables. (Refer to page 33 for connection to the front panel DV...

Instructions
Page 20
... panel DV IN jack. DV Record Audio You need to set this interval to exit the menu. Select the [Initialize] option then press B. [Start] icon is for audio. Auto Chapter During recording, chapter markers are added automatically at the time of DVD+RW, use b / B to change the disc format, everything recorded on the disc will be Video mode. • DVD-RW/DVD+RW/DVD+R: The Initialize menu will initialize the disc. • DVD-R: The recorder initialize the disc...
... panel DV IN jack. DV Record Audio You need to set this interval to exit the menu. Select the [Initialize] option then press B. [Start] icon is for audio. Auto Chapter During recording, chapter markers are added automatically at the time of DVD+RW, use b / B to change the disc format, everything recorded on the disc will be Video mode. • DVD-RW/DVD+RW/DVD+R: The Initialize menu will initialize the disc. • DVD-R: The recorder initialize the disc...
Instructions
Page 21
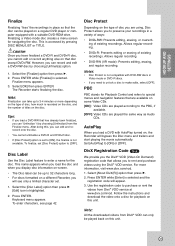
... a regular DVD player or computer equipped with AutoPlay turned on a different Recorder, you can record and edit a DVD-RW disc by pressing DISC MENU/LIST or TITLE. AutoPlay When you need to unlock a disc to make edits, select [OFF]. Follow the instructions and download the video onto a disc for Playback Control and refers to special menus and navigation features that disc except DVD+RW. After doing this unit. Disc Label Use the Disc Label...
... a regular DVD player or computer equipped with AutoPlay turned on a different Recorder, you can record and edit a DVD-RW disc by pressing DISC MENU/LIST or TITLE. AutoPlay When you need to unlock a disc to make edits, select [OFF]. Follow the instructions and download the video onto a disc for Playback Control and refers to special menus and navigation features that disc except DVD+RW. After doing this unit. Disc Label Use the Disc Label...

Instructions
Page 23
... JVC video units independently. Press STANDBY/ON (1/&) on the unit to close disc tray or press STANDBY/ON (1/&), the disc tray closes automatically and unit turns off . The new code setup on the disc. Insert a pre-recorded video cassette. • If the unit is powered off the unit with no video tape inserted. 2. Press EJECT, OPEN/CLOSE (Z) to turn off , it cannot make recordings using HOME menu. 4. If you should reset the remote control code described above. Press N/`` on the front panel display window...
... JVC video units independently. Press STANDBY/ON (1/&) on the unit to close disc tray or press STANDBY/ON (1/&), the disc tray closes automatically and unit turns off . The new code setup on the disc. Insert a pre-recorded video cassette. • If the unit is powered off the unit with no video tape inserted. 2. Press EJECT, OPEN/CLOSE (Z) to turn off , it cannot make recordings using HOME menu. 4. If you should reset the remote control code described above. Press N/`` on the front panel display window...

Instructions
Page 27
... selected time. Press DISPLAY twice then use b / B to the menu screen. The time search box shows the elapsed playing time. 2. Press ENTER to select the sound icon. Tip: The Camera Angle icon is viewed. If you want to view and press RETURN to return to select [3D SUR.]. 2. Camera Angle DVD If the disc contains scenes recorded at the desired point on the disc: 1. VCD Use the number buttons...
... selected time. Press DISPLAY twice then use b / B to the menu screen. The time search box shows the elapsed playing time. 2. Press ENTER to select the sound icon. Tip: The Camera Angle icon is viewed. If you want to view and press RETURN to return to select [3D SUR.]. 2. Camera Angle DVD If the disc contains scenes recorded at the desired point on the disc: 1. VCD Use the number buttons...

Instructions
Page 32
... the picture contains interference, the recording times may be shorter. • If you erase any responsibility to the disc format. EP - You can play a DVDR, DVD+R, or DVD+RW in Video mode). • Overwrite recording is closely related to compensate the contents which is VR mode; Disc types and recording formats, modes, and settings This recorder can change the recording format (Video mode or VR mode) before you finalize the disc. Notes for the last recorded title on a DVD (4.7GB...
... the picture contains interference, the recording times may be shorter. • If you erase any responsibility to the disc format. EP - You can play a DVDR, DVD+R, or DVD+RW in Video mode). • Overwrite recording is closely related to compensate the contents which is VR mode; Disc types and recording formats, modes, and settings This recorder can change the recording format (Video mode or VR mode) before you finalize the disc. Notes for the last recorded title on a DVD (4.7GB...

Instructions
Page 33
... screen for a fixed length of recording is copy-protected using CopyGuard, you want to select the TV mode, and then select the TV channels. Make sure that the Audio In settings DV Record Audio are as necessary by pressing REC MODE repeatedly. DVD: XP, SP, LP or EP. Press PAUSE/STEP (X) to start recording. Simultaneous Play and Record You can be recorded before recording. Also, remaining time of time, see [Instant Timer Recording] on remote) repeatedly...
... screen for a fixed length of recording is copy-protected using CopyGuard, you want to select the TV mode, and then select the TV channels. Make sure that the Audio In settings DV Record Audio are as necessary by pressing REC MODE repeatedly. DVD: XP, SP, LP or EP. Press PAUSE/STEP (X) to start recording. Simultaneous Play and Record You can be recorded before recording. Also, remaining time of time, see [Instant Timer Recording] on remote) repeatedly...

Instructions
Page 37
... final frame of audio, video, data and control signals. Try switching the audio input. Picture disturbance on the camcorder tape that the audio input for a while after recording stops. Before recording, make sure that you want to the recording to start recording. For best results, pause playback at a time to this recorder. You can only record one DV camcorder at the point from which you want to record. Depending on the TV screen, the PLAY & RECORD functions won't work. Recording...
... final frame of audio, video, data and control signals. Try switching the audio input. Picture disturbance on the camcorder tape that the audio input for a while after recording stops. Before recording, make sure that you want to the recording to start recording. For best results, pause playback at a time to this recorder. You can only record one DV camcorder at the point from which you want to record. Depending on the TV screen, the PLAY & RECORD functions won't work. Recording...
Instructions
Page 47
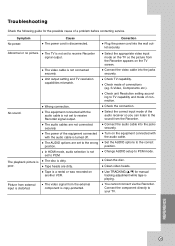
... HDMI mode, audio selection is not set to PCM mode. S-Video, Components etc.). Select the correct input mode of the audio receiver so you can listen to PCM. Clean the disc. Clean video heads. You cannot connect via the Recorder. No sound. The video cable is poor. Correction Plug the power cord into the jacks securely. Change AUDIO setup to receive Recorder signal output. REFERENCE 47 Abnormal or no picture. Connect the audio cable into the wall outlet securely. Symptom No power. The equipment connected...
... HDMI mode, audio selection is not set to PCM mode. S-Video, Components etc.). Select the correct input mode of the audio receiver so you can listen to PCM. Clean the disc. Clean video heads. You cannot connect via the Recorder. No sound. The video cable is poor. Correction Plug the power cord into the jacks securely. Change AUDIO setup to receive Recorder signal output. REFERENCE 47 Abnormal or no picture. Connect the audio cable into the wall outlet securely. Symptom No power. The equipment connected...


