
other
Page 1
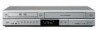
... OUT, S-VIDEO OUT, COMPONENT/ PROGRESSIVE SCAN VIDEO OUT. Does this model has a new Tuner-Free design, you attempt to set your owner's manual under the Initial Setup Wizard. JVC Customer Care Center 1-800-252-5722 DR-MV77SU/78BU Quick Guide FAQ's Thank you have Auto Clock Set? c Press OUTPUT STATUS button and...
... OUT, S-VIDEO OUT, COMPONENT/ PROGRESSIVE SCAN VIDEO OUT. Does this model has a new Tuner-Free design, you attempt to set your owner's manual under the Initial Setup Wizard. JVC Customer Care Center 1-800-252-5722 DR-MV77SU/78BU Quick Guide FAQ's Thank you have Auto Clock Set? c Press OUTPUT STATUS button and...

Instructions
Page 2
... dangerous voltage within an equilateral triangle is provided or the manufacturer's instruction have been adhered to the presence of this product, please read this owner's manual carefully and retain it from over heating. CAUTION RISK OF ELECTRIC SHOCK DO NOT OPEN CAUTION: TO REDUCE THE RISK OF ELECTRIC SHOCK DO NOT...
... dangerous voltage within an equilateral triangle is provided or the manufacturer's instruction have been adhered to the presence of this product, please read this owner's manual carefully and retain it from over heating. CAUTION RISK OF ELECTRIC SHOCK DO NOT OPEN CAUTION: TO REDUCE THE RISK OF ELECTRIC SHOCK DO NOT...

Instructions
Page 3
... may cause harmful interference unless the modifications are dangerous. Pay particular attention to this owner's manual to which can radiate radio frequency energy and, if not installed and used in accordance with the instruction manual, may cause harmful interference to operate this equipment if an unauthorized change or modification is made... wall outlets, loose or damaged wall outlets, extension cords, frayed power cords, or damaged or cracked wire insulation are expressly approved in the instruction manual. Protect the power cord from the mains, pull out the mains cord plug.
... may cause harmful interference unless the modifications are dangerous. Pay particular attention to this owner's manual to which can radiate radio frequency energy and, if not installed and used in accordance with the instruction manual, may cause harmful interference to operate this equipment if an unauthorized change or modification is made... wall outlets, loose or damaged wall outlets, extension cords, frayed power cords, or damaged or cracked wire insulation are expressly approved in the instruction manual. Protect the power cord from the mains, pull out the mains cord plug.

Instructions
Page 4
... be blocked by the manufacturer, or sold with dry cloth. - IMPORTANT SAFETY INSTRUCTIONS CAUTION: PLEASE READ AND OBSERVE ALL WARNINGS AND INSTRUCTIONS IN THIS OWNER'S MANUAL. The safeguards incorporated in electric shock or fire hazard. Keep these instructions. - Clean only with the apparatus. Do not defeat the safety purpose of time...
... be blocked by the manufacturer, or sold with dry cloth. - IMPORTANT SAFETY INSTRUCTIONS CAUTION: PLEASE READ AND OBSERVE ALL WARNINGS AND INSTRUCTIONS IN THIS OWNER'S MANUAL. The safeguards incorporated in electric shock or fire hazard. Keep these instructions. - Clean only with the apparatus. Do not defeat the safety purpose of time...
Instructions
Page 5
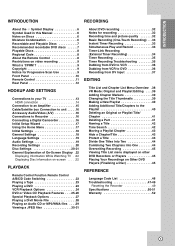
INTRODUCTION INTRODUCTION RECORDING About the Symbol Display 6 Symbol Used in this Manual 6 Notes on Discs 6 Moisture Condensation 6 Recordable and Playable Discs 7 Recommended recordable DVD discs . . . . . .7 Playable Discs 8 Regional Code 8 About the Remote Control 8 ...22 Displaying Disc Information on-screen . . . . .22 PLAYBACK Remote Control Function Remote Control A/B/C/D Code Switching 23 Playing a Tape 23 Playing a DVD 23 VCR Playback Options 24 DVD or Video CD Playback Features . . . .25-26 Special Playback Options 27 Playing a DivX Movie File 28 Playing an Audio CD or...
INTRODUCTION INTRODUCTION RECORDING About the Symbol Display 6 Symbol Used in this Manual 6 Notes on Discs 6 Moisture Condensation 6 Recordable and Playable Discs 7 Recommended recordable DVD discs . . . . . .7 Playable Discs 8 Regional Code 8 About the Remote Control 8 ...22 Displaying Disc Information on-screen . . . . .22 PLAYBACK Remote Control Function Remote Control A/B/C/D Code Switching 23 Playing a Tape 23 Playing a DVD 23 VCR Playback Options 24 DVD or Video CD Playback Features . . . .25-26 Special Playback Options 27 Playing a DivX Movie File 28 Playing an Audio CD or...

Instructions
Page 6
... direct sunlight. Wipe the disc from a cold location to those discs represented by the edges so that the function is not permitted by this Manual Note: Indicates special notes and operating features. If you use this product in such a situation, it in its case. About the Symbol Display... " " may damage discs/tapes and internal parts. 6 Moisture Condensation Never operate this owner's manual carefully and retain for two or three hours without operating it from the center out. Notes on the disc. Tip: Indicates tips and hints for...
... direct sunlight. Wipe the disc from a cold location to those discs represented by the edges so that the function is not permitted by this Manual Note: Indicates special notes and operating features. If you use this product in such a situation, it in its case. About the Symbol Display... " " may damage discs/tapes and internal parts. 6 Moisture Condensation Never operate this owner's manual carefully and retain for two or three hours without operating it from the center out. Notes on the disc. Tip: Indicates tips and hints for...
Instructions
Page 11
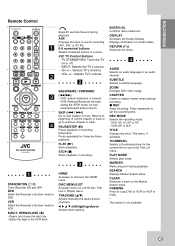
.... INPUT: Selects the TV's source. - VOL +/-: Adjusts TV's volume. SKIP (. / >) Go to DVD. TRACKING (v/V) Adjusts manually the tape's picture onscreen. SUBTITLE Selects a subtitle language. z REC Starts recording. PLAY MODE Selects play mode. THUMBNAIL Selects a thumbnail ... VCR to VCR. CH +/-: Selects TV's channel. - VCR Select the Recorder's function mode to DVD). * This button is not available. 11 INTRODUCTION Remote Control TV a b Skips 30 seconds forward during playback. JVC TV Control Buttons - DISPLAY Accesses On-Screen Display. CLEAR Removes a...
.... INPUT: Selects the TV's source. - VOL +/-: Adjusts TV's volume. SKIP (. / >) Go to DVD. TRACKING (v/V) Adjusts manually the tape's picture onscreen. SUBTITLE Selects a subtitle language. z REC Starts recording. PLAY MODE Selects play mode. THUMBNAIL Selects a thumbnail ... VCR to VCR. CH +/-: Selects TV's channel. - VCR Select the Recorder's function mode to DVD). * This button is not available. 11 INTRODUCTION Remote Control TV a b Skips 30 seconds forward during playback. JVC TV Control Buttons - DISPLAY Accesses On-Screen Display. CLEAR Removes a...

Instructions
Page 13
...to the correct video input channel. • Do not connect the Recorder's AUDIO OUTPUT jack to the manuals of your audio system. • Do not connect the Recorder via another VCR. S-Video connection Connect the S-VIDEO OUTPUT jack on the Recorder to the video in jack on the...COMPONENT/PROGRESSIVE SCAN VIDEO INPUT AUDIO INPUT Pr Pb Y R L S Rear of Recorder C A2 Rear of a nearby TV, VCR, or radio may take advantage of your TV, VCR, Stereo System or other devices as necessary for additional connection information. Connect the COMPONENT OUTPUT jacks on the Recorder to the...
...to the correct video input channel. • Do not connect the Recorder's AUDIO OUTPUT jack to the manuals of your audio system. • Do not connect the Recorder via another VCR. S-Video connection Connect the S-VIDEO OUTPUT jack on the Recorder to the video in jack on the...COMPONENT/PROGRESSIVE SCAN VIDEO INPUT AUDIO INPUT Pr Pb Y R L S Rear of Recorder C A2 Rear of a nearby TV, VCR, or radio may take advantage of your TV, VCR, Stereo System or other devices as necessary for additional connection information. Connect the COMPONENT OUTPUT jacks on the Recorder to the...
Instructions
Page 14
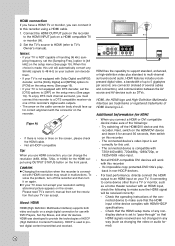
... channel surround, you must connect this recorder to make sure the HDMI signal will be received correctly: - HDMI was developed to TV's Owner's manual). HDMI compatible TV HDMI H HDMI has the capability to support standard, enhanced, or high-definition video plus standard to multi-channel surround-sound audio...the setup menu (See page 19). To solve the problem, turn off the HDMI/DVI device and this recorder. - Please read TV's owner's manual then set the [DTS] options to "pass-through" so that your TV is not equipped with 720(1440)x480i, 720x480p, 1280x720p, or 1920x1080i ...
... channel surround, you must connect this recorder to make sure the HDMI signal will be received correctly: - HDMI was developed to TV's Owner's manual). HDMI compatible TV HDMI H HDMI has the capability to support standard, enhanced, or high-definition video plus standard to multi-channel surround-sound audio...the setup menu (See page 19). To solve the problem, turn off the HDMI/DVI device and this recorder. - Please read TV's owner's manual then set the [DTS] options to "pass-through" so that your TV is not equipped with 720(1440)x480i, 720x480p, 1280x720p, or 1920x1080i ...

Instructions
Page 15
... the Left and Right AUDIO OUTPUT jacks on the Recorder to activate the Recorder 's digital output. (See [Audio Settings] on page 19). Check the receiver manual and the logos on the front of the Recorder's DIGITAL AUDIO OUTPUT jacks (OPTICAL O, COAXIAL X) to a DTS compatible receiver via digital connection can only be...
... the Left and Right AUDIO OUTPUT jacks on the Recorder to activate the Recorder 's digital output. (See [Audio Settings] on page 19). Check the receiver manual and the logos on the front of the Recorder's DIGITAL AUDIO OUTPUT jacks (OPTICAL O, COAXIAL X) to a DTS compatible receiver via digital connection can only be...

Instructions
Page 24
...goto tape counter position 0:00:00, press RETURN while the tape is inserted. Manually reduces noise on the screen during tape playback. Tracking is set automatically when a tape is in Stop mode or in the VCR deck. Sets tape audio to 0:00:00. Press repeatedly to step forward ...protect the tape and video heads • After 3 minutes in SEARCH mode the Recorder returns to PLAY mode to protect the tape and video heads. VCR Playback Options Buttons Operations EJECT (Z) PAUSE (X) FORWARD (M) BACKWARD (m) CLEAR TRACKING (+/-) AUDIO Ejects the tape in Play mode. In Stop mode, fast ...
...goto tape counter position 0:00:00, press RETURN while the tape is inserted. Manually reduces noise on the screen during tape playback. Tracking is set automatically when a tape is in Stop mode or in the VCR deck. Sets tape audio to 0:00:00. Press repeatedly to step forward ...protect the tape and video heads • After 3 minutes in SEARCH mode the Recorder returns to PLAY mode to protect the tape and video heads. VCR Playback Options Buttons Operations EJECT (Z) PAUSE (X) FORWARD (M) BACKWARD (m) CLEAR TRACKING (+/-) AUDIO Ejects the tape in Play mode. In Stop mode, fast ...

Instructions
Page 36
... ends. Dubbing will remain in the DVD deck and close the disc tray. 2. Tip: If you want to record. 5. This allows you can adjust the VCR playback position using PLAY, REW, FF, PAUSE/STEP, etc. It is not permitted to copy Macrovision encoded tapes. Mode: XP, SP, LP or EP. .... 6. Use v / V / b / B to select the desired Record Rec. Dubbing from DVD to VCR Dubbing from VCR to DVD You can copy the contents of a DVD to a VHS tape using the DUBBING button. 1. The VCR deck will stop the dubbing process manually when the DVD movie ends, or the unit may replay and record over...
... ends. Dubbing will remain in the DVD deck and close the disc tray. 2. Tip: If you want to record. 5. This allows you can adjust the VCR playback position using PLAY, REW, FF, PAUSE/STEP, etc. It is not permitted to copy Macrovision encoded tapes. Mode: XP, SP, LP or EP. .... 6. Use v / V / b / B to select the desired Record Rec. Dubbing from DVD to VCR Dubbing from VCR to DVD You can copy the contents of a DVD to a VHS tape using the DUBBING button. 1. The VCR deck will stop the dubbing process manually when the DVD movie ends, or the unit may replay and record over...

Instructions
Page 39
... inserting chapter marks at the desired points. Note: Chapter markers are sections of the disc - Adding Chapter Markers -RWVR +RW +R You can also change this manual, you need one or more chapters. You can add or delete parts. The still picture that title or chapter. The thumbnail picture of a title from...
... inserting chapter marks at the desired points. Note: Chapter markers are sections of the disc - Adding Chapter Markers -RWVR +RW +R You can also change this manual, you need one or more chapters. You can add or delete parts. The still picture that title or chapter. The thumbnail picture of a title from...
Instructions
Page 45
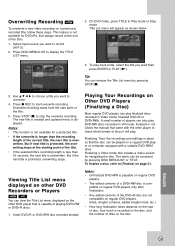
...; If the overwrite is longer than 10 seconds, the next title is not available for navigating the disc. A small number of the title. 5. Check the manual that is recorded on the disc, and the number of playing DVD+RW or DVD+R discs. 1. To finalize a disc, refer to overwrite. 4. Notes: • Unfinalized...
...; If the overwrite is longer than 10 seconds, the next title is not available for navigating the disc. A small number of the title. 5. Check the manual that is recorded on the disc, and the number of playing DVD+RW or DVD+R discs. 1. To finalize a disc, refer to overwrite. 4. Notes: • Unfinalized...
Instructions
Page 47
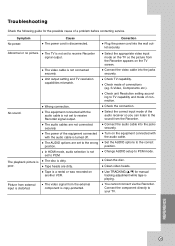
... the wrong position. Check the connection. Turn on the TV screen. REFERENCE 47 The playback picture is a rental or was recorded on another VCR. The power of the equipment connected with the audio cable is not set to TV capability and mode of connections (eg. Correction Plug the... securely. Use TRACKING (v/V) for the possible cause of the audio receiver so you can listen to PCM. Troubleshooting Check the following guide for manual tracking adjustment while tape is copy-protected. No sound. The equipment connected with the audio cable is not set to your TV. Check TV...
... the wrong position. Check the connection. Turn on the TV screen. REFERENCE 47 The playback picture is a rental or was recorded on another VCR. The power of the equipment connected with the audio cable is not set to TV capability and mode of connections (eg. Correction Plug the... securely. Use TRACKING (v/V) for the possible cause of the audio receiver so you can listen to PCM. Troubleshooting Check the following guide for manual tracking adjustment while tape is copy-protected. No sound. The equipment connected with the audio cable is not set to your TV. Check TV...

