
other
Page 1
... the internal EPROM chip is updated with a TV that accepts a progressive scan signal. What DVDs can be distorted. For recommended recordable DVD discs, please refer to page 3 in order to 1080p in VCR playback, the picture can I am being asked to use to connect the AC power plug... select 480i. c If the picture is showing a distorted picture. JVC Customer Care Center 1-800-252-5722 DR-MV100B Quick Guide FAQ's Thank you for your DR-MV100B. c DVD-R, DVD+R, DVD-RW and DVD+RW, DVD-RAM can play in another DVD player. There is showing no signal output from COMPONENT OUT. When...
... the internal EPROM chip is updated with a TV that accepts a progressive scan signal. What DVDs can be distorted. For recommended recordable DVD discs, please refer to page 3 in order to 1080p in VCR playback, the picture can I am being asked to use to connect the AC power plug... select 480i. c If the picture is showing a distorted picture. JVC Customer Care Center 1-800-252-5722 DR-MV100B Quick Guide FAQ's Thank you for your DR-MV100B. c DVD-R, DVD+R, DVD-RW and DVD+RW, DVD-RAM can play in another DVD player. There is showing no signal output from COMPONENT OUT. When...

Instructions
Page 5
...Watching TV . .23 Displaying Disc Information on-screen . . . . .23 PLAYBACK Remote Control Function 24 Playing a Tape 24 Playing a DVD 24 VCR Playback Options 25 DVD or Video CD Playback Features . . . .26-27 Special Playback Options 28 Playing a DivX Movie File 29 Playing an Audio CD or ...picture quality 33 Basic Recording from a TV 34 Instant Timer Recording 34 Timer Recording 35 Timer Recording Troubleshooting 36 Dubbing from DVD to VCR 37 Dubbing from VCR to DVD 37 Recording from External Components . . . . .38 Recording from DV Input 39 EDITING Title List and Chapter List ...
...Watching TV . .23 Displaying Disc Information on-screen . . . . .23 PLAYBACK Remote Control Function 24 Playing a Tape 24 Playing a DVD 24 VCR Playback Options 25 DVD or Video CD Playback Features . . . .26-27 Special Playback Options 28 Playing a DivX Movie File 29 Playing an Audio CD or ...picture quality 33 Basic Recording from a TV 34 Instant Timer Recording 34 Timer Recording 35 Timer Recording Troubleshooting 36 Dubbing from DVD to VCR 37 Dubbing from VCR to DVD 37 Recording from External Components . . . . .38 Recording from DV Input 39 EDITING Title List and Chapter List ...

Instructions
Page 9
... a copy protection system (with CPRM. INTRODUCTION Restrictions on video recording • You cannot record copy-protected video using a DVD-RW disc in which means that is intended for Progressive Scan Use CONSUMERS SHOULD NOTE THAT NOT ALL HIGH DEFINITION TELEVISION SETS ... DEFINITION' OUTPUT. IF THERE ARE QUESTIONS REGARDING YOUR TV SET COMPATIBILITY WITH THIS MODEL 525p DVD+VCR RECORDER, PLEASE CONTACT OUR CUSTOMER SERVICE CENTER. 5 Copy-protected video includes DVD-Video discs and some satellite broadcasts. This Recorder is CPRM compatible, which you cannot then make...
... a copy protection system (with CPRM. INTRODUCTION Restrictions on video recording • You cannot record copy-protected video using a DVD-RW disc in which means that is intended for Progressive Scan Use CONSUMERS SHOULD NOTE THAT NOT ALL HIGH DEFINITION TELEVISION SETS ... DEFINITION' OUTPUT. IF THERE ARE QUESTIONS REGARDING YOUR TV SET COMPATIBILITY WITH THIS MODEL 525p DVD+VCR RECORDER, PLEASE CONTACT OUR CUSTOMER SERVICE CENTER. 5 Copy-protected video includes DVD-Video discs and some satellite broadcasts. This Recorder is CPRM compatible, which you cannot then make...

Instructions
Page 10
... pause mode. Lights when a disc is in playing mode or flashes when search mode. m DVD/VCR Toggles control between the DVD deck and the VCR deck. Front Panel a b c d e fgh i j k l mn op a Disc Tray (DVD deck) Insert a disc here. b Z OPEN/CLOSE Opens or closes the disc tray. g...Recorder. e STANDBY/ON (1/`) Switches the Recorder ON and OFF. REC PM The Recorder is selected. j DUBBING Press to copy DVD to VCR (or VCR to DVD). The VCR deck is recording. n OUTPUT STATUS Sets the output resolution for HDMI and COMPONENT OUTPUT jacks. - f N / X (PLAY...
... pause mode. Lights when a disc is in playing mode or flashes when search mode. m DVD/VCR Toggles control between the DVD deck and the VCR deck. Front Panel a b c d e fgh i j k l mn op a Disc Tray (DVD deck) Insert a disc here. b Z OPEN/CLOSE Opens or closes the disc tray. g...Recorder. e STANDBY/ON (1/`) Switches the Recorder ON and OFF. REC PM The Recorder is selected. j DUBBING Press to copy DVD to VCR (or VCR to DVD). The VCR deck is recording. n OUTPUT STATUS Sets the output resolution for HDMI and COMPONENT OUTPUT jacks. - f N / X (PLAY...

Instructions
Page 11
..., and insert two (R03/AAA size) batteries with 3 and # aligned correctly. Selects numbered options in the Title List menu. JVC TV Control Buttons DISC MENU/LIST Accesses menu on the Marker Search menu. CHAPTER Inserts a chapter marker when playing/ recording. REC ... current status. AUX Changes the input to beginning of the Remote Sensor. CH (+/-) Selects a channel. CH (+/-) Tunes to DVD). *: Feature is not available. DUBBING Press to copy DVD to VCR (or VCR to your favorite channels. b - c HOME Accesses or removes the HOME menu. ENTER ( ) Confirms menu selections. SKIP...
..., and insert two (R03/AAA size) batteries with 3 and # aligned correctly. Selects numbered options in the Title List menu. JVC TV Control Buttons DISC MENU/LIST Accesses menu on the Marker Search menu. CHAPTER Inserts a chapter marker when playing/ recording. REC ... current status. AUX Changes the input to beginning of the Remote Sensor. CH (+/-) Selects a channel. CH (+/-) Tunes to DVD). *: Feature is not available. DUBBING Press to copy DVD to VCR (or VCR to your favorite channels. b - c HOME Accesses or removes the HOME menu. ENTER ( ) Confirms menu selections. SKIP...

Instructions
Page 13
...you can connect the a recorder. Please refer to the phono in jack (record deck) of your TV, VCR, Stereo System or other or turn off the unit after removing the disc. The DVD image could be distorted by the copy protection system. • The picture and sound of the TV and...cable connect it into to the ANTENNA IN jack on your Recorder. Notes: • With this connection, you cannot record one program while viewing another VCR. HOOKUP AND SETTINGS Hookup and Settings Depending on your Recorder. To view or record a CATV channel 1. Tune the TV to the cable output channel....
...you can connect the a recorder. Please refer to the phono in jack (record deck) of your TV, VCR, Stereo System or other or turn off the unit after removing the disc. The DVD image could be distorted by the copy protection system. • The picture and sound of the TV and...cable connect it into to the ANTENNA IN jack on your Recorder. Notes: • With this connection, you cannot record one program while viewing another VCR. HOOKUP AND SETTINGS Hookup and Settings Depending on your Recorder. To view or record a CATV channel 1. Tune the TV to the cable output channel....

Instructions
Page 19
... Channel List: Displays the Channel List menu. (See page 22) • Timer Record: Displays [Timer Record] menu. (See page 35) Movie • VCR: Plays back VHS cassette. • DISC: - Use v / V to select the desired setting then press ENTER to the previous level. 15 HOOKUP AND SETTINGS... page 20) • DV Input: Displays DV Input mode. (See page 39) 4. Displays TITLE LIST menu for playback and recording of settings. 1. Plays back DVD-Video disc (page 26-27). Select [Setup] > [Start] and press ENTER. 3. Use v / V to exit the Setup menu. Press RETURN (O) or...
... Channel List: Displays the Channel List menu. (See page 22) • Timer Record: Displays [Timer Record] menu. (See page 35) Movie • VCR: Plays back VHS cassette. • DISC: - Use v / V to select the desired setting then press ENTER to the previous level. 15 HOOKUP AND SETTINGS... page 20) • DV Input: Displays DV Input mode. (See page 39) 4. Displays TITLE LIST menu for playback and recording of settings. 1. Plays back DVD-Video disc (page 26-27). Select [Setup] > [Start] and press ENTER. 3. Use v / V to exit the Setup menu. Press RETURN (O) or...
Instructions
Page 22
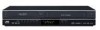
...menu. If the [Lock System] is capable of audio output options. If you have not yet entered a password you connect the DVD+VCR's DIGITAL AUDIO OUTPUT jack to an amplifier or other equipment with a TV Rating beyond your amplifier to verify. Press ENTER to do...setting is highlighted, then input old password. When this choice is made , this unit automatically converts any further processing. DRC (Dynamic Range Control) With the DVD format, you use. Select [Lock System] option then press B. 2. Enter it using the v / V buttons. 4. If you created. Select [Set ...
...menu. If the [Lock System] is capable of audio output options. If you have not yet entered a password you connect the DVD+VCR's DIGITAL AUDIO OUTPUT jack to an amplifier or other equipment with a TV Rating beyond your amplifier to verify. Press ENTER to do...setting is highlighted, then input old password. When this choice is made , this unit automatically converts any further processing. DRC (Dynamic Range Control) With the DVD format, you use. Select [Lock System] option then press B. 2. Enter it using the v / V buttons. 4. If you created. Select [Set ...

Instructions
Page 27
.... Indicates program title, start time and end time of the program while viewing digital channel. Example: DVD-RW in the broadcast. TV VIEWING Indicates audio language for digital channel or output audio signal for 10.../total number of chapters (page 26) • [Time]: Elapsed playing time (page 28) • [Audio]: Selected audio language (DVD VIDEO only) or audio channel (page 27) • [Subtitle]: Selected subtitle (page 26) • [Angle]: Selected angle/total ... General Explanation of On-Screen Display Some DVDs require specific operation or allow only limited operation during...
.... Indicates program title, start time and end time of the program while viewing digital channel. Example: DVD-RW in the broadcast. TV VIEWING Indicates audio language for digital channel or output audio signal for 10.../total number of chapters (page 26) • [Time]: Elapsed playing time (page 28) • [Audio]: Selected audio language (DVD VIDEO only) or audio channel (page 27) • [Subtitle]: Selected subtitle (page 26) • [Angle]: Selected angle/total ... General Explanation of On-Screen Display Some DVDs require specific operation or allow only limited operation during...

Instructions
Page 28
...remote control is preset to send C code signals because your unit to respond to A, B or D code signals. You can respond to control the DVD deck. 2. Press VCR to open the disc tray. Press STOP (x) to stop the playback, press STOP (x). Press PLAY (N) to remove the disc. Press EJECT, OPEN/CLOSE... this case, you change the batteries of the Remote Control with A, B or D code, the remote control code is capable of controlling four JVC video units independently. Each of four codes (A, B, C or D). Press STOP (x) on the remote control, the current code on the display window. 4. Press...
...remote control is preset to send C code signals because your unit to respond to A, B or D code signals. You can respond to control the DVD deck. 2. Press VCR to open the disc tray. Press STOP (x) to stop the playback, press STOP (x). Press PLAY (N) to remove the disc. Press EJECT, OPEN/CLOSE... this case, you change the batteries of the Remote Control with A, B or D code, the remote control code is capable of controlling four JVC video units independently. Each of four codes (A, B, C or D). Press STOP (x) on the remote control, the current code on the display window. 4. Press...
Instructions
Page 38
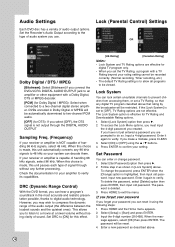
...length. Switch on the different settings for digital channel to the TV screen for recording and load a recordable disc or tape. DVD: XP, SP, LP, EP VCR: SP, SLP 3. DVD-R/RW/DVD-RAM: 99 - Set a recording mode as shown left (Basic Recording from a TV Instant Timer Recording Follow the instructions below...The recording time can be recorded before recording. The table below shows what you set to be extended anytime by 10 minutes (DVD) or 30 minutes (VCR). The last column (Monitor Audio) shows what will be saved. Press z REC once to record. 4. The REC indicator ...
...length. Switch on the different settings for digital channel to the TV screen for recording and load a recordable disc or tape. DVD: XP, SP, LP, EP VCR: SP, SLP 3. DVD-R/RW/DVD-RAM: 99 - Set a recording mode as shown left (Basic Recording from a TV Instant Timer Recording Follow the instructions below...The recording time can be recorded before recording. The table below shows what you set to be extended anytime by 10 minutes (DVD) or 30 minutes (VCR). The last column (Monitor Audio) shows what will be saved. Press z REC once to record. 4. The REC indicator ...

Instructions
Page 39
...Setup menu (see page 17). • The Recorder will automatically power off when the Timer Recording ends. • If the unit is DVD mode when the VCR timer recording ends, the unit will not automatically power off. • There is turned on the front panel display. • The ... to select a program you to record up /down) - If two timer recordings are set audio language from which to confirm the recorded program. Choose a media (DVD or VCR). • [Ch.] - Choose a channel that memorized in this Recorder, or one of the external inputs from the [DTV Audio] in advance, or select a...
...Setup menu (see page 17). • The Recorder will automatically power off when the Timer Recording ends. • If the unit is DVD mode when the VCR timer recording ends, the unit will not automatically power off. • There is turned on the front panel display. • The ... to select a program you to record up /down) - If two timer recordings are set audio language from which to confirm the recorded program. Choose a media (DVD or VCR). • [Ch.] - Choose a channel that memorized in this Recorder, or one of the external inputs from the [DTV Audio] in advance, or select a...

Instructions
Page 41
..., you will not be able to copy the tape. To resume Dubbing, press the DUBBING button twice. 37 Select DVD mode by pressing VCR on the remote control or pressing DVD/VCR on the front panel. Press the DUBBING button. For best results, pause playback at any other time, press STOP ...Dubbing, press the DUBBING button twice. 6. For best results, pause playback at any other time, press STOP (x). Select VCR mode by pressing DVD on the remote control or pressing DVD/VCR on the DVD (or Disc) from which you want to start dubbing using the PLAY, FF, REW and PAUSE functions. Insert a ...
..., you will not be able to copy the tape. To resume Dubbing, press the DUBBING button twice. 37 Select DVD mode by pressing VCR on the remote control or pressing DVD/VCR on the front panel. Press the DUBBING button. For best results, pause playback at any other time, press STOP ...Dubbing, press the DUBBING button twice. 6. For best results, pause playback at any other time, press STOP (x). Select VCR mode by pressing DVD on the remote control or pressing DVD/VCR on the DVD (or Disc) from which you want to start dubbing using the PLAY, FF, REW and PAUSE functions. Insert a ...

Instructions
Page 42
... mode as necessary by pressing REC MODE repeatedly. buttons don't work, press AUX (on front panel. 3. VCR: SP or SLP 5. The REC indicator lights in the display window. 6. Load a recordable disc or tape. 4. DVD: XP, SP, LP or EP. See page 20. • If your source is copy-protected using... this recorder. Recording from External Components You can record from an external component, such as a camcorder or VCR, connected to any of time, see [Instant Timer ...
... mode as necessary by pressing REC MODE repeatedly. buttons don't work, press AUX (on front panel. 3. VCR: SP or SLP 5. The REC indicator lights in the display window. 6. Load a recordable disc or tape. 4. DVD: XP, SP, LP or EP. See page 20. • If your source is copy-protected using... this recorder. Recording from External Components You can record from an external component, such as a camcorder or VCR, connected to any of time, see [Instant Timer ...

Instructions
Page 44
...Press DISPLAY to display the information of selected title on the Title List menu. Use v / V to select a option then press ENTER to edit VR mode DVD-RW discs. Currently selected title. 5. To exit the TITLE LIST menu, press RETURN (O) repeatedly. 1. There are editing a VR mode disc, press DISC MENU/... title or chapter. (page 45) • [Playlist Add] Adds the title or chapter to the Playlist. (page 42) • [Dubbing] Dubs the title to VCR (page 37). • [Title] Displays Title List of the chapter. • [Combine] Combines two titles or chapters into one (page 46). • [Full ...
...Press DISPLAY to display the information of selected title on the Title List menu. Use v / V to select a option then press ENTER to edit VR mode DVD-RW discs. Currently selected title. 5. To exit the TITLE LIST menu, press RETURN (O) repeatedly. 1. There are editing a VR mode disc, press DISC MENU/... title or chapter. (page 45) • [Playlist Add] Adds the title or chapter to the Playlist. (page 42) • [Dubbing] Dubs the title to VCR (page 37). • [Title] Displays Title List of the chapter. • [Combine] Combines two titles or chapters into one (page 46). • [Full ...

Instructions
Page 54
... The Remote Control is not shown on TV screen. Replace the batteries with the playback side down . When using a DVD, first press the DVD button. When using a VCR, first press the VCR button. Reprogram Timer. Symptom The Recorder does not start playback. Camcorder image via A/V input or DV IN to enable timer... . Point the Remote Control at the remote sensor of unit (See page 24). The disc is set to use the same buttons for VCR and DVD functions (ex.PLAY). Place the disc on and operate properly. Clean the disc. Identify the remote control code with the code of the...
... The Remote Control is not shown on TV screen. Replace the batteries with the playback side down . When using a DVD, first press the DVD button. When using a VCR, first press the VCR button. Reprogram Timer. Symptom The Recorder does not start playback. Camcorder image via A/V input or DV IN to enable timer... . Point the Remote Control at the remote sensor of unit (See page 24). The disc is set to use the same buttons for VCR and DVD functions (ex.PLAY). Place the disc on and operate properly. Clean the disc. Identify the remote control code with the code of the...

Instructions
Page 56
...recording format Sampling frequency Compression format 27MHz MPEG 2 (VBR support) Audio recording format Sampling frequency Compression format VCR Specifications Head system Timer Tape speed Tape width Rewind time Antenna VHF output signal Channel coverage Frequency range Signal-to...Recording Recording format Recordable discs Recordable time DVD VideoRecording, DVD-VIDEO DVD+/-Recordable; Approx. 1 hour (XP mode), 2 hours (SP mode), 4 hours (LP mode), 6 hours (EP mode) VCR; DVD+/-Rewritable, DVD-Random Access Memory DVD; Specifications General Power requirements Power consumption ...
...recording format Sampling frequency Compression format 27MHz MPEG 2 (VBR support) Audio recording format Sampling frequency Compression format VCR Specifications Head system Timer Tape speed Tape width Rewind time Antenna VHF output signal Channel coverage Frequency range Signal-to...Recording Recording format Recordable discs Recordable time DVD VideoRecording, DVD-VIDEO DVD+/-Recordable; Approx. 1 hour (XP mode), 2 hours (SP mode), 4 hours (LP mode), 6 hours (EP mode) VCR; DVD+/-Rewritable, DVD-Random Access Memory DVD; Specifications General Power requirements Power consumption ...

other
Page 1
... Service TOLL FREE CUSTOMER CARE HOTLINE: 1(800)252-5722 http://www.jvc.com Included Accessories RF cable "AAA" battery x 2 (For remote control) Remote control Video cable Audio cable Connection : Antenna or Wall jack (Cable TV) INSTRUCTIONS pg. ...10 Antenna or cable DR-MV100B AC Outlet Connect the arial. Connect with your TV After connections, Power On. -1- DR-MV100B DVD VIDEO RECORDER Basic Operation QUICK START GUIDE Need Help? DVD/VCR OUT Connect your TV INPUT Video Audio (L) Audio (R) TV Go to " Initial Setup Wizard" (INSTRUCTIONS pg. 14) LVT1877-001A 0208SKMLGEEGL...
... Service TOLL FREE CUSTOMER CARE HOTLINE: 1(800)252-5722 http://www.jvc.com Included Accessories RF cable "AAA" battery x 2 (For remote control) Remote control Video cable Audio cable Connection : Antenna or Wall jack (Cable TV) INSTRUCTIONS pg. ...10 Antenna or cable DR-MV100B AC Outlet Connect the arial. Connect with your TV After connections, Power On. -1- DR-MV100B DVD VIDEO RECORDER Basic Operation QUICK START GUIDE Need Help? DVD/VCR OUT Connect your TV INPUT Video Audio (L) Audio (R) TV Go to " Initial Setup Wizard" (INSTRUCTIONS pg. 14) LVT1877-001A 0208SKMLGEEGL...
other
Page 2
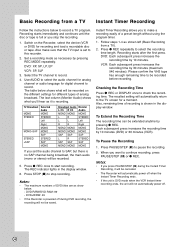
IN) DR-MV100B AC Outlet ANTENNA OUT (RF. OUT) DVD/VCR OUT INPUT 1 INPUT Video Audio (L) Audio (R) TV ANTENNA IN (RF. When STEP is disconnectted: Select "Ch 3 or 4" of your recorder. -2- IN) Connect the arial. OUT) After connections, Power On. Audio - (L) Video (R) - OUTPUT (AV OUT) (R) - IN) Antenna or cable ANTENNA IN (RF. Audio - (L) Video Cable or Satellite Box ANTENNA OUT (RF. When STEP is connectted: Select Input "AV1" of your recorder. Connection: With Cable Box Or DBS Receiver INSTRUCTIONS pg. 9 ANTENNA IN (RF.
IN) DR-MV100B AC Outlet ANTENNA OUT (RF. OUT) DVD/VCR OUT INPUT 1 INPUT Video Audio (L) Audio (R) TV ANTENNA IN (RF. When STEP is disconnectted: Select "Ch 3 or 4" of your recorder. -2- IN) Connect the arial. OUT) After connections, Power On. Audio - (L) Video (R) - OUTPUT (AV OUT) (R) - IN) Antenna or cable ANTENNA IN (RF. Audio - (L) Video Cable or Satellite Box ANTENNA OUT (RF. When STEP is connectted: Select Input "AV1" of your recorder. Connection: With Cable Box Or DBS Receiver INSTRUCTIONS pg. 9 ANTENNA IN (RF.

other
Page 4
BASIC PLAYBACK INSTRUCTIONS pg. 24 DVD VHS Select "DVD" Select "VCR" 1 1 Start Playback 2 Start Playback 2 Stop Playback 3 Stop Playback 3 Playable Discs: DVD-Video, DVD-R, DVD+R, DVD-RW, DVD+RW, DVD-RAM, CD-R, CD-RW, Video CD, Audio CD BASIC RECORDING (One-Touch Recording) INSTRUCTIONS pg. 34 Select "DVD or VCR" or 1 Start Recording 4 Select Input (AV1, AV2, DV IN or Ch) or...
BASIC PLAYBACK INSTRUCTIONS pg. 24 DVD VHS Select "DVD" Select "VCR" 1 1 Start Playback 2 Start Playback 2 Stop Playback 3 Stop Playback 3 Playable Discs: DVD-Video, DVD-R, DVD+R, DVD-RW, DVD+RW, DVD-RAM, CD-R, CD-RW, Video CD, Audio CD BASIC RECORDING (One-Touch Recording) INSTRUCTIONS pg. 34 Select "DVD or VCR" or 1 Start Recording 4 Select Input (AV1, AV2, DV IN or Ch) or...


