Instructions
Page 2
... EDICTEE PAR LE MINISTRE DES COMMUNICATIONS. These limits are designed to radio communications. However, there is encouraged to try to correct the interference by JVC could void the user's authority to operate the equipment. This equipment generates, uses and can be determined by turning the equipment off and on.... For Canada/pour le Canada THIS DIGITAL APPARATUS DOES NOT EXCEED THE CLASS B LIMITS FOR RADIO NOISE EMISSIONS FROM DIGITAL APPARATUS AS SET OUT IN THE INTERFERENCE-CAUSING EQUIPMENT STANDARD ENTITLED "DIGITAL APPARATUS", ICES-003 OF THE DEPARTMENT OF COMMUNICATIONS.
... EDICTEE PAR LE MINISTRE DES COMMUNICATIONS. These limits are designed to radio communications. However, there is encouraged to try to correct the interference by JVC could void the user's authority to operate the equipment. This equipment generates, uses and can be determined by turning the equipment off and on.... For Canada/pour le Canada THIS DIGITAL APPARATUS DOES NOT EXCEED THE CLASS B LIMITS FOR RADIO NOISE EMISSIONS FROM DIGITAL APPARATUS AS SET OUT IN THE INTERFERENCE-CAUSING EQUIPMENT STANDARD ENTITLED "DIGITAL APPARATUS", ICES-003 OF THE DEPARTMENT OF COMMUNICATIONS.
Instructions
Page 6
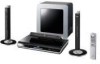
...operations of disc/file playback 22 Playing back a disc 22 Playing back a file 23 Display window on the main unit for purchasing a JVC product. Introduction Pausing playback 27 Advancing the picture frame by frame ..........27 Part description 3 Fast reverse/fast forward search 28 Playing back ...the menu bar 35 Playing back a specified part repeatedly (A-B repeat playback 36 Designating the time (Time search 36 Changing the initial settings with the preference screen 37 Basic operations 37 LANGUAGE 37 PICTURE 38 AUDIO 39 OTHERS 39 Language codes 40 1 Table of contents ...
...operations of disc/file playback 22 Playing back a disc 22 Playing back a file 23 Display window on the main unit for purchasing a JVC product. Introduction Pausing playback 27 Advancing the picture frame by frame ..........27 Part description 3 Fast reverse/fast forward search 28 Playing back ...the menu bar 35 Playing back a specified part repeatedly (A-B repeat playback 36 Designating the time (Time search 36 Changing the initial settings with the preference screen 37 Basic operations 37 LANGUAGE 37 PICTURE 38 AUDIO 39 OTHERS 39 Language codes 40 1 Table of contents ...
Instructions
Page 10
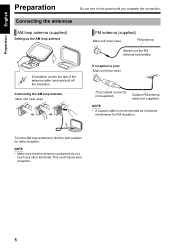
... covers the tips of the antenna cable, twist and pull off the insulation. This could cause poor reception. 5 Connecting the antennas AM loop antenna (supplied) Setting up the AM loop antenna FM antenna (supplied) Main unit (rear view) FM antenna Stretch out the FM antenna horizontally. Turn the AM loop antenna...
... covers the tips of the antenna cable, twist and pull off the insulation. This could cause poor reception. 5 Connecting the antennas AM loop antenna (supplied) Setting up the AM loop antenna FM antenna (supplied) Main unit (rear view) FM antenna Stretch out the FM antenna horizontally. Turn the AM loop antenna...
Instructions
Page 15
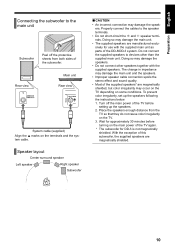
... An incorrect connection may damage the main unit. • The supplied speakers are manufactured exclusively for DD-3 is not magnetically shielded. Wait for approximately 30 minutes before setting up the speakers following the instructions below. 1. The change in impedance may damage the main unit and...subwoofer. Do not connect the supplied speakers to devices other speakers together with the supplied main unit as parts of the DD-8/DD-3 system. Doing so may damage the speakers. With the exception of this subwoofer, the supplied speakers are magnetically shielded, but color...
... An incorrect connection may damage the main unit. • The supplied speakers are manufactured exclusively for DD-3 is not magnetically shielded. Wait for approximately 30 minutes before setting up the speakers following the instructions below. 1. The change in impedance may damage the main unit and...subwoofer. Do not connect the supplied speakers to devices other speakers together with the supplied main unit as parts of the DD-8/DD-3 system. Doing so may damage the speakers. With the exception of this subwoofer, the supplied speakers are magnetically shielded, but color...
Instructions
Page 18
Select "480I" for a TV only compatible with this is not a malfunction of the system. • To check the compatibility of your TV, contact your local JVC customer service center. • All JVC-manufactured progressive TVs and high-definition TVs are fully compatible with interlaced video siginal. - "P" refers to ... To view an image on the power until you press [ENTER], but this system. • Even if the main unit is turned off, the video signal type setting is stored. Select "AUTO" for normal usage (the initial setting). - Select "480P" or "720P" as instructed below . - Generally, ...
Select "480I" for a TV only compatible with this is not a malfunction of the system. • To check the compatibility of your TV, contact your local JVC customer service center. • All JVC-manufactured progressive TVs and high-definition TVs are fully compatible with interlaced video siginal. - "P" refers to ... To view an image on the power until you press [ENTER], but this system. • Even if the main unit is turned off, the video signal type setting is stored. Select "AUTO" for normal usage (the initial setting). - Select "480P" or "720P" as instructed below . - Generally, ...
Instructions
Page 19
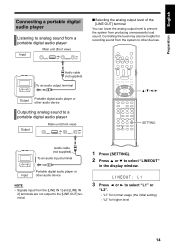
...) To an audio input terminal Input Portable digital audio player or other devices. Controlling the level may also be helpful for recording sound from the system to other audio device NOTE • Signals input from the [LINE IN 1] and [LINE IN 2] terminals are not output to the [LINE ...OUT] terminal. 1 Press [SETTING]. 2 Press 5 or / to select "LINEOUT" in the display window. 3 Press 2 or 3 to prevent the system from a portable digital audio player Input Main unit (front view) ■Selecting the analog output level of the...
...) To an audio input terminal Input Portable digital audio player or other devices. Controlling the level may also be helpful for recording sound from the system to other audio device NOTE • Signals input from the [LINE IN 1] and [LINE IN 2] terminals are not output to the [LINE ...OUT] terminal. 1 Press [SETTING]. 2 Press 5 or / to select "LINEOUT" in the display window. 3 Press 2 or 3 to prevent the system from a portable digital audio player Input Main unit (front view) ■Selecting the analog output level of the...
Instructions
Page 22
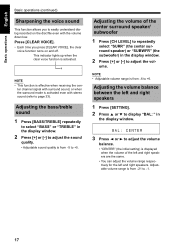
...indicator lights up when the clear voice function is effective when receiving the cen- Adjusting the volume balance between the left and right speakers 1 Press [SETTING]. 2 Press 5 or / to display "BAL: " in the display window. 3 Press 2 or 3 to adjust the volume balance. • "CENTER" (the initial... setting) is displayed when the volume of the center surround speaker/ subwoofer 1 Press [CH LEVEL] to repeatedly select "SURR" (the center surround speaker) or "SUBWFR" (...
...indicator lights up when the clear voice function is effective when receiving the cen- Adjusting the volume balance between the left and right speakers 1 Press [SETTING]. 2 Press 5 or / to display "BAL: " in the display window. 3 Press 2 or 3 to adjust the volume balance. • "CENTER" (the initial... setting) is displayed when the volume of the center surround speaker/ subwoofer 1 Press [CH LEVEL] to repeatedly select "SURR" (the center surround speaker) or "SUBWFR" (...
Instructions
Page 23
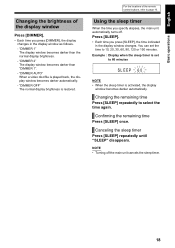
... changes. Press [SLEEP]. • Each time you press [SLEEP], the time indicated in the display window as follows. - You can set to 60 minutes NOTE • When the sleep timer is set the time to 10, 20, 30, 60, 90, 120 or 150 minutes. For the locations of the display window Press...
... changes. Press [SLEEP]. • Each time you press [SLEEP], the time indicated in the display window as follows. - You can set to 60 minutes NOTE • When the sleep timer is set the time to 10, 20, 30, 60, 90, 120 or 150 minutes. For the locations of the display window Press...
Instructions
Page 24
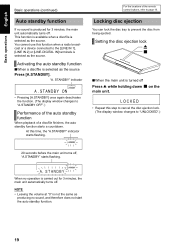
... automatically turns off . At this function when a radio broadcast or a device connected to "UNLOCKED".) 20 seconds before the main unit turns off, "A.STANDBY" starts flashing. Setting the disc ejection lock ■When the main unit is selected as the source Press [A.STANDBY]. . Basic operations English Basic operations (continued) Auto standby function...
... automatically turns off . At this function when a radio broadcast or a device connected to "UNLOCKED".) 20 seconds before the main unit turns off, "A.STANDBY" starts flashing. Setting the disc ejection lock ■When the main unit is selected as the source Press [A.STANDBY]. . Basic operations English Basic operations (continued) Auto standby function...
Instructions
Page 26
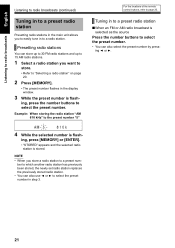
... the preset number in the display window. 3 While the preset number is flash- ber to which another radio station has previously been stored, the newly set radio station replaces the previously stored radio station. • You can also use 2 or 3 to a preset num- ing, press the number buttons to "Selecting a radio...
... the preset number in the display window. 3 While the preset number is flash- ber to which another radio station has previously been stored, the newly set radio station replaces the previously stored radio station. • You can also use 2 or 3 to a preset num- ing, press the number buttons to "Selecting a radio...
Instructions
Page 35
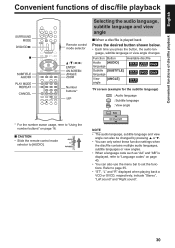
... The audio language, subtitle language and view angle can also be changed by pressing 5 or /. • You can only select these function settings when the disc/file contains multiple audio languages, subtitle languages or view angles. • When a language code such as "AA" and "AB...;When a disc/file is displayed, refer to "Language codes" on page 16. ■ CAUTION • Slide the remote control mode selector to set the functions. Function Button Audio [AUDIO] language Subtitle [SUBTITLE] language View angle [ANGLE] Available disc/file TV screen (example for the subtitle language)...
... The audio language, subtitle language and view angle can also be changed by pressing 5 or /. • You can only select these function settings when the disc/file contains multiple audio languages, subtitle languages or view angles. • When a language code such as "AA" and "AB...;When a disc/file is displayed, refer to "Language codes" on page 16. ■ CAUTION • Slide the remote control mode selector to set the functions. Function Button Audio [AUDIO] language Subtitle [SUBTITLE] language View angle [ANGLE] Available disc/file TV screen (example for the subtitle language)...
Instructions
Page 38
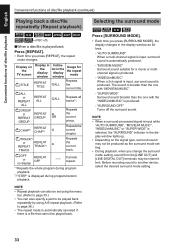
... the display window lights up. • Depending on the TV screen Display in the display window Indicator in the display window as the surround mode setting. • During playback, when you press [REPEAT], the repeat mode changes. NOTE • When a surround-processed signal is input while "AUTO ...SURROUND", "MOVIE/M.MUSIC", "WIDE/2chMUSIC" or "SUPER WIDE" is played back Press [REPEAT]. • Each time you change the surround mode setting, sound from the [LINE OUT] and [LINE-DIGITAL OUT] terminals may not be produced as follows. - "WIDE/2chMUSIC" When a 2ch signal is input...
... the display window lights up. • Depending on the TV screen Display in the display window Indicator in the display window as the surround mode setting. • During playback, when you press [REPEAT], the repeat mode changes. NOTE • When a surround-processed signal is input while "AUTO ...SURROUND", "MOVIE/M.MUSIC", "WIDE/2chMUSIC" or "SUPER WIDE" is played back Press [REPEAT]. • Each time you change the surround mode setting, sound from the [LINE OUT] and [LINE-DIGITAL OUT] terminals may not be produced as follows. - "WIDE/2chMUSIC" When a 2ch signal is input...
Instructions
Page 39
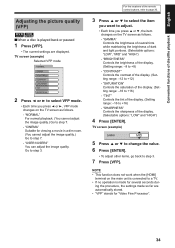
...while maintaining the brightness of the display. (Selectable options: "LOW" and "HIGH") 4 Press [ENTER]. "TINT" Controls the tint of the display. (Setting range: -16 to +16) - English Convenient functions of disc/file playback Adjusting the picture quality (VFP) ■When a disc is connected to ... VFP mode. • Each time you press 5 or /, the item changes on the TV screen as follows. - "SATURATION" Controls the saturation of the display. (Setting range: -12 to step 7. - Go to step 3. 7 Press [VFP]. TV screen (example) Selected VFP mode 2 Press 2 or 3 to a TV. &#...
...while maintaining the brightness of the display. (Selectable options: "LOW" and "HIGH") 4 Press [ENTER]. "TINT" Controls the tint of the display. (Setting range: -16 to +16) - English Convenient functions of disc/file playback Adjusting the picture quality (VFP) ■When a disc is connected to ... VFP mode. • Each time you press 5 or /, the item changes on the TV screen as follows. - "SATURATION" Controls the saturation of the display. (Setting range: -12 to step 7. - Go to step 3. 7 Press [VFP]. TV screen (example) Selected VFP mode 2 Press 2 or 3 to a TV. &#...
Instructions
Page 40
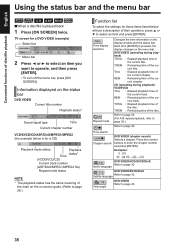
... 30. TV screen for those items listed below is pressed, the display changes on -screen guide. (Refer to page 26.) Function list To select the settings for a DVD VIDEO (example) Status bar Menu bar 2 Press 2 or 3 to select an item you want to enter the chapter number and press [ENTER]. T.REM...
... 30. TV screen for those items listed below is pressed, the display changes on -screen guide. (Refer to page 26.) Function list To select the settings for a DVD VIDEO (example) Status bar Menu bar 2 Press 2 or 3 to select an item you want to enter the chapter number and press [ENTER]. T.REM...
Instructions
Page 41
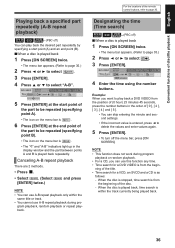
... position of (0 hour) 23 minutes 45 seconds, press the number buttons in the order of [ 0 ], [ 2 ], [ 3 ], [ 4 ] and [ 5 ]. • You can skip entering the minute and second settings. • If the incorrect value is entered, press 2 to be repeated (specifying point A). • The icon on the menu bar is . • The " " and "A-B" indicators...
... position of (0 hour) 23 minutes 45 seconds, press the number buttons in the order of [ 0 ], [ 2 ], [ 3 ], [ 4 ] and [ 5 ]. • You can skip entering the minute and second settings. • If the incorrect value is entered, press 2 to be repeated (specifying point A). • The icon on the menu bar is . • The " " and "A-B" indicators...
Instructions
Page 42
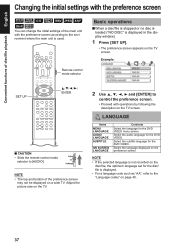
...preference screen may not be displayed on the TV screen. Select the audio language for the disc/ file is displayed in the display window) 1 Press [SET UP]. • The preference screen appears on a wide TV. NOTE • If the selected language is not recorded on the disc/file, the ...optimum language set for the DVD VIDEO. Select the language displayed on page 40. 37 Example: ■ CAUTION • Slide the remote control mode selector to the ...
...preference screen may not be displayed on the TV screen. Select the audio language for the disc/ file is displayed in the display window) 1 Press [SET UP]. • The preference screen appears on a wide TV. NOTE • If the selected language is not recorded on the disc/file, the ...optimum language set for the DVD VIDEO. Select the language displayed on page 40. 37 Example: ■ CAUTION • Slide the remote control mode selector to the ...
Instructions
Page 43
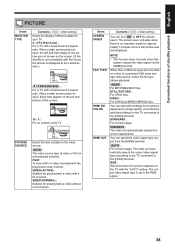
... aspect ratio. The screen saver activates when there is automatically selected. When files of disc/file playback PICTURE Items MONITOR TYPE Contents ( : initial setting) Select the display method suitable for your TV. 4 : 3 PS (Pan Scan) : For a TV with Pan Scan, the picture is...a video with conventional 4:3 aspect ratio. VIDEO : For ASF/DivX/MPEG1/MPEG2 files. RGB : Select this system outputs the video signal via the [HDMI] terminal. When a wide screen picture is set to the [HDMI] terminal. VIDEO (ACTIVE) : Suitable for approximately 5 minutes since a still picture was ...
... aspect ratio. The screen saver activates when there is automatically selected. When files of disc/file playback PICTURE Items MONITOR TYPE Contents ( : initial setting) Select the display method suitable for your TV. 4 : 3 PS (Pan Scan) : For a TV with Pan Scan, the picture is...a video with conventional 4:3 aspect ratio. VIDEO : For ASF/DivX/MPEG1/MPEG2 files. RGB : Select this system outputs the video signal via the [HDMI] terminal. When a wide screen picture is set to the [HDMI] terminal. VIDEO (ACTIVE) : Suitable for approximately 5 minutes since a still picture was ...
Instructions
Page 44
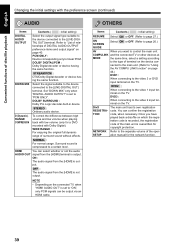
... nected to the main unit. (Refer to "Using the AV COMPU LINK function" on the TV. SETUP ation manual for copyright protection. Set "DOWN MIX" only when "DIGITAL AUDIO OUTPUT" is output. Surround sound is not output. DivX REGISTRATION The main unit has its own ...of surround sound without effects. ON : The audio signal from the [HDMI] is compressed to "PCM ONLY". AUDIO Items Contents ( : initial setting) DIGITAL AUDIO OUTPUT Select the output signal type suitable to the device connected to "ON", only PCM signals can confirm the registration code, when...
... nected to the main unit. (Refer to "Using the AV COMPU LINK function" on the TV. SETUP ation manual for copyright protection. Set "DOWN MIX" only when "DIGITAL AUDIO OUTPUT" is output. Surround sound is not output. DivX REGISTRATION The main unit has its own ...of surround sound without effects. ON : The audio signal from the [HDMI] is compressed to "PCM ONLY". AUDIO Items Contents ( : initial setting) DIGITAL AUDIO OUTPUT Select the output signal type suitable to the device connected to "ON", only PCM signals can confirm the registration code, when...
Instructions
Page 46
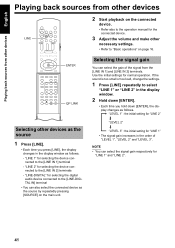
... 3 Adjust the volume and make other devices as follows. - "LEVEL 1" : the initial setting for "LINE 2" "LEVEL 2" "LEVEL 3" : the initial setting for selecting the device connected to the [LINE IN 2] terminals - Use the initial settings for "LINE 1" and "LINE 2". 41 NOTE • You can select the gain of ..."LINE-DIGITAL" for selecting the device connected to the [LINE IN 1] terminal - If the sound is too small or too loud, change the settings. 1 Press [LINE] repeatedly to the [LINE-DIGITAL IN] terminal • You can also select the connected device as follows. "LINE 2"...
... 3 Adjust the volume and make other devices as follows. - "LEVEL 1" : the initial setting for "LINE 2" "LEVEL 2" "LEVEL 3" : the initial setting for selecting the device connected to the [LINE IN 2] terminals - Use the initial settings for "LINE 1" and "LINE 2". 41 NOTE • You can select the gain of ..."LINE-DIGITAL" for selecting the device connected to the [LINE IN 1] terminal - If the sound is too small or too loud, change the settings. 1 Press [LINE] repeatedly to the [LINE-DIGITAL IN] terminal • You can also select the connected device as follows. "LINE 2"...
Instructions
Page 47
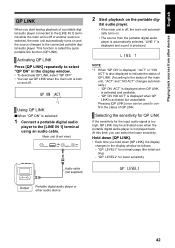
...time you hold down [QP LINK], the display changes in the display window. • To deactivate QP LINK, select "QP OFF". • You can set QP LINK when the main unit is both on and off , the main unit automatically turns on the portable dig- "QP: LEVEL2" for normal usage... (the initial setting) - Pressing [QP LINK] once can select the lower sensitivity. English Playing back sources from the portable digital audio player is automatically selected, "LINE 1" ...
...time you hold down [QP LINK], the display changes in the display window. • To deactivate QP LINK, select "QP OFF". • You can set QP LINK when the main unit is both on and off , the main unit automatically turns on the portable dig- "QP: LEVEL2" for normal usage... (the initial setting) - Pressing [QP LINK] once can select the lower sensitivity. English Playing back sources from the portable digital audio player is automatically selected, "LINE 1" ...


