
User Guide
Page 1
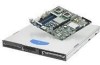
Intel® Server System SR1530CL / SR1530HCL / SR1530HCLS and Intel® Server System SR1530CLR / SR1530HCLR / SR1530HCLSR User Guide A Guide for Technically Qualified Assemblers of Intel® Identified Subassemblies/Products Intel Order Number D68456-005
Intel® Server System SR1530CL / SR1530HCL / SR1530HCLS and Intel® Server System SR1530CLR / SR1530HCLR / SR1530HCLSR User Guide A Guide for Technically Qualified Assemblers of Intel® Identified Subassemblies/Products Intel Order Number D68456-005

User Guide
Page 7
.... Preface About this Manual Thank you for purchasing and using the utilities that may be required to add and replace components on using the Intel® Server System SR1530CL / SR1530HCL / SR1530HCLS and/or the Intel® Server System SR1530CLR / SR1530HCLR / SR1530HCLSR. This manual is available in the Intel® Server Board S5000VCL Technical Product Specification. Chapter 2 provides instructions on the...
.... Preface About this Manual Thank you for purchasing and using the utilities that may be required to add and replace components on using the Intel® Server System SR1530CL / SR1530HCL / SR1530HCLS and/or the Intel® Server System SR1530CLR / SR1530HCLR / SR1530HCLSR. This manual is available in the Intel® Server Board S5000VCL Technical Product Specification. Chapter 2 provides instructions on the...
User Guide
Page 8
...; Server System SR1530CL / SR1530HCL / SR1530HCLS and/or the Intel® Server System SR1530CLR / SR1530HCLR / SR1530HCLSR ships with the following items: • One Intel® Server Board S5000VCL/S5000VCLR, installed in the server system • One 400-watt power supply module, installed in the server system • One low-profile riser, installed in the server system • Two system blowers, with the Intel® Server Board S5000VCLR. The Intel® Server System SR1530CLR...
...; Server System SR1530CL / SR1530HCL / SR1530HCLS and/or the Intel® Server System SR1530CLR / SR1530HCLR / SR1530HCLSR ships with the following items: • One Intel® Server Board S5000VCL/S5000VCLR, installed in the server system • One 400-watt power supply module, installed in the server system • One low-profile riser, installed in the server system • Two system blowers, with the Intel® Server Board S5000VCLR. The Intel® Server System SR1530CLR...

User Guide
Page 9
... SR1530 Technical Product Specification Found at: http://support.intel.com/support/motherboards/server/ S5000VCL/ Intel® Server Board S5000VCL Technical Product Specification Found at: http://support.intel.com/support/motherboards/server/ S5000VCL/ Intel® Server System SR1530CL / SR1530HCL / SR1530HCLS Quick Start User's Guide Intel® Server System SR1530CLR / SR1530HCLR / SR1530HCLSR Quick Start User's Guide Found in the server system • (SR1530HCL/SR1530HCLR) Cables - One front panel...
... SR1530 Technical Product Specification Found at: http://support.intel.com/support/motherboards/server/ S5000VCL/ Intel® Server Board S5000VCL Technical Product Specification Found at: http://support.intel.com/support/motherboards/server/ S5000VCL/ Intel® Server System SR1530CL / SR1530HCL / SR1530HCLS Quick Start User's Guide Intel® Server System SR1530CLR / SR1530HCLR / SR1530HCLSR Quick Start User's Guide Found in the server system • (SR1530HCL/SR1530HCLR) Cables - One front panel...

User Guide
Page 11
... importantes iii Warnings ...v Preface ...vii About this Manual ...vii Manual Organization ...vii Product Contents ...vii Intel® Server System Contents viii Server System References ix Chapter 1: Server System Features 1 Chassis Component Identification 4 Front Control Panel (SR1530CL/SR1530CLR 4 Front Control Panel (SR1530HCL/SR1530HCLS and SR1530HCLR/SR1530HCLSR) 5 System Rear ...6 Peripheral Devices ...7 Internal Components 10 Configuration Jumpers ...13 RAID Support ...14 Rack-Mounted...
... importantes iii Warnings ...v Preface ...vii About this Manual ...vii Manual Organization ...vii Product Contents ...vii Intel® Server System Contents viii Server System References ix Chapter 1: Server System Features 1 Chassis Component Identification 4 Front Control Panel (SR1530CL/SR1530CLR 4 Front Control Panel (SR1530HCL/SR1530HCLS and SR1530HCLR/SR1530HCLSR) 5 System Rear ...6 Peripheral Devices ...7 Internal Components 10 Configuration Jumpers ...13 RAID Support ...14 Rack-Mounted...

User Guide
Page 12
...Bezel 26 Removing the Front Bezel 26 Installing the Front Bezel 27 Removing and Installing the Server Cover 28 Removing the Server System Cover 28 Installing the Server System Cover 30 Removing and Installing the Processor Air Duct 32 Removing the Processor Air Duct ... Heat Sink 40 Removing the Heat Sink and Processor 41 Installing and Removing a Hard Drive (SR1530CL/SR1530CLR 42 Installing a Hard Disk Drive (SR1530CL/SR1530CLR 42 Removing a Hard Disk Drive (SR1530CL/SR1530CLR 46 Installing and Removing a Hot-Swap SAS/SATA Drive (SR1530HCL/SR1530HCLS and SR1530HCLR/SR1530HCLSR 47 ...
...Bezel 26 Removing the Front Bezel 26 Installing the Front Bezel 27 Removing and Installing the Server Cover 28 Removing the Server System Cover 28 Installing the Server System Cover 30 Removing and Installing the Processor Air Duct 32 Removing the Processor Air Duct ... Heat Sink 40 Removing the Heat Sink and Processor 41 Installing and Removing a Hard Drive (SR1530CL/SR1530CLR 42 Installing a Hard Disk Drive (SR1530CL/SR1530CLR 42 Removing a Hard Disk Drive (SR1530CL/SR1530CLR 46 Installing and Removing a Hot-Swap SAS/SATA Drive (SR1530HCL/SR1530HCLS and SR1530HCLR/SR1530HCLSR 47 ...

User Guide
Page 13
... the Server Board 69 Removing the Server Board 71 Replacing the CMOS Battery 72 Replacing the Power Supply (SR1530CL/SR1530CLR 73 Replacing the Power Supply (SR1530HCL/SR1530HCLS and SR1530HCLR/ SR1530HCLSR) ...78 Replacing the Front Panel Board (SR1530CL/SR1530CLR 83 Replacing the Front Panel Board (SR1530HCL/SR1530HCLR 85 Replacing a System Blower 88 Replacing the System Blowers (SR1530CL/SR1530CLR 88 Replacing a System Blower...
... the Server Board 69 Removing the Server Board 71 Replacing the CMOS Battery 72 Replacing the Power Supply (SR1530CL/SR1530CLR 73 Replacing the Power Supply (SR1530HCL/SR1530HCLS and SR1530HCLR/ SR1530HCLSR) ...78 Replacing the Front Panel Board (SR1530CL/SR1530CLR 83 Replacing the Front Panel Board (SR1530HCL/SR1530HCLR 85 Replacing a System Blower 88 Replacing the System Blowers (SR1530CL/SR1530CLR 88 Replacing a System Blower...
User Guide
Page 17
... Module 116 Table 11. Setup Menu Key Use 18 Table 4. Power Supply Output Capability 102 Table 5. Intel® Server System SR1530CL / SR1530HCL / SR1530HCLS and Intel Server System SR1530CLR / SR1530HCLR / SR1530HCLSR Feature Summary 2 Table 2. NIC LED Descriptions 6 Table 3. Other Markings ...166 Server System User Guide xvii System Status LED Color and Blink Codes 115 Table 9. LED Information ...114 Table 8. Product Ecology Compliance...
... Module 116 Table 11. Setup Menu Key Use 18 Table 4. Power Supply Output Capability 102 Table 5. Intel® Server System SR1530CL / SR1530HCL / SR1530HCLS and Intel Server System SR1530CLR / SR1530HCLR / SR1530HCLSR Feature Summary 2 Table 2. NIC LED Descriptions 6 Table 3. Other Markings ...166 Server System User Guide xvii System Status LED Color and Blink Codes 115 Table 9. LED Information ...114 Table 8. Product Ecology Compliance...
User Guide
Page 19
... the Server System Cover (SR1530CL/SR1530CLR 31 Figure 23. Intel® Server System SR1530HCL / SR1530HCLS and SR1530HCLR / SR1530HCLSR ...1 Figure 3. Front Controls and LEDs (SR1530HCL/SR1530HCLS and SR1530HCLR/ SR1530HCLSR)...5 Figure 5. Chassis Components (SR1530CL/SR1530CLR 10 Figure 9. Server Board Connector and Component Locations 12 Figure 11. Installing the Server System Cover (SR1530HCL/SR1530HCLS and SR1530HCLR/ SR1530HCLSR)...31 Figure 24. Optional Peripherals (SR1530CL/SR1530CLR 7 Figure 7. Intel® Server System SR1530CL/SR1530CLR 1 Figure...
... the Server System Cover (SR1530CL/SR1530CLR 31 Figure 23. Intel® Server System SR1530HCL / SR1530HCLS and SR1530HCLR / SR1530HCLSR ...1 Figure 3. Front Controls and LEDs (SR1530HCL/SR1530HCLS and SR1530HCLR/ SR1530HCLSR)...5 Figure 5. Chassis Components (SR1530CL/SR1530CLR 10 Figure 9. Server Board Connector and Component Locations 12 Figure 11. Installing the Server System Cover (SR1530HCL/SR1530HCLS and SR1530HCLR/ SR1530HCLSR)...31 Figure 24. Optional Peripherals (SR1530CL/SR1530CLR 7 Figure 7. Intel® Server System SR1530CL/SR1530CLR 1 Figure...

User Guide
Page 20
.../SR1530HCLS and SR1530HCLR/SR1530HCLSR 56 Figure 55. Installing the Optical Drive into the Server System (SR1530CL/SR1530CLR) ..... 54 Figure 51. Removing Bracket from Mounting Pegs (SR1530CL/SR1530CLR 52 Figure 47. Installing PCI Riser Assembly into Server System (SR1530CL/SR1530CLR 44 Figure 39. Removing Riser Card from Mounting Pegs (SR1530CL/SR1530CLR 58 Figure 57. Attaching the Brackets to Optical Drive (SR1530HCL/SR1530HCLS and...
.../SR1530HCLS and SR1530HCLR/SR1530HCLSR 56 Figure 55. Installing the Optical Drive into the Server System (SR1530CL/SR1530CLR) ..... 54 Figure 51. Removing Bracket from Mounting Pegs (SR1530CL/SR1530CLR 52 Figure 47. Installing PCI Riser Assembly into Server System (SR1530CL/SR1530CLR 44 Figure 39. Removing Riser Card from Mounting Pegs (SR1530CL/SR1530CLR 58 Figure 57. Attaching the Brackets to Optical Drive (SR1530HCL/SR1530HCLS and...
User Guide
Page 21
... from Server System (SR1530HCL/SR1530HCLR). 85 Figure 84. Installing System Blower in Server System (SR1530CL/SR1530CLR 84 Figure 83. Removing Front Panel Board from Front Panel Board 86 Figure 85. Disconnecting System Blower Cables (SR1530CL/SR1530CLR 88 Figure 88. Removing Blower Bracket with System Blowers from Server System (SR1530CL/SR1530CLR)...... 83 Figure 82. Disconnecting Power Cables (SR1530CL/SR1530CLR 74 Figure 74. Removing Front Panel Board from Server System (SR1530CL/ SR1530CLR)...89...
... from Server System (SR1530HCL/SR1530HCLR). 85 Figure 84. Installing System Blower in Server System (SR1530CL/SR1530CLR 84 Figure 83. Removing Front Panel Board from Front Panel Board 86 Figure 85. Disconnecting System Blower Cables (SR1530CL/SR1530CLR 88 Figure 88. Removing Blower Bracket with System Blowers from Server System (SR1530CL/SR1530CLR)...... 83 Figure 82. Disconnecting Power Cables (SR1530CL/SR1530CLR 74 Figure 74. Removing Front Panel Board from Server System (SR1530CL/ SR1530CLR)...89...

User Guide
Page 29
Hard Disk Drive Bay HDD0 (located under the slimline optical drive bay) C. Peripheral Devices The server system provides locations and hardware for installing hard drives, CD-ROM drive, or DVD-ROM drive. The following figure shows the available options. A. Slimline Optical Drive Bay B. Optional Peripherals (SR1530CL/SR1530CLR) Server System User Guide 7 The drives must be purchased separately. A B C AF001184 . Hard Disk Drive Bay HDD1 Figure 6.
Hard Disk Drive Bay HDD0 (located under the slimline optical drive bay) C. Peripheral Devices The server system provides locations and hardware for installing hard drives, CD-ROM drive, or DVD-ROM drive. The following figure shows the available options. A. Slimline Optical Drive Bay B. Optional Peripherals (SR1530CL/SR1530CLR) Server System User Guide 7 The drives must be purchased separately. A B C AF001184 . Hard Disk Drive Bay HDD1 Figure 6.

User Guide
Page 49
Push the bezel onto the front of the bezel, line up the center notch on the bezel with the center guide on the rack handles. 2. AF001056 Figure 18. Installing the Front Bezel (SR1530CL/SR1530CLR) Server System User Guide 27 Lock the bezel. Removing the Front Bezel (SR1530HCL/SR1530HCLS and SR1530HCLR/SR1530HCLSR) Installing the Front Bezel The front bezel is optional. 1. At each end of the server system until it clicks into place. 3. AF001613 Figure 17.
Push the bezel onto the front of the bezel, line up the center notch on the bezel with the center guide on the rack handles. 2. AF001056 Figure 18. Installing the Front Bezel (SR1530CL/SR1530CLR) Server System User Guide 27 Lock the bezel. Removing the Front Bezel (SR1530HCL/SR1530HCLS and SR1530HCLR/SR1530HCLSR) Installing the Front Bezel The front bezel is optional. 1. At each end of the server system until it clicks into place. 3. AF001613 Figure 17.

User Guide
Page 51
Removing the Server System Cover (SR1530CL/SR1530CLR) Server System User Guide 29 B C A AF000971 Figure 20.
Removing the Server System Cover (SR1530CL/SR1530CLR) Server System User Guide 29 B C A AF000971 Figure 20.

User Guide
Page 67
.... If a drive is closest to the power supply to the HDD0 power connector. HDD1 only: Route the power cable into the cable clip on the server board. See letter "B" in Figure 39. - Connect the data cables to the drive(s): - Use caution to the SATA 1 connector on the top of ...HDD1 carrier, attach the connector on the daisy chain power cable that is installed in the HDD0 carrier, attach the middle connector on the server board. B A1 0 HDD 0 C A B D HDD 1 AF001178 Figure 39. Connecting Hard Drive Power and Data Cables (SR1530CL/ SR1530CLR) Server System User Guide 45
.... If a drive is closest to the power supply to the HDD0 power connector. HDD1 only: Route the power cable into the cable clip on the server board. See letter "B" in Figure 39. - Connect the data cables to the drive(s): - Use caution to the SATA 1 connector on the top of ...HDD1 carrier, attach the connector on the daisy chain power cable that is installed in the HDD0 carrier, attach the middle connector on the server board. B A1 0 HDD 0 C A B D HDD 1 AF001178 Figure 39. Connecting Hard Drive Power and Data Cables (SR1530CL/ SR1530CLR) Server System User Guide 45

User Guide
Page 75
Attaching the Interposer Board (SR1530CL/SR1530CLR) 8. Attaching the Brackets to the optical drive using four screws as shown in the following figure. 7. B A AF001186 Figure 48. Attach the brackets to the Optical Drive (SR1530CL/ SR1530CLR) Server System User Guide 53 Attach the interposer board to the rear of the CD-ROM or DVD-ROM drive (see letter "B"). Secure the interposer board to the rear of the CD-ROM or DVD-ROM drive with two screws (see letter "A" in the following figure). AF000672 Figure 49.
Attaching the Interposer Board (SR1530CL/SR1530CLR) 8. Attaching the Brackets to the optical drive using four screws as shown in the following figure. 7. B A AF001186 Figure 48. Attach the brackets to the Optical Drive (SR1530CL/ SR1530CLR) Server System User Guide 53 Attach the interposer board to the rear of the CD-ROM or DVD-ROM drive (see letter "B"). Secure the interposer board to the rear of the CD-ROM or DVD-ROM drive with two screws (see letter "A" in the following figure). AF000672 Figure 49.

User Guide
Page 81
C D B A AF000670 Figure 57. Save these screws for future use. Removing the Optical Drive from the Optical Drive Bracket (SR1530CL/SR1530CLR) Server System User Guide 59 Remove the four screws that attach the brackets to the optical drive, as shown in the following figure. Removing the Brackets from the Server System (SR1530CL/ SR1530CLR) 9. AF000672 Figure 58.
C D B A AF000670 Figure 57. Save these screws for future use. Removing the Optical Drive from the Optical Drive Bracket (SR1530CL/SR1530CLR) Server System User Guide 59 Remove the four screws that attach the brackets to the optical drive, as shown in the following figure. Removing the Brackets from the Server System (SR1530CL/ SR1530CLR) 9. AF000672 Figure 58.

User Guide
Page 97
5. Lift up slightly on the front of the power supply until it from the Server System (SR1530CL/ SR1530CLR) Server System User Guide 75 Removing Power Supply from the chassis. . Save this screw. A B C B AF000994 Figure 74. Remove the screw at the bottom of the server system, next to the AC power input. You will re-insert it later (see letter "C") and then lift it clears the foot at the back of the chassis (see letter "B"). Slide the power supply forward (see letter "A" in the following figure).
5. Lift up slightly on the front of the power supply until it from the Server System (SR1530CL/ SR1530CLR) Server System User Guide 75 Removing Power Supply from the chassis. . Save this screw. A B C B AF000994 Figure 74. Remove the screw at the bottom of the server system, next to the AC power input. You will re-insert it later (see letter "C") and then lift it clears the foot at the back of the chassis (see letter "B"). Slide the power supply forward (see letter "A" in the following figure).

User Guide
Page 105
... wall outlet. Observe the safety and ESD precautions at the right side of service, turn off the system by pressing the power button, and unplug the AC power cord from Server System (SR1530CL/ SR1530CLR) Server System User Guide 83 Remove the server system cover. See letter "A" in the following figure. Before removing or replacing the front panel board, you...
... wall outlet. Observe the safety and ESD precautions at the right side of service, turn off the system by pressing the power button, and unplug the AC power cord from Server System (SR1530CL/ SR1530CLR) Server System User Guide 83 Remove the server system cover. See letter "A" in the following figure. Before removing or replacing the front panel board, you...

User Guide
Page 111
You will re-install them later (see letter "C"). A B C AF000990 Figure 88. Lift the bracket at the front of the bracket first, to clear the hard disk drive brackets (see letter "A" in place. Removing Blower Bracket with System Blowers from the server. 6. Remove the blower cable from beneath the clip at an angle, the front of the blower bracket (see letter "B"). Save these screws. Lift the blower bracket from Server System (SR1530CL/SR1530CLR) Server System User Guide 89 Remove the two screws that secure the blower bracket in the following figure).
You will re-install them later (see letter "C"). A B C AF000990 Figure 88. Lift the bracket at the front of the bracket first, to clear the hard disk drive brackets (see letter "A" in place. Removing Blower Bracket with System Blowers from the server. 6. Remove the blower cable from beneath the clip at an angle, the front of the blower bracket (see letter "B"). Save these screws. Lift the blower bracket from Server System (SR1530CL/SR1530CLR) Server System User Guide 89 Remove the two screws that secure the blower bracket in the following figure).

