
Product Guide
Page 3
... Controller 22 Field Replaceable Units and Sensor Data Records 22 System Event Log ...22 Platform Event Management 23 Emergency Management Port 23 Intel® Server Management 24 Security ...25 Summary of Software Security Features 25 Secure Mode ...27 Password Protection 28 Intrusion Switch Monitoring ... 31 Minimum Hardware Requirements 32 Installation Notes...32 Installation Procedures...33 Installing the I/O Gasket and Shield 33 Installing Chassis Standoffs 35 Installing the Rubber Bumper 36 Installing the Server Board 37 Installing or Replacing Processor(s 38 Contents 3
... Controller 22 Field Replaceable Units and Sensor Data Records 22 System Event Log ...22 Platform Event Management 23 Emergency Management Port 23 Intel® Server Management 24 Security ...25 Summary of Software Security Features 25 Secure Mode ...27 Password Protection 28 Intrusion Switch Monitoring ... 31 Minimum Hardware Requirements 32 Installation Notes...32 Installation Procedures...33 Installing the I/O Gasket and Shield 33 Installing Chassis Standoffs 35 Installing the Rubber Bumper 36 Installing the Server Board 37 Installing or Replacing Processor(s 38 Contents 3

Product Guide
Page 4
Installing Memory ...51 Cable Routing for Intel SC5200 Base Chassis 52 Cable Routing for Intel SC5200 Hot-Swap, Redundant Power Chassis 53 Making Connections to the Server Board 54 Installing the Serial B Cable 55 Finishing Up ...56 Replacing the Backup Battery 57 3 POST and the BIOS ... Access 92 How to Set Up Remote Modem or Serial Access 94 How to Set Up Paging Alerts 96 How Set Up LAN Alerts 98 4 Intel Server Board SE7501HG2 Product Guide
Installing Memory ...51 Cable Routing for Intel SC5200 Base Chassis 52 Cable Routing for Intel SC5200 Hot-Swap, Redundant Power Chassis 53 Making Connections to the Server Board 54 Installing the Serial B Cable 55 Finishing Up ...56 Replacing the Backup Battery 57 3 POST and the BIOS ... Access 92 How to Set Up Remote Modem or Serial Access 94 How to Set Up Paging Alerts 96 How Set Up LAN Alerts 98 4 Intel Server Board SE7501HG2 Product Guide

Product Guide
Page 6
... (CE Declaration of Conformity 132 Taiwan Declaration of the PWT 43 Figure 21. Placing the Server Board in the Chassis 37 Figure 9. Routing Cables...52 Figure 11. Applying Thermal Grease 48 6 Intel Server Board SE7501HG2 Product Guide Attaching the Gasket to the I /O Shield 33 Figure 4. Installing Rubber Bumper 36 Figure 8. Installing the Serial...
... (CE Declaration of Conformity 132 Taiwan Declaration of the PWT 43 Figure 21. Placing the Server Board in the Chassis 37 Figure 9. Routing Cables...52 Figure 11. Applying Thermal Grease 48 6 Intel Server Board SE7501HG2 Product Guide Attaching the Gasket to the I /O Shield 33 Figure 4. Installing Rubber Bumper 36 Figure 8. Installing the Serial...

Product Guide
Page 14
... fan heat sink to support both processors must be installed so that it faces the rear of the processor. 14 Intel Server Board SE7501HG2 Product Guide After the processor and heat sink are installed, both processors. Do not install the Processor Wind Tunnel when... refer to the instructions in the SE7501HG2 Quick Start User's Guide. The processor subsystem includes a single VR (Voltage Regulator) to ensure unimpeded airflow for the processors is required at each boxed Intel Xeon processor. When not using the Intel® Server Chassis SC5200 with your heat sink has ...
... fan heat sink to support both processors must be installed so that it faces the rear of the processor. 14 Intel Server Board SE7501HG2 Product Guide After the processor and heat sink are installed, both processors. Do not install the Processor Wind Tunnel when... refer to the instructions in the SE7501HG2 Quick Start User's Guide. The processor subsystem includes a single VR (Voltage Regulator) to ensure unimpeded airflow for the processors is required at each boxed Intel Xeon processor. When not using the Intel® Server Chassis SC5200 with your heat sink has ...

Product Guide
Page 22
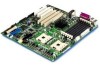
...and information on the types of events that a sensor can also log events by using the System Setup Utility. 22 Intel Server Board SE7501HG2 Product Guide For instructions on using the features described below, refer to send alerts and interact with some sensors disabled ... performs the following functions: • Monitors system components and sensors, including processors, memory, fans, power supplies, temperature sensors, and chassis intrusion sensors. • Manages nonvolatile storage for monitoring. The BMC stores FRU information for the baseboard in the system for the system...
...and information on the types of events that a sensor can also log events by using the System Setup Utility. 22 Intel Server Board SE7501HG2 Product Guide For instructions on using the features described below, refer to send alerts and interact with some sensors disabled ... performs the following functions: • Monitors system components and sensors, including processors, memory, fans, power supplies, temperature sensors, and chassis intrusion sensors. • Manages nonvolatile storage for monitoring. The BMC stores FRU information for the baseboard in the system for the system...

Product Guide
Page 23
... • Voltage sensor out of these forms: • Platform Event Pages - To use of the Serial B port, with either of range • Fan failure • Chassis intrusion • Power supply failure • Memory error • POST error • Processor fault resilient booting (FRB) failure • Fatal nonmaskable interrupt (NMI) from a source..., for remote management. The server is configured with remote access software, such as the Direct Platform Control or the Client System Setup Utility applications in Intel Server Management.
... • Voltage sensor out of these forms: • Platform Event Pages - To use of the Serial B port, with either of range • Fan failure • Chassis intrusion • Power supply failure • Memory error • POST error • Processor fault resilient booting (FRB) failure • Fatal nonmaskable interrupt (NMI) from a source..., for remote management. The server is configured with remote access software, such as the Direct Platform Control or the Client System Setup Utility applications in Intel Server Management.

Product Guide
Page 24
... for serial output redirection over a LAN. For more information on Intel Server Management and the individual ISM applications, see the ISM CD. 24 Intel Server Board SE7501HG2 Product Guide The operating system will control the port, depending on your configuration. Intel® Server Management Intel Server Management (ISM) is a system management package that is a ...locally or remotely, to provide access to the utilities. You can configure these settings using either the SSU or the SCW. ✏ NOTES SC5200 Server Chassis considerations: If you to monitor and manage a server.
... for serial output redirection over a LAN. For more information on Intel Server Management and the individual ISM applications, see the ISM CD. 24 Intel Server Board SE7501HG2 Product Guide The operating system will control the port, depending on your configuration. Intel® Server Management Intel Server Management (ISM) is a system management package that is a ...locally or remotely, to provide access to the utilities. You can configure these settings using either the SSU or the SCW. ✏ NOTES SC5200 Server Chassis considerations: If you to monitor and manage a server.
Product Guide
Page 29
... is later removed. Taking the server out of secure mode does not change the state of the server, the Intel Server Management software monitors the chassis intrusion switch if one is in the chassis. Description 29 Opening an access cover will be powered off when secure mode is set to masked, the system...
... is later removed. Taking the server out of secure mode does not change the state of the server, the Intel Server Management software monitors the chassis intrusion switch if one is in the chassis. Description 29 Opening an access cover will be powered off when secure mode is set to masked, the system...

Product Guide
Page 30
... a Class B device. Safety Cautions These warnings and cautions apply throughout this chapter. To remove power from system, you open the chassis, add, or remove any components. Integration of your local Intel Representative. CAUTIONS System power on/off: The power button DOES NOT turn off the server and disconnect the power cord, telecommunications... system product may be present on page 129 for product Safety and EMC regulatory compliance information. Otherwise, personal injury or equipment damage can result. 30 Intel Server Board SE7501HG2 Product Guide
... a Class B device. Safety Cautions These warnings and cautions apply throughout this chapter. To remove power from system, you open the chassis, add, or remove any components. Integration of your local Intel Representative. CAUTIONS System power on/off: The power button DOES NOT turn off the server and disconnect the power cord, telecommunications... system product may be present on page 129 for product Safety and EMC regulatory compliance information. Otherwise, personal injury or equipment damage can result. 30 Intel Server Board SE7501HG2 Product Guide

Product Guide
Page 31
... speed as the microprocessor used on your server when handling parts. Intended uses: This product was evaluated for use in servers that the chassis, power supply, and other parts. EMC testing: Before computer integration, make sure that will be extremely sensitive to ESD. Hold boards ...wrist strap attached to the server board. Server board diagram label provided: Place the label inside the chassis in an easy-to-see location, preferably oriented similarly to chassis groundany surface. Installations and Upgrades 31 We recommend that you perform all procedures in this ...
... speed as the microprocessor used on your server when handling parts. Intended uses: This product was evaluated for use in servers that the chassis, power supply, and other parts. EMC testing: Before computer integration, make sure that will be extremely sensitive to ESD. Hold boards ...wrist strap attached to the server board. Server board diagram label provided: Place the label inside the chassis in an easy-to-see location, preferably oriented similarly to chassis groundany surface. Installations and Upgrades 31 We recommend that you perform all procedures in this ...

Product Guide
Page 32
... see : http://support.intel.com/support/motherboards/server/SE7501HG2 Memory Minimum of two 128 MB ECC, DDR266-compliant registered SDRAM 184-pin gold DIMMs.1 Power Supply Minimum of one Intel Xeon processor with 1.2 A +5 V standby current (in the Intel® Server Chassis SC5200 with Hot Swap Redundant... Page 35 Page 36 Page 36 Page 38. For more information on supported processors and qualified memory and chassis components, see: http://support.intel.com/support/motherboards/server/SE7501HG2 Processor Minimum of 450 W with 512K cache. Refer also to support Wake On LAN* (WOL)) and...
... see : http://support.intel.com/support/motherboards/server/SE7501HG2 Memory Minimum of two 128 MB ECC, DDR266-compliant registered SDRAM 184-pin gold DIMMs.1 Power Supply Minimum of one Intel Xeon processor with 1.2 A +5 V standby current (in the Intel® Server Chassis SC5200 with Hot Swap Redundant... Page 35 Page 36 Page 36 Page 38. For more information on supported processors and qualified memory and chassis components, see: http://support.intel.com/support/motherboards/server/SE7501HG2 Processor Minimum of 450 W with 512K cache. Refer also to support Wake On LAN* (WOL)) and...

Product Guide
Page 33
... I/O Gasket and Shield ✏ NOTE An ATX 2.03-compliant I /O shield as shown. Remove the two backing strips from inside face of a chassis. Press the gasket onto the inside the chassis. Install the shield from the gasket. 2. TP00028 Figure 3. The shield is provided with the server board. The shield has cutouts that match...
... I/O Gasket and Shield ✏ NOTE An ATX 2.03-compliant I /O shield as shown. Remove the two backing strips from inside face of a chassis. Press the gasket onto the inside the chassis. Install the shield from the gasket. 2. TP00028 Figure 3. The shield is provided with the server board. The shield has cutouts that match...

Product Guide
Page 34
...match the I/O ports on the inner chassis wall. 2. Shield installs from the label included with your server board. 2. Installing the I /O shield snaps into place all the way around. Make sure the I /O Shield OM14625 34 Intel Server Board SE7501HG2 Product Guide It has cutouts that ...the dotted groove is seated. Figure 5. Insert top edge as shown. Press the label onto the outside the chassis wall, and the lip of chassis. Attaching the Label to the I/O Shield ...
...match the I/O ports on the inner chassis wall. 2. Shield installs from the label included with your server board. 2. Installing the I /O shield snaps into place all the way around. Make sure the I /O Shield OM14625 34 Intel Server Board SE7501HG2 Product Guide It has cutouts that ...the dotted groove is seated. Figure 5. Insert top edge as shown. Press the label onto the outside the chassis wall, and the lip of chassis. Attaching the Label to the I/O Shield ...

Product Guide
Page 35
... the server board to malfunction and may be different from the illustration. Standoffs are included with your chassis. Your chassis may permanently damage it. Standoff numbering in the eight positions marked P. Installations and Upgrades 35 Install standoffs...in other chassis may be different. 1 P P 20 P P P P P P 23 4 5 6 26 13 19 Figure 6. Installing Chassis Standoffs TP00105 ✏ NOTE Install standoffs in the server board. For the Intel SC5200 chassis: Standoffs are included with your chassis. Installing Chassis Standoffs If your chassis does not ...
... the server board to malfunction and may be different from the illustration. Standoffs are included with your chassis. Your chassis may permanently damage it. Standoff numbering in the eight positions marked P. Installations and Upgrades 35 Install standoffs...in other chassis may be different. 1 P P 20 P P P P P P 23 4 5 6 26 13 19 Figure 6. Installing Chassis Standoffs TP00105 ✏ NOTE Install standoffs in the server board. For the Intel SC5200 chassis: Standoffs are included with your chassis. Installing Chassis Standoffs If your chassis does not ...

Product Guide
Page 36
Installing Rubber Bumper 36 Intel Server Board SE7501HG2 Product Guide Remove the backing from the bumper and press it firmly into position in your chassis by placing your ruler against the standoffs as shown below. 2. Installing the Rubber Bumper 1. Measure and mark the bumper placement location in the chassis. 1 7 20 P P P P P P 4 8 P 18 7 P 0 23 6 19 26 3" (7.6 cm) OM14835 Figure 7.
Installing Rubber Bumper 36 Intel Server Board SE7501HG2 Product Guide Remove the backing from the bumper and press it firmly into position in your chassis by placing your ruler against the standoffs as shown below. 2. Installing the Rubber Bumper 1. Measure and mark the bumper placement location in the chassis. 1 7 20 P P P P P P 4 8 P 18 7 P 0 23 6 19 26 3" (7.6 cm) OM14835 Figure 7.

Product Guide
Page 37
Installing the Server Board 1. Installations and Upgrades 37 Placing the Server Board in a bag labeled "C." 1 2 Figure 8. Attach fasteners at the nine locations marked below. For the Intel SC5200 chassis, these screws are included with your chassis. Place the board into the four standoffs that the back panel I/O shield openings and chassis standoffs align correctly. 2. Attach the board using the screws that are packaged in the Chassis TP00106 ✏ NOTE If a single processor is to be used, insert screws into the chassis, making sure that border the CPU2 socket.
Installing the Server Board 1. Installations and Upgrades 37 Placing the Server Board in a bag labeled "C." 1 2 Figure 8. Attach fasteners at the nine locations marked below. For the Intel SC5200 chassis, these screws are included with your chassis. Place the board into the four standoffs that the back panel I/O shield openings and chassis standoffs align correctly. 2. Attach the board using the screws that are packaged in the Chassis TP00106 ✏ NOTE If a single processor is to be used, insert screws into the chassis, making sure that border the CPU2 socket.

Product Guide
Page 38
... Support website: http://support.intel.com/support/motherboards/server/SE7501HG2 ESD and handling processors: Reduce the risk of electrostatic discharge (ESD) damage to the processor by doing the following: (1) Touch the metal chassis before touching the processor or server board. Use correct retention ...mechanism clips: The 400 MHz and 533 MHz versions of different types or frequencies. Keep part of your processor. 38 Intel Server Board SE7501HG2 Product Guide Use only the...
... Support website: http://support.intel.com/support/motherboards/server/SE7501HG2 ESD and handling processors: Reduce the risk of electrostatic discharge (ESD) damage to the processor by doing the following: (1) Touch the metal chassis before touching the processor or server board. Use correct retention ...mechanism clips: The 400 MHz and 533 MHz versions of different types or frequencies. Keep part of your processor. 38 Intel Server Board SE7501HG2 Product Guide Use only the...

Product Guide
Page 39
...unplugging the AC power cord. 3. Opening Socket Lever and Attaching Processor Installations and Upgrades 39 Remove power from your system or chassis documentation for the processor. 5. Lower the socket lever completely. ✏ NOTE Make sure the alignment triangle mark and the ...OM15042 Figure 9. If you are installing the Server Board SE7501HG2 in a reference chassis. See Figure 9. If you are installing a processor and the Processor Wind Tunnel (PWT) in the SC5200 base chassis or in the Intel® Server Chassis SC5200 Hot Swap Redundant Power, disregard this chapter and ...
...unplugging the AC power cord. 3. Opening Socket Lever and Attaching Processor Installations and Upgrades 39 Remove power from your system or chassis documentation for the processor. 5. Lower the socket lever completely. ✏ NOTE Make sure the alignment triangle mark and the ...OM15042 Figure 9. If you are installing the Server Board SE7501HG2 in a reference chassis. See Figure 9. If you are installing a processor and the Processor Wind Tunnel (PWT) in the SC5200 base chassis or in the Intel® Server Chassis SC5200 Hot Swap Redundant Power, disregard this chapter and ...

Product Guide
Page 41
Position the retention clips over the plastic tabs at the center of the chassis. 9. Push down on the top of the retention mechanism (Figure 12, 2). 11. A C B C E 1 3 D 2 4 TP00099 Figure 12. Attaching the Heat Sink and Retention Clip Installations and Upgrades ...
Position the retention clips over the plastic tabs at the center of the chassis. 9. Push down on the top of the retention mechanism (Figure 12, 2). 11. A C B C E 1 3 D 2 4 TP00099 Figure 12. Attaching the Heat Sink and Retention Clip Installations and Upgrades ...

Product Guide
Page 44
... the retention mechanism (Figure 15, 2). 15. Attaching the Top Assembly to the Retention Mechanism ✏ NOTE System airflow must be side by side. 44 Intel Server Board SE7501HG2 Product Guide Make sure the PWT is aligned so the fan is toward the front of the retention mechanism apart slightly. If two processors... mechanism (Figure 15, 1). See Figure 15, 1. Attach CPU Fan 1 cable to the retention mechanism. The tabs on the tabs located at the sides of the chassis and the airflow is toward the I/O shield.
... the retention mechanism (Figure 15, 2). 15. Attaching the Top Assembly to the Retention Mechanism ✏ NOTE System airflow must be side by side. 44 Intel Server Board SE7501HG2 Product Guide Make sure the PWT is aligned so the fan is toward the front of the retention mechanism apart slightly. If two processors... mechanism (Figure 15, 1). See Figure 15, 1. Attach CPU Fan 1 cable to the retention mechanism. The tabs on the tabs located at the sides of the chassis and the airflow is toward the I/O shield.