Product Guide
Page 5
...Desktop Board Features Supported Operating Systems 11 Desktop Board Components 12 Processor ...14 Main Memory...14 Intel® Q35 Express Chipset 15 Intel Q35 Graphics Subsystem 16 Intel® GMA 3100 Graphics Controller 16 Digital Video Interface (DVI 17 Audio Subsystem 17 Legacy Input/Output (I/O) Controller 18 LAN Subsystem 18 RJ-45 LAN Connector LEDs 19 Intel... Serial ATA...21 Serial ATA RAID 21 Intel® Rapid Recover Technology 22 Expandability...22 BIOS ...22 Serial ATA and IDE Auto Configuration 22 PCI* and PCI Express* Auto Configuration 22 Security Passwords 23 Hard...
...Desktop Board Features Supported Operating Systems 11 Desktop Board Components 12 Processor ...14 Main Memory...14 Intel® Q35 Express Chipset 15 Intel Q35 Graphics Subsystem 16 Intel® GMA 3100 Graphics Controller 16 Digital Video Interface (DVI 17 Audio Subsystem 17 Legacy Input/Output (I/O) Controller 18 LAN Subsystem 18 RJ-45 LAN Connector LEDs 19 Intel... Serial ATA...21 Serial ATA RAID 21 Intel® Rapid Recover Technology 22 Expandability...22 BIOS ...22 Serial ATA and IDE Auto Configuration 22 PCI* and PCI Express* Auto Configuration 22 Security Passwords 23 Hard...
Product Guide
Page 6
Intel Desktop Board DQ35JO Product Guide 2 Installing and Replacing Desktop Board Components Before You Begin 31 Installation Precautions 32 Prevent Power Supply Overload 32 Observe Safety and Regulatory Requirements 32 Installing the I/O Shield 33 Installing and Removing the Desktop Board 34 Installing and Removing a Processor 35 ...DIMMs 40 Three DIMMs 41 Installing DIMMs 42 Removing DIMMs 44 Installing and Removing a PCI Express x16 Card 45 Installing a PCI Express x16 Card 45 Removing the PCI Express x16 Card 46 Connecting the IDE Cable 47 Connecting the Serial ATA (SATA) ...
Intel Desktop Board DQ35JO Product Guide 2 Installing and Replacing Desktop Board Components Before You Begin 31 Installation Precautions 32 Prevent Power Supply Overload 32 Observe Safety and Regulatory Requirements 32 Installing the I/O Shield 33 Installing and Removing the Desktop Board 34 Installing and Removing a Processor 35 ...DIMMs 40 Three DIMMs 41 Installing DIMMs 42 Removing DIMMs 44 Installing and Removing a PCI Express x16 Card 45 Installing a PCI Express x16 Card 45 Removing the PCI Express x16 Card 46 Connecting the IDE Cable 47 Connecting the Serial ATA (SATA) ...
Product Guide
Page 7
... 79 Recycling Considerations 79 Lead-Free Desktop Board 81 EMC Regulations 83 Ensure Electromagnetic Compatibility (EMC) Compliance 84 Product Certifications 85 Board-Level Certification Markings 85 Chassis and Component Certifications 86 Figures 1. Intel AMT Status Indicator 20 4. Remove the...6. Dual Channel Memory Configuration with Three DIMMs 41 17. Installing a PCI Express x16 Card 45 20. Desktop Board DQ35JO Mounting Screw Hole Locations 34 7. Close the Load Plate 38 13. Removing a PCI Express x16 Card 46 vii Lift the Socket Lever 35 8. Install the ...
... 79 Recycling Considerations 79 Lead-Free Desktop Board 81 EMC Regulations 83 Ensure Electromagnetic Compatibility (EMC) Compliance 84 Product Certifications 85 Board-Level Certification Markings 85 Chassis and Component Certifications 86 Figures 1. Intel AMT Status Indicator 20 4. Remove the...6. Dual Channel Memory Configuration with Three DIMMs 41 17. Installing a PCI Express x16 Card 45 20. Desktop Board DQ35JO Mounting Screw Hole Locations 34 7. Close the Load Plate 38 13. Removing a PCI Express x16 Card 46 vii Lift the Socket Lever 35 8. Install the ...
Product Guide
Page 9
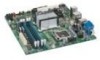
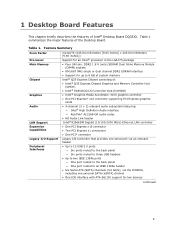
... 8 GB of system memory Intel® Q35 Express Chipset consisting of Intel® Desktop Board DQ35JO. 1 Desktop Board Features This chapter briefly describes the features of : • Intel® Q35 Express Chipset Graphics and Memory Controller Hub (GMCH) • Intel® 82801IDO I/O Controller Hub (ICH9DO) • Intel® Graphics Media Accelerator 3100 graphics controller • One PCI Express* x16 connector supporting PCI Express graphics cards •...
... 8 GB of system memory Intel® Q35 Express Chipset consisting of Intel® Desktop Board DQ35JO. 1 Desktop Board Features This chapter briefly describes the features of : • Intel® Q35 Express Chipset Graphics and Memory Controller Hub (GMCH) • Intel® 82801IDO I/O Controller Hub (ICH9DO) • Intel® Graphics Media Accelerator 3100 graphics controller • One PCI Express* x16 connector supporting PCI Express graphics cards •...
Product Guide
Page 10
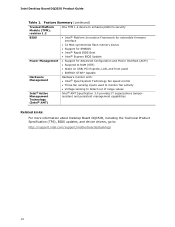
...to RAM (STR) • Wake on USB, PCI Express, LAN, and front panel • ENERGY STAR* capable Hardware Management Intel® Active Management Technology (Intel® AMT) Hardware monitor with: • Intel® Quiet System Technology fan speed control •... Intel® AMT Specification 3.0 provides IT organizations tamperresistant and persistent management capabilities Related Links: For more information about Desktop Board DQ35JO, including the Technical Product Specification (TPS), BIOS updates, and device drivers, go to: http://support.intel.com/support/motherboards/desktop/...
...to RAM (STR) • Wake on USB, PCI Express, LAN, and front panel • ENERGY STAR* capable Hardware Management Intel® Active Management Technology (Intel® AMT) Hardware monitor with: • Intel® Quiet System Technology fan speed control •... Intel® AMT Specification 3.0 provides IT organizations tamperresistant and persistent management capabilities Related Links: For more information about Desktop Board DQ35JO, including the Technical Product Specification (TPS), BIOS updates, and device drivers, go to: http://support.intel.com/support/motherboards/desktop/...
Product Guide
Page 15
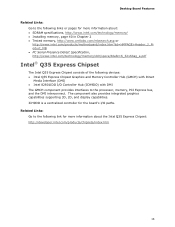
... The GMCH component provides interfaces to the following links or pages for the board's I /O Controller Hub (ICH9DO) with Direct Media Interface (DMI) • Intel 82801IDO I /O paths. The component also provides integrated graphics capabilities supporting 3D, 2D, and display capabilities. Desktop Board Features Related Links: Go to the processor, memory, PCI Express bus, and the DMI interconnect.
... The GMCH component provides interfaces to the following links or pages for the board's I /O Controller Hub (ICH9DO) with Direct Media Interface (DMI) • Intel 82801IDO I /O paths. The component also provides integrated graphics capabilities supporting 3D, 2D, and display capabilities. Desktop Board Features Related Links: Go to the processor, memory, PCI Express bus, and the DMI interconnect.
Product Guide
Page 16
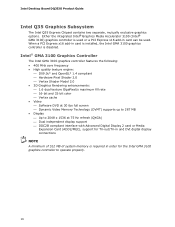
Intel Desktop Board DQ35JO Product Guide Intel Q35 Graphics Subsystem The Intel Q35 Express Chipset contains two separate, mutually exclusive graphics options. When a PCI Express x16 add-in order for TV-out/TV-in and DVI digital display connections NOTE A minimum of 512 MB of system memory is required in card is installed, the Intel... GMA 3100 graphics controller is used or a PCI Express x16 add-in card can be used. Intel® GMA 3100 Graphics Controller The Intel GMA 3100 graphics controller features the following: • 400 ...
Intel Desktop Board DQ35JO Product Guide Intel Q35 Graphics Subsystem The Intel Q35 Express Chipset contains two separate, mutually exclusive graphics options. When a PCI Express x16 add-in order for TV-out/TV-in and DVI digital display connections NOTE A minimum of 512 MB of system memory is required in card is installed, the Intel... GMA 3100 graphics controller is used or a PCI Express x16 add-in card can be used. Intel® GMA 3100 Graphics Controller The Intel GMA 3100 graphics controller features the following: • 400 ...
Product Guide
Page 17
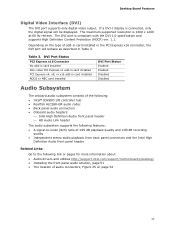
... drivers and utilities http://support.intel.com/support/motherboards/desktop/ • Installing the front panel audio solution, page 51 • The location of audio connectors, Figure 25 on page 54 17 DVI Port Status PCI Express x16 Connector No add-in card installed Non-video PCI Express x1 add-in card installed PCI Express x4, x8, or x16 add...
... drivers and utilities http://support.intel.com/support/motherboards/desktop/ • Installing the front panel audio solution, page 51 • The location of audio connectors, Figure 25 on page 54 17 DVI Port Status PCI Express x16 Connector No add-in card installed Non-video PCI Express x1 add-in card installed PCI Express x4, x8, or x16 add...
Product Guide
Page 22
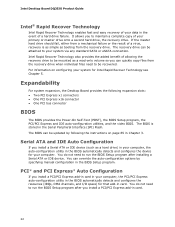
... program after installing a Serial ATA or IDE device. You do not need to your computer. Intel Desktop Board DQ35JO Product Guide Intel® Rapid Recover Technology Intel Rapid Recover Technology enables fast and easy recovery of your primary or master drive onto a second ...Desktop Board provides the following the instructions on configuring your computer, the PCI/PCI Express auto-configuration utility in the BIOS automatically detects and configures the resources (IRQs, DMA channels, and I/O space) for that add-in the BIOS automatically detects and configures the device for Intel...
... program after installing a Serial ATA or IDE device. You do not need to your computer. Intel Desktop Board DQ35JO Product Guide Intel® Rapid Recover Technology Intel Rapid Recover Technology enables fast and easy recovery of your primary or master drive onto a second ...Desktop Board provides the following the instructions on configuring your computer, the PCI/PCI Express auto-configuration utility in the BIOS automatically detects and configures the resources (IRQs, DMA channels, and I/O space) for that add-in the BIOS automatically detects and configures the device for Intel...
Product Guide
Page 27
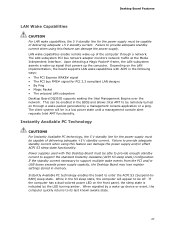
...the Desktop Board may lose register settings stored in memory. Desktop Board Features LAN Wake Capabilities CAUTION For LAN wake capabilities, the 5 V standby line for PCI 2.3 compliant LAN designs • By Ping • Magic Packet • The onboard LAN subsystem Desktop Board DQ35JO supports waking the Intel Management.... The client system will appear to provide adequate standby current when using this Desktop Board must be in the following ways: • The PCI Express WAKE# signal • The PCI bus PME# signal for the power supply must be remotely turned on through ...
...the Desktop Board may lose register settings stored in memory. Desktop Board Features LAN Wake Capabilities CAUTION For LAN wake capabilities, the 5 V standby line for PCI 2.3 compliant LAN designs • By Ping • Magic Packet • The onboard LAN subsystem Desktop Board DQ35JO supports waking the Intel Management.... The client system will appear to provide adequate standby current when using this Desktop Board must be in the following ways: • The PCI Express WAKE# signal • The PCI bus PME# signal for the power supply must be remotely turned on through ...
Product Guide
Page 29
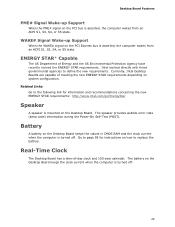
WAKE# Signal Wake-up Support When the PME# signal on the PCI bus is turned off . Intel worked directly with these governmental agencies to replace the battery. Real-Time Clock The Desktop Board has a time-of Energy and the US Environmental Protection Agency have recently ...the following link for instructions on how to define the new requirements. Desktop Board Features PME# Signal Wake-up Support When the WAKE# signal on the PCI Express bus is turned off . 29 Currently, Intel Desktop Boards are capable of meeting the new ENERGY STAR requirements depending on system ...
WAKE# Signal Wake-up Support When the PME# signal on the PCI bus is turned off . Intel worked directly with these governmental agencies to replace the battery. Real-Time Clock The Desktop Board has a time-of Energy and the US Environmental Protection Agency have recently ...the following link for instructions on how to define the new requirements. Desktop Board Features PME# Signal Wake-up Support When the WAKE# signal on the PCI Express bus is turned off . 29 Currently, Intel Desktop Boards are capable of meeting the new ENERGY STAR requirements depending on system ...

Product Guide
Page 31
...This chapter tells you how to: • Install the I/O shield • Install and remove the Desktop Board • Install and remove a processor • Install and remove memory • Install and remove a PCI Express x16 card • Connect the IDE and Serial ATA cables • Install the External SATA (eSATA)...panel power button is not available, you open the computer or perform any of the computer chassis. 31 Some circuitry on the board can result in this chapter only at an ESD workstation using and modifying electronic equipment. Follow these guidelines before you can provide...
...This chapter tells you how to: • Install the I/O shield • Install and remove the Desktop Board • Install and remove a processor • Install and remove memory • Install and remove a PCI Express x16 card • Connect the IDE and Serial ATA cables • Install the External SATA (eSATA)...panel power button is not available, you open the computer or perform any of the computer chassis. 31 Some circuitry on the board can result in this chapter only at an ESD workstation using and modifying electronic equipment. Follow these guidelines before you can provide...
Product Guide
Page 45
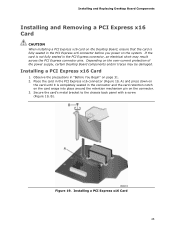
... down on the card until it is fully seated in the PCI Express x16 connector before you power on the system. Installing a PCI Express x16 Card 45 Installing and Replacing Desktop Board Components Installing and Removing a PCI Express x16 Card CAUTION When installing a PCI Express x16 card on the Desktop Board, ensure that the card is completely seated in the connector and...
... down on the card until it is fully seated in the PCI Express x16 connector before you power on the system. Installing a PCI Express x16 Card 45 Installing and Replacing Desktop Board Components Installing and Removing a PCI Express x16 Card CAUTION When installing a PCI Express x16 card on the Desktop Board, ensure that the card is completely seated in the connector and...
Product Guide
Page 46
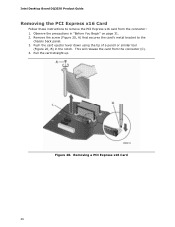
Pull the card straight up. Removing a PCI Express x16 Card 46 Observe the precautions in the notch. Remove the screw (Figure 20, A) that secures the card's metal bracket to remove the PCI Express x16 card from the connector (C). 4. Figure 20. This will release the card from the connector: 1. Intel Desktop Board DQ35JO Product Guide Removing the PCI Express x16 Card Follow these instructions to the chassis back panel. 3. Push the card ejector lever down using the tip of a pencil or similar tool (Figure 20, B) in "Before You Begin" on page 31. 2.
Pull the card straight up. Removing a PCI Express x16 Card 46 Observe the precautions in the notch. Remove the screw (Figure 20, A) that secures the card's metal bracket to remove the PCI Express x16 card from the connector (C). 4. Figure 20. This will release the card from the connector: 1. Intel Desktop Board DQ35JO Product Guide Removing the PCI Express x16 Card Follow these instructions to the chassis back panel. 3. Push the card ejector lever down using the tip of a pencil or similar tool (Figure 20, B) in "Before You Begin" on page 31. 2.

