Product Guide
Page 3
Contents 1 Desktop Board Features Desktop Board Components 9 Processor ...10 Main Memory ...11 Intel® 845GV Chipset ...11 Intel® 82845GV Graphics and Memory Controller Hub (GMCH 12 Intel® 82801DB I/O Controller Hub (ICH4 12 Firmware Hub (FWH 12 Input/Output (I/O) Controller 12 Integrated Graphics...13 LAN Subsystem (Optional 13 LAN Subsystem Software 13 ...
Contents 1 Desktop Board Features Desktop Board Components 9 Processor ...10 Main Memory ...11 Intel® 845GV Chipset ...11 Intel® 82845GV Graphics and Memory Controller Hub (GMCH 12 Intel® 82801DB I/O Controller Hub (ICH4 12 Firmware Hub (FWH 12 Input/Output (I/O) Controller 12 Integrated Graphics...13 LAN Subsystem (Optional 13 LAN Subsystem Software 13 ...
Product Guide
Page 4
Intel Desktop Board D845GVAD2 Product Guide Installing and Removing Memory 24 Installing DIMMs ...24 Removing DIMMs ...25 Connecting the IDE Cable 25 Connecting the Front Panel Header 27 Installing a Front Panel Audio Solution (Optional 27 ... Jumper Block 28 Clearing Passwords ...29 Replacing the Battery ...29 3 Updating the BIOS Updating the BIOS with the Intel® Express BIOS Update Utility 33 Updating the BIOS with the Intel® Flash Memory Update Utility 33 Obtaining the BIOS Update File 33 Updating the BIOS...34 Recovering the BIOS 34 4 Using the...
Intel Desktop Board D845GVAD2 Product Guide Installing and Removing Memory 24 Installing DIMMs ...24 Removing DIMMs ...25 Connecting the IDE Cable 25 Connecting the Front Panel Header 27 Installing a Front Panel Audio Solution (Optional 27 ... Jumper Block 28 Clearing Passwords ...29 Replacing the Battery ...29 3 Updating the BIOS Updating the BIOS with the Intel® Express BIOS Update Utility 33 Updating the BIOS with the Intel® Flash Memory Update Utility 33 Obtaining the BIOS Update File 33 Updating the BIOS...34 Recovering the BIOS 34 4 Using the...
Product Guide
Page 5
... the I/O Shield 20 4. Desktop Board Mounting Holes 21 5. Back Panel Connectors 60 12. Front Panel Headers...64 v Installing a Memory Module 24 8. Connecting the IDE Cable 26 9. Location of the Standby Power Indicator 16 3. Installing a Processor...22 6. Connecting the...31 11. Contents Power and Hardware Connectors 62 Add-In Card and Peripheral Interface Connectors 63 Front Panel Headers 64 Desktop Board Resources 66 Memory Map ...66 DMA Channels ...66 Interrupts ...67 A Error Messages and Indicators BIOS Beep Codes ...69 BIOS Error Messages ...70 B Regulatory...
... the I/O Shield 20 4. Desktop Board Mounting Holes 21 5. Back Panel Connectors 60 12. Front Panel Headers...64 v Installing a Memory Module 24 8. Connecting the IDE Cable 26 9. Location of the Standby Power Indicator 16 3. Installing a Processor...22 6. Connecting the...31 11. Contents Power and Hardware Connectors 62 Add-In Card and Peripheral Interface Connectors 63 Front Panel Headers 64 Desktop Board Resources 66 Memory Map ...66 DMA Channels ...66 Interrupts ...67 A Error Messages and Indicators BIOS Beep Codes ...69 BIOS Error Messages ...70 B Regulatory...
Product Guide
Page 6
...Program Function Keys 38 7. IDE Configuration Submenu 45 14. Security Menu...53 21. Front Panel Audio Header Signal Names (J8A1 61 30. System Memory Map...66 33. BIOS Error Messages 70 37. Jumper Settings for the BIOS Setup Program Modes (J9H2 28 5. Advanced Menu...40 10. ...J9G1 65 32. Video Configuration Submenu 50 18. Power Menu...54 22. RJ-45 LAN Connector LEDs 14 4. Main Menu...39 9. Intel Desktop Board D845GVAD2 Product Guide Tables 1. Event Log Configuration Submenu 49 17. Hard Disk Drives Submenu 56 26. Chipset Configuration Submenu 52 20. BIOS Setup...
...Program Function Keys 38 7. IDE Configuration Submenu 45 14. Security Menu...53 21. Front Panel Audio Header Signal Names (J8A1 61 30. System Memory Map...66 33. BIOS Error Messages 70 37. Jumper Settings for the BIOS Setup Program Modes (J9H2 28 5. Advanced Menu...40 10. ...J9G1 65 32. Video Configuration Submenu 50 18. Power Menu...54 22. RJ-45 LAN Connector LEDs 14 4. Main Menu...39 9. Intel Desktop Board D845GVAD2 Product Guide Tables 1. Event Log Configuration Submenu 49 17. Hard Disk Drives Submenu 56 26. Chipset Configuration Submenu 52 20. BIOS Setup...
Product Guide
Page 7
...at : http://support.intel.com/support/motherboards/desktop/ Intel® 845GV chipset, consisting of: • Intel® 82845GV Graphics and Memory Controller Hub (GMCH) with Accelerated Hub Architecture (AHA) bus • Intel® 82801DB I/O ...Intel® Pentium® 4 processor in an mPGA_478 socket • 400 MHz FSB Intel® Celeron® processor in an mPGA-478 socket • Up to two 184-pin, 2.5 V, Dual Inline Memory Module (DIMM) sockets • DDR266/200 Double Data Rate (DDR) SDRAM interface • Designed to support up to 2 GB of Intel® Desktop Board D845GVAD2...
...at : http://support.intel.com/support/motherboards/desktop/ Intel® 845GV chipset, consisting of: • Intel® 82845GV Graphics and Memory Controller Hub (GMCH) with Accelerated Hub Architecture (AHA) bus • Intel® 82801DB I/O ...Intel® Pentium® 4 processor in an mPGA_478 socket • 400 MHz FSB Intel® Celeron® processor in an mPGA-478 socket • Up to two 184-pin, 2.5 V, Dual Inline Memory Module (DIMM) sockets • DDR266/200 Double Data Rate (DDR) SDRAM interface • Designed to support up to 2 GB of Intel® Desktop Board D845GVAD2...
Product Guide
Page 11
...://support.intel.com/support/motherboards/desktop/ Intel® 845GV Chipset The Intel 845GV chipset consists of tested memory, refer to the Intel World Wide Web site at power up to this board. To view or download these specifications, refer to this Intel World Wide Web site: http://www.intel.com/technology/memory/pcsdram/spec/ Desktop Board D845GVAD2 supports system memory as...
...://support.intel.com/support/motherboards/desktop/ Intel® 845GV Chipset The Intel 845GV chipset consists of tested memory, refer to the Intel World Wide Web site at power up to this board. To view or download these specifications, refer to this Intel World Wide Web site: http://www.intel.com/technology/memory/pcsdram/spec/ Desktop Board D845GVAD2 supports system memory as...
Product Guide
Page 12
... or 2.88 MB diskette drive • Intelligent power management, including a programmable wake up to the rest of the platform. Features on Desktop Board D845GVAD2 include: • Single processor support with access to 2 GB DDR SDRAM at 266/200 MHz operation ✏ NOTE 512 Mbit technology has not been...PCI systems • PS/2-style mouse and keyboard interfaces • Interface for up event interface • PCI power management support 12 Intel Desktop Board D845GVAD2 Product Guide Intel® 82845GV Graphics and Memory Controller Hub (GMCH) The GMCH provides the processor, system...
... or 2.88 MB diskette drive • Intelligent power management, including a programmable wake up to the rest of the platform. Features on Desktop Board D845GVAD2 include: • Single processor support with access to 2 GB DDR SDRAM at 266/200 MHz operation ✏ NOTE 512 Mbit technology has not been...PCI systems • PS/2-style mouse and keyboard interfaces • Interface for up event interface • PCI power management support 12 Intel Desktop Board D845GVAD2 Product Guide Intel® 82845GV Graphics and Memory Controller Hub (GMCH) The GMCH provides the processor, system...
Product Guide
Page 16
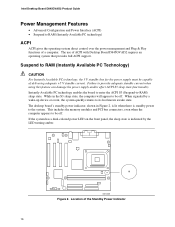
...power to the system. OM14569 Figure 2. Location of ACPI with Desktop Board D845GVAD2 requires an operating system that provides full ACPI support. When signaled by the LED turning amber. This includes the memory modules and PCI bus connectors, even when the computer appears to be off... is lit when there is indicated by a wake-up device or event, the system quickly returns to its last known awake state. Intel Desktop Board D845GVAD2 Product Guide Power Management Features • Advanced Configuration and Power Interface (ACPI) • Suspend to RAM (Instantly Available PC technology)...
...power to the system. OM14569 Figure 2. Location of ACPI with Desktop Board D845GVAD2 requires an operating system that provides full ACPI support. When signaled by the LED turning amber. This includes the memory modules and PCI bus connectors, even when the computer appears to be off... is lit when there is indicated by a wake-up device or event, the system quickly returns to its last known awake state. Intel Desktop Board D845GVAD2 Product Guide Power Management Features • Advanced Configuration and Power Interface (ACPI) • Suspend to RAM (Instantly Available PC technology)...

Product Guide
Page 17
...the location of the fan connectors. See Figure 13 on page 62 for the location of the power connectors. Fan Connectors Desktop Board D845GVAD2 has two chassis fan connectors and one call to access the computer • Detects incoming call similarly for external and internal modems •... of a USB peripheral that supports Wake from the PCI and/or USB buses exceeds power supply capacity, the Intel desktop board may lose register settings stored in memory. Desktop Board Features CAUTION Power supplies used with this desktop board, refer to the TPS by selecting the Technical...
...the location of the fan connectors. See Figure 13 on page 62 for the location of the power connectors. Fan Connectors Desktop Board D845GVAD2 has two chassis fan connectors and one call to access the computer • Detects incoming call similarly for external and internal modems •... of a USB peripheral that supports Wake from the PCI and/or USB buses exceeds power supply capacity, the Intel desktop board may lose register settings stored in memory. Desktop Board Features CAUTION Power supplies used with this desktop board, refer to the TPS by selecting the Technical...
Product Guide
Page 19
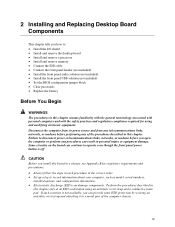
... a station is off. Failure to : • Install the I/O shield • Install and remove the desktop board • Install and remove a processor • Install and remove memory • Connect the IDE cable • Connect the front panel header (not included) • Install the front panel audio solution (not included) • Install the...
... a station is off. Failure to : • Install the I/O shield • Install and remove the desktop board • Install and remove a processor • Install and remove memory • Connect the IDE cable • Connect the front panel header (not included) • Install the front panel audio solution (not included) • Install the...
Product Guide
Page 24
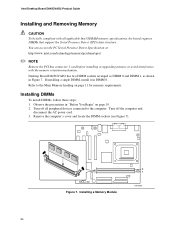
... Remove the computer's cover and locate the DIMM sockets (see Figure 7). Refer to the Main Memory heading on page 19. 2. Figure 7. Turn off the computer and disconnect the AC power cord. 3. Intel Desktop Board D845GVAD2 Product Guide Installing and Removing Memory CAUTION To be fully compliant with the memory retention mechanism. You can access the PC...
... Remove the computer's cover and locate the DIMM sockets (see Figure 7). Refer to the Main Memory heading on page 19. 2. Figure 7. Turn off the computer and disconnect the AC power cord. 3. Intel Desktop Board D845GVAD2 Product Guide Installing and Removing Memory CAUTION To be fully compliant with the memory retention mechanism. You can access the PC...

Product Guide
Page 25
...reconnect the AC power cord. For example, do not connect an ATA hard drive as an ATAPI master device. Position the DIMM above the socket. Replace the computer's cover and reconnect the AC power cord. Gently spread the retaining clips at either end of the slowest drive. ✏...into place. When the DIMM is backward compatible with drives using slower IDE transfer protocols. Removing DIMMs To remove a memory module, follow these steps: 1. Connecting the IDE Cable The Intel® boxed desktop board package includes an IDE cable. The cable connects two drives to the open position. 5. ...
...reconnect the AC power cord. For example, do not connect an ATA hard drive as an ATAPI master device. Position the DIMM above the socket. Replace the computer's cover and reconnect the AC power cord. Gently spread the retaining clips at either end of the slowest drive. ✏...into place. When the DIMM is backward compatible with drives using slower IDE transfer protocols. Removing DIMMs To remove a memory module, follow these steps: 1. Connecting the IDE Cable The Intel® boxed desktop board package includes an IDE cable. The cable connects two drives to the open position. 5. ...
Product Guide
Page 29
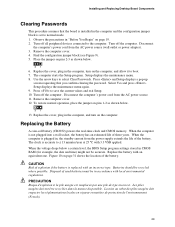
...on the computer. Replace the battery with local environmental regulations. CAUTION Risk of explosion if the battery is not plugged into a wall socket, the battery has an estimated life of the battery. Les piles usagées doivent être recyclées dans la .... 11. Setup displays the maintenance menu. 8. Replacing the Battery A coin-cell battery (CR2032) powers the real-time clock and CMOS memory. Installing and Replacing Desktop Board Components Clearing Passwords This procedure assumes that you confirm clearing the password. PRECAUTION Risque d'explosion si la pile ...
...on the computer. Replace the battery with local environmental regulations. CAUTION Risk of explosion if the battery is not plugged into a wall socket, the battery has an estimated life of the battery. Les piles usagées doivent être recyclées dans la .... 11. Setup displays the maintenance menu. 8. Replacing the Battery A coin-cell battery (CR2032) powers the real-time clock and CMOS memory. Installing and Replacing Desktop Board Components Clearing Passwords This procedure assumes that you confirm clearing the password. PRECAUTION Risque d'explosion si la pile ...
Product Guide
Page 33
...the location on the Intel World Wide Web site: http://support.intel.com/support/motherboards/desktop 33 Updating the BIOS with the Intel Express BIOS Update utility: 1. Go to the D845GVAD2 page and click the Express BIOS Update utility file for creating a bootable flash memory update floppy that contains...need to update the BIOS. To update the BIOS with the Intel® Flash Memory Update Utility With the Intel Flash Memory Update Utility you can update the system BIOS from the Web provides a simple method for the D845GVAD2 board's BIOS. 3. Download the file to your BIOS. ...
...the location on the Intel World Wide Web site: http://support.intel.com/support/motherboards/desktop 33 Updating the BIOS with the Intel Express BIOS Update utility: 1. Go to the D845GVAD2 page and click the Express BIOS Update utility file for creating a bootable flash memory update floppy that contains...need to update the BIOS. To update the BIOS with the Intel® Flash Memory Update Utility With the Intel Flash Memory Update Utility you can update the system BIOS from the Web provides a simple method for the D845GVAD2 board's BIOS. 3. Download the file to your BIOS. ...
Product Guide
Page 34
... the computer, disconnect the computer's power cord, and disconnect all pins as shown below to : • Update the BIOS in flash memory • Update the language section of code available in drive A. Recovering the BIOS It is complete, the monitor will automatically run the BIOS...to boot. Insert the bootable BIOS update diskette into diskette drive A. 5. Intel Desktop Board D845GVAD2 Product Guide ✏ NOTE Review the instructions distributed with the update files updates the BIOS. The Intel Flash Memory Update Utility allows you to remove the diskette and to recover the BIOS ...
... the computer, disconnect the computer's power cord, and disconnect all pins as shown below to : • Update the BIOS in flash memory • Update the language section of code available in drive A. Recovering the BIOS It is complete, the monitor will automatically run the BIOS...to boot. Insert the bootable BIOS update diskette into diskette drive A. 5. Intel Desktop Board D845GVAD2 Product Guide ✏ NOTE Review the instructions distributed with the update files updates the BIOS. The Intel Flash Memory Update Utility allows you to remove the diskette and to recover the BIOS ...
Product Guide
Page 37
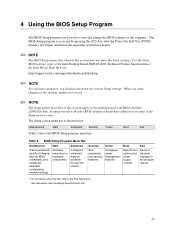
...BIOS identifier LY84510A.86A. 4 Using the BIOS Setup Program The BIOS Setup program can be used to the Intel Desktop Board D845GVAD2 Technical Product Specification or the Intel World Wide Web site: http://support.intel.com/support/motherboards/desktop ✏ NOTE For reference purposes, you make changes to the settings, update this record. ✏... the BIOS Setup program menu bar. BIOS Setup Program Menu Bar Maintenance Clears passwords and Boot Integrity Service (BIS)* credentials, and configures extended configuration memory settings Main Allocates resources for the computer.
...BIOS identifier LY84510A.86A. 4 Using the BIOS Setup Program The BIOS Setup program can be used to the Intel Desktop Board D845GVAD2 Technical Product Specification or the Intel World Wide Web site: http://support.intel.com/support/motherboards/desktop ✏ NOTE For reference purposes, you make changes to the settings, update this record. ✏... the BIOS Setup program menu bar. BIOS Setup Program Menu Bar Maintenance Clears passwords and Boot Integrity Service (BIS)* credentials, and configures extended configuration memory settings Main Allocates resources for the computer.

Product Guide
Page 39
.... Table 8. Main Menu Feature BIOS Version Processor Type Processor Speed System Bus Speed System Memory Speed Cache RAM Options No options No options No options No options No options No options Total Memory Memory Bank 0 Memory Bank 1 Language System Time System Date No options No options • English (default)...the current time. Displays processor type. Displays the size of the BIOS. Displays the total amount of RAM in the memory banks. Displays processor speed. Selects the current default language used to configure the system date and system time. Dislays the system...
.... Table 8. Main Menu Feature BIOS Version Processor Type Processor Speed System Bus Speed System Memory Speed Cache RAM Options No options No options No options No options No options No options Total Memory Memory Bank 0 Memory Bank 1 Language System Time System Date No options No options • English (default)...the current time. Displays processor type. Displays the size of the BIOS. Displays the total amount of RAM in the memory banks. Displays processor speed. Selects the current default language used to configure the system date and system time. Dislays the system...

Product Guide
Page 46
Intel Desktop Board D845GVAD2 Product Guide Primary/Secondary IDE Master/Slave Submenus Maintenance Main Advanced Security PCI Configuration Boot Configuration Peripheral Configuration IDE Configuration Diskette Configuration Event Log Configuration ...; Disabled When the Type feature is set to the device occurs one example is set to be changed. Disabled: the Data transfer from and to memory Check the hard disk drive's specifications for optimum setting. Auto: the Data gransfer from and to User, these IDE submenus. Auto fills-in capabilities from...
Intel Desktop Board D845GVAD2 Product Guide Primary/Secondary IDE Master/Slave Submenus Maintenance Main Advanced Security PCI Configuration Boot Configuration Peripheral Configuration IDE Configuration Diskette Configuration Event Log Configuration ...; Disabled When the Type feature is set to the device occurs one example is set to be changed. Disabled: the Data transfer from and to memory Check the hard disk drive's specifications for optimum setting. Auto: the Data gransfer from and to User, these IDE submenus. Auto fills-in capabilities from...

Product Guide
Page 50
...; 256 MB • Integrated (default) • PCI • 512 KB • 1 MB (default) • 8 MB Amount of system memory available for use by the graphics device. Allows selecting a PCI video controller as the display device that will be active when the system boots. Controls... how much system RAM is used to configure video features. Intel Desktop Board D845GVAD2 Product Guide Video Configuration Submenu Maintenance Main Advanced Security Power Boot Exit PCI Configuration Boot Configuration Peripheral Configuration IDE ...
...; 256 MB • Integrated (default) • PCI • 512 KB • 1 MB (default) • 8 MB Amount of system memory available for use by the graphics device. Allows selecting a PCI video controller as the display device that will be active when the system boots. Controls... how much system RAM is used to configure video features. Intel Desktop Board D845GVAD2 Product Guide Video Configuration Submenu Maintenance Main Advanced Security Power Boot Exit PCI Configuration Boot Configuration Peripheral Configuration IDE ...
Product Guide
Page 52
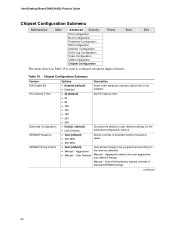
Aggressive • Manual - User Defined allows manual override of detected memory frequency value. Chooses the default or user defined settings for the extended configuration options. continued 52 Chipset Configuration ... to be programmed according to the memory detected. Manual - Allows override of detected SDRAM settings. Manual - Set PCI latency time. Auto allows timings to configure advanced chipset features. Aggressive selects the most aggressive user defiend timings. Intel Desktop Board D845GVAD2 Product Guide Chipset Configuration Submenu Maintenance ...
Aggressive • Manual - User Defined allows manual override of detected memory frequency value. Chooses the default or user defined settings for the extended configuration options. continued 52 Chipset Configuration ... to be programmed according to the memory detected. Manual - Allows override of detected SDRAM settings. Manual - Set PCI latency time. Auto allows timings to configure advanced chipset features. Aggressive selects the most aggressive user defiend timings. Intel Desktop Board D845GVAD2 Product Guide Chipset Configuration Submenu Maintenance ...


