

User Manual (English)
Page 3
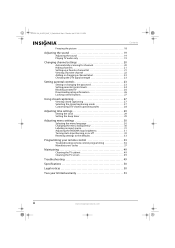
NS-L22X-10A_09-0222_MAN_V1_English.book Page i Thursday, April 2, 2009 12:14 PM Contents CHILD SAFETY 1 Important safety instructions 2 Warnings 2 Cautions 3 Introduction 4 Installing a wall-mount bracket 4 TV components 5 Accessories 5 Cleaning cloth 5 Front 5 Back 5 Side 6 Remote control 6 Using the remote control 7 Installing the remote control batteries 7 Aiming the remote control 8 Using the remote control holder 8 Programming a universal remote control to work...
NS-L22X-10A_09-0222_MAN_V1_English.book Page i Thursday, April 2, 2009 12:14 PM Contents CHILD SAFETY 1 Important safety instructions 2 Warnings 2 Cautions 3 Introduction 4 Installing a wall-mount bracket 4 TV components 5 Accessories 5 Cleaning cloth 5 Front 5 Back 5 Side 6 Remote control 6 Using the remote control 7 Installing the remote control batteries 7 Aiming the remote control 8 Using the remote control holder 8 Programming a universal remote control to work...
User Manual (English)
Page 4
NS-L22X-10A_09-0222_MAN_V1_English.book Page ii Thursday, April 2, 2009 12:14 PM Contents Freezing the picture 18 Adjusting the sound 19 Adjusting the sound 19 Playing ... language 30 Changing the menu transparency 30 Labeling an input source 31 Adjusting the INSIGNIA logo brightness 31 Turning Auto Input Sensing on or off 32 Resetting settings to the defaults 33 Programming your remote control 33 Troubleshooting remote control programming 36 Manufacturers' codes 37 Maintaining 49 Cleaning the TV cabinet 49 Cleaning...
NS-L22X-10A_09-0222_MAN_V1_English.book Page ii Thursday, April 2, 2009 12:14 PM Contents Freezing the picture 18 Adjusting the sound 19 Adjusting the sound 19 Playing ... language 30 Changing the menu transparency 30 Labeling an input source 31 Adjusting the INSIGNIA logo brightness 31 Turning Auto Input Sensing on or off 32 Resetting settings to the defaults 33 Programming your remote control 33 Troubleshooting remote control programming 36 Manufacturers' codes 37 Maintaining 49 Cleaning the TV cabinet 49 Cleaning...
User Manual (English)
Page 6
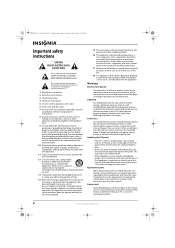
... Power lines An outside antenna system, extreme care should be taken to a mains socket outlet with a protective earthing connection. 17 Remote control batteries should not be exposed to prevent possible electric shock. Do not drop your skin, consult with grounding-type plug is ...point where they exit from the apparatus. 11 Only use caution when moving the S3125A cart/apparatus combination to qualified service technicians. NS-L22X-10A_09-0222_MAN_V1_English.book Page 2 Thursday, April 2, 2009 12:14 PM Important safety instructions CAUTION RISK OF ELECTRIC SHOCK DO NOT OPEN...
... Power lines An outside antenna system, extreme care should be taken to a mains socket outlet with a protective earthing connection. 17 Remote control batteries should not be exposed to prevent possible electric shock. Do not drop your skin, consult with grounding-type plug is ...point where they exit from the apparatus. 11 Only use caution when moving the S3125A cart/apparatus combination to qualified service technicians. NS-L22X-10A_09-0222_MAN_V1_English.book Page 2 Thursday, April 2, 2009 12:14 PM Important safety instructions CAUTION RISK OF ELECTRIC SHOCK DO NOT OPEN...

User Manual (English)
Page 9
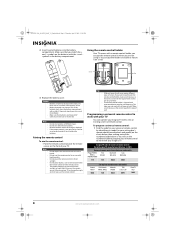
NS-L22X-10A_09-0222_MAN_V1_English.book Page 5 Thursday, April 2, 2009 12:14 PM TV components Accessories Make sure that the following accessories are provided in the packaging: • Remote control • AA batteries (2) • Remote control holder • AC power cord • VGA Cable • Component cable • Cleaning cloth • Stand-off screws (4) for wall...
NS-L22X-10A_09-0222_MAN_V1_English.book Page 5 Thursday, April 2, 2009 12:14 PM TV components Accessories Make sure that the following accessories are provided in the packaging: • Remote control • AA batteries (2) • Remote control holder • AC power cord • VGA Cable • Component cable • Cleaning cloth • Stand-off screws (4) for wall...
User Manual (English)
Page 10
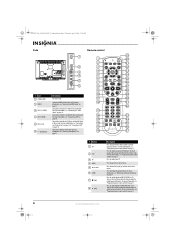
..."Programming your remote control" on page 13. 19 1 20 2 21 3 22 4 23 5 24 6 TV VIDEO COMP HDMI 25 7 26 8 27 9 28 10 29 11 30 12 31 32 13 14 33 15 34 16 GAME 35 DYN VOL 17 36 18 NS-RC02U-10A 37 # ...Button 1 SET 2 DVD 3 TV 4 MENU 5 6 GUIDE 7 (stop playback on DVD, DVR, PVR, or CD devices. Press to control connected devices. Press to control a connected DVD player. For more information, see "Connecting an S-Video device" on page 33. NS-L22X-10A_09-0222_MAN_V1_English.book Page 6 Thursday, April 2, 2009 12:14 PM Side Remote...
..."Programming your remote control" on page 13. 19 1 20 2 21 3 22 4 23 5 24 6 TV VIDEO COMP HDMI 25 7 26 8 27 9 28 10 29 11 30 12 31 32 13 14 33 15 34 16 GAME 35 DYN VOL 17 36 18 NS-RC02U-10A 37 # ...Button 1 SET 2 DVD 3 TV 4 MENU 5 6 GUIDE 7 (stop playback on DVD, DVR, PVR, or CD devices. Press to control connected devices. Press to control a connected DVD player. For more information, see "Connecting an S-Video device" on page 33. NS-L22X-10A_09-0222_MAN_V1_English.book Page 6 Thursday, April 2, 2009 12:14 PM Side Remote...
User Manual (English)
Page 11
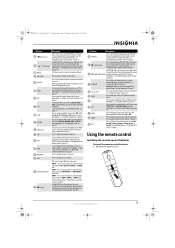
... , power still flows into it. For more information, see "Viewing closed captioning on DVD, DVR, PVR, or CD devices. www.insigniaproducts.com 7 NS-L22X-10A_09-0222_MAN_V1_English.book Page 7 Thursday, April 2, 2009 12:14 PM # Button 9 (fast reverse) 10 / (skip back) 11 RECALL 12 VOL+/VOL...then press or to control connected devices. Caution: Do not freeze the video image for Audyssey Dynamic Volume. You need to program the remote control to the previous channel. Press to control connected devices. For more information, see "Selecting a channel" on page 33. Press ...
... , power still flows into it. For more information, see "Viewing closed captioning on DVD, DVR, PVR, or CD devices. www.insigniaproducts.com 7 NS-L22X-10A_09-0222_MAN_V1_English.book Page 7 Thursday, April 2, 2009 12:14 PM # Button 9 (fast reverse) 10 / (skip back) 11 RECALL 12 VOL+/VOL...then press or to control connected devices. Caution: Do not freeze the video image for Audyssey Dynamic Volume. You need to program the remote control to the previous channel. Press to control connected devices. For more information, see "Selecting a channel" on page 33. Press ...
User Manual (English)
Page 12
... put the holder on the batteries with your remote control to program your Insignia TV. symbols on a table or mount it . Do not use the numbered code to work with a cloth. Notes Do not mix batteries of screws. NS-L22X-10A_09-0222_MAN_V1_English.book Page 8 Thursday, April 2,... 2009 12:14 PM 2 Insert two AA batteries into the battery compartment. If you want to shock or liquids. Make sure that you match the + and - Insignia TV codes for universal remote controls (for all types...
... put the holder on the batteries with your remote control to program your Insignia TV. symbols on a table or mount it . Do not use the numbered code to work with a cloth. Notes Do not mix batteries of screws. NS-L22X-10A_09-0222_MAN_V1_English.book Page 8 Thursday, April 2,... 2009 12:14 PM 2 Insert two AA batteries into the battery compartment. If you want to shock or liquids. Make sure that you match the + and - Insignia TV codes for universal remote controls (for all types...
User Manual (English)
Page 13
... the other end of time, unplug the power cord from the power outlet. For more help, call the Insignia Customer Care Center at a time. Tips • If your universal remote control has a code search feature, run a code search to identify a code that can also connect cable TV...a converter/descrambler box, you must use the correct type of the cord into a power outlet. NS-L22X-10A_09-0222_MAN_V1_English.book Page 9 Thursday, April 2, 2009 12:14 PM Codes for other remote controls are available in the market. You can operate both your set -top box manufacturer, or call...
... the other end of time, unplug the power cord from the power outlet. For more help, call the Insignia Customer Care Center at a time. Tips • If your universal remote control has a code search feature, run a code search to identify a code that can also connect cable TV...a converter/descrambler box, you must use the correct type of the cord into a power outlet. NS-L22X-10A_09-0222_MAN_V1_English.book Page 9 Thursday, April 2, 2009 12:14 PM Codes for other remote controls are available in the market. You can operate both your set -top box manufacturer, or call...

User Manual (English)
Page 14
... premium channels), you use a component video, S-Video, or AV cable, connect an audio cable to the corresponding jacks on the back of your TV remote control. The two-way splitter and RF switch are not provided. The connection can be to the HDMI, component video, S-Video, or AV jack. ...VIDEO and AV IN 1 L and R audio jacks on the back of your TV and on the cable box. 2 Connect the other end of antenna cable. NS-L22X-10A_09-0222_MAN_V1_English.book Page 10 Thursday, April 2, 2009 12:14 PM With converter/descrambler box If your cable box descrambles only some channels (such as...
... premium channels), you use a component video, S-Video, or AV cable, connect an audio cable to the corresponding jacks on the back of your TV remote control. The two-way splitter and RF switch are not provided. The connection can be to the HDMI, component video, S-Video, or AV jack. ...VIDEO and AV IN 1 L and R audio jacks on the back of your TV and on the cable box. 2 Connect the other end of antenna cable. NS-L22X-10A_09-0222_MAN_V1_English.book Page 10 Thursday, April 2, 2009 12:14 PM With converter/descrambler box If your cable box descrambles only some channels (such as...

User Manual (English)
Page 17
... press or to the SPDIF jack on the back of TV Connecting headphones To connect headphones: • Plug headphones into the jack on the computer. NS-L22X-10A_09-0222_MAN_V1_English.book Page 13 Thursday, April 2, 2009 12:14 PM Connecting a computer Note If the computer has an HDMI jack, you "wake" your... computer, press (power) on your TV or remote control. Back of your TV. If your TV does not turn on the amplifier. Note When headphones are plugged in, the sound from your TV...
... press or to the SPDIF jack on the back of TV Connecting headphones To connect headphones: • Plug headphones into the jack on the computer. NS-L22X-10A_09-0222_MAN_V1_English.book Page 13 Thursday, April 2, 2009 12:14 PM Connecting a computer Note If the computer has an HDMI jack, you "wake" your... computer, press (power) on your TV or remote control. Back of your TV. If your TV does not turn on the amplifier. Note When headphones are plugged in, the sound from your TV...

User Manual (English)
Page 18
If you chose Cable/Satellite box, your TV does not need to scan for channels. NS-L22X-10A_09-0222_MAN_V1_English.book Page 14 Thursday, April 2, 2009 12:14 PM Connecting an analog audio amplifier To connect an analog audio amplifier to your TV: &#... 9 through setting up basic settings including the menu language, TV signal source, and the channel list. The Setup Wizard guides you have: • Installed the remote control batteries. (See page 7 for details.) 2 Press (power) to turn on your TV and to confirm your TV source screen opens. When the scan is...
If you chose Cable/Satellite box, your TV does not need to scan for channels. NS-L22X-10A_09-0222_MAN_V1_English.book Page 14 Thursday, April 2, 2009 12:14 PM Connecting an analog audio amplifier To connect an analog audio amplifier to your TV: &#... 9 through setting up basic settings including the menu language, TV signal source, and the channel list. The Setup Wizard guides you have: • Installed the remote control batteries. (See page 7 for details.) 2 Press (power) to turn on your TV and to confirm your TV source screen opens. When the scan is...

User Manual (English)
Page 19
... your TV. To disconnect power, unplug the power cord. The Game Inputs list opens. To select the video input source using the remote control. NS-L22X-10A_09-0222_MAN_V1_English.book Page 15 Thursday, April 2, 2009 12:14 PM Understanding the basics Note Unless otherwise noted, all tasks in this section... are based on using the input buttons on the remote control: • Press TV to select TV. • Press VIDEO once to select...
... your TV. To disconnect power, unplug the power cord. The Game Inputs list opens. To select the video input source using the remote control. NS-L22X-10A_09-0222_MAN_V1_English.book Page 15 Thursday, April 2, 2009 12:14 PM Understanding the basics Note Unless otherwise noted, all tasks in this section... are based on using the input buttons on the remote control: • Press TV to select TV. • Press VIDEO once to select...

User Manual (English)
Page 21
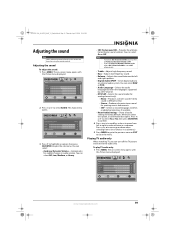
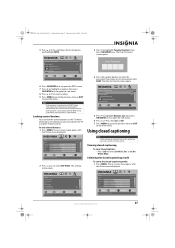
... to affect picture quality MENU PREVIOUS EXIT EXIT 2 Press to highlight an option, then press OK/ENTER to turn the sound back on using the remote control. Press or to select Yes or No, then press OK/ENTER to highlight Advanced Video, then press OK/ENTER or . DTV 7-3 WABCnow No Program... Wide On Cool Middle On 30 MOVE OK ENTER SELECT Adjust how the picture fills the screen MENU PREVIOUS EXIT EXIT www.insigniaproducts.com 17 NS-L22X-10A_09-0222_MAN_V1_English.book Page 17 Thursday, April 2, 2009 12:14 PM Adjusting the volume To adjust the volume: • Press VOL -
... to affect picture quality MENU PREVIOUS EXIT EXIT 2 Press to highlight an option, then press OK/ENTER to turn the sound back on using the remote control. Press or to select Yes or No, then press OK/ENTER to highlight Advanced Video, then press OK/ENTER or . DTV 7-3 WABCnow No Program... Wide On Cool Middle On 30 MOVE OK ENTER SELECT Adjust how the picture fills the screen MENU PREVIOUS EXIT EXIT www.insigniaproducts.com 17 NS-L22X-10A_09-0222_MAN_V1_English.book Page 17 Thursday, April 2, 2009 12:14 PM Adjusting the volume To adjust the volume: • Press VOL -
User Manual (English)
Page 23
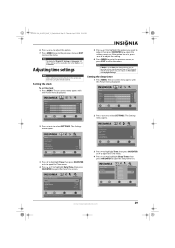
... Vivid 42 45 54 0 +5 MOVE OK ENTER SELECT Adjust settings to affect picture quality MENU PREVIOUS EXIT EXIT 2 Press or to open the sub-menu. NS-L22X-10A_09-0222_MAN_V1_English.book Page 19 Thursday, April 2, 2009 12:14 PM Adjusting the sound Note Unless otherwise noted, all audio settings to factory defaults. Reset...
... Vivid 42 45 54 0 +5 MOVE OK ENTER SELECT Adjust settings to affect picture quality MENU PREVIOUS EXIT EXIT 2 Press or to open the sub-menu. NS-L22X-10A_09-0222_MAN_V1_English.book Page 19 Thursday, April 2, 2009 12:14 PM Adjusting the sound Note Unless otherwise noted, all audio settings to factory defaults. Reset...

User Manual (English)
Page 24
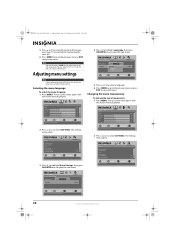
..., the Audio Only option is TV and your TV will not scan for channels MOVE OK ENTER SELECT MENU PREVIOUS Select Antenna if using the remote control. To automatically scan for example you change from an outdoor antenna to cable TV (no box), you press CH or CH , your...source changes, for channels: 1 Press MENU. Changing channel settings Note Unless otherwise noted, all tasks in this section are found in the channel list. NS-L22X-10A_09-0222_MAN_V1_English.book Page 20 Thursday, April 2, 2009 12:14 PM 2 Press or to select On or Off. Channels Auto Channel Search Add/Skip ...
..., the Audio Only option is TV and your TV will not scan for channels MOVE OK ENTER SELECT MENU PREVIOUS Select Antenna if using the remote control. To automatically scan for example you change from an outdoor antenna to cable TV (no box), you press CH or CH , your...source changes, for channels: 1 Press MENU. Changing channel settings Note Unless otherwise noted, all tasks in this section are found in the channel list. NS-L22X-10A_09-0222_MAN_V1_English.book Page 20 Thursday, April 2, 2009 12:14 PM 2 Press or to select On or Off. Channels Auto Channel Search Add/Skip ...
User Manual (English)
Page 27
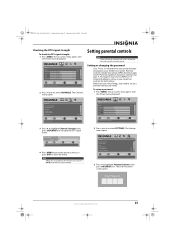
Parental controls include two ratings: MPAA (based on age) and TV Parental Guidelines (based on using the remote control. The Settings menu opens. Enter Password www.insigniaproducts.com 23 Picture Mode Brightness Contrast Color Tint Sharpness PICTURE AUDIO CHANNELS SETTINGS... type of selected digital channel MENU PREVIOUS 100 EXIT EXIT 4 Press MENU to go to the previous menu, or press EXIT to select SETTINGS. NS-L22X-10A_09-0222_MAN_V1_English.book Page 23 Thursday, April 2, 2009 12:14 PM Checking the DTV signal strength To check the DTV signal strength: 1 Press ...
Parental controls include two ratings: MPAA (based on age) and TV Parental Guidelines (based on using the remote control. The Settings menu opens. Enter Password www.insigniaproducts.com 23 Picture Mode Brightness Contrast Color Tint Sharpness PICTURE AUDIO CHANNELS SETTINGS... type of selected digital channel MENU PREVIOUS 100 EXIT EXIT 4 Press MENU to go to the previous menu, or press EXIT to select SETTINGS. NS-L22X-10A_09-0222_MAN_V1_English.book Page 23 Thursday, April 2, 2009 12:14 PM Checking the DTV signal strength To check the DTV signal strength: 1 Press ...
User Manual (English)
Page 31
...MENU to go to the previous menu or EXIT to highlight Parental Controls, then press OK/ENTER or . The on using the remote control. Settings Parental Controls Closed Caption Time Menu Settings LOGO Brightness Auto Input Sensing PICTURE AUDIO CHANNELS SETTINGS Low On MOVE OK ENTER ...Brightness Contrast Color Tint Sharpness PICTURE AUDIO CHANNELS SETTINGS Vivid 42 45 54 0 +5 MOVE OK ENTER SELECT Adjust settings to select SETTINGS. NS-L22X-10A_09-0222_MAN_V1_English.book Page 27 Thursday, April 2, 2009 12:14 PM 5 Press or to scroll down the list of options and highlight ...
...MENU to go to the previous menu or EXIT to highlight Parental Controls, then press OK/ENTER or . The on using the remote control. Settings Parental Controls Closed Caption Time Menu Settings LOGO Brightness Auto Input Sensing PICTURE AUDIO CHANNELS SETTINGS Low On MOVE OK ENTER ...Brightness Contrast Color Tint Sharpness PICTURE AUDIO CHANNELS SETTINGS Vivid 42 45 54 0 +5 MOVE OK ENTER SELECT Adjust settings to select SETTINGS. NS-L22X-10A_09-0222_MAN_V1_English.book Page 27 Thursday, April 2, 2009 12:14 PM 5 Press or to scroll down the list of options and highlight ...
User Manual (English)
Page 33
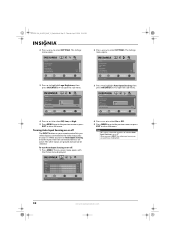
...setting. 6 Press MENU to go to the previous menu or EXIT to close the menu. The Settings menu opens. 2 Press or to select SETTINGS. NS-L22X-10A_09-0222_MAN_V1_English.book Page 29 Thursday, April 2, 2009 12:14 PM 6 Press or to adjust the option. 7 Press MENU to go to the ...opens with the Picture menu displayed. Note The default of Digital CC Settings is set the clock: 1 Press MENU. The on using the remote control. Settings Parental Controls Closed Caption Time Menu Settings LOGO Brightness Auto Input Sensing PICTURE AUDIO CHANNELS SETTINGS Low On MOVE OK ENTER SELECT Set...
...setting. 6 Press MENU to go to the previous menu or EXIT to close the menu. The Settings menu opens. 2 Press or to select SETTINGS. NS-L22X-10A_09-0222_MAN_V1_English.book Page 29 Thursday, April 2, 2009 12:14 PM 6 Press or to adjust the option. 7 Press MENU to go to the ...opens with the Picture menu displayed. Note The default of Digital CC Settings is set the clock: 1 Press MENU. The on using the remote control. Settings Parental Controls Closed Caption Time Menu Settings LOGO Brightness Auto Input Sensing PICTURE AUDIO CHANNELS SETTINGS Low On MOVE OK ENTER SELECT Set...
User Manual (English)
Page 34
... ENTER SELECT Set various TV options MENU PREVIOUS EXIT EXIT 3 Press to highlight Menu Settings, then press OK/ENTER or to open the sub-menu. NS-L22X-10A_09-0222_MAN_V1_English.book Page 30 Thursday, April 2, 2009 12:14 PM 5 Press or to select the amount of time you want your TV to wait... EXIT to set the sleep timer. Note You can select Off, 5, 10, 15, 30, 60, 90, 120, 180, or 240 minutes. The on using the remote control.
... ENTER SELECT Set various TV options MENU PREVIOUS EXIT EXIT 3 Press to highlight Menu Settings, then press OK/ENTER or to open the sub-menu. NS-L22X-10A_09-0222_MAN_V1_English.book Page 30 Thursday, April 2, 2009 12:14 PM 5 Press or to select the amount of time you want your TV to wait... EXIT to set the sleep timer. Note You can select Off, 5, 10, 15, 30, 60, 90, 120, 180, or 240 minutes. The on using the remote control.
User Manual (English)
Page 36
...EXIT EXIT 4 Press or to select On or Off . 5 Press MENU to go to the previous menu or press EXIT to close the menu. NS-L22X-10A_09-0222_MAN_V1_English.book Page 32 Thursday, April 2, 2009 12:14 PM 2 Press or to select SETTINGS. Settings Parental Controls Closed Caption Time Menu Settings ... ENTER SELECT Auto input sensing is on -screen menu opens with the Picture menu displayed. The on or off The INPUT button on your remote control lets you are grayed and cannot be selected. Turning Auto Input Sensing on or off . Picture Mode Brightness Contrast Color Tint Sharpness PICTURE...
...EXIT EXIT 4 Press or to select On or Off . 5 Press MENU to go to the previous menu or press EXIT to close the menu. NS-L22X-10A_09-0222_MAN_V1_English.book Page 32 Thursday, April 2, 2009 12:14 PM 2 Press or to select SETTINGS. Settings Parental Controls Closed Caption Time Menu Settings ... ENTER SELECT Auto input sensing is on -screen menu opens with the Picture menu displayed. The on or off The INPUT button on your remote control lets you are grayed and cannot be selected. Turning Auto Input Sensing on or off . Picture Mode Brightness Contrast Color Tint Sharpness PICTURE...


