
FAQs (English)
Page 1
... online at: NS-L19Q-10A: http://insigniaproducts.com/products/televisions/NS-L19Q10A.html FAQs Insignia FY10 LCD TVs (NS-L19Q-10A, NS-L19W1Q-10A, NS-L22Q-10A, NS-L26Q-10A, NS-L32Q-10A, NS-L37Q-10A, NS-L42Q-10A) July 29, 2010 Setup ...1 Image/Picture Issues 5 Hardware Issues 8 Channel Issues ...8 General ...11 Audio Issues ...12 Setup 1. Insignia TV codes for universal remote controls (for all Insignia TVs manufactured after Jan. 1, 2007) Universal remote control manufacturers and...
... online at: NS-L19Q-10A: http://insigniaproducts.com/products/televisions/NS-L19Q10A.html FAQs Insignia FY10 LCD TVs (NS-L19Q-10A, NS-L19W1Q-10A, NS-L22Q-10A, NS-L26Q-10A, NS-L32Q-10A, NS-L37Q-10A, NS-L42Q-10A) July 29, 2010 Setup ...1 Image/Picture Issues 5 Hardware Issues 8 Channel Issues ...8 General ...11 Audio Issues ...12 Setup 1. Insignia TV codes for universal remote controls (for all Insignia TVs manufactured after Jan. 1, 2007) Universal remote control manufacturers and...
FAQs (English)
Page 2
... NS-L32Q-10A: http://insigniaproducts.com/products/televisions/NS-L32Q10A.html NS-L37Q-10A: http://insigniaproducts.com/products/televisions/NS-L37Q10A.html NS-L42Q-10A: http://insigniaproducts.com/products/televisions/NS-L42Q10A.html Follow your universal remote control's instructions to control. 2 If the code is entered. Turn on programming your Insignia Universal Remote, please refer to program (TV, DVD...
... NS-L32Q-10A: http://insigniaproducts.com/products/televisions/NS-L32Q10A.html NS-L37Q-10A: http://insigniaproducts.com/products/televisions/NS-L37Q10A.html NS-L42Q-10A: http://insigniaproducts.com/products/televisions/NS-L42Q10A.html Follow your universal remote control's instructions to control. 2 If the code is entered. Turn on programming your Insignia Universal Remote, please refer to program (TV, DVD...
FAQs (English)
Page 3
...press OK/ENTER to highlight the CHANNELS. If more help selecting the best connection? To get the best digital audio and picture, use the remote that came with that box to the AV Out jacks on the HDMI device. Component Video Cables are you using? HDMI Cable ... cable are red, green and blue. Press MENU. The audio cables are using a cable/satellite box, cable connected directly to view your remote to select Component to the TV, or an antenna? If you must use an HDMI connection. Component is needed, please follow the steps below. &#...
...press OK/ENTER to highlight the CHANNELS. If more help selecting the best connection? To get the best digital audio and picture, use the remote that came with that box to the AV Out jacks on the HDMI device. Component Video Cables are you using? HDMI Cable ... cable are red, green and blue. Press MENU. The audio cables are using a cable/satellite box, cable connected directly to view your remote to select Component to the TV, or an antenna? If you must use an HDMI connection. Component is needed, please follow the steps below. &#...

FAQs (English)
Page 5
... This is not filling the screen. Turn on the remote: o Normal: Selects the aspect ratio that came with the four included screws. I attach my stand? NS-L19Q-10A, NS-L19W1Q-10A, NS-L22Q-10A o To attach your TV screen face-down on the external devices. The video... cable(s) you are using an antenna, the signal strength of digital TV and movies is possible you are receiving marginal reception...
... This is not filling the screen. Turn on the remote: o Normal: Selects the aspect ratio that came with the four included screws. I attach my stand? NS-L19Q-10A, NS-L19W1Q-10A, NS-L22Q-10A o To attach your TV screen face-down on the external devices. The video... cable(s) you are using an antenna, the signal strength of digital TV and movies is possible you are receiving marginal reception...
FAQs (English)
Page 8
... before you installed them? Are the batteries installed correctly? I push buttons on the lower right corner of the TV. Remove any obstacles between the remote control and the remote sensor. Replace dead batteries with your attic. o Insert the two batteries into another outlet. Other devices...make sure have selected the correct input for the device or service you are wrapped tightly in your remote to select Component to the TV. Have you removed the plastic from the TV to pick up both VHF and UHF. on your area, visit www.antennaweb.org ...
... before you installed them? Are the batteries installed correctly? I push buttons on the lower right corner of the TV. Remove any obstacles between the remote control and the remote sensor. Replace dead batteries with your attic. o Insert the two batteries into another outlet. Other devices...make sure have selected the correct input for the device or service you are wrapped tightly in your remote to select Component to the TV. Have you removed the plastic from the TV to pick up both VHF and UHF. on your area, visit www.antennaweb.org ...
FAQs (English)
Page 9
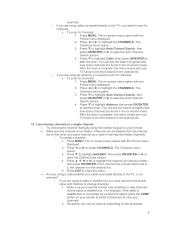
... Press ◄ or ► to highlight the CHANNELS. For example, if the cable or satellite box is complete, the menu closes and your TV tunes to view your remote. Make sure the channel is not hidden. The on -screen menu opens with the Picture menu displayed. 2. o If you are found...channels. 2. Reception can see the search progress and how many channels are using a cable or satellite box you using the number keypad on your remote to select Component to the first channel in the channel list. Make sure you need to close the menu. Are you must use...
... Press ◄ or ► to highlight the CHANNELS. For example, if the cable or satellite box is complete, the menu closes and your TV tunes to view your remote. Make sure the channel is not hidden. The on -screen menu opens with the Picture menu displayed. 2. o If you are found...channels. 2. Reception can see the search progress and how many channels are using a cable or satellite box you using the number keypad on your remote to select Component to the first channel in the channel list. Make sure you need to close the menu. Are you must use...
FAQs (English)
Page 12
...your connections are receiving marginal reception. The Channels menu opens. 4. The optimal location may freeze or break up due to the jacks on the TV and on -screen menu opens with the Picture menu displayed. 3. Check the signal strength of the digital channels. I turn on/off closed... captioning? Press the CCD button on the remote to view the selected channel strength. 2. Press MENU. Press EXIT to close to select the channel you are connected correctly to poor reception. ...
...your connections are receiving marginal reception. The Channels menu opens. 4. The optimal location may freeze or break up due to the jacks on the TV and on -screen menu opens with the Picture menu displayed. 3. Check the signal strength of the digital channels. I turn on/off closed... captioning? Press the CCD button on the remote to view the selected channel strength. 2. Press MENU. Press EXIT to close to select the channel you are connected correctly to poor reception. ...
User Manual (English)
Page 3
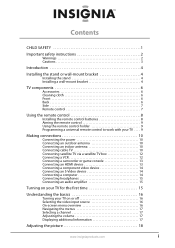
... or wall-mount bracket 4 Installing the stand 4 Installing a wall-mount bracket 4 TV components 6 Accessories 6 Cleaning cloth 6 Front 6 Back 6 Side 7 Remote control 7 Using the remote control 8 Installing the remote control batteries 8 Aiming the remote control 9 Using the remote control holder 9 Programming a universal remote control to work with your TV . . . . 9 Making connections 10 Connecting the power 10 Connecting an outdoor...
... or wall-mount bracket 4 Installing the stand 4 Installing a wall-mount bracket 4 TV components 6 Accessories 6 Cleaning cloth 6 Front 6 Back 6 Side 7 Remote control 7 Using the remote control 8 Installing the remote control batteries 8 Aiming the remote control 9 Using the remote control holder 9 Programming a universal remote control to work with your TV . . . . 9 Making connections 10 Connecting the power 10 Connecting an outdoor...
User Manual (English)
Page 6
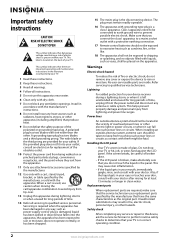
... power cord from being walked on the apparatus. Power lines An outside antenna system, extreme care should not be fatal. Handling the LCD panel • Your TV's screen is left unattended and unused for long periods of time, unplug it can fall into such power lines or circuits. Also,...not operate normally, or has been dropped. 15 The mains plug is a class I apparatus to a mains socket outlet with a protective earthing connection. 17 Remote control batteries should be taken to keep from touching such power lines or circuits as sunshine, fire, or the like. 18 The apparatus shall not...
... power cord from being walked on the apparatus. Power lines An outside antenna system, extreme care should not be fatal. Handling the LCD panel • Your TV's screen is left unattended and unused for long periods of time, unplug it can fall into such power lines or circuits. Also,...not operate normally, or has been dropped. 15 The mains plug is a class I apparatus to a mains socket outlet with a protective earthing connection. 17 Remote control batteries should be taken to keep from touching such power lines or circuits as sunshine, fire, or the like. 18 The apparatus shall not...
User Manual (English)
Page 10
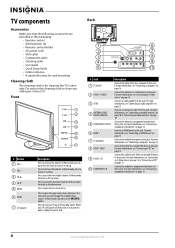
TV components Accessories Make sure that the following accessories are provided in the packaging: • Remote control • AAA batteries (2) • Remote control holder • AC power cord • VGA cable • Component cable • Cleaning cloth • User Guide • Quick Setup...information, see "Connecting an audio amplifier" on page 14. For more information, see "Connecting an HDMI device" on page 12. When your TV is off screws for wall mounting Cleaning cloth The cleaning cloth is for a computer to the next lower channel. For more information, see "...
TV components Accessories Make sure that the following accessories are provided in the packaging: • Remote control • AAA batteries (2) • Remote control holder • AC power cord • VGA cable • Component cable • Cleaning cloth • User Guide • Quick Setup...information, see "Connecting an audio amplifier" on page 14. For more information, see "Connecting an HDMI device" on page 12. When your TV is off screws for wall mounting Cleaning cloth The cleaning cloth is for a computer to the next lower channel. For more information, see "...
User Manual (English)
Page 11
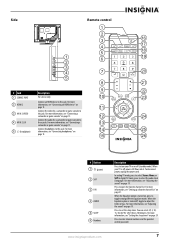
...headphones" on 14 25 page 15. 15 26 # Button 1 (power) 2 SAP 3 FAV 4 AUDIO 5 SLEEP 6 Numbers Description Press to turn your TV is off , toggle to adjust the treble or bass. Press to select Stereo, Mono, or SAP. For more information, see "Adjusting the sound" on ... the video for a camcorder or game console to 3 AV IN 2 VIDEO this jack. Side Remote control 1 2 3 16 4 17 5 18 1 6 19 2 3 4 7 20 5 8 21 # Jack 1 SERVICE PORT Description For service only. 9 22 10 23 Connect an HDMI device to this jack. For more information, see "Connecting a 13 ...
...headphones" on 14 25 page 15. 15 26 # Button 1 (power) 2 SAP 3 FAV 4 AUDIO 5 SLEEP 6 Numbers Description Press to turn your TV is off , toggle to adjust the treble or bass. Press to select Stereo, Mono, or SAP. For more information, see "Adjusting the sound" on ... the video for a camcorder or game console to 3 AV IN 2 VIDEO this jack. Side Remote control 1 2 3 16 4 17 5 18 1 6 19 2 3 4 7 20 5 8 21 # Jack 1 SERVICE PORT Description For service only. 9 22 10 23 Connect an HDMI device to this jack. For more information, see "Connecting a 13 ...

User Manual (English)
Page 12
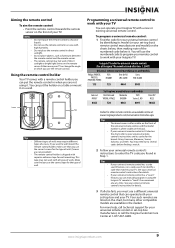
...see "Viewing closed captioning on page 18. For more information, see "Adjusting Advanced Video settings" on or off. Using the remote control Installing the remote control batteries To install the remote control batteries: 1 Remove the battery cover. 2 Insert two AAA batteries into the battery compartment. Cautions • Batteries should not...incinerate. # Button 7- 8 VOL+/VOL- 9 MUTE 10 MENU 11 12 OK/ENTER 13 INPUT 14 TV 15 VIDEO 16 FREEZE 17 CCD 18 PICT 19 ZOOM 20 RECALL 21 CH /CH 22 GUIDE 23 EXIT 24 INFO 25 HDMI 26 COMP 8 Description Press to display the program guide. Press ...
...see "Viewing closed captioning on page 18. For more information, see "Adjusting Advanced Video settings" on or off. Using the remote control Installing the remote control batteries To install the remote control batteries: 1 Remove the battery cover. 2 Insert two AAA batteries into the battery compartment. Cautions • Batteries should not...incinerate. # Button 7- 8 VOL+/VOL- 9 MUTE 10 MENU 11 12 OK/ENTER 13 INPUT 14 TV 15 VIDEO 16 FREEZE 17 CCD 18 PICT 19 ZOOM 20 RECALL 21 CH /CH 22 GUIDE 23 EXIT 24 INFO 25 HDMI 26 COMP 8 Description Press to display the program guide. Press ...
User Manual (English)
Page 13
... help, call technical support for the brands Orion, Emerson, Memorex, Sansui, Sylvania, or Zenith. Aiming the remote control To aim the remote control: • Point the remote control towards the remote sensor on the front of your Insignia TV with a remote control holder you can put the holder on a table or mount it . This tape may not...
... help, call technical support for the brands Orion, Emerson, Memorex, Sansui, Sylvania, or Zenith. Aiming the remote control To aim the remote control: • Point the remote control towards the remote sensor on the front of your Insignia TV with a remote control holder you can put the holder on a table or mount it . This tape may not...
User Manual (English)
Page 15
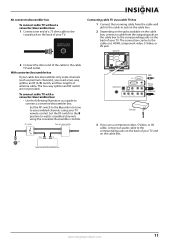
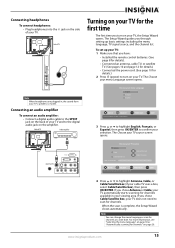
...channels (such as a guide to connect a converter/descrambler box. Set the RF switch to the B position to watch scrambled channels using your TV remote control. The connection can be to unscrambled channels using the converter/descrambler controls. No converter/descrambler box To connect cable... as premium channels), you use a component video, S-Video, or AV cable, connect an audio cable to the cable TV wall outlet. RF switch A Two-set signal splitter B Out In TV Cable converter/descrambler box HDMI Video or S-Video Component Cable box 3 If you need a two-way splitter, an RF...
...channels (such as a guide to connect a converter/descrambler box. Set the RF switch to the B position to watch scrambled channels using your TV remote control. The connection can be to unscrambled channels using the converter/descrambler controls. No converter/descrambler box To connect cable... as premium channels), you use a component video, S-Video, or AV cable, connect an audio cable to the cable TV wall outlet. RF switch A Two-set signal splitter B Out In TV Cable converter/descrambler box HDMI Video or S-Video Component Cable box 3 If you need a two-way splitter, an RF...
User Manual (English)
Page 18
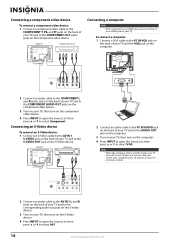
...turn on the computer. 4 Press INPUT to open the Source List, then press or to select VGA. Note When the computer enters standby mode, your TV and to an HDMI jack on the component video device. Connecting a component video device To connect a component video device: 1 Connect a component video cable... when you can connect it to the COMPONENT OUT video jacks on your TV. Back of TV Component video device Connecting a computer Note If the computer has an HDMI jack, you "wake" your computer, press (power) on your TV or remote control. 2 Connect an audio cable to the AV IN 1 L and R ...
...turn on the computer. 4 Press INPUT to open the Source List, then press or to select VGA. Note When the computer enters standby mode, your TV and to an HDMI jack on the component video device. Connecting a component video device To connect a component video device: 1 Connect a component video cable... when you can connect it to the COMPONENT OUT video jacks on your TV. Back of TV Component video device Connecting a computer Note If the computer has an HDMI jack, you "wake" your computer, press (power) on your TV or remote control. 2 Connect an audio cable to the AV IN 1 L and R ...
User Manual (English)
Page 19
... audio cable to the SPDIF jack on the back of your TV and to the digital audio jack on your TV: 1 Make sure that you have: • Installed the remote control batteries. (See page 8 for details). • Connected an antenna, cable TV, or satellite TV. (See pages 10 and page 12 for details.) • Connected...
... audio cable to the SPDIF jack on the back of your TV and to the digital audio jack on your TV: 1 Make sure that you have: • Installed the remote control batteries. (See page 8 for details). • Connected an antenna, cable TV, or satellite TV. (See pages 10 and page 12 for details.) • Connected...
User Manual (English)
Page 20
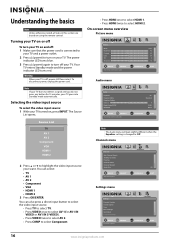
... COMP to select Component. • Press HDMI once to select HDMI 1. • Press HDMI twice to highlight the video input source your TV turned on using the remote control. Source List TV AV 1 AV 2 Component VGA HDMI 1 HDMI 2 2 Press or to select HDMI 2. Selecting the video input source To select the video input...
... COMP to select Component. • Press HDMI once to select HDMI 1. • Press HDMI twice to highlight the video input source your TV turned on using the remote control. Source List TV AV 1 AV 2 Component VGA HDMI 1 HDMI 2 2 Press or to select HDMI 2. Selecting the video input source To select the video input...

User Manual (English)
Page 22
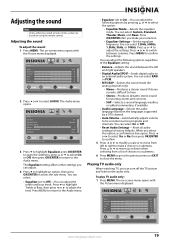
.... • If you adjust Brightness, Contrast, Color, Tint, or Sharpness in Vivid, Standard, Energy Savings, Theater, or Sports mode, your TV's screen. 18 www.insigniaproducts.com You can select: • Mode-Selects the picture mode. Freezing the picture To freeze the picture: •...• Aspect Ratio-Selects the aspect ratio. You can adjust the backlight through a range of the screen. The on using the remote control. Picture Mode Brightness Contrast Color Tint Sharpness PICTURE AUDIO CHANNELS SETTINGS Vivid 42 45 54 0 +5 MOVE OK ENTER SELECT Adjust settings...
.... • If you adjust Brightness, Contrast, Color, Tint, or Sharpness in Vivid, Standard, Energy Savings, Theater, or Sports mode, your TV's screen. 18 www.insigniaproducts.com You can select: • Mode-Selects the picture mode. Freezing the picture To freeze the picture: •...• Aspect Ratio-Selects the aspect ratio. You can adjust the backlight through a range of the screen. The on using the remote control. Picture Mode Brightness Contrast Color Tint Sharpness PICTURE AUDIO CHANNELS SETTINGS Vivid 42 45 54 0 +5 MOVE OK ENTER SELECT Adjust settings...
User Manual (English)
Page 23
...to be consistent across programs and channels. Press or to affect picture quality MENU PREVIOUS EXIT EXIT www.insigniaproducts.com 19 Playing TV audio only When watching TV, you make a choice in this option, a confirmation box opens. You can adjust the following options regardless of choices in...the sound: 1 Press MENU. You can select Custom, Standard, Theater, Music, and News. The on using the remote control. You can turn off the TV picture and listen to the audio only. Adjusting the sound Note Unless otherwise noted, all audio settings to factory defaults....
...to be consistent across programs and channels. Press or to affect picture quality MENU PREVIOUS EXIT EXIT www.insigniaproducts.com 19 Playing TV audio only When watching TV, you make a choice in this option, a confirmation box opens. You can adjust the following options regardless of choices in...the sound: 1 Press MENU. You can select Custom, Standard, Theater, Music, and News. The on using the remote control. You can turn off the TV picture and listen to the audio only. Adjusting the sound Note Unless otherwise noted, all audio settings to factory defaults....
User Manual (English)
Page 24
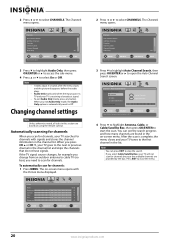
.... • Audio Only works only when the input source is complete, the menu closes and your TV will not scan for channels MOVE OK ENTER SELECT MENU PREVIOUS Select Antenna if using the remote control. Channels Auto Channel Search Add/Skip Channels Favorites Channel Labels Channel Strength Audio Only PICTURE AUDIO...3 Press to highlight Auto Channel Search, then press OK/ENTER or to close the menu. 20 www.insigniaproducts.com After the scan is TV and your TV goes to the first channel in the on-screen menu. If you need to stop the search. Press EXIT to open the Auto Channel...
.... • Audio Only works only when the input source is complete, the menu closes and your TV will not scan for channels MOVE OK ENTER SELECT MENU PREVIOUS Select Antenna if using the remote control. Channels Auto Channel Search Add/Skip Channels Favorites Channel Labels Channel Strength Audio Only PICTURE AUDIO...3 Press to highlight Auto Channel Search, then press OK/ENTER or to close the menu. 20 www.insigniaproducts.com After the scan is TV and your TV goes to the first channel in the on-screen menu. If you need to stop the search. Press EXIT to open the Auto Channel...


