User Manual (English)
Page 2
Contents CHILD SAFETY 1 Important safety instructions 2 Warnings 2 Cautions 3 Introduction 4 Features 4 Installing the stand or wall-mount bracket 4 Installing the stand 4 Installing a wall-mount bracket 4 TV components 4 Accessories 4 Front 5 Side 5 Back 6 Remote control 6 Using the remote control 7 Installing remote control batteries 7 Aiming the remote control 8 Programming your existing universal ...
Contents CHILD SAFETY 1 Important safety instructions 2 Warnings 2 Cautions 3 Introduction 4 Features 4 Installing the stand or wall-mount bracket 4 Installing the stand 4 Installing a wall-mount bracket 4 TV components 4 Accessories 4 Front 5 Side 5 Back 6 Remote control 6 Using the remote control 7 Installing remote control batteries 7 Aiming the remote control 8 Programming your existing universal ...
User Manual (English)
Page 5
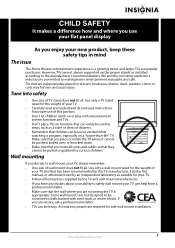
...; Make sure that you decide to making home entertainment enjoyable and safe. www.insigniaproducts.com 1 Some wall mounts are committed to wall mount your TV, always remember: • One size of wall mount does not fit all. If you are inappropriately placed on dressers, bookcases, shelves, desks, speakers, ...chests, or carts may fall over , or knocked down. • Make sure that the wall where you are required for safe wall mount installation. Use only a wall mount rated for your TV. • Carefully read and understand all cords and cables so that can easily be...
...; Make sure that you decide to making home entertainment enjoyable and safe. www.insigniaproducts.com 1 Some wall mounts are committed to wall mount your TV, always remember: • One size of wall mount does not fit all. If you are inappropriately placed on dressers, bookcases, shelves, desks, speakers, ...chests, or carts may fall over , or knocked down. • Make sure that the wall where you are required for safe wall mount installation. Use only a wall mount rated for your TV. • Carefully read and understand all cords and cables so that can easily be...
User Manual (English)
Page 8
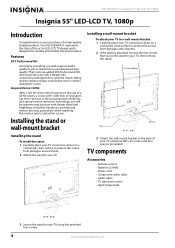
... the stand. 15.75 inches (400 mm) M6 screws Stand 3 Attach the wall-mount bracket to your purchase of your TV using the provided four screws. 4 www.insigniaproducts.com Your NS-55E560A11 represents the state of the art in the last generation of resolution (up from 720...15.75 inches (400 mm) Installing a wall-mount bracket To attach your TV to a wall-mount bracket: 1 Carefully place your TV screen face-down on your TV using four M8 × 25 screws and four spacers (provided). NS-55E560A11 Insignia 55" LED-LCD TV, 1080p Insignia 55" LED-LCD TV, 1080p Introduction Congratulations...
... the stand. 15.75 inches (400 mm) M6 screws Stand 3 Attach the wall-mount bracket to your purchase of your TV using the provided four screws. 4 www.insigniaproducts.com Your NS-55E560A11 represents the state of the art in the last generation of resolution (up from 720...15.75 inches (400 mm) Installing a wall-mount bracket To attach your TV to a wall-mount bracket: 1 Carefully place your TV screen face-down on your TV using four M8 × 25 screws and four spacers (provided). NS-55E560A11 Insignia 55" LED-LCD TV, 1080p Insignia 55" LED-LCD TV, 1080p Introduction Congratulations...
Quick Setup Guide (English)
Page 1
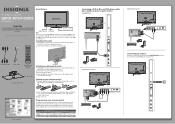
... compartment. 3 Replace the cover. Front feature 55" 1080p LED-LCD HDTV QUICK SETUP GUIDE NS-55E560A11 Thank You for common codes. Make sure that the + and - Universal remote control TV codes (for all Insignia TVs manufactured after Jan. 1, 2007) Universal remote control makers and models Philips PHDVD5, PH5DSS,... screen from damages and scratches. 2 Remove the four screws holding the TV to its stand. 3 Remove the stand column. 4 Secure the Wall-mount bracket to work with the bracket. Setting up your TV using the (power) button on your remote or need a di erent remote control code...
... compartment. 3 Replace the cover. Front feature 55" 1080p LED-LCD HDTV QUICK SETUP GUIDE NS-55E560A11 Thank You for common codes. Make sure that the + and - Universal remote control TV codes (for all Insignia TVs manufactured after Jan. 1, 2007) Universal remote control makers and models Philips PHDVD5, PH5DSS,... screen from damages and scratches. 2 Remove the four screws holding the TV to its stand. 3 Remove the stand column. 4 Secure the Wall-mount bracket to work with the bracket. Setting up your TV using the (power) button on your remote or need a di erent remote control code...


