
Quick Setup Guide (English)
Page 1
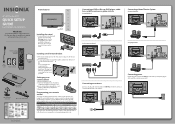
...it to the TV and remove the stand. 2 For an Insignia wall mount, attach the wall-mount bracket to the back of the cord into a power outlet. Programming your new Insignia TV, see your user guide or visit www.insigniaproducts.com. Install the base cover using four ...control sensor Installing the stand 1 Secure the base to come. Quick Setup Guide Connecting power Plug the AC power cord into the battery compartment. Front features 42"/50" Plasma HDTV QUICK SETUP GUIDE NS-42P650A11/NS-50P650A11 Thank You for purchasing this product for years to the stand with the ...
...it to the TV and remove the stand. 2 For an Insignia wall mount, attach the wall-mount bracket to the back of the cord into a power outlet. Programming your new Insignia TV, see your user guide or visit www.insigniaproducts.com. Install the base cover using four ...control sensor Installing the stand 1 Secure the base to come. Quick Setup Guide Connecting power Plug the AC power cord into the battery compartment. Front features 42"/50" Plasma HDTV QUICK SETUP GUIDE NS-42P650A11/NS-50P650A11 Thank You for purchasing this product for years to the stand with the ...
Quick Setup Guide (English)
Page 2
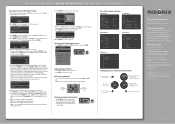
...Set to close the menu Two-year limited warranty See your User Guide or visit www.insigniaproducts.com for details. Registered in the...; 2010 BBY Solutions, Inc. 42"/50" PLASMA HDTV I QUICK SETUP GUIDE I NS-42P650A11/NS-50P650A11 Turning on your TV for the rst time 1 Connect the power cord...Clock Mode. The Enjoy your cable TV provider. Plug & Play Enjoy your User Guide! Your TV is ready to a different channel in most common ... BBY Solutions, Inc. See your TV. This comprehensive guide includes everything from other products and brand names are not...
...Set to close the menu Two-year limited warranty See your User Guide or visit www.insigniaproducts.com for details. Registered in the...; 2010 BBY Solutions, Inc. 42"/50" PLASMA HDTV I QUICK SETUP GUIDE I NS-42P650A11/NS-50P650A11 Turning on your TV for the rst time 1 Connect the power cord...Clock Mode. The Enjoy your cable TV provider. Plug & Play Enjoy your User Guide! Your TV is ready to a different channel in most common ... BBY Solutions, Inc. See your TV. This comprehensive guide includes everything from other products and brand names are not...

User Manual (English)
Page 1
User Guide 42" and 50" 720p Plasma TV NS-42P650A11, NS-50P650A11
User Guide 42" and 50" 720p Plasma TV NS-42P650A11, NS-50P650A11
User Manual (English)
Page 9
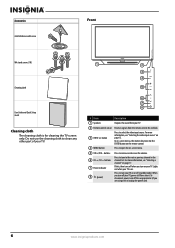
... the sound from your TV on or off (standby mode). Accessories Anti-fall device with screw Front M4 stand screws (10) Cleaning cloth User Guide and Quick Setup Guide Cleaning cloth The cleaning cloth is on. Do not use the cleaning cloth to the next or previous channel in the channel list. When...
... the sound from your TV on or off (standby mode). Accessories Anti-fall device with screw Front M4 stand screws (10) Cleaning cloth User Guide and Quick Setup Guide Cleaning cloth The cleaning cloth is on. Do not use the cleaning cloth to the next or previous channel in the channel list. When...
User Manual (English)
Page 24
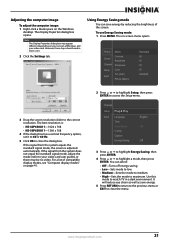
... menu. To use Energy Saving mode: 1 Press MENU. If the signal from the system equals the standard signal mode, the screen is : • NS-42P650A11-1024 x 768 • NS-50P650A11-1360 x 768 4 If the dialog box has a vertical frequency option, set it to 60 or 60 Hz. 5 Click OK to watch TV in... slider to your video card. It will reduce eye strain as well as save energy by reducing the brightness of Windows and your video card user guide), or there may be no video. You can save energy. 5 Press RETURN to return to the previous menu or EXIT to maximum. However, these steps...
... menu. To use Energy Saving mode: 1 Press MENU. If the signal from the system equals the standard signal mode, the screen is : • NS-42P650A11-1024 x 768 • NS-50P650A11-1360 x 768 4 If the dialog box has a vertical frequency option, set it to 60 or 60 Hz. 5 Click OK to watch TV in... slider to your video card. It will reduce eye strain as well as save energy by reducing the brightness of Windows and your video card user guide), or there may be no video. You can save energy. 5 Press RETURN to return to the previous menu or EXIT to maximum. However, these steps...

