
Quick Setup Guide (English)
Page 1
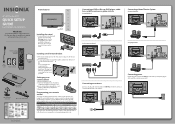
... bracket to the back of your remote control 1 Remove the battery cover. 2 Insert two AAA batteries into a power outlet. Always store the TV upright because of the possibility of this product for purchasing this ne Insignia television. Front features 42"/50" Plasma HDTV QUICK SETUP GUIDE NS-42P650A11/NS-50P650A11 Thank You for years to...
... bracket to the back of your remote control 1 Remove the battery cover. 2 Insert two AAA batteries into a power outlet. Always store the TV upright because of the possibility of this product for purchasing this ne Insignia television. Front features 42"/50" Plasma HDTV QUICK SETUP GUIDE NS-42P650A11/NS-50P650A11 Thank You for years to...
Quick Setup Guide (English)
Page 2
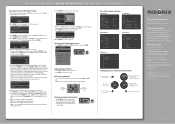
... community forum at www.insigniaproducts.com for helpful information from a digital channel. 9 Press ENTER. Av. INSIGNIA is a trademark of the OSD screen opens. 42"/50" PLASMA HDTV I QUICK SETUP GUIDE I NS-42P650A11/NS-50P650A11 Turning on your TV for the rst time 1 Connect the power cord, then press (power) to... Channel Setup Plug & Play Input Language Time Game Mode V-Chip Caption Energy Saving : English : Off : Off Navigating menus with your remote control Press to return to the previous menu Press to move to view an information banner. See your area and stores them in your ...
... community forum at www.insigniaproducts.com for helpful information from a digital channel. 9 Press ENTER. Av. INSIGNIA is a trademark of the OSD screen opens. 42"/50" PLASMA HDTV I QUICK SETUP GUIDE I NS-42P650A11/NS-50P650A11 Turning on your TV for the rst time 1 Connect the power cord, then press (power) to... Channel Setup Plug & Play Input Language Time Game Mode V-Chip Caption Energy Saving : English : Off : Off Navigating menus with your remote control Press to return to the previous menu Press to move to view an information banner. See your area and stores them in your ...
User Manual (English)
Page 2
... stand 4 Securing your TV to a wall or cabinet 4 Installing a wall-mount bracket 5 TV components 5 Accessories 5 Cleaning cloth 6 Front 6 Back 7 Remote control 7 Using the remote control 8 Installing remote control batteries 8 Aiming the remote control 9 Programming a universal remote control to work with your TV . . . . 9 Making connections 9 Connecting the power 9 Installing the ferrite core 9 Connecting an outdoor antenna...
... stand 4 Securing your TV to a wall or cabinet 4 Installing a wall-mount bracket 5 TV components 5 Accessories 5 Cleaning cloth 6 Front 6 Back 7 Remote control 7 Using the remote control 8 Installing remote control batteries 8 Aiming the remote control 9 Programming a universal remote control to work with your TV . . . . 9 Making connections 9 Connecting the power 9 Installing the ferrite core 9 Connecting an outdoor antenna...
User Manual (English)
Page 5
... uses replacement parts specified by the manufacturer, or sold with three-prong, grounding-type plug is a Class I apparatus to a grounding-type, three-prong outlet. 17 Remote control batteries should not be exposed to dripping or splashing, and no objects filled with one wider than the other electric light or power circuits...
... uses replacement parts specified by the manufacturer, or sold with three-prong, grounding-type plug is a Class I apparatus to a grounding-type, three-prong outlet. 17 Remote control batteries should not be exposed to dripping or splashing, and no objects filled with one wider than the other electric light or power circuits...
User Manual (English)
Page 8
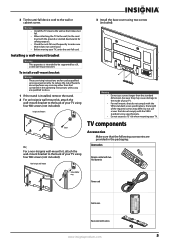
...TV. Warning • Do not use screws longer than that contained in the operating instructions unless you are provided in the packaging: Accessories Remote control with two AAA batteries Screw-holder ring Power cord Ferrite core Base cover with the ground or slanted downwards for use screws that ...kit, attach the wall-mount bracket to the back of the required screws may cause damage to be supported by qualified service personnel only. Non-Insignia wall mount 3 Install the base cover using four M8 screws (not included). Do not use by a UL Listed wall-mount bracket. TV components...
...TV. Warning • Do not use screws longer than that contained in the operating instructions unless you are provided in the packaging: Accessories Remote control with two AAA batteries Screw-holder ring Power cord Ferrite core Base cover with the ground or slanted downwards for use screws that ...kit, attach the wall-mount bracket to the back of the required screws may cause damage to be supported by qualified service personnel only. Non-Insignia wall mount 3 Install the base cover using four M8 screws (not included). Do not use by a UL Listed wall-mount bracket. TV components...
User Manual (English)
Page 9
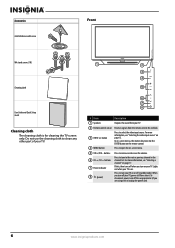
... on. In on-screen menus, this button functions like the ENTER button on -screen menu. 5 VOL+/VOL- Press to tune to open the on the remote control. 4 MENU button Press to the next or previous channel in the channel list. For more information, see "Selecting the video input source" on or... part of your TV. # Item 1 Speakers Description Outputs the sound from your TV is for cleaning the TV screen only. Lights red when your TV. 2 Remote control sensor Receives signals from the remote control. buttons 6 CH /CH buttons 7 Power indicator 8 (power) Press to turn off your TV.
... on. In on-screen menus, this button functions like the ENTER button on -screen menu. 5 VOL+/VOL- Press to tune to open the on the remote control. 4 MENU button Press to the next or previous channel in the channel list. For more information, see "Selecting the video input source" on or... part of your TV. # Item 1 Speakers Description Outputs the sound from your TV is for cleaning the TV screen only. Lights red when your TV. 2 Remote control sensor Receives signals from the remote control. buttons 6 CH /CH buttons 7 Power indicator 8 (power) Press to turn off your TV.
User Manual (English)
Page 10
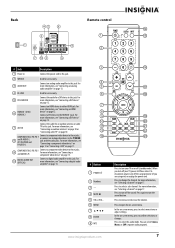
..., Y and AUDIO L/R Connect a component video device to this jack. Press to turn the sound back on -screen menu, press to the HDMI IN 1 jack. Back Remote control # Jack Description 1 Power in Connect the power cord to this jack. 2 SERVICE Used for service only. 3 AUDIO OUT Connect an analog audio amplifier to...
..., Y and AUDIO L/R Connect a component video device to this jack. Press to turn the sound back on -screen menu, press to the HDMI IN 1 jack. Back Remote control # Jack Description 1 Power in Connect the power cord to this jack. 2 SERVICE Used for service only. 3 AUDIO OUT Connect an analog audio amplifier to...
User Manual (English)
Page 11
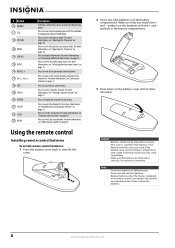
... on the batteries with a cloth. For more information, see "Displaying additional information" on page 17. symbols in the channel list. If the remote control is depleted. # Button 10 RETURN 11 CCD 12 PICTURE 13 ZOOM 14 DISPLAY 15 INPUT 16 RECALL 17 CH /CH 18 EXIT 19 FAV.... Press to the previously viewed channel. Press to select the sound mode. Press to set the sleep timer. Using the remote control Installing remote control batteries To install remote control batteries: 1 Press the battery cover latch in component video or HDMI mode. If the batteries leak, clean the battery...
... on the batteries with a cloth. For more information, see "Displaying additional information" on page 17. symbols in the channel list. If the remote control is depleted. # Button 10 RETURN 11 CCD 12 PICTURE 13 ZOOM 14 DISPLAY 15 INPUT 16 RECALL 17 CH /CH 18 EXIT 19 FAV.... Press to the previously viewed channel. Press to select the sound mode. Press to set the sleep timer. Using the remote control Installing remote control batteries To install remote control batteries: 1 Press the battery cover latch in component video or HDMI mode. If the batteries leak, clean the battery...

User Manual (English)
Page 12
...set -top box manufacturer, or call technical support for your universal remote control by identifying its model (or your universal remote control's instructions for details. 3 If all Insignia TVs manufactured after Jan. 1, 2007) Universal remote control manufacturers and models Philips PHDVD5, PH5DSS, PMDVR8, PDVR8 RCA RCU807... for the brands Orion, Emerson, Memorex, Sansui, Sylvania, or Zenith. For more help, call the Insignia Customer Care Center at a time. Do not use the remote control. You may not work with your TV You can manually program it is often visible on the back...
...set -top box manufacturer, or call technical support for your universal remote control by identifying its model (or your universal remote control's instructions for details. 3 If all Insignia TVs manufactured after Jan. 1, 2007) Universal remote control manufacturers and models Philips PHDVD5, PH5DSS, PMDVR8, PDVR8 RCA RCU807... for the brands Orion, Emerson, Memorex, Sansui, Sylvania, or Zenith. For more help, call the Insignia Customer Care Center at a time. Do not use the remote control. You may not work with your TV You can manually program it is often visible on the back...
User Manual (English)
Page 17
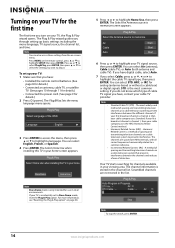
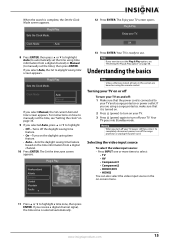
... Select Home Use when installing this TV in the list. Turning on your TV for the first time The first time you turn on the remote control, press or to highlight SETUP, then press ENTER. The Plug & Play wizard guides you through setting up your first broadcast channel is ... 3 Press ENTER to access the menu, then press or to memorize. The Select the Antenna source to select the setting you have: • Installed the remote control batteries. (See page 8 for details.) • Connected an antenna, cable TV, or satellite TV. (See pages 10 through 11 for details.) • ...
... Select Home Use when installing this TV in the list. Turning on your TV for the first time The first time you turn on the remote control, press or to highlight SETUP, then press ENTER. The Plug & Play wizard guides you through setting up your first broadcast channel is ... 3 Press ENTER to access the menu, then press or to memorize. The Select the Antenna source to select the setting you have: • Installed the remote control batteries. (See page 8 for details.) • Connected an antenna, cable TV, or satellite TV. (See pages 10 through 11 for details.) • ...
User Manual (English)
Page 18
Plug & Play Sets the Clock Mode. OK 8 Press ENTER, then press or to highlight Auto (to automatically set the time using the remote control. If you are based on or off To turn off your TV. Plug & Play Enjoy your TV screen opens. Your TV is ready to ...
Plug & Play Sets the Clock Mode. OK 8 Press ENTER, then press or to highlight Auto (to automatically set the time using the remote control. If you are based on or off To turn off your TV. Plug & Play Enjoy your TV screen opens. Your TV is ready to ...
User Manual (English)
Page 21
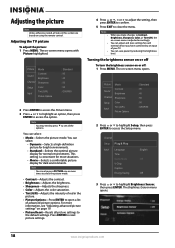
... can select: • Dynamic-Selects a high-definition picture for bright environments. • Standard-Selects the optimal picture display for dark environments. The on using the remote control. This setting is adjusted accordingly. Note You can select: • Mode-Selects the picture mode. The on or off: 1 Press MENU. Channel Setup Plug...
... can select: • Dynamic-Selects a high-definition picture for bright environments. • Standard-Selects the optimal picture display for dark environments. The on using the remote control. This setting is adjusted accordingly. Note You can select: • Mode-Selects the picture mode. The on or off: 1 Press MENU. Channel Setup Plug...
User Manual (English)
Page 25
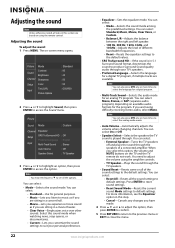
Note You may need to adjust the volume using the remote control. You can select: • Mode-Selects the sound mode. Note You can select Standard, Music, Movie, Clear Voice, or Custom. • Balance L/R-Adjusts the ... Equalizer option in this step. • Cancel-Cancels any changes you select this option, the volume and MUTE buttons on the TV and the TV remote do not work. Adjusting the sound To adjust the sound: 1 Press MENU. You need to press to close the menu. 22 www.insigniaproducts.com You...
Note You may need to adjust the volume using the remote control. You can select: • Mode-Selects the sound mode. Note You can select Standard, Music, Movie, Clear Voice, or Custom. • Balance L/R-Adjusts the ... Equalizer option in this step. • Cancel-Cancels any changes you select this option, the volume and MUTE buttons on the TV and the TV remote do not work. Adjusting the sound To adjust the sound: 1 Press MENU. You need to press to close the menu. 22 www.insigniaproducts.com You...
User Manual (English)
Page 26
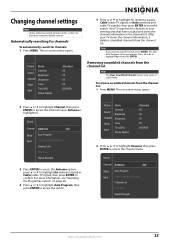
... to stop the search, press ENTER. Removing scrambled channels from the channel list. For more information, see "Resetting the Plug & Play option" on using the remote control. Your TV searches for channels: 1 Press MENU. The Stop Auto Program? Sound Channel Antenna : Air Setup Input Auto Program Clear Scrambled Channel Channel List...
... to stop the search, press ENTER. Removing scrambled channels from the channel list. For more information, see "Resetting the Plug & Play option" on using the remote control. Your TV searches for channels: 1 Press MENU. The Stop Auto Program? Sound Channel Antenna : Air Setup Input Auto Program Clear Scrambled Channel Channel List...
User Manual (English)
Page 30
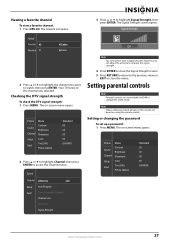
... Signal Strength Note You cannot fine-tune a digital channel. Note Unless otherwise noted, all tasks in HDMI or component video mode. The on using the remote control. Picture Mode Sound Channel Contrast Brightness Sharpness Setup Input Color Tint (G/R) Picture Options : Standard : 95 : 45 : 50 : 50 : G50/R50 www.insigniaproducts.com 27...
... Signal Strength Note You cannot fine-tune a digital channel. Note Unless otherwise noted, all tasks in HDMI or component video mode. The on using the remote control. Picture Mode Sound Channel Contrast Brightness Sharpness Setup Input Color Tint (G/R) Picture Options : Standard : 95 : 45 : 50 : 50 : G50/R50 www.insigniaproducts.com 27...
User Manual (English)
Page 35
... Unless otherwise noted, all rating information downloads. The rating will be in this section are based on -screen menu opens. Downloadable U.S. The on using the remote control. Picture Mode Sound Channel Contrast Brightness Sharpness Setup Input Color Tint (G/R) Picture Options : Standard : 95 : 45 : 50 : 50 : G50/R50 1 Number for the current...
... Unless otherwise noted, all rating information downloads. The rating will be in this section are based on -screen menu opens. Downloadable U.S. The on using the remote control. Picture Mode Sound Channel Contrast Brightness Sharpness Setup Input Color Tint (G/R) Picture Options : Standard : 95 : 45 : 50 : 50 : G50/R50 1 Number for the current...
User Manual (English)
Page 37
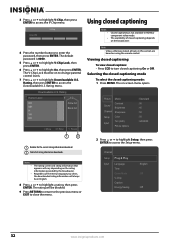
... or to change the digital caption styles when Caption Mode is set to Default-Returns all tasks in this section are based on using the remote control. Channel Setup Plug & Play Input Language Time Game Mode V-Chip Caption Energy Saving : English : Off : Off 5 Press ENTER, press or to highlight Setup, then...
... or to change the digital caption styles when Caption Mode is set to Default-Returns all tasks in this section are based on using the remote control. Channel Setup Plug & Play Input Language Time Game Mode V-Chip Caption Energy Saving : English : Off : Off 5 Press ENTER, press or to highlight Setup, then...
User Manual (English)
Page 40
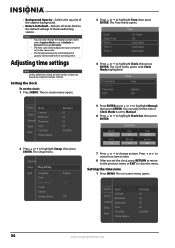
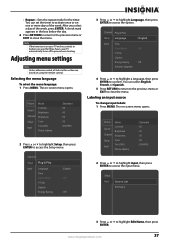
... to highlight Language, then press ENTER to highlight Edit Name, then press ENTER. You can set the timer to activate once or on using the remote control. Note If the timer turns on your TV automatically turns off to prevent over-heating. Adjusting menu settings Note Unless otherwise noted, all tasks...
... to highlight Language, then press ENTER to highlight Edit Name, then press ENTER. You can set the timer to activate once or on using the remote control. Note If the timer turns on your TV automatically turns off to prevent over-heating. Adjusting menu settings Note Unless otherwise noted, all tasks...
User Manual (English)
Page 43
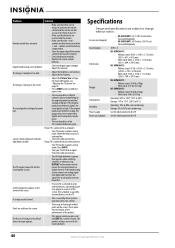
... into the remote. • Make sure that batteries are subject to an external device: • Your TV may be in power-saving mode. Screen size (diagonal) Sound output Dimensions Weight Temperature Humidity Power supply Power consumption • NS-42P650A11: 42.3 (107.44 cm) inches measured diagonally • NS-50P650A11: 49.9 ... × 631 × 69.5 mm) • With stand: 40.54 × 27.48 × 11.75 inches (1031 × 699 × 299.5 mm) NS-50P650A11: • Without stand: 47.28 × 28.33 × 2.73 inches (1202.5 × 790 × 31.06 mm) • With stand: 47.28 &#...
... into the remote. • Make sure that batteries are subject to an external device: • Your TV may be in power-saving mode. Screen size (diagonal) Sound output Dimensions Weight Temperature Humidity Power supply Power consumption • NS-42P650A11: 42.3 (107.44 cm) inches measured diagonally • NS-50P650A11: 49.9 ... × 631 × 69.5 mm) • With stand: 40.54 × 27.48 × 11.75 inches (1031 × 699 × 299.5 mm) NS-50P650A11: • Without stand: 47.28 × 28.33 × 2.73 inches (1202.5 × 790 × 31.06 mm) • With stand: 47.28 &#...


