Firmware Installation Guide (English)
Page 1
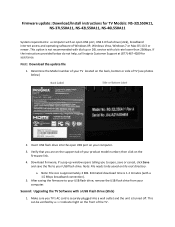
... help, call Insignia Customer Support at (877) 467‐4289 for TV Models: NS‐32L550A11, NS‐37L550A11, NS‐42L550A11, NS‐46L550A11 System requirements: a computer with an open , save or cancel, click Save and save the file to your computer. 3. Download firmware; Make sure you to open USB port, USB 2.0 flash drive (stick), broadband internet access and operating software of the TV. Firmware update: Download/Install instructions for assistance. Insert USB flash drive into a wall...
... help, call Insignia Customer Support at (877) 467‐4289 for TV Models: NS‐32L550A11, NS‐37L550A11, NS‐42L550A11, NS‐46L550A11 System requirements: a computer with an open , save or cancel, click Save and save the file to your computer. 3. Download firmware; Make sure you to open USB port, USB 2.0 flash drive (stick), broadband internet access and operating software of the TV. Firmware update: Download/Install instructions for assistance. Insert USB flash drive into a wall...
What is Firmware? (English)
Page 1
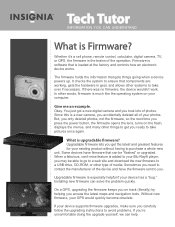
.... Upgradable firmware is the brains of the operation. Installing new firmware can help. Whether it's a cell phone, remote control, calculator, digital camera, TV, or GPS, the firmware is especially helpful if your device has a "bug." Sometimes you need to contact the manufacturer of media. In other words, firmware is much like the operating system on the flash, displays the menus, and many other systems to take pictures...
.... Upgradable firmware is the brains of the operation. Installing new firmware can help. Whether it's a cell phone, remote control, calculator, digital camera, TV, or GPS, the firmware is especially helpful if your device has a "bug." Sometimes you need to contact the manufacturer of media. In other words, firmware is much like the operating system on the flash, displays the menus, and many other systems to take pictures...
Quick Setup Guide (English)
Page 1
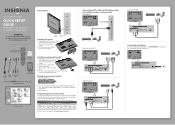
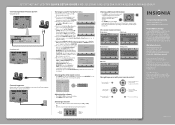
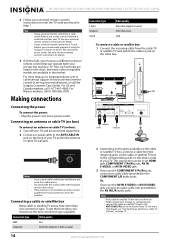
... television. AC Audio Component power cable cable cord Cleaning cloth Remote control holder Installing a wall-mount bracket 1 Carefully place your TV and the RF OUT jack on the antenna. Connecting a DVD or Blu-ray DVD player, cable box, satellite receiver, or game console Using HDMI (best) Using component (better) Using S-Video (good) Using composite (fair) Connecting an antenna Connect a 75 ohm cable (not included) to the back of your TV screen face-down on the batteries align with the four screws provided. Setting up your remote or need a different remote control code...
... television. AC Audio Component power cable cable cord Cleaning cloth Remote control holder Installing a wall-mount bracket 1 Carefully place your TV and the RF OUT jack on the antenna. Connecting a DVD or Blu-ray DVD player, cable box, satellite receiver, or game console Using HDMI (best) Using component (better) Using S-Video (good) Using composite (fair) Connecting an antenna Connect a 75 ohm cable (not included) to the back of your TV screen face-down on the batteries align with the four screws provided. Setting up your remote or need a different remote control code...
Quick Setup Guide (English)
Page 2
... or to show the digital program guide, which may take 20+ minutes MENU PREVIOUS EXIT EXIT scanning for the first time 1 Connect the power cord, then press (power) to affect sound quality MENU PREVIOUS EXIT EXIT Settings menu Channels Auto Channel Search Add/Skip Channels Favorites Channel Labels Channel Strength Audio Only PICTURE AUDIO CHANNELS SETTINGS USB Off MOVE OK ENTER SELECT Adjust channel options MENU PREVIOUS EXIT EXIT Settings Parental Controls Closed Caption Time Menu Settings Auto Input Sensing Input Labels PICTURE AUDIO CHANNELS SETTINGS USB On MOVE OK ENTER...
... or to show the digital program guide, which may take 20+ minutes MENU PREVIOUS EXIT EXIT scanning for the first time 1 Connect the power cord, then press (power) to affect sound quality MENU PREVIOUS EXIT EXIT Settings menu Channels Auto Channel Search Add/Skip Channels Favorites Channel Labels Channel Strength Audio Only PICTURE AUDIO CHANNELS SETTINGS USB Off MOVE OK ENTER SELECT Adjust channel options MENU PREVIOUS EXIT EXIT Settings Parental Controls Closed Caption Time Menu Settings Auto Input Sensing Input Labels PICTURE AUDIO CHANNELS SETTINGS USB On MOVE OK ENTER...
User Manual (English)
Page 2
... remote control 10 Using the remote control holder 10 Programming your universal Insignia remote control 10 Programming a different universal remote control 13 Making connections 14 Connecting the power 14 Connecting an antenna or cable TV (no box 14 Connecting a cable or satellite box 14 Connecting an HDMI device 15 Connecting a component video device 15 Connecting an S-Video device 16 Connecting a camcorder or game console 16 Connecting a VCR 17 Connecting a computer 17 Connecting headphones 18 Connecting a digital sound system 18 Connecting an analog sound system 18 Turning...
... remote control 10 Using the remote control holder 10 Programming your universal Insignia remote control 10 Programming a different universal remote control 13 Making connections 14 Connecting the power 14 Connecting an antenna or cable TV (no box 14 Connecting a cable or satellite box 14 Connecting an HDMI device 15 Connecting a component video device 15 Connecting an S-Video device 16 Connecting a camcorder or game console 16 Connecting a VCR 17 Connecting a computer 17 Connecting headphones 18 Connecting a digital sound system 18 Connecting an analog sound system 18 Turning...
User Manual (English)
Page 3
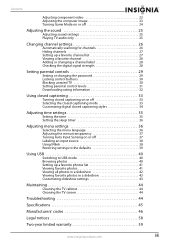
... 29 Locking control buttons 30 Blocking unrated TV 30 Setting parental control levels 31 Downloading rating information 32 Using closed captioning 33 Turning closed captioning on or off 33 Selecting the closed captioning mode 33 Customizing digital closed captioning styles 34 Adjusting time settings 35 Setting the time 35 Setting the sleep timer 36 Adjusting menu settings 36 Selecting the menu language 36 Adjusting the menu transparency 37 Turning Auto Input Sensing on or off 37 Labeling an input source 38 Using INlink 38 Restoring settings to the defaults 39 Using USB 40...
... 29 Locking control buttons 30 Blocking unrated TV 30 Setting parental control levels 31 Downloading rating information 32 Using closed captioning 33 Turning closed captioning on or off 33 Selecting the closed captioning mode 33 Customizing digital closed captioning styles 34 Adjusting time settings 35 Setting the time 35 Setting the sleep timer 36 Adjusting menu settings 36 Selecting the menu language 36 Adjusting the menu transparency 37 Turning Auto Input Sensing on or off 37 Labeling an input source 38 Using INlink 38 Restoring settings to the defaults 39 Using USB 40...
User Manual (English)
Page 5
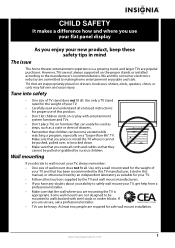
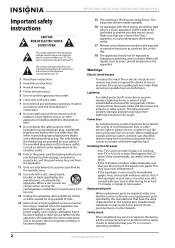
... independent laboratory as suitable for proper use your flat panel display As you enjoy your new product, keep these safety tips in this manual, or otherwise listed by curious children. If you are not designed to be mounted to wall mount your TV, always remember: • One size of TV stand does not fit all cords and cables so that they cannot be...
... independent laboratory as suitable for proper use your flat panel display As you enjoy your new product, keep these safety tips in this manual, or otherwise listed by curious children. If you are not designed to be mounted to wall mount your TV, always remember: • One size of TV stand does not fit all cords and cables so that they cannot be...
User Manual (English)
Page 6
..., grounding-type plug is used, use attachments/accessories specified by the manufacturer. 12 Use only with liquids, such as power-supply cord or plug is the disconnecting device. Make sure that your TV or hit, jolt, or press hard against the LCD panel. Lightning For added protection for your device receiver during lightning storms or when unused for long periods of time...
..., grounding-type plug is used, use attachments/accessories specified by the manufacturer. 12 Use only with liquids, such as power-supply cord or plug is the disconnecting device. Make sure that your TV or hit, jolt, or press hard against the LCD panel. Lightning For added protection for your device receiver during lightning storms or when unused for long periods of time...
User Manual (English)
Page 12
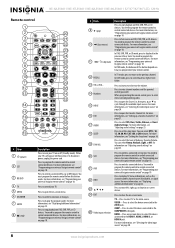
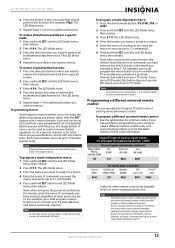
.... You need to program the remote control to the COMPONENT video jacks. For more information, see "Programming your universal Insignia remote control" on page 10. Press to control connected devices. For more information, see "Adjusting sound settings" on page 25. 20 STB 21 AUX 22 INFO 23 24 EXIT 25 Video input selection Press to close the on-screen menu. Press to select SRS, Bass, Treble, Balance, or Reset Audio Settings. Press to fast reverse on DVD, DVR...
.... You need to program the remote control to the COMPONENT video jacks. For more information, see "Programming your universal Insignia remote control" on page 10. Press to control connected devices. For more information, see "Adjusting sound settings" on page 25. 20 STB 21 AUX 22 INFO 23 24 EXIT 25 Video input selection Press to close the on-screen menu. Press to select SRS, Bass, Treble, Balance, or Reset Audio Settings. Press to fast reverse on DVD, DVR...
User Manual (English)
Page 13
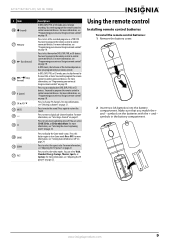
... select the video modes. Press to display the Game mode status. Using the remote control Installing remote control batteries To install the remote control batteries: 1 Remove the battery cover. 2 Insert two AA batteries into the battery compartment. Make sure that you programmed your universal Insignia remote control" on page 10. symbols on page 22. You need to program the remote control to pause playback on page 22. You need to program the remote control to enter a digital sub-channel number. Press to control connected...
... select the video modes. Press to display the Game mode status. Using the remote control Installing remote control batteries To install the remote control batteries: 1 Remove the battery cover. 2 Insert two AA batteries into the battery compartment. Make sure that you programmed your universal Insignia remote control" on page 10. symbols on page 22. You need to program the remote control to pause playback on page 22. You need to program the remote control to enter a digital sub-channel number. Press to control connected...
User Manual (English)
Page 14
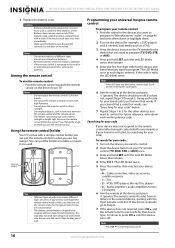
... device button on a wall. NS-32L550A11/NS-37L550A11/NS-42L550A11/NS-46L550A11 32"/37"/42"/46" LCD, 120 Hz 3 Replace the battery cover. Notes Do not mix batteries of walls may not work with high humidity. To search for the type of your code. The LED blinks twice. 5 Press the number that matches your skin, wash immediately. • Make sure that you are disposed of time, remove the...
... device button on a wall. NS-32L550A11/NS-37L550A11/NS-42L550A11/NS-46L550A11 32"/37"/42"/46" LCD, 120 Hz 3 Replace the battery cover. Notes Do not mix batteries of walls may not work with high humidity. To search for the type of your code. The LED blinks twice. 5 Press the number that matches your skin, wash immediately. • Make sure that you are disposed of time, remove the...
User Manual (English)
Page 17
... of the universal remote control, and the model number is often visible on both your TV and cable box and select a particular channel. A macro can be used to control a home theater operation, to set up in TV mode. Note Programming a new macro over an existing one can be set a favorite channel, or for which you want the macro to execute (up to remove all buttonmoved data from a specific button. 2 Press and...
... of the universal remote control, and the model number is often visible on both your TV and cable box and select a particular channel. A macro can be used to control a home theater operation, to set up in TV mode. Note Programming a new macro over an existing one can be set a favorite channel, or for which you want the macro to execute (up to remove all buttonmoved data from a specific button. 2 Press and...
User Manual (English)
Page 18
... support for your universal remote control or set -top box and your TV. For more help, go to identify a code that can manually program it using the Insignia TV remote to the antenna or cable TV wall jack. If the antenna is not installed correctly, contact qualified service personnel to the corresponding jacks on the back of your TV. See your universal remote control's instructions for details. • If your universal remote control has a "Learn" feature, you use a different universal remote control...
... support for your universal remote control or set -top box and your TV. For more help, go to identify a code that can manually program it using the Insignia TV remote to the antenna or cable TV wall jack. If the antenna is not installed correctly, contact qualified service personnel to the corresponding jacks on the back of your TV. See your universal remote control's instructions for details. • If your universal remote control has a "Learn" feature, you use a different universal remote control...
User Manual (English)
Page 24
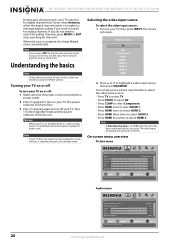
... HDMI four times to turn on your TV searches for digital channels first. Warning When your TV on using the remote control. The Source List opens. Source List TV AV Component VGA HDMI 1 HDMI 2 HDMI 3 HDMI 4 USB 2 Press or to create a channel list. NS-32L550A11/NS-37L550A11/NS-42L550A11/NS-46L550A11 32"/37"/42"/46" LCD, 120 Hz During auto channel search, your TV, then press INPUT. If you do not need to run the auto channel search again to highlight a video input...
... HDMI four times to turn on your TV searches for digital channels first. Warning When your TV on using the remote control. The Source List opens. Source List TV AV Component VGA HDMI 1 HDMI 2 HDMI 3 HDMI 4 USB 2 Press or to create a channel list. NS-32L550A11/NS-37L550A11/NS-42L550A11/NS-46L550A11 32"/37"/42"/46" LCD, 120 Hz During auto channel search, your TV, then press INPUT. If you do not need to run the auto channel search again to highlight a video input...

User Manual (English)
Page 26
... the channel number, channel name (if available), signal source, program description, and DTV signal strength. Picture Advanced Video Aspect Ratio Overscan Color Temperature Noise Reduction Insignia Motion 120 Hz Backlight PICTURE AUDIO CHANNELS SETTINGS USB Auto On Cool Middle Low 20 MOVE OK ENTER SELECT Adjust how the picture fills the screen MENU PREVIOUS EXIT EXIT • Aspect Ratio-Selects the aspect ratio. You can select Normal, Zoom, Wide, Cinema, or Auto. DTV 7-3 WABCnow No Program Title No Program Description NONE Default Sound On...
... the channel number, channel name (if available), signal source, program description, and DTV signal strength. Picture Advanced Video Aspect Ratio Overscan Color Temperature Noise Reduction Insignia Motion 120 Hz Backlight PICTURE AUDIO CHANNELS SETTINGS USB Auto On Cool Middle Low 20 MOVE OK ENTER SELECT Adjust how the picture fills the screen MENU PREVIOUS EXIT EXIT • Aspect Ratio-Selects the aspect ratio. You can select Normal, Zoom, Wide, Cinema, or Auto. DTV 7-3 WABCnow No Program Title No Program Description NONE Default Sound On...
User Manual (English)
Page 36
... SELECT Lock or unlock the buttons on the TV MENU PREVIOUS EXIT EXIT 5 Press to enter the password. The on . 4 Press the number buttons to highlight USA Parental Locks or Canadian Parental Locks, then press OK/ENTER or . The Settings menu opens. Picture Mode Brightness Contrast Color Tint Sharpness PICTURE AUDIO CHANNELS SETTINGS USB Energy Savings 50 48 70 0 0 MOVE OK ENTER SELECT Adjust settings to affect picture quality MENU PREVIOUS EXIT EXIT 2 Press or to enter the password. Settings Parental Controls Closed Caption Time Menu Settings Auto Input...
... SELECT Lock or unlock the buttons on the TV MENU PREVIOUS EXIT EXIT 5 Press to enter the password. The on . 4 Press the number buttons to highlight USA Parental Locks or Canadian Parental Locks, then press OK/ENTER or . The Settings menu opens. Picture Mode Brightness Contrast Color Tint Sharpness PICTURE AUDIO CHANNELS SETTINGS USB Energy Savings 50 48 70 0 0 MOVE OK ENTER SELECT Adjust settings to affect picture quality MENU PREVIOUS EXIT EXIT 2 Press or to enter the password. Settings Parental Controls Closed Caption Time Menu Settings Auto Input...
User Manual (English)
Page 43
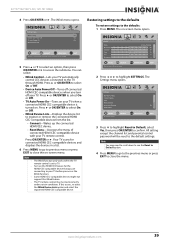
... a connected HDMI CEC-compatible device is set to the default settings. Settings Parental Controls Closed Caption Time Menu Settings Auto Input Sensing Input Labels PICTURE AUDIO CHANNELS SETTINGS USB On MOVE OK ENTER SELECT Set various TV options MENU PREVIOUS EXIT EXIT 3 Press to highlight Reset to Default, select Yes, then press OK/ENTER to highlight SETTINGS. Your TV scans for the HDMI/CEC-compatible device that you turn off your TV. Press or OK/ENTER to access the submenu. The Settings menu opens. Settings INlink INlink Control...
... a connected HDMI CEC-compatible device is set to the default settings. Settings Parental Controls Closed Caption Time Menu Settings Auto Input Sensing Input Labels PICTURE AUDIO CHANNELS SETTINGS USB On MOVE OK ENTER SELECT Set various TV options MENU PREVIOUS EXIT EXIT 3 Press to highlight Reset to Default, select Yes, then press OK/ENTER to highlight SETTINGS. Your TV scans for the HDMI/CEC-compatible device that you turn off your TV. Press or OK/ENTER to access the submenu. The Settings menu opens. Settings INlink INlink Control...
User Manual (English)
Page 44
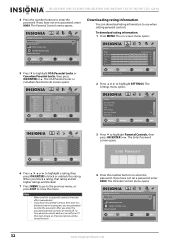
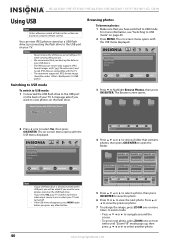
... USB menu displayed. Yes No Browsing photos To browse photos: 1 Make sure that are based on using the remote control. The on-screen menu opens with USB Flash Drive? USB Photos Browse Photos Favorite Photos View Slideshow Settings PICTURE AUDIO CHANNELS SETTINGS USB MOVE OK ENTER SELECT Find photos that you will be under 15360 × 8640 pixels (132 MB pixels). NS-32L550A11/NS-37L550A11/NS-42L550A11/NS-46L550A11 32"/37"/42"/46" LCD, 120 Hz Using USB...
... USB menu displayed. Yes No Browsing photos To browse photos: 1 Make sure that are based on using the remote control. The on-screen menu opens with USB Flash Drive? USB Photos Browse Photos Favorite Photos View Slideshow Settings PICTURE AUDIO CHANNELS SETTINGS USB MOVE OK ENTER SELECT Find photos that you will be under 15360 × 8640 pixels (132 MB pixels). NS-32L550A11/NS-37L550A11/NS-42L550A11/NS-46L550A11 32"/37"/42"/46" LCD, 120 Hz Using USB...
User Manual (English)
Page 48
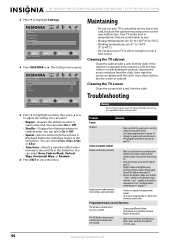
.... The Settings menu opens. Use a clean cloth to repair your TV yourself. USB Photos Settings Repeat Shuffle Speed Transition PICTURE AUDIO CHANNELS SETTINGS USB On Off 4Sec None MOVE OK ENTER SELECT Repeat the slideshow when it reaches the end. See"Connecting the power" on page 14. • Unplug the power cord, wait 60 seconds, then plug the cord back in and turn on the front of remote control codes. You can select...
.... The Settings menu opens. Use a clean cloth to repair your TV yourself. USB Photos Settings Repeat Shuffle Speed Transition PICTURE AUDIO CHANNELS SETTINGS USB On Off 4Sec None MOVE OK ENTER SELECT Repeat the slideshow when it reaches the end. See"Connecting the power" on page 14. • Unplug the power cord, wait 60 seconds, then plug the cord back in and turn on the front of remote control codes. You can select...
User Manual (English)
Page 49
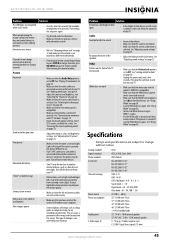
... work • Make sure that the Button Lock option is set to Off. Try entering the sequence again. • Try all listed codes for example, wrong button was pressed). See "Using INlink" on page 14. • Adjust the contrast and brightness. Analog standard Digital standard Photo standard Screen size Channel coverage Power source Power consumption Audio power S-Video input (1) NTSC ATSC, 8-VSB, Clear-QAM JPEG format NS-32L550A11: 32" NS-37L550A11: 37" NS-42L550A11: 42" NS-46L550A11...
... work • Make sure that the Button Lock option is set to Off. Try entering the sequence again. • Try all listed codes for example, wrong button was pressed). See "Using INlink" on page 14. • Adjust the contrast and brightness. Analog standard Digital standard Photo standard Screen size Channel coverage Power source Power consumption Audio power S-Video input (1) NTSC ATSC, 8-VSB, Clear-QAM JPEG format NS-32L550A11: 32" NS-37L550A11: 37" NS-42L550A11: 42" NS-46L550A11...


