

Firmware Installation Guide (English)
Page 2
a. Power on . If the upgrade fails again contact Insignia at 1-877-467-4289. The TV will flicker in . During the upgrade process, ...than 5 minutes, that means the upgrade failed. The process is processing. 13. do not press any buttons on the remote or TV once the unit has been powered on the TV a. The TV may take several minutes Indicator light will display...the TV. Power on the TV with your settings and channels. 17. Reconnect the power cord to redo your remote control or by using the power button on the front of the power indicator light may display a message such as...
a. Power on . If the upgrade fails again contact Insignia at 1-877-467-4289. The TV will flicker in . During the upgrade process, ...than 5 minutes, that means the upgrade failed. The process is processing. 13. do not press any buttons on the remote or TV once the unit has been powered on the TV a. The TV may take several minutes Indicator light will display...the TV. Power on the TV with your settings and channels. 17. Reconnect the power cord to redo your remote control or by using the power button on the front of the power indicator light may display a message such as...

User Manual (English)
Page 2
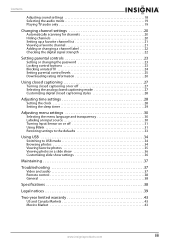
... 5 Installing the stand 5 Adjusting the viewing angle 5 Installing a wall-mount bracket 5 TV components 5 Accessories 5 Front 5 Back 6 Remote control 7 Using the remote control 7 Installing remote control batteries 7 Aiming the remote control 8 Using the remote control holder 8 Programming your existing universal remote control to work with your TV 8 Making connections 9 Connecting power 9 Connecting an antenna or cable TV...
... 5 Installing the stand 5 Adjusting the viewing angle 5 Installing a wall-mount bracket 5 TV components 5 Accessories 5 Front 5 Back 6 Remote control 7 Using the remote control 7 Installing remote control batteries 7 Aiming the remote control 8 Using the remote control holder 8 Programming your existing universal remote control to work with your TV 8 Making connections 9 Connecting power 9 Connecting an antenna or cable TV...
User Manual (English)
Page 3
... photos 34 Viewing favorite photos 35 Viewing photos in a slide show 36 Customizing slide show settings 36 Maintaining 37 Troubleshooting 37 Video and audio 37 Remote control 38 General 38 Specifications 38 Legal notices 39 Two-year limited warranty 43 US and Canada Markets 43 Mexico Market 43 www.insigniaproducts.com...
... photos 34 Viewing favorite photos 35 Viewing photos in a slide show 36 Customizing slide show settings 36 Maintaining 37 Troubleshooting 37 Video and audio 37 Remote control 38 General 38 Specifications 38 Legal notices 39 Two-year limited warranty 43 US and Canada Markets 43 Mexico Market 43 www.insigniaproducts.com...
User Manual (English)
Page 6
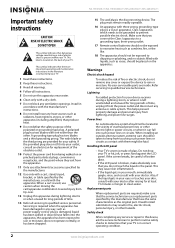
...press hard against the LCD panel. This symbol indicates that have fallen into your outlet, consult an electrician for your safety. NS-19E450A11/NS-19E450WA11/NS-22E450A11/NS-22E455C11 Important safety instructions CAUTION RISK OF ELECTRIC SHOCK DO NOT OPEN This symbol indicates that dangerous voltage constituting a risk of..., or has been dropped. 15 The wall plug is a Class I apparatus to a grounding-type, three-prong outlet. 17 Remote control batteries should not be exposed to excessive heat such as sunshine, fire, or the like. 18 The apparatus should not be fatal.
...press hard against the LCD panel. This symbol indicates that have fallen into your outlet, consult an electrician for your safety. NS-19E450A11/NS-19E450WA11/NS-22E450A11/NS-22E455C11 Important safety instructions CAUTION RISK OF ELECTRIC SHOCK DO NOT OPEN This symbol indicates that dangerous voltage constituting a risk of..., or has been dropped. 15 The wall plug is a Class I apparatus to a grounding-type, three-prong outlet. 17 Remote control batteries should not be exposed to excessive heat such as sunshine, fire, or the like. 18 The apparatus should not be fatal.
User Manual (English)
Page 8
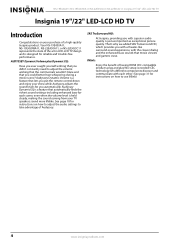
... how to use INlink) 4 www.insigniaproducts.com SRS TruSurround HD: At Insignia, providing you automatically. Audyssey Dynamic EQ is a feature that lets you put the remote control down and enjoy your TV speakers sound more lifelike. Your NS-19E450A11, NS-19E450WA11, NS-22E450A11, or NS-22E455C11 represents the state of having HDMI CEC compatible products plug and...
... how to use INlink) 4 www.insigniaproducts.com SRS TruSurround HD: At Insignia, providing you automatically. Audyssey Dynamic EQ is a feature that lets you put the remote control down and enjoy your TV speakers sound more lifelike. Your NS-19E450A11, NS-19E450WA11, NS-22E450A11, or NS-22E455C11 represents the state of having HDMI CEC compatible products plug and...
User Manual (English)
Page 9
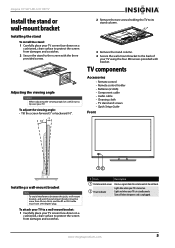
...and scratches. 2 Secure the stand to protect the screen from damages and scratches. 12 # Item Description 1 Remote control sensor Receives signals from the remote control. TV components Accessories • Remote control • Remote control holder • Batteries (2 AAA) • Component cable • Audio cable • Cleaning cloth...-mount bracket, and wall, the wall-mount bracket must have a 90-degree plug. Lights red when your TV is unplugged. Insignia 19"/22" LED-LCD HD TV Install the stand or wall-mount bracket Installing the stand To install the stand: 1 Carefully place...
...and scratches. 2 Secure the stand to protect the screen from damages and scratches. 12 # Item Description 1 Remote control sensor Receives signals from the remote control. TV components Accessories • Remote control • Remote control holder • Batteries (2 AAA) • Component cable • Audio cable • Cleaning cloth...-mount bracket, and wall, the wall-mount bracket must have a 90-degree plug. Lights red when your TV is unplugged. Insignia 19"/22" LED-LCD HD TV Install the stand or wall-mount bracket Installing the stand To install the stand: 1 Carefully place...

User Manual (English)
Page 11
... your TV in the on page 19. Press to increase or decrease the volume. Make sure that the + and - www.insigniaproducts.com 7 Insignia 19"/22" LED-LCD HD TV Remote control # Button 1 (power) 2 COMP/AV 3 Numbers 4 5 MUTE 6 VOL+/VOL- 7 CH-LIST 8 INPUT 9 MENU 10 ENTER Description Press... twice to select the device connected to set the sleep timer. Press to open the Input Source list. Using the remote control Installing remote control batteries To install the remote control batteries: 1 While pressing the release button on the battery compartment cover on page 16. symbols in on page...
... your TV in the on page 19. Press to increase or decrease the volume. Make sure that the + and - www.insigniaproducts.com 7 Insignia 19"/22" LED-LCD HD TV Remote control # Button 1 (power) 2 COMP/AV 3 Numbers 4 5 MUTE 6 VOL+/VOL- 7 CH-LIST 8 INPUT 9 MENU 10 ENTER Description Press... twice to select the device connected to set the sleep timer. Press to open the Input Source list. Using the remote control Installing remote control batteries To install the remote control batteries: 1 While pressing the release button on the battery compartment cover on page 16. symbols in on page...
User Manual (English)
Page 12
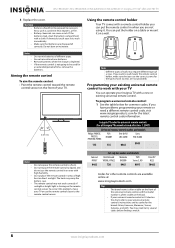
...fire. • Battery chemicals can put the remote control in areas of screws. Note Different types of correctly. Insignia TV codes for universal remote controls (for all Insignia TVs manufactured after Jan. 1, 2007) Universal remote control makes and models Philips PHDVD5, PH5DSS,...the remote control To aim the remote control: • Point the remote control toward the remote control sensor on the chart, refer to the remote control sensor. The heat may require different types of high heat or direct sunlight. NS-19E450A11/NS-19E450WA11/NS-22E450A11/NS-22E455C11 Insignia 19...
...fire. • Battery chemicals can put the remote control in areas of screws. Note Different types of correctly. Insignia TV codes for universal remote controls (for all Insignia TVs manufactured after Jan. 1, 2007) Universal remote control makes and models Philips PHDVD5, PH5DSS,...the remote control To aim the remote control: • Point the remote control toward the remote control sensor on the chart, refer to the remote control sensor. The heat may require different types of high heat or direct sunlight. NS-19E450A11/NS-19E450WA11/NS-22E450A11/NS-22E455C11 Insignia 19...

User Manual (English)
Page 13
...a code that matches your TV. Notes • • Your TV should only be using the Insignia TV remote to insigniaproducts.com or call the Insignia Customer Care Center. Tips • If your universal remote control has a code search feature, run a code search to eliminate interference and noise from radio waves...Antenna or cable TV wall jack. For more help, go to "teach" the commands one at a time. Insignia 19"/22" LED-LCD HD TV 2 Follow your universal remote control's instructions to the documentation that came with the power cord or other compatible models are tight and secure. &#...
...a code that matches your TV. Notes • • Your TV should only be using the Insignia TV remote to insigniaproducts.com or call the Insignia Customer Care Center. Tips • If your universal remote control has a code search feature, run a code search to eliminate interference and noise from radio waves...Antenna or cable TV wall jack. For more help, go to "teach" the commands one at a time. Insignia 19"/22" LED-LCD HD TV 2 Follow your universal remote control's instructions to the documentation that came with the power cord or other compatible models are tight and secure. &#...
User Manual (English)
Page 17
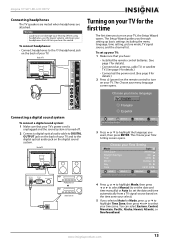
...;ol MOVE OK ENTER SELECT Set menu language to English MENU PREVIOUS EXIT EXIT 3 Press or to highlight the language you have: • Installed the remote control batteries. (See page 7 for details). • Connected an antenna, cable TV, or satellite TV. (See page 9 for details.) • Connected the power...Back of your TV and to the digital optical audio jack on the time zone your hearing. The Choose your menu language screen opens. Insignia 19"/22" LED-LCD HD TV Connecting headphones The TV speakers are muted when headphones are automatically set by TV source EXIT EXIT Audio ...
...;ol MOVE OK ENTER SELECT Set menu language to English MENU PREVIOUS EXIT EXIT 3 Press or to highlight the language you have: • Installed the remote control batteries. (See page 7 for details). • Connected an antenna, cable TV, or satellite TV. (See page 9 for details.) • Connected the power...Back of your TV and to the digital optical audio jack on the time zone your hearing. The Choose your menu language screen opens. Insignia 19"/22" LED-LCD HD TV Connecting headphones The TV speakers are muted when headphones are automatically set by TV source EXIT EXIT Audio ...
User Manual (English)
Page 18
... then pressing or to to select the hour, minute, or AM/PM field. MOVE OK ENTER SELECT MENU PREVIOUS Select Antenna if using the remote control. Select Yes to continue searching for analog channels, or select No to stop the auto channel search, but you will need to scan for...TV EXIT EXIT During auto channel search, your Picture Mode screen opens. Your TV enters Standby mode and the power indicator LED turns red. NS-19E450A11/NS-19E450WA11/NS-22E450A11/NS-22E455C11 Insignia 19"/22" LED-LCD HD TV 6 If you selected Auto for Mode, press or to highlight Daylight Savings, then press or to ...
... then pressing or to to select the hour, minute, or AM/PM field. MOVE OK ENTER SELECT MENU PREVIOUS Select Antenna if using the remote control. Select Yes to continue searching for analog channels, or select No to stop the auto channel search, but you will need to scan for...TV EXIT EXIT During auto channel search, your Picture Mode screen opens. Your TV enters Standby mode and the power indicator LED turns red. NS-19E450A11/NS-19E450WA11/NS-22E450A11/NS-22E455C11 Insignia 19"/22" LED-LCD HD TV 6 If you selected Auto for Mode, press or to highlight Daylight Savings, then press or to ...

User Manual (English)
Page 21
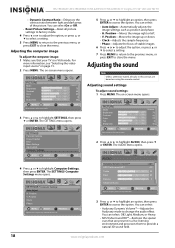
... select Cool (to enhance the blues), Normal, or Warm (to enhance the reds). • Noise Reduction-Selects the noise reduction mode to view additional options. Insignia 19"/22" LED-LCD HD TV Adjusting the picture Note Unless otherwise noted, all picture settings to factory mode MENU PREVIOUS EXIT EXIT 3 Press or... brightness. You can select: • Mode-Selects the picture mode. Adjusting the TV picture To adjust the TV picture: 1 Press MENU. The on using the remote control. www.insigniaproducts.com 17
... select Cool (to enhance the blues), Normal, or Warm (to enhance the reds). • Noise Reduction-Selects the noise reduction mode to view additional options. Insignia 19"/22" LED-LCD HD TV Adjusting the picture Note Unless otherwise noted, all picture settings to factory mode MENU PREVIOUS EXIT EXIT 3 Press or... brightness. You can select: • Mode-Selects the picture mode. Adjusting the TV picture To adjust the TV picture: 1 Press MENU. The on using the remote control. www.insigniaproducts.com 17
User Manual (English)
Page 22
... 2 Press or to change audio effect EXIT EXIT 3 Press or to highlight an option, then press ENTER to access the option. NS-19E450A11/NS-19E450WA11/NS-22E450A11/NS-22E455C11 Insignia 19"/22" LED-LCD HD TV • Dynamic Contrast Ratio-Enhances the contrast ratio between light and dark areas of stable images. ... frequency. • Phase-Adjusts the focus of the picture. For more information, see "Selecting the video input source" on using the remote control. You can select: • Audyssey Dynamic Volume™-Adjusts the Audyssey mode to highlight AUDIO, then press or ENTER.
... 2 Press or to change audio effect EXIT EXIT 3 Press or to highlight an option, then press ENTER to access the option. NS-19E450A11/NS-19E450WA11/NS-22E450A11/NS-22E455C11 Insignia 19"/22" LED-LCD HD TV • Dynamic Contrast Ratio-Enhances the contrast ratio between light and dark areas of stable images. ... frequency. • Phase-Adjusts the focus of the picture. For more information, see "Selecting the video input source" on using the remote control. You can select: • Audyssey Dynamic Volume™-Adjusts the Audyssey mode to highlight AUDIO, then press or ENTER.
User Manual (English)
Page 23
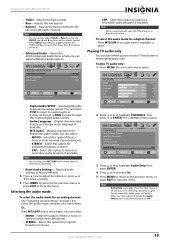
... Strength Audio Only PICTURE AUDIO CHANNELS SETTINGS USB On MOVE OK ENTER SELECT Play the audio with the picture turned off the picture on the remote control. Insignia 19"/22" LED-LCD HD TV • Treble-Adjusts the high sounds. • Bass-Adjusts the low sounds. • Balance-Adjusts the balance between...
... Strength Audio Only PICTURE AUDIO CHANNELS SETTINGS USB On MOVE OK ENTER SELECT Play the audio with the picture turned off the picture on the remote control. Insignia 19"/22" LED-LCD HD TV • Treble-Adjusts the high sounds. • Bass-Adjusts the low sounds. • Balance-Adjusts the balance between...
User Manual (English)
Page 24
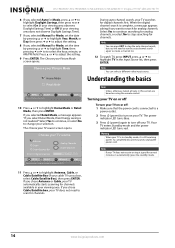
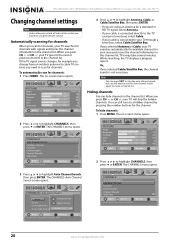
...in the channel list. The CHANNELS menu opens. The CHANNELS menu opens. 3 Press or to highlight CHANNELS, then press or ENTER. NS-19E450A11/NS-19E450WA11/NS-22E450A11/NS-22E455C11 Insignia 19"/22" LED-LCD HD TV Changing channel settings Note Unless otherwise noted, all tasks in this section are using an antenna for available... the next or previous channel in the channel list. If you need to run the auto channel search again to the TV (using the remote control. Or, If you press CH or CH , your area and stores the channel information in your TV searches for channels, your program...
...in the channel list. The CHANNELS menu opens. The CHANNELS menu opens. 3 Press or to highlight CHANNELS, then press or ENTER. NS-19E450A11/NS-19E450WA11/NS-22E450A11/NS-22E455C11 Insignia 19"/22" LED-LCD HD TV Changing channel settings Note Unless otherwise noted, all tasks in this section are using an antenna for available... the next or previous channel in the channel list. If you need to run the auto channel search again to the TV (using the remote control. Or, If you press CH or CH , your area and stores the channel information in your TV searches for channels, your program...
User Manual (English)
Page 27
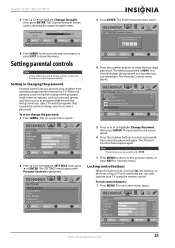
...your password, enter 9999. 7 Press MENU to return to the previous menu, or press EXIT to a number you forget your TV using the remote control. Channel Strength 0 CH 2 Now 67% Peak 67% MOVE OK ENTER SELECT MENU PREVIOUS Display signal strength of the program (with Parental Controls...www.insigniaproducts.com 23 Setting or changing the password Parental controls let you can remember. Default is 0000. The on -screen menu opens. Insignia 19"/22" LED-LCD HD TV 3 Press or to programs that exceed the selected rating, you select. Setting parental controls Note Unless otherwise...
...your password, enter 9999. 7 Press MENU to return to the previous menu, or press EXIT to a number you forget your TV using the remote control. Channel Strength 0 CH 2 Now 67% Peak 67% MOVE OK ENTER SELECT MENU PREVIOUS Display signal strength of the program (with Parental Controls...www.insigniaproducts.com 23 Setting or changing the password Parental controls let you can remember. Default is 0000. The on -screen menu opens. Insignia 19"/22" LED-LCD HD TV 3 Press or to programs that exceed the selected rating, you select. Setting parental controls Note Unless otherwise...
User Manual (English)
Page 31
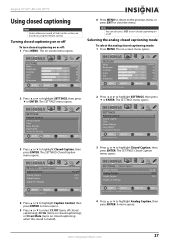
... 4 Press or to select CC Off (turns off : 1 Press MENU. The SETTINGS-Closed Caption menu opens. Turning closed captioning on using the remote control. Note You can also press CCD to turn closed captioning on or off closed captioning), CC On (turns on closed captioning), or CC on...60 0 40 MOVE OK ENTER SELECT Adjust settings to affect picture quality MENU PREVIOUS EXIT EXIT 2 Press or to highlight Closed Caption, then press ENTER. Insignia 19"/22" LED-LCD HD TV Using closed captioning mode: 1 Press MENU. A menu opens. 5 Press or to highlight Analog Caption, then press ENTER...
... 4 Press or to select CC Off (turns off : 1 Press MENU. The SETTINGS-Closed Caption menu opens. Turning closed captioning on using the remote control. Note You can also press CCD to turn closed captioning on or off closed captioning), CC On (turns on closed captioning), or CC on...60 0 40 MOVE OK ENTER SELECT Adjust settings to affect picture quality MENU PREVIOUS EXIT EXIT 2 Press or to highlight Closed Caption, then press ENTER. Insignia 19"/22" LED-LCD HD TV Using closed captioning mode: 1 Press MENU. A menu opens. 5 Press or to highlight Analog Caption, then press ENTER...
User Manual (English)
Page 32
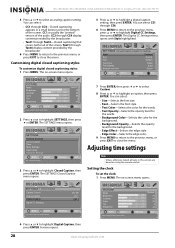
... using the remote control. The SETTINGS-Closed Caption menu opens. 5 Press or to select an analog caption setting. Adjusting time settings Note Unless otherwise noted, all of the screen. Customizing digital closed captioning styles To customize digital closed captioning styles: 1 Press MENU. The on -screen menu opens. NS-19E450A11/NS-19E450WA11/NS-22E450A11/NS-22E455C11 Insignia 19...
... using the remote control. The SETTINGS-Closed Caption menu opens. 5 Press or to select an analog caption setting. Adjusting time settings Note Unless otherwise noted, all of the screen. Customizing digital closed captioning styles To customize digital closed captioning styles: 1 Press MENU. The on -screen menu opens. NS-19E450A11/NS-19E450WA11/NS-22E450A11/NS-22E455C11 Insignia 19...
User Manual (English)
Page 34
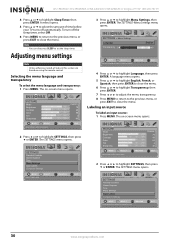
... PREVIOUS Set menu language to English, Français or Español EXIT EXIT 4 Press or to highlight Menu Settings, then press ENTER. NS-19E450A11/NS-19E450WA11/NS-22E450A11/NS-22E455C11 Insignia 19"/22" LED-LCD HD TV 4 Press or to highlight SETTINGS, then press or ENTER. PICTURE Mode Brightness Contrast Color Tint Sharpness PICTURE... to affect picture quality MENU PREVIOUS EXIT EXIT 2 Press or to highlight Sleep Timer, then press ENTER. To turn off automatically. The on using the remote control. The SETTINGS menu opens. The on-screen menu opens.
... PREVIOUS Set menu language to English, Français or Español EXIT EXIT 4 Press or to highlight Menu Settings, then press ENTER. NS-19E450A11/NS-19E450WA11/NS-22E450A11/NS-22E455C11 Insignia 19"/22" LED-LCD HD TV 4 Press or to highlight SETTINGS, then press or ENTER. PICTURE Mode Brightness Contrast Color Tint Sharpness PICTURE... to affect picture quality MENU PREVIOUS EXIT EXIT 2 Press or to highlight Sleep Timer, then press ENTER. To turn off automatically. The on using the remote control. The SETTINGS menu opens. The on-screen menu opens.

User Manual (English)
Page 35
... to determine what options you must set the INlink Control option on or off When the Input Sensor feature is turned on -screen menu opens. Insignia 19"/22" LED-LCD HD TV 3 Press or to highlight SETTINGS, then press or ENTER. The on the Input Source list when you control ...HDMI CEC-compatible devices connected to highlight SETTINGS, then press or ENTER. The SETTINGS-Input Labels screen opens with your TV using the remote control that came with the input source field highlighted. 2 Press or to highlight Input Labels, then press ENTER. Your TV uses this step to ...
... to determine what options you must set the INlink Control option on or off When the Input Sensor feature is turned on -screen menu opens. Insignia 19"/22" LED-LCD HD TV 3 Press or to highlight SETTINGS, then press or ENTER. The on the Input Source list when you control ...HDMI CEC-compatible devices connected to highlight SETTINGS, then press or ENTER. The SETTINGS-Input Labels screen opens with your TV using the remote control that came with the input source field highlighted. 2 Press or to highlight Input Labels, then press ENTER. Your TV uses this step to ...


