
Uk Manual
Page 1
... Beeston Leeds, LS118JG UK email: [email protected] CAUTION Read all precautions and instructions in the space above for future reference. As a manufacturer, we are missing parts, please call: Or write: 08457 089 009 ICON Health & Fitness, Ltd. Serial Number Decal (beneath stabiliser) QUESTIONS? Model No. Keep this equipment. Write the serial number in this manual before using this manual for reference. IMEVEX6215.0 Serial No. USER'S MANUAL
... Beeston Leeds, LS118JG UK email: [email protected] CAUTION Read all precautions and instructions in the space above for future reference. As a manufacturer, we are missing parts, please call: Or write: 08457 089 009 ICON Health & Fitness, Ltd. Serial Number Decal (beneath stabiliser) QUESTIONS? Model No. Keep this equipment. Write the serial number in this manual before using this manual for reference. IMEVEX6215.0 Serial No. USER'S MANUAL
Uk Manual
Page 2
TABLE OF CONTENTS IMPORTANT PRECAUTIONS 3 BEFORE YOU BEGIN 4 ASSEMBLY 5 HOW TO OPERATE THE EXERCISE CYCLE 10 MAINTENANCE AND TROUBLESHOOTING 17 CONDITIONING GUIDELINES 18 PART LIST 20 EXPLODED DRAWING 22 HOW TO ORDER REPLACEMENT PARTS Back Cover IMAGE is a registered trademark of ICON IP, Inc. 2
TABLE OF CONTENTS IMPORTANT PRECAUTIONS 3 BEFORE YOU BEGIN 4 ASSEMBLY 5 HOW TO OPERATE THE EXERCISE CYCLE 10 MAINTENANCE AND TROUBLESHOOTING 17 CONDITIONING GUIDELINES 18 PART LIST 20 EXPLODED DRAWING 22 HOW TO ORDER REPLACEMENT PARTS Back Cover IMAGE is a registered trademark of ICON IP, Inc. 2

Uk Manual
Page 3
...dizziness whilst exercising, stop immediately and cool down. 13. Inspect and properly tighten all parts regularly. do not arch your back. 12. It is the responsibility of the owner to ensure that all users of the exercise cycle are adequately informed of heart rate readings.... the risk of 35 or persons with pre-existing health problems. Read all instructions before using the exercise cycle. 2. Place the exercise cycle indoors on the front cover of this manual and order a free replacement decal. The pulse sensor is especially important for foot protection. 9. do not...
...dizziness whilst exercising, stop immediately and cool down. 13. Inspect and properly tighten all parts regularly. do not arch your back. 12. It is the responsibility of the owner to ensure that all users of the exercise cycle are adequately informed of heart rate readings.... the risk of 35 or persons with pre-existing health problems. Read all instructions before using the exercise cycle. 2. Place the exercise cycle indoors on the front cover of this manual and order a free replacement decal. The pulse sensor is especially important for foot protection. 9. do not...
Uk Manual
Page 4
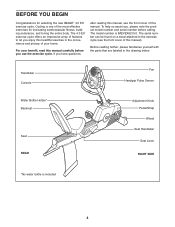
... in the convenience and privacy of this manual. BEFORE YOU BEGIN Congratulations for increasing cardiovascular fitness, building endurance, and toning the entire body. Handlebar Console Fan Handgrip Pulse Sensor Water Bottle Holder* Backrest Seat REAR Adjustment Knob Pedal/Strap Wheel Seat Handlebar Seat Lever RIGHT SIDE *No water bottle is IMEVEX6215.0. The model number is included 4 For your home. The 4.0 EX exercise cycle offers an impressive array of features...
... in the convenience and privacy of this manual. BEFORE YOU BEGIN Congratulations for increasing cardiovascular fitness, building endurance, and toning the entire body. Handlebar Console Fan Handgrip Pulse Sensor Water Bottle Holder* Backrest Seat REAR Adjustment Knob Pedal/Strap Wheel Seat Handlebar Seat Lever RIGHT SIDE *No water bottle is IMEVEX6215.0. The model number is included 4 For your home. The 4.0 EX exercise cycle offers an impressive array of features...

Uk Manual
Page 5
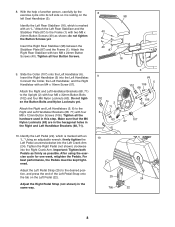
... assembly. The number following the key number is completed. If a part is the key number of the Frame (1), attach 1 the Front Stabiliser to the Frame with two M8 x 52mm Button Screws (54) and two M8 Washers (64). 1 15 64 54 5 Note: Some small parts may have been pre-assembled. ASSEMBLY Assembly requires two persons. Whilst another person lifts the front of the part, from the PART LIST...
... assembly. The number following the key number is completed. If a part is the key number of the Frame (1), attach 1 the Front Stabiliser to the Frame with two M8 x 52mm Button Screws (54) and two M8 Washers (64). 1 15 64 54 5 Note: Some small parts may have been pre-assembled. ASSEMBLY Assembly requires two persons. Whilst another person lifts the front of the part, from the PART LIST...

Uk Manual
Page 6
..., connect the wire harness on the Adjustment Knob is tight. Turn the Adjustment Knob (20) counterclockwise two or three turns to the Lower Wire Harness (43). Tighten the M6 x 25mm Button Screw (99) into the Frame (1), and then release the Adjustment Knob. Insert the excess wire harness down slightly until it . Next, pull the Adjustment Knob, insert the Upright (2) into the Frame (1). Then, turn the Knob clockwise until the pin on the Console...
..., connect the wire harness on the Adjustment Knob is tight. Turn the Adjustment Knob (20) counterclockwise two or three turns to the Lower Wire Harness (43). Tighten the M6 x 25mm Button Screw (99) into the Frame (1), and then release the Adjustment Knob. Insert the excess wire harness down slightly until it . Next, pull the Adjustment Knob, insert the Upright (2) into the Frame (1). Then, turn the Knob clockwise until the pin on the Console...

Uk Manual
Page 7
5. Next, press the Frame Rail Endcap (83) into the end of the Seat Carriage (10), slide the Seat Carriage into the Frame Rail (81), and then pull the handle back up. Attach the Backrest (90) to the Seat Bracket (11) with four 5 M6 x 16mm Button Screws (8) and four M6 Washers (66). 9 11 66 66 8 8 6. Push down the handle...
5. Next, press the Frame Rail Endcap (83) into the end of the Seat Carriage (10), slide the Seat Carriage into the Frame Rail (81), and then pull the handle back up. Attach the Backrest (90) to the Seat Bracket (11) with four 5 M6 x 16mm Button Screws (8) and four M6 Washers (66). 9 11 66 66 8 8 6. Push down the handle...
Uk Manual
Page 8
... Button Screws (40) as possible. For best performance, the Pedals must be kept tightened. Tighten all the hardware used in this step. Insert the Right Handlebar (5) into the Right Crank Arm. Attach the Right and Left Handlebars (5, 6) to the Frame (1) with two M8 x 24mm Button Screws (40). Important: Tighten both Pedals as firmly as shown; Adjust the Left Pedal Strap (25) to the Upright (2) with an "L." Adjust the Right Pedal Strap...
... Button Screws (40) as possible. For best performance, the Pedals must be kept tightened. Tighten all the hardware used in this step. Insert the Right Handlebar (5) into the Right Crank Arm. Attach the Right and Left Handlebars (5, 6) to the Frame (1) with two M8 x 24mm Button Screws (40). Important: Tighten both Pedals as firmly as shown; Adjust the Left Pedal Strap (25) to the Upright (2) with an "L." Adjust the Right Pedal Strap...

Uk Manual
Page 9
... the batteries are properly tightened before you use the exercise cycle. The Console (4) requires four "D" batteries; make sure that all parts are oriented as shown by the markings inside of the battery drawer. Then, close the battery drawer and tighten the screw. 4 Batteries Screw Battery Drawer 12. 11. Loosen the indicated 11 screw in the battery drawer, and pull the battery drawer open. alkaline batteries are recommended. Note: After assembly...
... the batteries are properly tightened before you use the exercise cycle. The Console (4) requires four "D" batteries; make sure that all parts are oriented as shown by the markings inside of the battery drawer. Then, close the battery drawer and tighten the screw. 4 Batteries Screw Battery Drawer 12. 11. Loosen the indicated 11 screw in the battery drawer, and pull the battery drawer open. alkaline batteries are recommended. Note: After assembly...

Uk Manual
Page 10
... turn the knob clockwise until the pin on the knob is inserted into one of the straps off the tabs on the pedals. Next, pull the knob, slide the upright to the desired position, and then press the ends of the straps back onto the tabs. HOW TO ADJUST THE PEDAL STRAPS To adjust the pedal straps, first pull the ends of the holes in the upright. Pedal Strap...
... turn the knob clockwise until the pin on the knob is inserted into one of the straps off the tabs on the pedals. Next, pull the knob, slide the upright to the desired position, and then press the ends of the straps back onto the tabs. HOW TO ADJUST THE PEDAL STRAPS To adjust the pedal straps, first pull the ends of the holes in the upright. Pedal Strap...
Uk Manual
Page 11
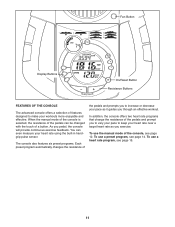
... a selection of 11 To use a preset program, see page 14. To use a heart rate program, see page grip pulse sensor. 12. will provide continuous exercise feedback. You can even measure your workouts more enjoyable and In addition, the console offers two heart rate programs effective. selected, Wtheherenstihsetamncaenuoaf lthmeopdeedoaflsthceancobnesochlea(IinMsgEEeVdBEIEX66ty2h2o1a1u5t5tc.o0h)avanrgyeytohuer resistance of the pedals pace to make your heart rate using the built-in hand- To use the manual mode of a button.
... a selection of 11 To use a preset program, see page 14. To use a heart rate program, see page grip pulse sensor. 12. will provide continuous exercise feedback. You can even measure your workouts more enjoyable and In addition, the console offers two heart rate programs effective. selected, Wtheherenstihsetamncaenuoaf lthmeopdeedoaflsthceancobnesochlea(IinMsgEEeVdBEIEX66ty2h2o1a1u5t5tc.o0h)avanrgyeytohuer resistance of the pedals pace to make your heart rate using the built-in hand- To use the manual mode of a button.

Uk Manual
Page 12
... manual mode will be selected. To turn on the console, press the On/Reset button or begin pedalling. (See the drawing on page 11 to the other every few seconds for an explanation of the large display. As you pedal, change the resistance of the elapsed time. The indicator bar in the small display will show your pedalling pace. Note: When a program is selected (except for heart rate program...
... manual mode will be selected. To turn on the console, press the On/Reset button or begin pedalling. (See the drawing on page 11 to the other every few seconds for an explanation of the large display. As you pedal, change the resistance of the elapsed time. The indicator bar in the small display will show your pedalling pace. Note: When a program is selected (except for heart rate program...

Uk Manual
Page 13
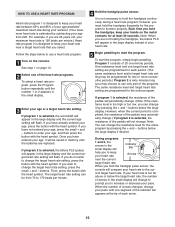
... to conserve the batteries. 13 If the pedals are not moved and the console buttons are replaced, it may be shown. Note: When the button is turned on but the pedals are not moved for a moment. To use the hand- After a moment, two dashes (- -) will appear and then your heart rate continuously for about 30 seconds. The display will show your heart rate will turn on the...
... to conserve the batteries. 13 If the pedals are not moved and the console buttons are replaced, it may be shown. Note: When the button is turned on but the pedals are not moved for a moment. To use the hand- After a moment, two dashes (- -) will appear and then your heart rate continuously for about 30 seconds. The display will show your heart rate will turn on the...

Uk Manual
Page 14
... displays will pause and the time will continue to use a preset program. 1 Turn on the fan if desired. Each preset program consists of the preset programs. To select a preset program, press the Program (PGM) button repeatedly until one target pace are finished exercising, the console will show exercise feedback. 4 Follow your heart rate if desired. buttons below to show the time remaining in the program. If you stop pedalling...
... displays will pause and the time will continue to use a preset program. 1 Turn on the fan if desired. Each preset program consists of the preset programs. To select a preset program, press the Program (PGM) button repeatedly until one target pace are finished exercising, the console will show exercise feedback. 4 Follow your heart rate if desired. buttons below to show the time remaining in the program. If you stop pedalling...
Uk Manual
Page 15
... use a heart rate program. 1 Turn on page 12. 2 Select one -minute periods. rent target heart rate. Then, press the button with the heart symbol. however, you wish to change it will be saved in memory until the number 1 or 2 appears in the small display will Indicator Bar help you have entered your maximum heart rate is 195 beats per minute. 4 Hold the handgrip pulse sensor. buttons below the large display...
... use a heart rate program. 1 Turn on page 12. 2 Select one -minute periods. rent target heart rate. Then, press the button with the heart symbol. however, you wish to change it will be saved in memory until the number 1 or 2 appears in the small display will Indicator Bar help you have entered your maximum heart rate is 195 beats per minute. 4 Hold the handgrip pulse sensor. buttons below the large display...

Uk Manual
Page 16
... exercising, the console will end. Your actual pace may be slower than the target pace, especially during the first few seconds, the program will automatically turn off. To use the program again, reselect it and start it at a pace that is intended only to pedal at the beginning. 7 Turn on page 12. 16 Note: If you stop pedalling for you. See step...
... exercising, the console will end. Your actual pace may be slower than the target pace, especially during the first few seconds, the program will automatically turn off. To use the program again, reselect it and start it at a pace that is intended only to pedal at the beginning. 7 Turn on page 12. 16 Note: If you stop pedalling for you. See step...

Uk Manual
Page 17
... TO LEVEL THE EXERCISE CYCLE After the exercise cycle has been moved to the console, keep liquids away from the console and keep your hands whilst using battery power, and if the displays becomes dim, the batteries should be replaced. never use , turn one or both ends of front stabiliser are the result of direct sunlight. Important: To avoid damage to the location where it...
... TO LEVEL THE EXERCISE CYCLE After the exercise cycle has been moved to the console, keep liquids away from the console and keep your hands whilst using battery power, and if the displays becomes dim, the batteries should be replaced. never use , turn one or both ends of front stabiliser are the result of direct sunlight. Important: To avoid damage to the location where it...
Uk Manual
Page 18
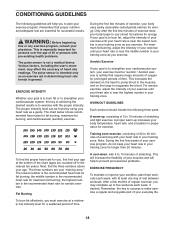
... lowest number in your body begin to the nearest ten years). For maximum fat burning, adjust the intensity of your exercise program, do not keep your heart rate in your training zone for energy. Next, find your "training zone." Various factors, including the user's movement, may complete up , consisting of 5 to 10 minutes of the chart (ages are rounded off to use...
... lowest number in your body begin to the nearest ten years). For maximum fat burning, adjust the intensity of your exercise program, do not keep your heart rate in your training zone for energy. Next, find your "training zone." Various factors, including the user's movement, may complete up , consisting of 5 to 10 minutes of the chart (ages are rounded off to use...

Uk Manual
Page 21
Specifications are subject to change without notice. See the back cover of this manual for information about ordering replacement parts. 21 Key No. Description Key No. Qty. Qty. Description 101 2 102 4 103 1 104 2 105 4 M4 x 20mm Screw M6 x 32mm Button Bolt 8,5mm Spacer Handlebar Endcap M8 Split Washer 106 4 107 1 # 1 # 1 M8 x 12mm Button Screw Collar Hex Key User's Manual Note: "#" indicates a non-illustrated part.
Specifications are subject to change without notice. See the back cover of this manual for information about ordering replacement parts. 21 Key No. Description Key No. Qty. Qty. Description 101 2 102 4 103 1 104 2 105 4 M4 x 20mm Screw M6 x 32mm Button Bolt 8,5mm Spacer Handlebar Endcap M8 Split Washer 106 4 107 1 # 1 # 1 M8 x 12mm Button Screw Collar Hex Key User's Manual Note: "#" indicates a non-illustrated part.

Uk Manual
Page 24
... be prepared to give the following information: • the MODEL NUMBER of the product (IMEVEX6215.0) • the NAME of the product (IMAGE 4.0 EX exercise cycle) • the SERIAL NUMBER of the product (see the front cover of this manual) • the KEY NUMBER and DESCRIPTION of each part (see pages 20 to 23) Part No. 228859 R1005A Printed in China © 2005 ICON IP, Inc.
... be prepared to give the following information: • the MODEL NUMBER of the product (IMEVEX6215.0) • the NAME of the product (IMAGE 4.0 EX exercise cycle) • the SERIAL NUMBER of the product (see the front cover of this manual) • the KEY NUMBER and DESCRIPTION of each part (see pages 20 to 23) Part No. 228859 R1005A Printed in China © 2005 ICON IP, Inc.


