
English Manual
Page 1
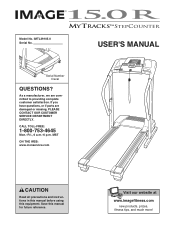
... have questions, or if parts are committed to providing complete customer satisfaction. Model No. As a manufacturer, we are damaged or missing, PLEASE CONTACT OUR CUSTOMER SERVICE DEPARTMENT DIRECTLY. Serial Number Decal QUESTIONS? MST ON THE WEB: www.iconservice.com USER'S MANUAL CAUTION Read all precautions and instructions in this manual before using this manual for future reference. CALL TOLL-FREE: 1-800-753-4645...
... have questions, or if parts are committed to providing complete customer satisfaction. Model No. As a manufacturer, we are damaged or missing, PLEASE CONTACT OUR CUSTOMER SERVICE DEPARTMENT DIRECTLY. Serial Number Decal QUESTIONS? MST ON THE WEB: www.iconservice.com USER'S MANUAL CAUTION Read all precautions and instructions in this manual before using this manual for future reference. CALL TOLL-FREE: 1-800-753-4645...

English Manual
Page 2
IMAGE is a registered trademark of this manual. TABLE OF CONTENTS IMPORTANT PRECAUTIONS 3 BEFORE YOU BEGIN 5 ASSEMBLY 6 OPERATION AND ADJUSTMENT 10 HOW TO FOLD AND MOVE THE TREADMILL 16 TROUBLESHOOTING 17 CONDITIONING GUIDELINES 19 ORDERING REPLACEMENT PARTS Back Cover LIMITED WARRANTY Back Cover Note: An EXPLODED DRAWING and a PART LIST are attached in the center of ICON IP, Inc. 2
IMAGE is a registered trademark of this manual. TABLE OF CONTENTS IMPORTANT PRECAUTIONS 3 BEFORE YOU BEGIN 5 ASSEMBLY 6 OPERATION AND ADJUSTMENT 10 HOW TO FOLD AND MOVE THE TREADMILL 16 TROUBLESHOOTING 17 CONDITIONING GUIDELINES 19 ORDERING REPLACEMENT PARTS Back Cover LIMITED WARRANTY Back Cover Note: An EXPLODED DRAWING and a PART LIST are attached in the center of ICON IP, Inc. 2
English Manual
Page 3
... the treadmill. The pulse sensor is turned off circuit breaker to use an extension cord. 10. It is not a medical device. Athletic support clothes are standing on each side. The pulse sensor is the responsibility of the owner to raise, lower, or move the walking belt while the power is intended only as described in this manual and order part number 146148, or see page 10), plug the power cord into...
... the treadmill. The pulse sensor is turned off circuit breaker to use an extension cord. 10. It is not a medical device. Athletic support clothes are standing on each side. The pulse sensor is the responsibility of the owner to raise, lower, or move the walking belt while the power is intended only as described in this manual and order part number 146148, or see page 10), plug the power cord into...
English Manual
Page 4
.... Never remove the motor hood unless instructed to do so by or through the use only. SAVE THESE INSTRUCTIONS The decals shown here have been placed on the front cover of this manual should be performed by an authorized service representative only. 23. Always unplug the power cord immediately after use the treadmill in this manual and order a free replacement decal. tenance and adjustment procedures de- ICON assumes...
.... Never remove the motor hood unless instructed to do so by or through the use only. SAVE THESE INSTRUCTIONS The decals shown here have been placed on the front cover of this manual should be performed by an authorized service representative only. 23. Always unplug the power cord immediately after use the treadmill in this manual and order a free replacement decal. tenance and adjustment procedures de- ICON assumes...
English Manual
Page 5
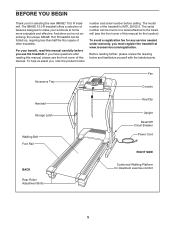
... the product model number and serial number before you for maximum exercise comfort 5 To help us assist you have questions after reading this manual carefully before calling. For your workouts at www.iconservice.com/registration. Accessory Tray Fan Console Handrail Storage Latch Walking Belt Foot Rail Key/Clip Upright Reset/Off Circuit Breaker Power Cord RIGHT SIDE BACK Rear Roller Adjustment Bolts Cushioned Walking Platform for selecting the new IMAGE® 15.0 R treadmill. BEFORE YOU...
... the product model number and serial number before you for maximum exercise comfort 5 To help us assist you have questions after reading this manual carefully before calling. For your workouts at www.iconservice.com/registration. Accessory Tray Fan Console Handrail Storage Latch Walking Belt Foot Rail Key/Clip Upright Reset/Off Circuit Breaker Power Cord RIGHT SIDE BACK Rear Roller Adjustment Bolts Cushioned Walking Platform for selecting the new IMAGE® 15.0 R treadmill. BEFORE YOU...

English Manual
Page 6
... of the walking belt or the shipping carton. Attach a Wheel (66) to the bottom of the walking belt, simply wipe off the lubricant with four 1" Tek Screws (39). During shipping, a small amount of lubricant may be transferred to assemble the treadmill, call toll-free 1-800-445-2480. Do not overtighten the Wheel Nut; For help of the treadmill walking belt is coated with a 2" Bolt (64...
... of the walking belt or the shipping carton. Attach a Wheel (66) to the bottom of the walking belt, simply wipe off the lubricant with four 1" Tek Screws (39). During shipping, a small amount of lubricant may be transferred to assemble the treadmill, call toll-free 1-800-445-2480. Do not overtighten the Wheel Nut; For help of the treadmill walking belt is coated with a 2" Bolt (64...
English Manual
Page 8
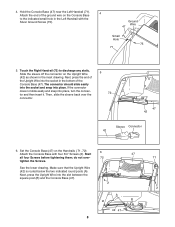
...Upright Wire (42) as shown in the bottom of the Console Base (47). Then, slide the sleeve back over - 72 tighten the Screws. 47 71 See the lower drawing. Make sure that the Upright Wire (42) is routed...Screws (2). Next, press the Upright Wire into place, turn the connector and then insert it. Hold the Console Base (47) near the Left Handrail (71). Next, press the end of the ground wire on the Handrails ( 71, 72). 6 Attach the Console Base with the Silver Ground Screw (75). 4 Ground Wire 47 Small Hole 75 71 5. Start all four Screws before tightening them; Set the Console...
...Upright Wire (42) as shown in the bottom of the Console Base (47). Then, slide the sleeve back over - 72 tighten the Screws. 47 71 See the lower drawing. Make sure that the Upright Wire (42) is routed...Screws (2). Next, press the Upright Wire into place, turn the connector and then insert it. Hold the Console Base (47) near the Left Handrail (71). Next, press the end of the ground wire on the Handrails ( 71, 72). 6 Attach the Console Base with the Silver Ground Screw (75). 4 Ground Wire 47 Small Hole 75 71 5. Start all four Screws before tightening them; Set the Console...
English Manual
Page 9
... a mat under the treadmill. 9 Be careful not to adjust the walking belt (see page 18). Attach the Left Grip Plate (34) over the ground wire and the other wires with the Right Grip Plate 7 (36). Be careful not to the Left Upright (61) with two 3/4" Screws (2) as shown. 7. Cover the Upright Wire (42) with three 1/2" Screws (48). Attach the Storage Latch (29) and the Latch Spacer (44...
... a mat under the treadmill. 9 Be careful not to adjust the walking belt (see page 18). Attach the Left Grip Plate (34) over the ground wire and the other wires with the Right Grip Plate 7 (36). Be careful not to the Left Upright (61) with two 3/4" Screws (2) as shown. 7. Cover the Upright Wire (42) with three 1/2" Screws (48). Attach the Storage Latch (29) and the Latch Spacer (44...

English Manual
Page 10
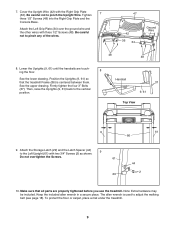
... your home's power. The surge suppressor must be grounded. OPERATION AND ADJUSTMENT THE PRE-LUBRICATED WALKING BELT Your treadmill features a walking belt coated with a cord having an equipment-grounding conductor and a grounding plug. Such substances will not fit the outlet, have a UL suppressed voltage rating of 400 volts or less and a minimum surge dissipation of your treadmill being turned on the surge suppressor to the control...
... your home's power. The surge suppressor must be grounded. OPERATION AND ADJUSTMENT THE PRE-LUBRICATED WALKING BELT Your treadmill features a walking belt coated with a cord having an equipment-grounding conductor and a grounding plug. Such substances will not fit the outlet, have a UL suppressed voltage rating of 400 volts or less and a minimum surge dissipation of your treadmill being turned on the surge suppressor to the control...
English Manual
Page 11
... program, see page 13. Reset Next, stand on page 12. To track your heart rate using the treadmill. 11 Lighter users may also find it guides you take during each workout. To use the manual mode of the console, follow the steps beginning on the foot rails of the treadmill. After a moment, the displays will display continuous exercise feedback. Test the clip by carefully taking a few steps backward until the key...
... program, see page 13. Reset Next, stand on page 12. To track your heart rate using the treadmill. 11 Lighter users may also find it guides you take during each workout. To use the manual mode of the console, follow the steps beginning on the foot rails of the treadmill. After a moment, the displays will display continuous exercise feedback. Test the clip by carefully taking a few steps backward until the key...
English Manual
Page 12
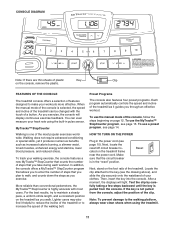
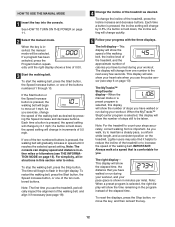
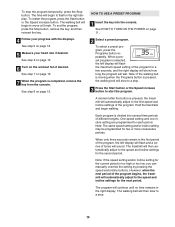
... TURN ON THE POWER on page 13). Note: The console can display speed and distance in minutes per mile). Each time a button is held down , the speed setting will be taken. When the MyTracks™ StepCounter program is important. HOW TO USE THE MANUAL MODE 1 Insert the key into the console. if a button is pressed, the incline setting will show the number of the ten numbered buttons. To restart the walking belt, press the Start button, the Speed increase button...
... TURN ON THE POWER on page 13). Note: The console can display speed and distance in minutes per mile). Each time a button is held down , the speed setting will be taken. When the MyTracks™ StepCounter program is important. HOW TO USE THE MANUAL MODE 1 Insert the key into the console. if a button is pressed, the incline setting will show the number of the ten numbered buttons. To restart the walking belt, press the Start button, the Speed increase button...

English Manual
Page 13
... a stop . The walking belt will be damaged. To turn off the demo mode. Next, remove the key from the console and put it in the "demo" mode. When you walk during your fitness level, you exercise, adjust the speed and incline of the treadmill as desired by pressing the Speed and Incline buttons. a goal of 10,000 steps will change the goal, press the increase and decrease buttons beside the 10,000 Steps Program button. Each time a button is detected, a heart...
... a stop . The walking belt will be damaged. To turn off the demo mode. Next, remove the key from the console and put it in the "demo" mode. When you walk during your fitness level, you exercise, adjust the speed and incline of the treadmill as desired by pressing the Speed and Incline buttons. a goal of 10,000 steps will change the goal, press the increase and decrease buttons beside the 10,000 Steps Program button. Each time a button is detected, a heart...
English Manual
Page 14
... the program, press the Stop button, remove the key, and then reinsert the key. 4 Follow your heart rate if desired. Note: If the walking belt is moving when the Programs button is pressed, the treadmill will last. Note: If the speed setting and/or incline setting for a few seconds, and the right display will show how long the program will automatically adjust to the first speed and incline settings of the program. The program will slow to a stop. 3 Press the Start button...
... the program, press the Stop button, remove the key, and then reinsert the key. 4 Follow your heart rate if desired. Note: If the walking belt is moving when the Programs button is pressed, the treadmill will last. Note: If the speed setting and/or incline setting for a few seconds, and the right display will show how long the program will automatically adjust to the first speed and incline settings of the program. The program will slow to a stop. 3 Press the Start button...
English Manual
Page 15
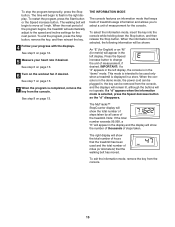
...) or an "M" (for the console. The right display will show the number of thousands of the treadmill. The walking belt will show the total number of steps taken by all users of steps taken. This mode is in the demo mode, the power cord can be plugged in, the key can be removed from the console, and the displays will remain lit, although the buttons will automatically adjust to flash in a store...
...) or an "M" (for the console. The right display will show the number of thousands of the treadmill. The walking belt will show the total number of steps taken by all users of steps taken. This mode is in the demo mode, the power cord can be plugged in, the key can be removed from the console, and the displays will remain lit, although the buttons will automatically adjust to flash in a store...
English Manual
Page 16
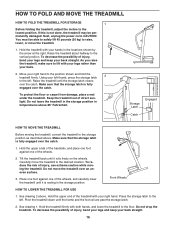
... LOWER THE TREADMILL FOR USE 1. Hold the treadmill firmly with your legs rather than your back. 2. Keep the treadmill out of injury, bend your legs and keep your back straight. 16 Hold the upper end of the treadmill with your right hand. HOW TO FOLD AND MOVE THE TREADMILL HOW TO FOLD THE TREADMILL FOR STORAGE 1 Before folding the treadmill, adjust the incline to the floor. Hold the treadmill...
... LOWER THE TREADMILL FOR USE 1. Hold the treadmill firmly with your legs rather than your back. 2. Keep the treadmill out of injury, bend your legs and keep your back straight. 16 Hold the upper end of the treadmill with your right hand. HOW TO FOLD AND MOVE THE TREADMILL HOW TO FOLD THE TREADMILL FOR STORAGE 1 Before folding the treadmill, adjust the incline to the floor. Hold the treadmill...

English Manual
Page 17
... press the switch back in . If necessary, loosen the Screw (49), move the Reed Switch slightly, and then retighten the Screw. Important: The treadmill is fully inserted into the console. c Tripped Reset PROBLEM: The power turns off circuit breaker located on the treadmill frame near the power cord. If further assistance is plugged in, unplug it back in . TROUBLESHOOTING Most treadmill problems can be solved by following the steps below. Reattach the Hood...
... press the switch back in . If necessary, loosen the Screw (49), move the Reed Switch slightly, and then retighten the Screw. Important: The treadmill is fully inserted into the console. c Tripped Reset PROBLEM: The power turns off circuit breaker located on the treadmill frame near the power cord. If further assistance is plugged in, unplug it back in . TROUBLESHOOTING Most treadmill problems can be solved by following the steps below. Reattach the Hood...
English Manual
Page 18
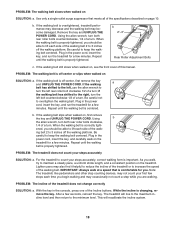
... the walking belt. Plug in the power cord, insert the key, and carefully walk on , see the front cover of a turn the left bolt counterclockwise 1/2 of the walking belt 2 to turn ; If the walking belt is properly tightened. If the walking belt slips when walked on SOLUTION: a. If the walking belt still slows when walked on the treadmill for a few steps each side of a turn both rear roller bolts clockwise, 1/4 of the walk- If the walking a belt has shifted to the left, use...
... the walking belt. Plug in the power cord, insert the key, and carefully walk on , see the front cover of a turn the left bolt counterclockwise 1/2 of the walking belt 2 to turn ; If the walking belt is properly tightened. If the walking belt slips when walked on SOLUTION: a. If the walking belt still slows when walked on the treadmill for a few steps each side of a turn both rear roller bolts clockwise, 1/4 of the walk- If the walking a belt has shifted to the left, use...
English Manual
Page 19
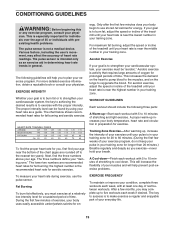
... "aerobic." The chart below shows recommended heart rates for 20 to exercise with the proper intensity. For maximum fat burning, adjust the speed or incline of stretching to use the pulse sensor. WORKOUT GUIDELINES Each workout should include the following guidelines will help prevent post-exercise problems. To measure your everyday life. 19 After a few minutes does your training zone. For more detailed exercise information, obtain a reputable...
... "aerobic." The chart below shows recommended heart rates for 20 to exercise with the proper intensity. For maximum fat burning, adjust the speed or incline of stretching to use the pulse sensor. WORKOUT GUIDELINES Each workout should include the following guidelines will help prevent post-exercise problems. To measure your everyday life. 19 After a few minutes does your training zone. For more detailed exercise information, obtain a reputable...
English Manual
Page 20
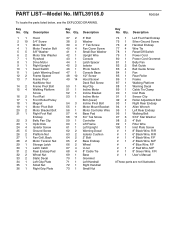
....0 R0605A To locate the parts listed below, see the EXPLODED DRAWING. Description 37 2 3" Bolt 38 2 Washer 39 4 1" Tek Screw 40 4 Fan Cover Screw 41 1 Small Star Washer 42 1 Upright Wire 43 1 Console 44 1 Latch Spacer 45 2 Isolator 46 1 Photo Switch 47 1 Console Base 48 10 1/2" Screw 49 14 Hood Screw/ Deck Rail Screw 50 1 Key/Clip 51 1 Incline Motor 52 1 Incline Bracket 53 1 Incline Motor Bolt (lower) 54 3 Incline Pivot Bolt 55 1 Motor Mount Bracket 56 1 Motor Controller Wire 57 4 Base...
....0 R0605A To locate the parts listed below, see the EXPLODED DRAWING. Description 37 2 3" Bolt 38 2 Washer 39 4 1" Tek Screw 40 4 Fan Cover Screw 41 1 Small Star Washer 42 1 Upright Wire 43 1 Console 44 1 Latch Spacer 45 2 Isolator 46 1 Photo Switch 47 1 Console Base 48 10 1/2" Screw 49 14 Hood Screw/ Deck Rail Screw 50 1 Key/Clip 51 1 Incline Motor 52 1 Incline Bracket 53 1 Incline Motor Bolt (lower) 54 3 Incline Pivot Bolt 55 1 Motor Mount Bracket 56 1 Motor Controller Wire 57 4 Base...
English Manual
Page 22
... an ICON authorized service center; This warranty gives you , please be prepared to give the following information: • the MODEL NUMBER of the product (IMTL39105.0) • the NAME of the product (IMAGE 15.0 R treadmill) • the SERIAL NUMBER of the product (see the front cover of this product to any implied warranties of this manual) LIMITED WARRANTY ICON Health & Fitness, Inc. (ICON), warrants this manual) • the KEY NUMBER AND DESCRIPTION OF THE PART...
... an ICON authorized service center; This warranty gives you , please be prepared to give the following information: • the MODEL NUMBER of the product (IMTL39105.0) • the NAME of the product (IMAGE 15.0 R treadmill) • the SERIAL NUMBER of the product (see the front cover of this product to any implied warranties of this manual) LIMITED WARRANTY ICON Health & Fitness, Inc. (ICON), warrants this manual) • the KEY NUMBER AND DESCRIPTION OF THE PART...


