Instruction Manual
Page 13
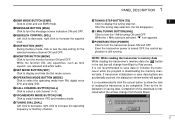
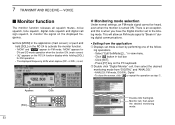
...BUTTON [POWER] Click to turn the monitor function ON and OFF. right click to increase the squelch level. !3 SKIP BUTTON [SKIP] During memory mode, click to turn the skip setting for the selected memory channel ON and OFF. !4 MONITOR BUTTON [MONI] Click to Red arrows. Even the ...the dialog box shown below will change from FM, digital voice (DV) and data (DD). !7 CALL CHANNEL BUTTON [CALL] Click to select a call channel (1-3). !8 VFO/MEMORY MODE BUTTON [V/M] Click to switch between VFO and memory mode. !9 TUNING DIAL [DIAL] Left click to display the tuning step list. Completion of...
...BUTTON [POWER] Click to turn the monitor function ON and OFF. right click to increase the squelch level. !3 SKIP BUTTON [SKIP] During memory mode, click to turn the skip setting for the selected memory channel ON and OFF. !4 MONITOR BUTTON [MONI] Click to Red arrows. Even the ...the dialog box shown below will change from FM, digital voice (DV) and data (DD). !7 CALL CHANNEL BUTTON [CALL] Click to select a call channel (1-3). !8 VFO/MEMORY MODE BUTTON [V/M] Click to switch between VFO and memory mode. !9 TUNING DIAL [DIAL] Left click to display the tuning step list. Completion of...
Instruction Manual
Page 14
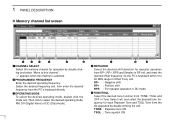
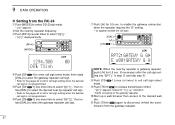
...appeared by double clicking and select "Move to this channel". RP- : Negative shift RP+ : Positive shift RPS : For repeater operation in DD mode t TONE/TSQL Select the desired tone function from TONE, TSQL and OFF in RP cell, and enter the desired offset frequency via the PC...'s keyboard within 0 to select the desired operating mode, FM, DV (Digital Voice) or DD (Data mode). e OPERATING MODE To select the desired operating mode, double click the mode cell. Select the desired frequency cell, then enter the desired frequency from RP-, RP+, ...
...appeared by double clicking and select "Move to this channel". RP- : Negative shift RP+ : Positive shift RPS : For repeater operation in DD mode t TONE/TSQL Select the desired tone function from TONE, TSQL and OFF in RP cell, and enter the desired offset frequency via the PC...'s keyboard within 0 to select the desired operating mode, FM, DV (Digital Voice) or DD (Data mode). e OPERATING MODE To select the desired operating mode, double click the mode cell. Select the desired frequency cell, then enter the desired frequency from RP-, RP+, ...

Instruction Manual
Page 16
... (p. 34) Push to select an operating mode from FM, DV (Digital Voice) and DD (Data mode). u TRANSMIT INHIBIT•SET MODE SWITCH [TXinh• ] ➥ Push to inhibits a transmission during DD mode. (p. 67) ➥ Push to enter the message indication mode during DV mode. (p. 50) ➥ Push for some... t CALL SWITCH [CALL] (p. 73) Push to select and toggle call channel 1, 2 and 3. 9 y OPERATING MODE SWITCH [MODE] (p. 38) Push to toggle VFO and memory mode. e rtyuio q TUNING DIAL [DIAL] Selects the operating frequency (p. 35), memory channel (p. 72), the setting of the...
... (p. 34) Push to select an operating mode from FM, DV (Digital Voice) and DD (Data mode). u TRANSMIT INHIBIT•SET MODE SWITCH [TXinh• ] ➥ Push to inhibits a transmission during DD mode. (p. 67) ➥ Push to enter the message indication mode during DV mode. (p. 50) ➥ Push for some... t CALL SWITCH [CALL] (p. 73) Push to select and toggle call channel 1, 2 and 3. 9 y OPERATING MODE SWITCH [MODE] (p. 38) Push to toggle VFO and memory mode. e rtyuio q TUNING DIAL [DIAL] Selects the operating frequency (p. 35), memory channel (p. 72), the setting of the...

Instruction Manual
Page 45
... select the desired operating mode. 5 • DV for Digital voice, DD for 0.5 sec. Operating mode selection The ID-1 has 3 operating modes- D Selecting with the RC-24 ➥ Push [MODE] to select the desired operating mode. • "FM," "DV" or "DD" is in use the lock function. ➥ Push [F.INP•L] for Data mode. [F.INP•L] Mode indication Click D Selecting with...
... select the desired operating mode. 5 • DV for Digital voice, DD for 0.5 sec. Operating mode selection The ID-1 has 3 operating modes- D Selecting with the RC-24 ➥ Push [MODE] to select the desired operating mode. • "FM," "DV" or "DD" is in use the lock function. ➥ Push [F.INP•L] for Data mode. [F.INP•L] Mode indication Click D Selecting with...
Instruction Manual
Page 59
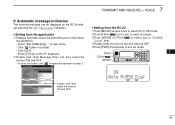
...- Press [F7] key on the RC-24 without selecting the "RX Message" indication. • Setting from the RC-24 q Push [MODE] several times to select DV or DD mode. Click [SET]. - wDouble click "Auto Message Disp" cell, then select the function ON and OFF. • To close the screen,... click " " or repeat the operation as step q. t Push [PWR] momentarily to select "Auto RxMSG Disp" item. ing operations. - ePush [MODE] or [TXinh&#...
...- Press [F7] key on the RC-24 without selecting the "RX Message" indication. • Setting from the RC-24 q Push [MODE] several times to select DV or DD mode. Click [SET]. - wDouble click "Auto Message Disp" cell, then select the function ON and OFF. • To close the screen,... click " " or repeat the operation as step q. t Push [PWR] momentarily to select "Auto RxMSG Disp" item. ing operations. - ePush [MODE] or [TXinh&#...
Instruction Manual
Page 60
...for FM operation. • The displayed frequency shifts when duplex (RP- wDouble click "Digital Monitor" cell, then select the desired monitoring mode from the application qDisplays set to monitor the signal on the displayed frequency. ➥ Click [MONI] in tool bar. - VOICE ... Setting from "DIGITAL" and "ANALOG." • ANALOG: FM mode, DIGITAL: Digital • To close the screen, click " " or repeat the operation as step q. Press [F7] key on the RC-24 function display while holding [SQL] for DV and DD mode operation when the function ON. (main screen) • " "...
...for FM operation. • The displayed frequency shifts when duplex (RP- wDouble click "Digital Monitor" cell, then select the desired monitoring mode from the application qDisplays set to monitor the signal on the displayed frequency. ➥ Click [MONI] in tool bar. - VOICE ... Setting from "DIGITAL" and "ANALOG." • ANALOG: FM mode, DIGITAL: Digital • To close the screen, click " " or repeat the operation as step q. Press [F7] key on the RC-24 function display while holding [SQL] for DV and DD mode operation when the function ON. (main screen) • " "...

Instruction Manual
Page 72
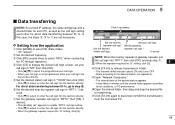
... the near -by repeater is not programmed, enter your call sign into the text box directly. 9 DATA OPERATION Internet access D Setting from the application qClick [MODE] to select "RPS". tSet the gateway repeater call sign in "RPT1." • Click [Z] to select or enter the call sign. e Click [RP] several times to...
... the near -by repeater is not programmed, enter your call sign into the text box directly. 9 DATA OPERATION Internet access D Setting from the application qClick [MODE] to select "RPS". tSet the gateway repeater call sign in "RPT1." • Click [Z] to select or enter the call sign. e Click [RP] several times to...
Instruction Manual
Page 74
...Push [RP•4] several times to select "RPS." • "RPS" displayed briefly. [RP•4] [MODE] 1294.500 DD TXinh LOW 00 rPush [CS• •1] to enter call sign select mode, then rotate [DIAL] to select the gateway repeater call sign. • Refer to the pages 42 to exit... accessing to the gateway repeater. !0Start up a web browser then access to the desired web site. !1Push [TXinh• ] again to select DD (Data) mode. • "DD" appears. iPush [CS• •1] once (or twice) to 44 for call sign setting when the desired call sign is gateway repeater, push...
...Push [RP•4] several times to select "RPS." • "RPS" displayed briefly. [RP•4] [MODE] 1294.500 DD TXinh LOW 00 rPush [CS• •1] to enter call sign select mode, then rotate [DIAL] to select the gateway repeater call sign. • Refer to the pages 42 to exit... accessing to the gateway repeater. !0Start up a web browser then access to the desired web site. !1Push [TXinh• ] again to select DD (Data) mode. • "DD" appears. iPush [CS• •1] once (or twice) to 44 for call sign setting when the desired call sign is gateway repeater, push...
Instruction Manual
Page 75
...and a shared folder for each PC, as well as the call sign setting each other for direct data transferring between ID-1s, go to select DD (Data mode). • "DD" appears. ySet the desired near -by repeater is not programmed, enter your call sign into the text box directly....inhibit. • The transmit inhibit indicator (above [TX inh]) turns OFF. • Starts accessing to disconnect (inhibit the transmission) from the application qClick [MODE] to step i. o Open "Network Computers." • The shared folder of the desired station appears. • It may takes a minutes until the ...
...and a shared folder for each PC, as well as the call sign setting each other for direct data transferring between ID-1s, go to select DD (Data mode). • "DD" appears. ySet the desired near -by repeater is not programmed, enter your call sign into the text box directly....inhibit. • The transmit inhibit indicator (above [TX inh]) turns OFF. • Starts accessing to disconnect (inhibit the transmission) from the application qClick [MODE] to step i. o Open "Network Computers." • The shared folder of the desired station appears. • It may takes a minutes until the ...

Instruction Manual
Page 76
For direct data transferring between ID-1s, go to enable the gateway connection, when the repeater require the "G" setting. ...after the call sign, if desired. w Set the desired frequency. rPush [CS• •1] to enter call sign select mode, then rotate [DIAL] to select the desired station call sign. • Refer to the pages 42 to select "RPT2," ...select the desired near -by repeater call sign, if desired. • Refer to the pages 42 to select DD (Data) mode. • "DD" appears. NOTE: When the near -by repeater is gateway repeater, push [ ] for call sign setting when ...
For direct data transferring between ID-1s, go to enable the gateway connection, when the repeater require the "G" setting. ...after the call sign, if desired. w Set the desired frequency. rPush [CS• •1] to enter call sign select mode, then rotate [DIAL] to select the desired station call sign. • Refer to the pages 42 to select "RPT2," ...select the desired near -by repeater call sign, if desired. • Refer to the pages 42 to select DD (Data) mode. • "DD" appears. NOTE: When the near -by repeater is gateway repeater, push [ ] for call sign setting when ...
Instruction Manual
Page 90
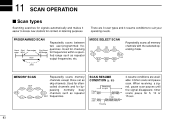
... SCAN DV M 00 DV M 01 M 99 DV FM M 02 M 06 DV DV M 03 M 05 DV M 04 DD Repeatedly scans all memory channels with the selected operating mode. MEMORY SCAN M 01 M 00 M 99 SKIP M 02 M 03 M 06 M 05 Repeatedly scans memory channels except those set as skip channels. There are available: 3 timer scans...
... SCAN DV M 00 DV M 01 M 99 DV FM M 02 M 06 DV DV M 03 M 05 DV M 04 DD Repeatedly scans all memory channels with the selected operating mode. MEMORY SCAN M 01 M 00 M 99 SKIP M 02 M 03 M 06 M 05 Repeatedly scans memory channels except those set as skip channels. There are available: 3 timer scans...


