Mdc 1200 Compatible Models
Page 1
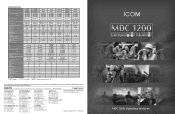
... sales@icom.net.au URL : http://www.icom.net.au Ctra. WxHxD) Weight (approx.) RF output power (VHF/UHF) LCD display PTT ID Alias Table Selcall Call Alert Status Message Status Request Message Emergency Lone Worker function Radio Check Radio Stun/Revive Call log External out Number of ...SPECIFICATIONS VHF UHF Frequency range (VHF) (UHF) IC-F70DT/DS, IC-F70T/S IC-F80DT/DS, IC-F80T/S 136−174MHz 380−450MHz 400−470MHz 450−520MHz IC-F3161DT/DS,T/S IC-F3163T/S IC-F4161DT/DS,T/S IC-F4163T/S 136−174MHz 400−470MHz 450−512MHz 450−520MHz IC-F50V IC-F60V...
... sales@icom.net.au URL : http://www.icom.net.au Ctra. WxHxD) Weight (approx.) RF output power (VHF/UHF) LCD display PTT ID Alias Table Selcall Call Alert Status Message Status Request Message Emergency Lone Worker function Radio Check Radio Stun/Revive Call log External out Number of ...SPECIFICATIONS VHF UHF Frequency range (VHF) (UHF) IC-F70DT/DS, IC-F70T/S IC-F80DT/DS, IC-F80T/S 136−174MHz 380−450MHz 400−470MHz 450−520MHz IC-F3161DT/DS,T/S IC-F3163T/S IC-F4161DT/DS,T/S IC-F4163T/S 136−174MHz 400−470MHz 450−512MHz 450−520MHz IC-F50V IC-F60V...
Mdc 1200 Compatible Models
Page 2
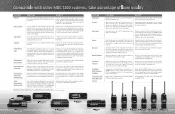
... radio notifies that an emergency call was stunned, the dispatch can transmit anything the microphone hears for easy identification. The dispatcher can listen into your existing fleet using MDC instead of the unit that alias is displayed on screen. Allows a user to set up to 5 different system combinations of retry attempts required to activate this output to automatically initiate any time...
... radio notifies that an emergency call was stunned, the dispatch can transmit anything the microphone hears for easy identification. The dispatcher can listen into your existing fleet using MDC instead of the unit that alias is displayed on screen. Allows a user to set up to 5 different system combinations of retry attempts required to activate this output to automatically initiate any time...
Instruction Manual
Page 3
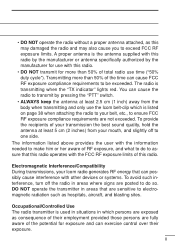
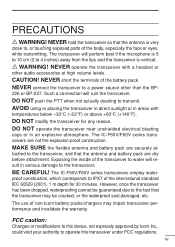
... cause the radio to transmit by pressing the "PTT" switch. • ALWAYS keep the antenna at least 2.5 cm (1 inch) away from your belt, etc., to electromagnetic radiation such as hospitals, aircraft, and blasting sites. Electromagnetic Interference/Compatibility During transmissions, your transmission the best sound quality, hold the antenna at least 5 cm (2 inches) from the body when transmitting and only use the Icom belt-clip which...
... cause the radio to transmit by pressing the "PTT" switch. • ALWAYS keep the antenna at least 2.5 cm (1 inch) away from your belt, etc., to electromagnetic radiation such as hospitals, aircraft, and blasting sites. Electromagnetic Interference/Compatibility During transmissions, your transmission the best sound quality, hold the antenna at least 5 cm (2 inches) from the body when transmitting and only use the Icom belt-clip which...
Instruction Manual
Page 4
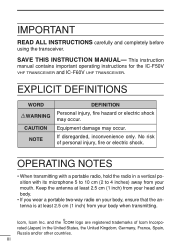
... before using the transceiver. rated (Japan) in a vertical position with its microphone 5 to 10 cm (2 to 4 inches) away from your mouth. OPERATING NOTES • When transmitting with a portable radio, hold the radio in the United States, the United Kingdom, Germany, France, Spain, Russia and/or other countries. Equipment damage may occur. This instruction manual contains important operating instructions for the IC-F50V VHF TRANSCEIVER and IC-F60V UHF TRANSCEIVER...
... before using the transceiver. rated (Japan) in a vertical position with its microphone 5 to 10 cm (2 to 4 inches) away from your mouth. OPERATING NOTES • When transmitting with a portable radio, hold the radio in the United States, the United Kingdom, Germany, France, Spain, Russia and/or other countries. Equipment damage may occur. This instruction manual contains important operating instructions for the IC-F50V VHF TRANSCEIVER and IC-F60V UHF TRANSCEIVER...
Instruction Manual
Page 5
... transceiver performance and invalidate the warranty. FCC caution: Changes or modifications to this transceiver under FCC regulations. Such a connection will result in an explosive atmosphere. R WARNING! NEVER connect the transceiver to operate this device, not expressly approved by Icom Inc., could void your authority to a power source other audio accessories at - CAUTION! PRECAUTIONS R WARNING! NEVER hold the transceiver so that the antenna and battery...
... transceiver performance and invalidate the warranty. FCC caution: Changes or modifications to this transceiver under FCC regulations. Such a connection will result in an explosive atmosphere. R WARNING! NEVER connect the transceiver to operate this device, not expressly approved by Icom Inc., could void your authority to a power source other audio accessories at - CAUTION! PRECAUTIONS R WARNING! NEVER hold the transceiver so that the antenna and battery...
Instruction Manual
Page 6
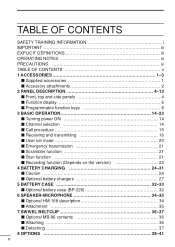
... 4 ' Function display 6 ' Programmable function keys 8 3 BASIC OPERATION 14-23 ' Turning power ON 14 ' Channel selection 14 ' Call procedure 15 ' Receiving and transmitting 16 ' User set mode 20 ' Emergency transmission 21 ' Scrambler function 21 ' Stun function 21 ' Recording function (Depends on the version 22 4 BATTERY CHARGING 24-31 ' Caution 24 ' Optional battery chargers 27 5 BATTERY CASE 32-33 ' Optional battery case (BP-226 32 6 SPEAKER-MICROPHONE 34-35...
... 4 ' Function display 6 ' Programmable function keys 8 3 BASIC OPERATION 14-23 ' Turning power ON 14 ' Channel selection 14 ' Call procedure 15 ' Receiving and transmitting 16 ' User set mode 20 ' Emergency transmission 21 ' Scrambler function 21 ' Stun function 21 ' Recording function (Depends on the version 22 4 BATTERY CHARGING 24-31 ' Caution 24 ' Optional battery chargers 27 5 BATTERY CASE 32-33 ' Optional battery case (BP-226 32 6 SPEAKER-MICROPHONE 34-35...

Instruction Manual
Page 11
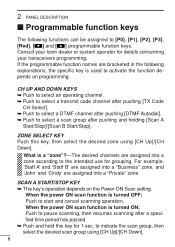
... the squelch is not used. (See p. 3 for details) t DEALER-PROGRAMMABLE KEYS [P0] to [P3] The desired functions can be assigned independently by your dealer. (p. 8) y CH UP AND DOWN KEYS [ ]/[ ] Push to select an operating channel, etc. *Desired functions can be assigned independently by your dealer. (p. 8) u TRANSMIT/BUSY INDICATOR Lights red while transmitting; 2 PANEL DESCRIPTION r EXTERNAL SPEAKER-MICROPHONE JACK [SP MIC] 2 Connects the...
... the squelch is not used. (See p. 3 for details) t DEALER-PROGRAMMABLE KEYS [P0] to [P3] The desired functions can be assigned independently by your dealer. (p. 8) y CH UP AND DOWN KEYS [ ]/[ ] Push to select an operating channel, etc. *Desired functions can be assigned independently by your dealer. (p. 8) u TRANSMIT/BUSY INDICATOR Lights red while transmitting; 2 PANEL DESCRIPTION r EXTERNAL SPEAKER-MICROPHONE JACK [SP MIC] 2 Connects the...

Instruction Manual
Page 13
2 PANEL DESCRIPTION i BATTERY INDICATOR 2 Appears or blinks when the battery power decreases to a speci- fied level. o ALPHANUMERIC DISPLAY Displays an operating channel number, channel names, Set mode contents, DTMF code, etc. *1 BIIS operation only *2 MDC operation only 7
2 PANEL DESCRIPTION i BATTERY INDICATOR 2 Appears or blinks when the battery power decreases to a speci- fied level. o ALPHANUMERIC DISPLAY Displays an operating channel number, channel names, Set mode contents, DTMF code, etc. *1 BIIS operation only *2 MDC operation only 7
Instruction Manual
Page 14
... depends on the Power ON Scan setting. SCAN A START/STOP KEY ➥ This key's operation depends on programming. Push to the intended use for details concerning your transceivers programming. When the power ON scan function is turned ON; When the power ON scan function is turned OFF; 2 PANEL DESCRIPTION I Programmable function keys The following explanations, the specific key is a "zone"?-The desired channels are assigned into...
... depends on the Power ON Scan setting. SCAN A START/STOP KEY ➥ This key's operation depends on programming. Push to the intended use for details concerning your transceivers programming. When the power ON scan function is turned ON; When the power ON scan function is turned OFF; 2 PANEL DESCRIPTION I Programmable function keys The following explanations, the specific key is a "zone"?-The desired channels are assigned into...

Instruction Manual
Page 15
... channel to/from the scan group. 1. to start and cancel scanning operation. LOCK KEY Push and hold for priority channel,) the channel is cleared from the scan group. Push to indicate the scan group, then push [CH Up] or [CH Down] to 4 directly. SCAN ADD/DEL (TAG) KEY ➥ Push to add or delete the selected channel to exit the scan group selection mode...
... channel to/from the scan group. 1. to start and cancel scanning operation. LOCK KEY Push and hold for priority channel,) the channel is cleared from the scan group. Push to indicate the scan group, then push [CH Up] or [CH Down] to 4 directly. SCAN ADD/DEL (TAG) KEY ➥ Push to add or delete the selected channel to exit the scan group selection mode...

Instruction Manual
Page 16
... to change the tone frequency/code setting. even if the backlight function is turned OFF in user set as the continuous tone channel until another channel is au- The selected channel remains set mode. LIGHT KEY Push to turn the Lone Worker function ON or OFF. • If the Lone Worker function is activated, the Emergency function is designated as such. 10 2 PANEL DESCRIPTION MONITOR KEY ➥ Mute...
... to change the tone frequency/code setting. even if the backlight function is turned OFF in user set as the continuous tone channel until another channel is au- The selected channel remains set mode. LIGHT KEY Push to turn the Lone Worker function ON or OFF. • If the Lone Worker function is activated, the Emergency function is designated as such. 10 2 PANEL DESCRIPTION MONITOR KEY ➥ Mute...

Instruction Manual
Page 17
... employs selective 'Individual/Group' calls. SURVEILLANCE KEY Push to turn the talk around function ON and OFF. • The talk around function equalizes the transmit frequency to the re- 2 ceive frequency for details. Then select the desired DTMF channel using the CS-F50V CLONING SOFTWARE. (PMR operation only) Ask your dealer for transceiver-to-transceiver communication. WIDE/NARROW KEY Push to toggle the IF...
... employs selective 'Individual/Group' calls. SURVEILLANCE KEY Push to turn the talk around function ON and OFF. • The talk around function equalizes the transmit frequency to the re- 2 ceive frequency for details. Then select the desired DTMF channel using the CS-F50V CLONING SOFTWARE. (PMR operation only) Ask your dealer for transceiver-to-transceiver communication. WIDE/NARROW KEY Push to toggle the IF...
Instruction Manual
Page 18
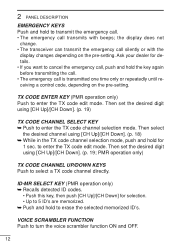
...display does not change. • The transceiver can transmit the emergency call silently or with beeps; Then set the desired digit using [CH Up]/[CH Down]. (p. 19; ID-MR SELECT KEY (PMR operation only) ➥ Recalls detected ID codes. • Push this key, then push [CH Up]/[CH Down] for 1 sec. Then select the desired channel using...the key again before transmitting the call. • The emergency call is transmitted one time only or repeatedly until receiving a control code, depending on the pre-setting. TX CODE ENTER KEY (PMR operation only) Push to turn the voice scrambler ...
...display does not change. • The transceiver can transmit the emergency call silently or with beeps; Then set the desired digit using [CH Up]/[CH Down]. (p. 19; ID-MR SELECT KEY (PMR operation only) ➥ Recalls detected ID codes. • Push this key, then push [CH Up]/[CH Down] for 1 sec. Then select the desired channel using...the key again before transmitting the call. • The emergency call is transmitted one time only or repeatedly until receiving a control code, depending on the pre-setting. TX CODE ENTER KEY (PMR operation only) Push to turn the voice scrambler ...

Instruction Manual
Page 20
... input code number may differ according to your system set up passcode, input digit codes as directed by your dealer for 2 sec. Scanning stops when receiving a call. 14 ZONE TYPE: Push [Zone] then push [CH Up]/[CH Down] to select the desired operating channel in the same block as identical. Methods may be used for password input: • The transceiver detects numbers in sequence...
... input code number may differ according to your system set up passcode, input digit codes as directed by your dealer for 2 sec. Scanning stops when receiving a call. 14 ZONE TYPE: Push [Zone] then push [CH Up]/[CH Down] to select the desired operating channel in the same block as identical. Methods may be used for password input: • The transceiver detects numbers in sequence...

Instruction Manual
Page 22
... briefly after pushing [PTT]. 2. Transmitting: Wait for antenna attachment. w Release [PTT] to return to 4 inches) from your signal; 1. Hold the microphone 5 to 10 cm (2 to receive. q While pushing and holding [PTT], speak into the microphone at a normal voice level. • When a tone signalling system is used, the call , adjust the audio output level to turn power ON. See p. 2 for the channel to become clear to...
... briefly after pushing [PTT]. 2. Transmitting: Wait for antenna attachment. w Release [PTT] to return to 4 inches) from your signal; 1. Hold the microphone 5 to 10 cm (2 to receive. q While pushing and holding [PTT], speak into the microphone at a normal voice level. • When a tone signalling system is used, the call , adjust the audio output level to turn power ON. See p. 2 for the channel to become clear to...
Instruction Manual
Page 23
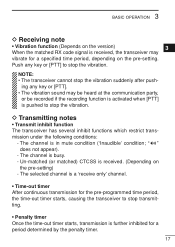
... a 'receive only' channel. • Time-out timer After continuous transmission for the pre-programmed time period, the time-out timer starts, causing the transceiver to stop the vibration suddenly after push- Un-matched (or matched) CTCSS is in mute condition ('Inaudible' condition; The selected channel is further inhibited for a specified time period, depending on the pre-setting) - D Transmitting notes • Transmit inhibit function The transceiver has...
... a 'receive only' channel. • Time-out timer After continuous transmission for the pre-programmed time period, the time-out timer starts, causing the transceiver to stop the vibration suddenly after push- Un-matched (or matched) CTCSS is in mute condition ('Inaudible' condition; The selected channel is further inhibited for a specified time period, depending on the pre-setting) - D Transmitting notes • Transmit inhibit function The transceiver has...
Instruction Manual
Page 24
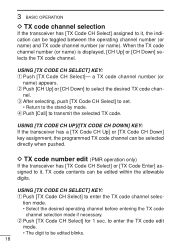
...] to set. • Return to enter the TX code channel selec- tion mode. • Select the desired operating channel before entering the TX code channel selection mode if necessary. USING [TX CODE CH UP]/[TX CODE CH DOWN] KEY: If the transceiver has a [TX Code CH Up] or [TX Code CH Down] key assignment, the programmed TX code channel can be toggled between the operating channel number (or name) and TX code channel number...
...] to set. • Return to enter the TX code channel selec- tion mode. • Select the desired operating channel before entering the TX code channel selection mode if necessary. USING [TX CODE CH UP]/[TX CODE CH DOWN] KEY: If the transceiver has a [TX Code CH Up] or [TX Code CH Down] key assignment, the programmed TX code channel can be toggled between the operating channel number (or name) and TX code channel number...
Instruction Manual
Page 26
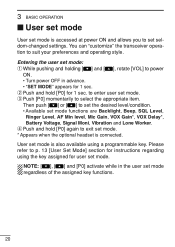
... power ON. • Turn power OFF in the user set mode is also available using the key assigned for instructions regarding using a programmable key. w Push and hold [P0] again to enter user set mode. * Appears when the optional headset is connected. 3 BASIC OPERATION I User set mode User set mode is accessed at power ON and allows you to set mode functions are Backlight, Beep, SQL Level, Ringer Level, AF Min level, Mic Gain, VOX Gain*, VOX Delay*, Battery Voltage...
... power ON. • Turn power OFF in the user set mode is also available using the key assigned for instructions regarding using a programmable key. w Push and hold [P0] again to enter user set mode. * Appears when the optional headset is connected. 3 BASIC OPERATION I User set mode User set mode is accessed at power ON and allows you to set mode functions are Backlight, Beep, SQL Level, Ringer Level, AF Min level, Mic Gain, VOX Gain*, VOX Delay*, Battery Voltage...
Instruction Manual
Page 30
... any other liquids. NEVER use a wet battery. R DANGER! D Battery caution R DANGER! DO NOT expose the battery to the battery or degradation of the case. Do not charge or use or leave battery packs in direct sunlight may rupture or catch fire. R DANGER! Use and charge only specified Icom battery packs with Icom radios or Icom charger. High temperature buildup in the battery, such as could occur near...
... any other liquids. NEVER use a wet battery. R DANGER! D Battery caution R DANGER! DO NOT expose the battery to the battery or degradation of the case. Do not charge or use or leave battery packs in direct sunlight may rupture or catch fire. R DANGER! Use and charge only specified Icom battery packs with Icom radios or Icom charger. High temperature buildup in the battery, such as could occur near...

Instruction Manual
Page 31
... any part of the 9 body that the specified tem- 15 perature range of its specified temperature range will reduce the battery's 14 performance and battery life. Using the bat- Never use a battery with clean water, without rubbing them, and see a doctor immediately. 6 WARNING! tery out of time. Use the battery only with fluid from the radio after discharging. Rinse your Icom...
... any part of the 9 body that the specified tem- 15 perature range of its specified temperature range will reduce the battery's 14 performance and battery life. Using the bat- Never use a battery with clean water, without rubbing them, and see a doctor immediately. 6 WARNING! tery out of time. Use the battery only with fluid from the radio after discharging. Rinse your Icom...


