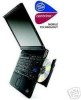
Hardware Maintenance Manual
Page 6
... PCI cover 133 3020 ThinkPad Dock top cover 136 Locations 140 Front view 140 Rear view 141 Bottom view 142 Parts list 143 T20, T21, T22 and T23 series model matrix 146 Overall 147 AC adapters 156 LCD FRUs 157 Keyboard 160 Recovery CDs 161 Miscellaneous parts 170 ...Optional FRUs 171 Common parts list 172 Notices 174 Trademarks 174 vi ThinkPad T20, T21, T22, T23 (MT 2647/2648)
... PCI cover 133 3020 ThinkPad Dock top cover 136 Locations 140 Front view 140 Rear view 141 Bottom view 142 Parts list 143 T20, T21, T22 and T23 series model matrix 146 Overall 147 AC adapters 156 LCD FRUs 157 Keyboard 160 Recovery CDs 161 Miscellaneous parts 170 ...Optional FRUs 171 Common parts list 172 Notices 174 Trademarks 174 vi ThinkPad T20, T21, T22, T23 (MT 2647/2648)
Hardware Maintenance Manual
Page 28
... __ 7. Date of a nonsupported device v Forgotten computer password (making the computer unusable) v Sticky keys caused by spilling a liquid onto the keyboard The following are not covered under warranty: v LCD panel cracked from the application of excessive force or from being dropped v Scratched (cosmetic) parts...incompatible card v Damage caused by foreign material in which the failing FRU was subjected to excessive force, or dropped. 22 ThinkPad T20, T21, T22, T23 (MT 2647/2648) Procedure index and page number in the diskette drive v Diskette drive damage caused by pressure on the...
... __ 7. Date of a nonsupported device v Forgotten computer password (making the computer unusable) v Sticky keys caused by spilling a liquid onto the keyboard The following are not covered under warranty: v LCD panel cracked from the application of excessive force or from being dropped v Scratched (cosmetic) parts...incompatible card v Damage caused by foreign material in which the failing FRU was subjected to excessive force, or dropped. 22 ThinkPad T20, T21, T22, T23 (MT 2647/2648) Procedure index and page number in the diskette drive v Diskette drive damage caused by pressure on the...

Hardware Maintenance Manual
Page 35
... entered standby mode by closing the LCD cover.) General descriptions 29 To end screen blank mode and resume normal operation, press any operation with the keyboard, the TrackPoint, the hard disk, the parallel connector, or the diskette drive within that the battery power is low. (Alternatively, if Hibernate when battery becomes...
... entered standby mode by closing the LCD cover.) General descriptions 29 To end screen blank mode and resume normal operation, press any operation with the keyboard, the TrackPoint, the hard disk, the parallel connector, or the diskette drive within that the battery power is low. (Alternatively, if Hibernate when battery becomes...

Hardware Maintenance Manual
Page 37
... the timer conditions are using the ACPI operating system and have set on the timer, and the user does not do any operation with the keyboard, the TrackPoint, the hard-disk drive, the parallel connector, or the diskette drive within that time. The hibernation file in the boot record on , the...
... the timer conditions are using the ACPI operating system and have set on the timer, and the user does not do any operation with the keyboard, the TrackPoint, the hard-disk drive, the parallel connector, or the diskette drive within that time. The hibernation file in the boot record on , the...

Hardware Maintenance Manual
Page 39
... v Joystick Test v Diskette v System Load v CD-ROM/DVD Test v Stereo Speaker v 802.11 Wireless Radio Test(*) Notes: v In the Keyboard test in Diagnostics. Before running PC-Doctor DOS, detach the ...49. Checkout guide If an error code appears, go to "Symptom-to-FRU index" on ThinkPad. On the first screen, select the model and press Enter. Follow the instructions on the ...v LS-120/240 Drive v Communication v Wireless LAN(*) v Memory Test - A pull-down for some models. v The sound card is not recognized in the Stereo Speaker in the IBM BIOS Setup Utility, Diskette Drives test is ...
... v Joystick Test v Diskette v System Load v CD-ROM/DVD Test v Stereo Speaker v 802.11 Wireless Radio Test(*) Notes: v In the Keyboard test in Diagnostics. Before running PC-Doctor DOS, detach the ...49. Checkout guide If an error code appears, go to "Symptom-to-FRU index" on ThinkPad. On the first screen, select the model and press Enter. Follow the instructions on the ...v LS-120/240 Drive v Communication v Wireless LAN(*) v Memory Test - A pull-down for some models. v The sound card is not recognized in the Stereo Speaker in the IBM BIOS Setup Utility, Diskette Drives test is ...
Hardware Maintenance Manual
Page 45
ThinkPad T20, T21, T22 and T23 series Product overview 41 Specifications 43 Status indicators 45 FRU Tests... and T22 series 66 For T23 series 68 1060 Ethernet daughter card 71 1070 Ultrabay 2000 device 73 1080 Keyboard 74 For T20, T21 and T22 series 74 For T23 series 75 1090 Keyboard CRU insulator 82 1100 Hinge cover...T23 series 92 1120 Fan assembly 94 For T20, T21, T22 series 94 For T23 series 97 1130 CPU 98 For T20, T21 and T22 series 98 For T23 series 99 1140 PC Card slot assembly 100 For T20, T21, T22 series 100 For T23 series 102 1150 Speaker 103 © Copyright IBM...
ThinkPad T20, T21, T22 and T23 series Product overview 41 Specifications 43 Status indicators 45 FRU Tests... and T22 series 66 For T23 series 68 1060 Ethernet daughter card 71 1070 Ultrabay 2000 device 73 1080 Keyboard 74 For T20, T21 and T22 series 74 For T23 series 75 1090 Keyboard CRU insulator 82 1100 Hinge cover...T23 series 92 1120 Fan assembly 94 For T20, T21, T22 series 94 For T23 series 97 1130 CPU 98 For T20, T21 and T22 series 98 For T23 series 99 1140 PC Card slot assembly 100 For T20, T21, T22 series 100 For T23 series 102 1150 Speaker 103 © Copyright IBM...

Hardware Maintenance Manual
Page 46
...Keyboard Recovery CDs For Windows 98 (T22 series) . . . . . Locations Front view Rear view Bottom view Parts list T20, T21, T22 and T23 series model matrix Overall For T20, T21 and T22 For T23 AC adapters LCD FRUs 13.3-in . XGA TFT 14.1-in . For Windows 2000/Windows NT (T22 series) For Windows 98 (T23... series) . . . . . For Windows 2000/Windows NT (T23 series) For Windows XP (T23 series) . . . . . Notices Trademarks ....172 . 173 . 174 . 174 40 ThinkPad T20, T21, T22, T23 (MT 2647/2648) 1160 Hard-disk bay 1170 Ultrabay ...
...Keyboard Recovery CDs For Windows 98 (T22 series) . . . . . Locations Front view Rear view Bottom view Parts list T20, T21, T22 and T23 series model matrix Overall For T20, T21 and T22 For T23 AC adapters LCD FRUs 13.3-in . XGA TFT 14.1-in . For Windows 2000/Windows NT (T22 series) For Windows 98 (T23... series) . . . . . For Windows 2000/Windows NT (T23 series) For Windows XP (T23 series) . . . . . Notices Trademarks ....172 . 173 . 174 . 174 40 ThinkPad T20, T21, T22, T23 (MT 2647/2648) 1160 Hard-disk bay 1170 Ultrabay ...

Hardware Maintenance Manual
Page 48
...256 MB DIMM card (maximum of 512 MB) CMOS RAM Display T23 v 64 MB, 128 MB, 256 MB, or 512 MB ..., XGA (1024×768 resolution) TFT color LCD T21, T22, T23 v 13.3-inch, 16M colors, XGA (1024×768 resolution) TFT..., IDE interface v 20.0 GB, 2.5-inch, IDE interface v 32.0 GB, 2.5-inch, IDE interface I/O port T23 v 15.0 GB, 2.5-inch, IDE interface v 20.0 GB, 2.5-inch, IDE interface v 30.0 GB, 2.5-..., IDE interface v External monitor v Line-in v Headphone v Microphone v Mouse or keyboard v Parallel or diskette drive v Port replicator connector v Serial v One universal serial bus (USB)...
...256 MB DIMM card (maximum of 512 MB) CMOS RAM Display T23 v 64 MB, 128 MB, 256 MB, or 512 MB ..., XGA (1024×768 resolution) TFT color LCD T21, T22, T23 v 13.3-inch, 16M colors, XGA (1024×768 resolution) TFT..., IDE interface v 20.0 GB, 2.5-inch, IDE interface v 32.0 GB, 2.5-inch, IDE interface I/O port T23 v 15.0 GB, 2.5-inch, IDE interface v 20.0 GB, 2.5-inch, IDE interface v 30.0 GB, 2.5-..., IDE interface v External monitor v Line-in v Headphone v Microphone v Mouse or keyboard v Parallel or diskette drive v Port replicator connector v Serial v One universal serial bus (USB)...
Hardware Maintenance Manual
Page 50
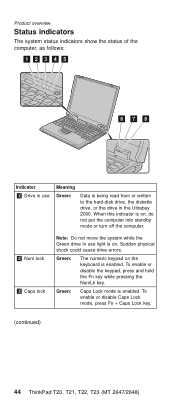
... hold the Fn key while pressing the NumLk key. To enable or disable Caps Lock mode, press Fn + Caps Lock key. (continued) 44 ThinkPad T20, T21, T22, T23 (MT 2647/2648) When this indicator is on, do not put the computer into standby mode or turn off the computer. 2 Num lock 3 Caps... lock Note: Do not move the system while the Green drive in use Meaning Green: Data is enabled. Green: Caps Lock mode is on the keyboard is...
... hold the Fn key while pressing the NumLk key. To enable or disable Caps Lock mode, press Fn + Caps Lock key. (continued) 44 ThinkPad T20, T21, T22, T23 (MT 2647/2648) When this indicator is on, do not put the computer into standby mode or turn off the computer. 2 Num lock 3 Caps... lock Note: Do not move the system while the Green drive in use Meaning Green: Data is enabled. Green: Caps Lock mode is on the keyboard is...

Hardware Maintenance Manual
Page 52
... --> Keyboard If the TrackPoint does not work, check the configuration in turn, and run the following : v Interactive Tests --> Mouse Diagnostics --> Fixed Disks (continued) 46 ThinkPad T20, T21, T22, T23 (MT 2647/2648) Lucent Soft Modem Loopback (T23 only) d. This drift can occur when a slight, steady pressure is necessary. Diagnostics --> Systemboard Diagnostics --> Other Devices --> IBM AC...
... --> Keyboard If the TrackPoint does not work, check the configuration in turn, and run the following : v Interactive Tests --> Mouse Diagnostics --> Fixed Disks (continued) 46 ThinkPad T20, T21, T22, T23 (MT 2647/2648) Lucent Soft Modem Loopback (T23 only) d. This drift can occur when a slight, steady pressure is necessary. Diagnostics --> Systemboard Diagnostics --> Other Devices --> IBM AC...
Hardware Maintenance Manual
Page 56
... and select "Password" --> "IBM Security Chip" --> "Clear IBM Security Chip" to clear this error. 2. Enter IBM BIOS Setup Utility by entering supervisor password, and select "Password" --> "IBM Security Chip" --> "Clear IBM Security Chip" to clear this error. 2. System board. 50 ThinkPad T20, T21, T22, T23 (MT 2647/2648) System board... has been removed password. 0194 Enter the supervisor The computer has been carried password. System board. 021x Keyboard error Run interactive tests of them. Security chip. 3. Symptom-to-FRU index Symptom or error FRU or action, in...
... and select "Password" --> "IBM Security Chip" --> "Clear IBM Security Chip" to clear this error. 2. Enter IBM BIOS Setup Utility by entering supervisor password, and select "Password" --> "IBM Security Chip" --> "Clear IBM Security Chip" to clear this error. 2. System board. 50 ThinkPad T20, T21, T22, T23 (MT 2647/2648) System board... has been removed password. 0194 Enter the supervisor The computer has been carried password. System board. 021x Keyboard error Run interactive tests of them. Security chip. 3. Symptom-to-FRU index Symptom or error FRU or action, in...

Hardware Maintenance Manual
Page 80
Removing and replacing a FRU 1080 Keyboard For access, remove these FRUs, in order: v "1010 Battery pack" on page 60 v "1020 Backup battery" on page 61 v "1030 Hard-disk drive" on page 63 v "1070 Ultrabay 2000 device" on page 73 For T20, T21 and T22 series 1 Step 1 Screw (quantity) M2.5 × 14 mm, nylon-coated (2) Torque 0.392 Nm (4 kgfcm) Note: T20, T21 and T22 series do not have the removal procedures 2 to step 5. (continued) 74 ThinkPad T20, T21, T22, T23 (MT 2647/2648) After step 1 , go to 4 .
Removing and replacing a FRU 1080 Keyboard For access, remove these FRUs, in order: v "1010 Battery pack" on page 60 v "1020 Backup battery" on page 61 v "1030 Hard-disk drive" on page 63 v "1070 Ultrabay 2000 device" on page 73 For T20, T21 and T22 series 1 Step 1 Screw (quantity) M2.5 × 14 mm, nylon-coated (2) Torque 0.392 Nm (4 kgfcm) Note: T20, T21 and T22 series do not have the removal procedures 2 to step 5. (continued) 74 ThinkPad T20, T21, T22, T23 (MT 2647/2648) After step 1 , go to 4 .

Hardware Maintenance Manual
Page 84
Removing and replacing a FRU Note: Before installing a new keyboard, attach the easy-button cover as follows: 4 1 32 1 (continued) 78 ThinkPad T20, T21, T22, T23 (MT 2647/2648)
Removing and replacing a FRU Note: Before installing a new keyboard, attach the easy-button cover as follows: 4 1 32 1 (continued) 78 ThinkPad T20, T21, T22, T23 (MT 2647/2648)

Hardware Maintenance Manual
Page 85
Make sure that the keyboard edges, shown in the figure. Install the new keyboard, following the directions in the figure as follows: 1. Removing and replacing a FRU When installing the keyboard, do as (A), (B), and (C), are under the frame. (A) (B) (C) (continued) ThinkPad T20, T21, T22 and T23 series 79
Make sure that the keyboard edges, shown in the figure. Install the new keyboard, following the directions in the figure as follows: 1. Removing and replacing a FRU When installing the keyboard, do as (A), (B), and (C), are under the frame. (A) (B) (C) (continued) ThinkPad T20, T21, T22 and T23 series 79
Hardware Maintenance Manual
Page 86
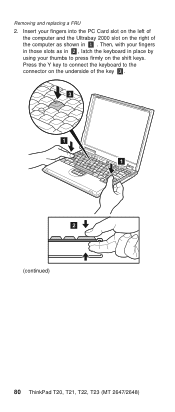
Press the Y key to connect the keyboard to press firmly on the underside of the computer as in 2 , latch the keyboard in place by using your fingers in those slots as shown in 1 . Removing and replacing a FRU 2. Insert your fingers into the PC Card slot on the left of the computer and the Ultrabay 2000 slot on the right of the key 3 . 3 1 1 2 (continued) 80 ThinkPad T20, T21, T22, T23 (MT 2647/2648) Then, with your thumbs to the connector on the shift keys.
Press the Y key to connect the keyboard to press firmly on the underside of the computer as in 2 , latch the keyboard in place by using your fingers in those slots as shown in 1 . Removing and replacing a FRU 2. Insert your fingers into the PC Card slot on the left of the computer and the Ultrabay 2000 slot on the right of the key 3 . 3 1 1 2 (continued) 80 ThinkPad T20, T21, T22, T23 (MT 2647/2648) Then, with your thumbs to the connector on the shift keys.
Hardware Maintenance Manual
Page 87
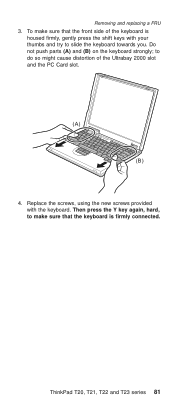
to make sure that the keyboard is housed firmly, gently press the shift keys with the keyboard. Replace the screws, using the new screws provided with your thumbs and try to slide the keyboard towards you. ThinkPad T20, T21, T22 and T23 series 81 Then press the Y key again, hard, to do so might cause distortion of the keyboard is firmly connected. To make sure that the front side of the Ultrabay 2000 slot and the PC Card slot. (A) (B) 4. Do not push parts (A) and (B) on the keyboard strongly; Removing and replacing a FRU 3.
to make sure that the keyboard is housed firmly, gently press the shift keys with the keyboard. Replace the screws, using the new screws provided with your thumbs and try to slide the keyboard towards you. ThinkPad T20, T21, T22 and T23 series 81 Then press the Y key again, hard, to do so might cause distortion of the keyboard is firmly connected. To make sure that the front side of the Ultrabay 2000 slot and the PC Card slot. (A) (B) 4. Do not push parts (A) and (B) on the keyboard strongly; Removing and replacing a FRU 3.
Hardware Maintenance Manual
Page 88
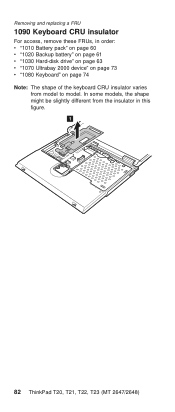
Removing and replacing a FRU 1090 Keyboard CRU insulator For access, remove these FRUs, in this figure. 1 82 ThinkPad T20, T21, T22, T23 (MT 2647/2648) In some models, the shape might be slightly different from the insulator in order: v "1010 Battery pack" on page 60 v "1020 Backup battery" on page 61 v "1030 Hard-disk drive" on page 63 v "1070 Ultrabay 2000 device" on page 73 v "1080 Keyboard" on page 74 Note: The shape of the keyboard CRU insulator varies from model to model.
Removing and replacing a FRU 1090 Keyboard CRU insulator For access, remove these FRUs, in this figure. 1 82 ThinkPad T20, T21, T22, T23 (MT 2647/2648) In some models, the shape might be slightly different from the insulator in order: v "1010 Battery pack" on page 60 v "1020 Backup battery" on page 61 v "1030 Hard-disk drive" on page 63 v "1070 Ultrabay 2000 device" on page 73 v "1080 Keyboard" on page 74 Note: The shape of the keyboard CRU insulator varies from model to model.
Hardware Maintenance Manual
Page 89
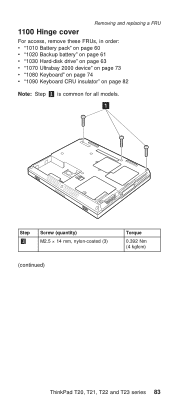
1100 Hinge cover Removing and replacing a FRU For access, remove these FRUs, in order: v "1010 Battery pack" on page 60 v "1020 Backup battery" on page 61 v "1030 Hard-disk drive" on page 63 v "1070 Ultrabay 2000 device" on page 73 v "1080 Keyboard" on page 74 v "1090 Keyboard CRU insulator" on page 82 Note: Step 1 is common for all models. 1 Step 1 Screw (quantity) M2.5 × 14 mm, nylon-coated (3) (continued) Torque 0.392 Nm (4 kgfcm) ThinkPad T20, T21, T22 and T23 series 83
1100 Hinge cover Removing and replacing a FRU For access, remove these FRUs, in order: v "1010 Battery pack" on page 60 v "1020 Backup battery" on page 61 v "1030 Hard-disk drive" on page 63 v "1070 Ultrabay 2000 device" on page 73 v "1080 Keyboard" on page 74 v "1090 Keyboard CRU insulator" on page 82 Note: Step 1 is common for all models. 1 Step 1 Screw (quantity) M2.5 × 14 mm, nylon-coated (3) (continued) Torque 0.392 Nm (4 kgfcm) ThinkPad T20, T21, T22 and T23 series 83
Hardware Maintenance Manual
Page 94
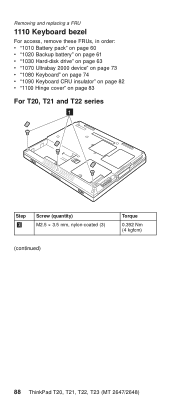
Removing and replacing a FRU 1110 Keyboard bezel For access, remove these FRUs, in order: v "1010 Battery pack" on page 60 v "1020 Backup battery" on page 61 v "1030 Hard-disk drive" on page 63 v "1070 Ultrabay 2000 device" on page 73 v "1080 Keyboard" on page 74 v "1090 Keyboard CRU insulator" on page 82 v "1100 Hinge cover" on page 83 For T20, T21 and T22 series 1 Step 1 Screw (quantity) M2.5 × 3.5 mm, nylon-coated (3) (continued) Torque 0.392 Nm (4 kgfcm) 88 ThinkPad T20, T21, T22, T23 (MT 2647/2648)
Removing and replacing a FRU 1110 Keyboard bezel For access, remove these FRUs, in order: v "1010 Battery pack" on page 60 v "1020 Backup battery" on page 61 v "1030 Hard-disk drive" on page 63 v "1070 Ultrabay 2000 device" on page 73 v "1080 Keyboard" on page 74 v "1090 Keyboard CRU insulator" on page 82 v "1100 Hinge cover" on page 83 For T20, T21 and T22 series 1 Step 1 Screw (quantity) M2.5 × 3.5 mm, nylon-coated (3) (continued) Torque 0.392 Nm (4 kgfcm) 88 ThinkPad T20, T21, T22, T23 (MT 2647/2648)

Hardware Maintenance Manual
Page 99
a b b b b ThinkPad T20, T21, T22 and T23 series 93 Removing and replacing a FRU When installing, do as follows: v Make sure that all of the latches of the keyboard bezel b are firmly attached. v Make sure that the a -part is firmly attached as shown in the figure.
a b b b b ThinkPad T20, T21, T22 and T23 series 93 Removing and replacing a FRU When installing, do as follows: v Make sure that all of the latches of the keyboard bezel b are firmly attached. v Make sure that the a -part is firmly attached as shown in the figure.
