
Hardware Maintenance Manual
Page 41
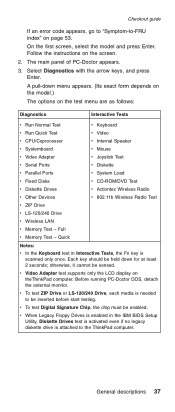
... down menu appears. (Its exact form depends on the model.) The options on page 53. Quick Notes: v In the Keyboard test in the IBM BIOS Setup Utility, Diskette Drives test is activated even if no legacy diskette drive is scanned only once. v To test ZIP Drive or LS-120...Enter. Before running PC-Doctor DOS, detach the external monitor. The main panel of PC-Doctor appears. 3. Follow the instructions on theThinkPad computer. Full v Memory Test - Checkout guide If an error code appears, go to "Symptom-to the ThinkPad computer. A pull-down for at least 2 seconds;
... down menu appears. (Its exact form depends on the model.) The options on page 53. Quick Notes: v In the Keyboard test in the IBM BIOS Setup Utility, Diskette Drives test is activated even if no legacy diskette drive is scanned only once. v To test ZIP Drive or LS-120...Enter. Before running PC-Doctor DOS, detach the external monitor. The main panel of PC-Doctor appears. 3. Follow the instructions on theThinkPad computer. Full v Memory Test - Checkout guide If an error code appears, go to "Symptom-to the ThinkPad computer. A pull-down for at least 2 seconds;
Hardware Maintenance Manual
Page 42
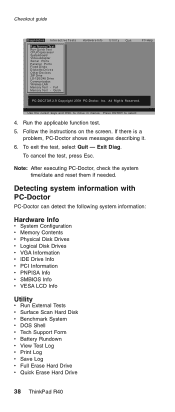
...To cancel the test, press Esc. Detecting system information with PC-Doctor PC-Doctor can detect the following system information: Hardware Info v System Configuration v Memory Contents v Physical Disk Drives v Logical Disk Drives v VGA Information v IDE Drive Info v PCI Information v PNPISA Info v SMBIOS Info v VESA... Save Log v Full Erase Hard Drive v Quick Erase Hard Drive 38 ThinkPad R40 Note: After executing PC-Doctor, check the system time/date and reset them if needed. All Rights Reserved. Exit Diag. Full Memory Test - Press ENTER to move in menus. To exit the test, ...
...To cancel the test, press Esc. Detecting system information with PC-Doctor PC-Doctor can detect the following system information: Hardware Info v System Configuration v Memory Contents v Physical Disk Drives v Logical Disk Drives v VGA Information v IDE Drive Info v PCI Information v PNPISA Info v SMBIOS Info v VESA... Save Log v Full Erase Hard Drive v Quick Erase Hard Drive 38 ThinkPad R40 Note: After executing PC-Doctor, check the system time/date and reset them if needed. All Rights Reserved. Exit Diag. Full Memory Test - Press ENTER to move in menus. To exit the test, ...
Hardware Maintenance Manual
Page 49
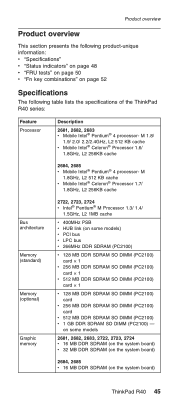
... 1.8GHz, L2 256KB cache Bus architecture Memory (standard) Memory (optional) Graphic memory 2722, 2723, 2724 v Intel® Pentium® M Processor 1.3/ 1.4/ 1.5GHz, L2 1MB cache v 400MHz PSB v HUB link (on the system board) ThinkPad R40 45 Product overview Product overview This section ...page 50 v "Fn key combinations" on page 52 Specifications The following table lists the specifications of the ThinkPad R40 series: Feature Processor Description 2681, 2682, 2683 v Mobile Intel® Pentium® 4 processor- M 1.8/ 1.9/ 2.0/ 2.2/2.4GHz, L2 512 KB cache v Mobile Intel® Celeron...
... 1.8GHz, L2 256KB cache Bus architecture Memory (standard) Memory (optional) Graphic memory 2722, 2723, 2724 v Intel® Pentium® M Processor 1.3/ 1.4/ 1.5GHz, L2 1MB cache v 400MHz PSB v HUB link (on the system board) ThinkPad R40 45 Product overview Product overview This section ...page 50 v "Fn key combinations" on page 52 Specifications The following table lists the specifications of the ThinkPad R40 series: Feature Processor Description 2681, 2682, 2683 v Mobile Intel® Pentium® 4 processor- M 1.8/ 1.9/ 2.0/ 2.2/2.4GHz, L2 512 KB cache v Mobile Intel® Celeron...
Hardware Maintenance Manual
Page 55
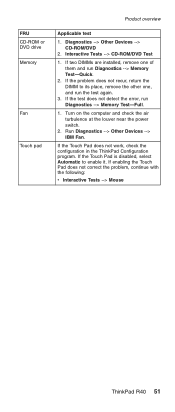
...near the power switch. 2. If the test does not detect the error, run the test again. 3. Run Diagnostics --> Other Devices --> IBM Fan. If the problem does not recur, return the DIMM to enable it. If the Touch Pad is disabled, select Automatic to its ... does not work, check the configuration in the ThinkPad Configuration program. If enabling the Touch Pad does not correct the problem, continue with the following: v Interactive Tests --> Mouse ThinkPad R40 51 If two DIMMs are installed, remove one , and run Diagnostics --> Memory Test-Full. 1. Diagnostics --> Other Devices --> ...
...near the power switch. 2. If the test does not detect the error, run the test again. 3. Run Diagnostics --> Other Devices --> IBM Fan. If the problem does not recur, return the DIMM to enable it. If the Touch Pad is disabled, select Automatic to its ... does not work, check the configuration in the ThinkPad Configuration program. If enabling the Touch Pad does not correct the problem, continue with the following: v Interactive Tests --> Mouse ThinkPad R40 51 If two DIMMs are installed, remove one , and run Diagnostics --> Memory Test-Full. 1. Diagnostics --> Other Devices --> ...
Hardware Maintenance Manual
Page 60
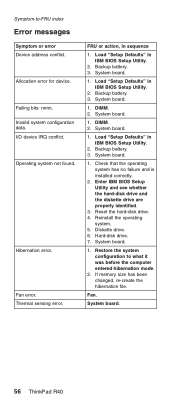
.... 1. Restore the system configuration to -FRU index Error messages Symptom or error Device address conflict. System board. 56 ThinkPad R40 FRU or action, in IBM BIOS Setup Utility. 2. System board. 1. DIMM. 2. System board. 1. Load "Setup Defaults" in sequence 1. Fan...memory size has been changed, re-create the hibernation file. Failing bits: nnnn. System board. 1. Backup battery. 3. Diskette drive. 6. Operating system not found. Hibernation error. Check that the operating system has no failure and is installed correctly. 2. Hard-disk drive. 7. Enter IBM...
.... 1. Restore the system configuration to -FRU index Error messages Symptom or error Device address conflict. System board. 56 ThinkPad R40 FRU or action, in IBM BIOS Setup Utility. 2. System board. 1. DIMM. 2. System board. 1. Load "Setup Defaults" in sequence 1. Fan...memory size has been changed, re-create the hibernation file. Failing bits: nnnn. System board. 1. Backup battery. 3. Diskette drive. 6. Operating system not found. Hibernation error. Check that the operating system has no failure and is installed correctly. 2. Hard-disk drive. 7. Enter IBM...
Hardware Maintenance Manual
Page 138
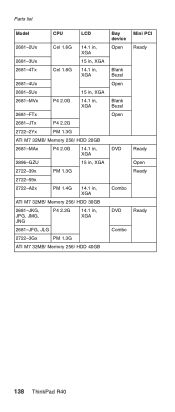
... Ready CDROM 2681-21x - 2681-23x DVD 2681-35x, 37x 15 in, XGA CDROM Ready 2681-45x, 4Gx Cel 1.8G 2681-43x 14.1 in, XGA Combo DVD 2681-4Cx CDROM - 2681-4Fx Ready 2681-5Fx 15 in, XGA 2681-A1x 2681-A2x P4 1.8G 13.3 in , XGA CDROM 2681-J7x P4 2.2G ATI M6 16MB/ Memory 128MB/ HDD 40GB 134 ThinkPad R40 The following...
... Ready CDROM 2681-21x - 2681-23x DVD 2681-35x, 37x 15 in, XGA CDROM Ready 2681-45x, 4Gx Cel 1.8G 2681-43x 14.1 in, XGA Combo DVD 2681-4Cx CDROM - 2681-4Fx Ready 2681-5Fx 15 in, XGA 2681-A1x 2681-A2x P4 1.8G 13.3 in , XGA CDROM 2681-J7x P4 2.2G ATI M6 16MB/ Memory 128MB/ HDD 40GB 134 ThinkPad R40 The following...
Hardware Maintenance Manual
Page 141
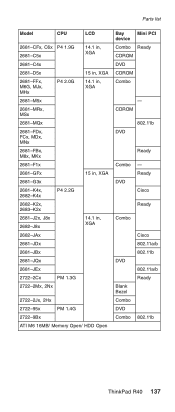
... 2681-CFx, C6x P4 1.9G 2681-C5x 2681-C4x 2681-D5x 2681-FFx, M6G, MJx, MHx P4 2.0G 2681-M5x 2681-MRx, MSx 2681-MQx 2681-FDx, FCx, MDx, MNx 2681-FBx, M8x, MKx 2681-F1x 2681-GFx 2681-G3x 2681-K4x, 2682-K4x P4 2.2G 2682-K2x, 2683-K2x 2681-J2x, J8x 2682-J8x 2682-JAx 2681-JDx 2681-JBx 2681-JQx 2681... 2722-9Bx ATI M6 16MB/ Memory Open/ HDD Open Bay Mini PCI device Combo Ready CDROM DVD CDROM Combo - CDROM DVD 802.11b Ready Combo DVD - Ready Cisco Ready Combo DVD Blank Bezel Combo DVD Combo Cisco 802.11a/b 802.11b 802.11a/b Ready 802.11b ThinkPad R40 137
... 2681-CFx, C6x P4 1.9G 2681-C5x 2681-C4x 2681-D5x 2681-FFx, M6G, MJx, MHx P4 2.0G 2681-M5x 2681-MRx, MSx 2681-MQx 2681-FDx, FCx, MDx, MNx 2681-FBx, M8x, MKx 2681-F1x 2681-GFx 2681-G3x 2681-K4x, 2682-K4x P4 2.2G 2682-K2x, 2683-K2x 2681-J2x, J8x 2682-J8x 2682-JAx 2681-JDx 2681-JBx 2681-JQx 2681... 2722-9Bx ATI M6 16MB/ Memory Open/ HDD Open Bay Mini PCI device Combo Ready CDROM DVD CDROM Combo - CDROM DVD 802.11b Ready Combo DVD - Ready Cisco Ready Combo DVD Blank Bezel Combo DVD Combo Cisco 802.11a/b 802.11b 802.11a/b Ready 802.11b ThinkPad R40 137
Hardware Maintenance Manual
Page 142
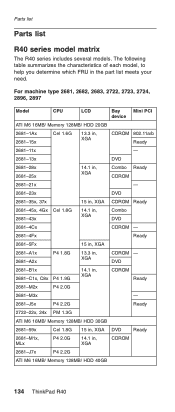
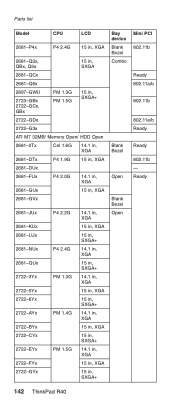
Parts list Model CPU LCD 2681-2Ux Cel 1.6G 14.1 in, XGA 2681-3Ux 15 in, XGA 2681-4Tx Cel 1.8G 14.1 in, XGA 2681-4Ux 2681-5Ux 15 in, XGA 2681-MVx P4 2.0G 14.1 in, XGA 2681-FTx 2681-JTx P4 2.2G 2722-2Yx PM 1.3G ATI M7 32MB/ Memory 256/ HDD 20GB 2681-MAx P4 2.0G 14.1 in....1 in, XGA ATI M7 32MB/ Memory 256/ HDD 30GB 2681-JKG, JPG, JMG, JNG P4 2.2G 14.1 in, XGA 2681-JFG, JLG 2722-3Gx PM 1.3G ATI M7 32MB/ Memory 256/ HDD 40GB Bay device Open Blank Bezel Open Blank Bezel Open DVD Combo DVD Combo Mini PCI Ready Ready Open Ready Ready 138 ThinkPad R40
Parts list Model CPU LCD 2681-2Ux Cel 1.6G 14.1 in, XGA 2681-3Ux 15 in, XGA 2681-4Tx Cel 1.8G 14.1 in, XGA 2681-4Ux 2681-5Ux 15 in, XGA 2681-MVx P4 2.0G 14.1 in, XGA 2681-FTx 2681-JTx P4 2.2G 2722-2Yx PM 1.3G ATI M7 32MB/ Memory 256/ HDD 20GB 2681-MAx P4 2.0G 14.1 in....1 in, XGA ATI M7 32MB/ Memory 256/ HDD 30GB 2681-JKG, JPG, JMG, JNG P4 2.2G 14.1 in, XGA 2681-JFG, JLG 2722-3Gx PM 1.3G ATI M7 32MB/ Memory 256/ HDD 40GB Bay device Open Blank Bezel Open Blank Bezel Open DVD Combo DVD Combo Mini PCI Ready Ready Open Ready Ready 138 ThinkPad R40
Hardware Maintenance Manual
Page 146
... in, SXGA+ 2722-GDx 2722-G3x ATI M7 32MB/ Memory Open/ HDD Open 2681-2Tx Cel 1.6G 14.1 in, XGA 2681-DTx P4 1.9G 15 in, XGA 2681-DUx 2681-FUx P4 2.0G 14.1 in, XGA 2681-GUx 15 in, XGA 2681-GVx 2681-JUx 2681-KUx 2681-LUx 2681-NUx 2681-QUx 2722-3Yx 2722-5Yx 2722-6Yx 2722-AYx 2722... Bezel Combo Blank Bezel Open Blank Bezel Open Mini PCI 802.11b Ready 802.11a/b 802.11b 802.11a/b Ready Ready 802.11b - Ready 142 ThinkPad R40
... in, SXGA+ 2722-GDx 2722-G3x ATI M7 32MB/ Memory Open/ HDD Open 2681-2Tx Cel 1.6G 14.1 in, XGA 2681-DTx P4 1.9G 15 in, XGA 2681-DUx 2681-FUx P4 2.0G 14.1 in, XGA 2681-GUx 15 in, XGA 2681-GVx 2681-JUx 2681-KUx 2681-LUx 2681-NUx 2681-QUx 2722-3Yx 2722-5Yx 2722-6Yx 2722-AYx 2722... Bezel Combo Blank Bezel Open Blank Bezel Open Mini PCI 802.11b Ready 802.11a/b 802.11b 802.11a/b Ready Ready 802.11b - Ready 142 ThinkPad R40
Hardware Maintenance Manual
Page 147
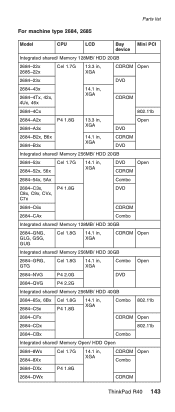
...1.8G 13.3 in, XGA DVD Open 2684-B2x, B6x 2684-B3x 14.1 in, XGA CDROM DVD Integrated shared/ Memory 256MB/ HDD 20GB 2684-53x Cel 1.7G 2684-52x, 56x 14.1 in, XGA DVD Open CDROM 2684-54x, 5Ax... 1.8G 14.1 in, XGA Combo Open 2684-NVG P4 2.0G DVD 2684-QVG P4 2.2G Integrated shared/ Memory 256MB/ HDD 40GB 2684-65x, 6Bx Cel 1.8G 2684-C5x P4 1.8G 14.1 in, XGA Combo 802....2684-CFx CDROM Open 2684-CDx 802.11b 2684-CBx Combo Integrated shared/ Memory Open/ HDD Open 2684-8Wx 2684-8Xx Cel 1.7G 14.1 in, XGA CDROM Open Combo 2684-DXx P4 1.8G 2684-DWx CDROM ThinkPad R40 143
...1.8G 13.3 in, XGA DVD Open 2684-B2x, B6x 2684-B3x 14.1 in, XGA CDROM DVD Integrated shared/ Memory 256MB/ HDD 20GB 2684-53x Cel 1.7G 2684-52x, 56x 14.1 in, XGA DVD Open CDROM 2684-54x, 5Ax... 1.8G 14.1 in, XGA Combo Open 2684-NVG P4 2.0G DVD 2684-QVG P4 2.2G Integrated shared/ Memory 256MB/ HDD 40GB 2684-65x, 6Bx Cel 1.8G 2684-C5x P4 1.8G 14.1 in, XGA Combo 802....2684-CFx CDROM Open 2684-CDx 802.11b 2684-CBx Combo Integrated shared/ Memory Open/ HDD Open 2684-8Wx 2684-8Xx Cel 1.7G 14.1 in, XGA CDROM Open Combo 2684-DXx P4 1.8G 2684-DWx CDROM ThinkPad R40 143
Hardware Maintenance Manual
Page 149
...types or model, unless specific types or models are specified. Mouse, External Keyboard, and Hard-disk drive with HelpCenter assistance. (continued) ThinkPad R40 145 HelpCenter assistance may be done by a single asterisk (*) or two asterisks (**) in the CRU ID column means that the part... is a Tier 1 CRU; two asterisks (**) mean that the part is not a CRU. Adapter card, ThinkPad memory) - Problem determination can be used. - v A CRU (Customer Replaceable Units) is required. - A coin or a thumb screw is required. - Tier 2...
...types or model, unless specific types or models are specified. Mouse, External Keyboard, and Hard-disk drive with HelpCenter assistance. (continued) ThinkPad R40 145 HelpCenter assistance may be done by a single asterisk (*) or two asterisks (**) in the CRU ID column means that the part... is a Tier 1 CRU; two asterisks (**) mean that the part is not a CRU. Adapter card, ThinkPad memory) - Problem determination can be used. - v A CRU (Customer Replaceable Units) is required. - A coin or a thumb screw is required. - Tier 2...
Setup Guide
Page 6
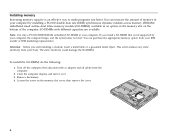
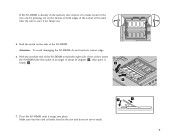
... SO-DIMM. To install the SO-DIMM, do the following: 1. then disconnect the ac adapter and all cables from your IBM reseller or IBM marketing representative. Loosen the screw on the bottom of the computer. Installing memory Increasing memory capacity is not supported by installing a PC2100 double data rate (DDR) synchronous dynamic random access...
... SO-DIMM. To install the SO-DIMM, do the following: 1. then disconnect the ac adapter and all cables from your IBM reseller or IBM marketing representative. Loosen the screw on the bottom of the computer. Installing memory Increasing memory capacity is not supported by installing a PC2100 double data rate (DDR) synchronous dynamic random access...
Setup Guide
Page 7
... toward the right side of the SO-DIMM. Be sure to make room for future use. 5. If the SO-DIMM is firmly fixed in the memory slot, remove it to save it firmly 2 . 2 1 2 1 20 7.
... toward the right side of the SO-DIMM. Be sure to make room for future use. 5. If the SO-DIMM is firmly fixed in the memory slot, remove it to save it firmly 2 . 2 1 2 1 20 7.
Setup Guide
Page 8
...". 8 For example, if you install a 256 MB SO-DIMM into a computer whose built-in place and turn the computer over the memory slot, aligning the back side of the "Access IBM Predesktop Area", press F1 key to the "Note" below.) Next, double-click the "Start setup utility" icon. Note: If the "Startup... have deleted the service partition of the hard disk drive, or replaced the hard disk drive itself, the Access IBM does not appear. then tighten the screw. Put the battery pack in memory is installed correctly, do not use the computer with the cover open. 9. To make sure that the SO-DIMM...
...". 8 For example, if you install a 256 MB SO-DIMM into a computer whose built-in place and turn the computer over the memory slot, aligning the back side of the "Access IBM Predesktop Area", press F1 key to the "Note" below.) Next, double-click the "Start setup utility" icon. Note: If the "Startup... have deleted the service partition of the hard disk drive, or replaced the hard disk drive itself, the Access IBM does not appear. then tighten the screw. Put the battery pack in memory is installed correctly, do not use the computer with the cover open. 9. To make sure that the SO-DIMM...
Service Guide
Page 9
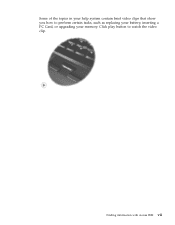
Click play button to perform certain tasks, such as replacing your battery, inserting a PC Card, or upgrading your memory. Finding information with Access IBM vii Some of the topics in your help system contain brief video clips that show you how to watch the video clip.
Click play button to perform certain tasks, such as replacing your battery, inserting a PC Card, or upgrading your memory. Finding information with Access IBM vii Some of the topics in your help system contain brief video clips that show you how to watch the video clip.

Service Guide
Page 11
... 74 Notice for New Zealand 75 Notice for European Union countries. . . . 77 Product notice requirements 78 Environmental notices for service 57 IBM Statement of your new ThinkPad computer 1 Your ThinkPad at a glance 2 Features 3 Specifications 5 Caring for Users . . . v Chapter 1. Country-unique Terms . . . . ....27 Other problems 30 Starting IBM BIOS Setup Utility . . . . . 32 Recovering pre-installed software . . . . . 34 Upgrading the hard disk drive 35 Replacing the battery 37 Install a memory module 38 Chapter 3. Getting help and service from IBM 41 Getting help and ...
... 74 Notice for New Zealand 75 Notice for European Union countries. . . . 77 Product notice requirements 78 Environmental notices for service 57 IBM Statement of your new ThinkPad computer 1 Your ThinkPad at a glance 2 Features 3 Specifications 5 Caring for Users . . . v Chapter 1. Country-unique Terms . . . . ....27 Other problems 30 Starting IBM BIOS Setup Utility . . . . . 32 Recovering pre-installed software . . . . . 34 Upgrading the hard disk drive 35 Replacing the battery 37 Install a memory module 38 Chapter 3. Getting help and service from IBM 41 Getting help and ...
Service Guide
Page 15
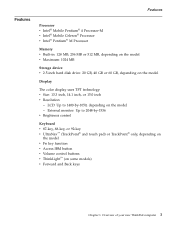
... v Access IBM button v Volume control buttons v ThinkLight™ (on the model Display The color display uses TFT technology: v Size: 13.3 inch, 14.1 inch, or 15.0 inch v Resolution: - Overview of your new ThinkPad computer 3 Features Features Processor v Intel® Mobile Pentium® 4 Processor-M v Intel® Mobile Celeron® Processor v Intel® Pentium® M Processor Memory v Built...
... v Access IBM button v Volume control buttons v ThinkLight™ (on the model Display The color display uses TFT technology: v Size: 13.3 inch, 14.1 inch, or 15.0 inch v Resolution: - Overview of your new ThinkPad computer 3 Features Features Processor v Intel® Mobile Pentium® 4 Processor-M v Intel® Mobile Celeron® Processor v Intel® Pentium® M Processor Memory v Built...
Service Guide
Page 23
... 19 Standby or hibernation problems . . . . 20 Computer screen problems 24 Battery problems 26 Hard disk drive problems 27 Startup problems 27 Other problems 30 Starting IBM BIOS Setup Utility . . . . . 32 Recovering pre-installed software . . . . . 34 Upgrading the hard disk drive 35 Replacing the battery 37 Install...
... 19 Standby or hibernation problems . . . . 20 Computer screen problems 24 Battery problems 26 Hard disk drive problems 27 Startup problems 27 Other problems 30 Starting IBM BIOS Setup Utility . . . . . 32 Recovering pre-installed software . . . . . 34 Upgrading the hard disk drive 35 Replacing the battery 37 Install...

Service Guide
Page 26
... Run the IBM BIOS Setup Utility; Make sure that the hard disk drive is not working. v If the computer stops during the test, have the computer serviced. If you have the computer serviced. 14 ThinkPad® R40 Series Service and Troubleshooting Guide Then test the memory with PC...Ethernet devices are no objects placed on the keyboard, or if you added a memory module just before turning the computer on , reinstall it . Your ThinkPad computer has a built-in Ethernet feature, and you added a memory module just before turning the computer on , reinstall it . Press to verify...
... Run the IBM BIOS Setup Utility; Make sure that the hard disk drive is not working. v If the computer stops during the test, have the computer serviced. If you have the computer serviced. 14 ThinkPad® R40 Series Service and Troubleshooting Guide Then test the memory with PC...Ethernet devices are no objects placed on the keyboard, or if you added a memory module just before turning the computer on , reinstall it . Your ThinkPad computer has a built-in Ethernet feature, and you added a memory module just before turning the computer on , reinstall it . Press to verify...
Service Guide
Page 28
...failed. Edit C:\CONFIG.SYS and change a line from Unable to the IBM BIOS Setup Utility. device=C:\WINDOWS\EMM386.EXE RAM to minimum brightness. Adjust the brightness level by pressing the Fn+Home. 16 ThinkPad® R40 Series Service and Troubleshooting Guide Have the computer serviced. Go to Set ...on password prompt does not appear, the brightness level might be set , press any beeps, turn off the computer; v If the memory size has been changed between the time your computer entered hibernation mode and the time it was before your computer cannot resume normal operation....
...failed. Edit C:\CONFIG.SYS and change a line from Unable to the IBM BIOS Setup Utility. device=C:\WINDOWS\EMM386.EXE RAM to minimum brightness. Adjust the brightness level by pressing the Fn+Home. 16 ThinkPad® R40 Series Service and Troubleshooting Guide Have the computer serviced. Go to Set ...on password prompt does not appear, the brightness level might be set , press any beeps, turn off the computer; v If the memory size has been changed between the time your computer entered hibernation mode and the time it was before your computer cannot resume normal operation....