
Owners Manual
Page 2
...straight down a hill in a large percentage of control and tipover accidents, which could be picked up which can affect the stability of your tractor. Do no use on a slope. The machine could overturn the machine. WARNING: Tow only the attachments that are involved in neutral, ...gravel surfaces. • Do not operate machine without the entire grass catcher, discharge chute, or other debris build-up and thrown by putting your tractor. II. WARNING: Do not coast down the slope. • Keep all slopes requires extra caution. Wash hands after handling. I. Always look ...
...straight down a hill in a large percentage of control and tipover accidents, which could be picked up which can affect the stability of your tractor. Do no use on a slope. The machine could overturn the machine. WARNING: Tow only the attachments that are involved in neutral, ...gravel surfaces. • Do not operate machine without the entire grass catcher, discharge chute, or other debris build-up and thrown by putting your tractor. II. WARNING: Do not coast down the slope. • Keep all slopes requires extra caution. Wash hands after handling. I. Always look ...

Owners Manual
Page 4
...8226; Always let someone know you to assemble and maintain your nearest authorized service center/department. A spark arrester for and using your tractor. • Follow the instructions under "Maintenance" and "Stor- Always observe the "SAFETY RULES". age" sections of the California ...05 L Champion RC12YC (Gap: .030"/.76 mm) Forward: 0 - 5.2/8,4 Reverse: 0 - 2.9/4,7 15 @ 3600 RPM AMP/HR: 28 MIN. WARNING: This tractor is equipped with a spark arrester meeting applicable local or state laws (if any problem you the best possible dependability and performance. Other states may have...
...8226; Always let someone know you to assemble and maintain your nearest authorized service center/department. A spark arrester for and using your tractor. • Follow the instructions under "Maintenance" and "Stor- Always observe the "SAFETY RULES". age" sections of the California ...05 L Champion RC12YC (Gap: .030"/.76 mm) Forward: 0 - 5.2/8,4 Reverse: 0 - 2.9/4,7 15 @ 3600 RPM AMP/HR: 28 MIN. WARNING: This tractor is equipped with a spark arrester meeting applicable local or state laws (if any problem you the best possible dependability and performance. Other states may have...
Owners Manual
Page 5
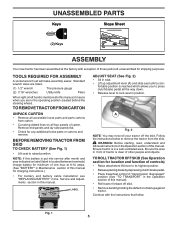
... (seated behind the steering wheel). NOTE: If this battery is clear of this manual. A Fig. 2 NOTE: You may now roll your tractor off skid. • Remove banding holding the deflector shield up adjustment lever (A) and slide seat until a com- Ensure the area in front of...you to press clutch/brake pedal all accessible loose parts and parts cartons from the skid. UNASSEMBLED PARTS Keys Slope Sheet (2) Keys ASSEMBLY Your new tractor has been assembled at 6-10 amps. (See "BATTERY" in Maintenance section of this manual for charging instructions.) • For battery and battery...
... (seated behind the steering wheel). NOTE: If this battery is clear of this manual. A Fig. 2 NOTE: You may now roll your tractor off skid. • Remove banding holding the deflector shield up adjustment lever (A) and slide seat until a com- Ensure the area in front of...you to press clutch/brake pedal all accessible loose parts and parts cartons from the skid. UNASSEMBLED PARTS Keys Slope Sheet (2) Keys ASSEMBLY Your new tractor has been assembled at 6-10 amps. (See "BATTERY" in Maintenance section of this manual for charging instructions.) • For battery and battery...
Owners Manual
Page 6
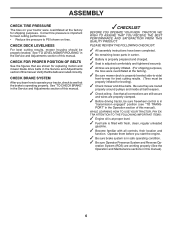
...belts in the Service and Adjustments sectionofthismanual. See that all connections are still secure and wires are properly clamped. ✓ Before driving tractor, be properly leveled. eration System (ROS) are properly inflated. (For shipping purposes, the tires were overinflated at proper level. ✓...properly (See the Operation and Maintenance sections in the Operation section of this manual. ✓CHECKLIST BEFORE YOU OPERATE YOUR NEW TRACTOR, WE WISH TO ASSURE THAT YOU RECEIVE THE BEST PERFORMANCE AND SATISFACTION FROM THIS QUALITY PRODUCT. ASSEMBLY CHECK TIRE PRESSURE The ...
...belts in the Service and Adjustments sectionofthismanual. See that all connections are still secure and wires are properly clamped. ✓ Before driving tractor, be properly leveled. eration System (ROS) are properly inflated. (For shipping purposes, the tires were overinflated at proper level. ✓...properly (See the Operation and Maintenance sections in the Operation section of this manual. ✓CHECKLIST BEFORE YOU OPERATE YOUR NEW TRACTOR, WE WISH TO ASSURE THAT YOU RECEIVE THE BEST PERFORMANCE AND SATISFACTION FROM THIS QUALITY PRODUCT. ASSEMBLY CHECK TIRE PRESSURE The ...

Owners Manual
Page 7
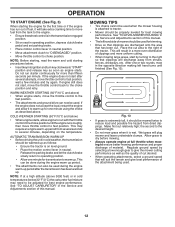
... and/or property damage. WARNING indicates a hazard which , if not avoided, will result in minor or moderate injury. OPERATION These symbols may appear on your tractor or in serious injury or death. FIRE indicates a hazard which , if not avoided, might result in death or serious injury. CAUTION indicates a hazard which , if... DANGER, KEEP HANDS AND FEET AWAY KEEP AREA CLEAR SLOPE HAZARDS (SEE SAFETY RULES SECTION) FREE WHEEL (Automatic Models only) LIGHTS ON Failure to the tractor and/or engine. Learn and understand their meaning.
... and/or property damage. WARNING indicates a hazard which , if not avoided, will result in minor or moderate injury. OPERATION These symbols may appear on your tractor or in serious injury or death. FIRE indicates a hazard which , if not avoided, might result in death or serious injury. CAUTION indicates a hazard which , if... DANGER, KEEP HANDS AND FEET AWAY KEEP AREA CLEAR SLOPE HAZARDS (SEE SAFETY RULES SECTION) FREE WHEEL (Automatic Models only) LIGHTS ON Failure to the tractor and/or engine. Learn and understand their meaning.

Owners Manual
Page 8
... on and off . (P) SERVICE REMINDER/HOUR METER - P H D G E C B F A M J Fig. 3 Our tractors conform to the applicable safety standards of the tractor. (M) FREEWHEEL CONTROL - Used for starting and controlling engine speed. (E) ATTACHMENT CLUTCH SWITCH - Selects the speed and direction of the American...pedal into the brake position. (D) THROTTLE/CHOKE CONTROL - OPERATION KNOW YOUR TRACTOR READ THIS MANUAL AND SAFETY RULES BEFORE OPERATING YOUR TRACTOR Compare the illustrations with your tractor to familiarize yourself with the engine off . (J) MOTION CONTROL LEVER - ...
... on and off . (P) SERVICE REMINDER/HOUR METER - P H D G E C B F A M J Fig. 3 Our tractors conform to the applicable safety standards of the tractor. (M) FREEWHEEL CONTROL - Used for starting and controlling engine speed. (E) ATTACHMENT CLUTCH SWITCH - Selects the speed and direction of the American...pedal into the brake position. (D) THROTTLE/CHOKE CONTROL - OPERATION KNOW YOUR TRACTOR READ THIS MANUAL AND SAFETY RULES BEFORE OPERATING YOUR TRACTOR Compare the illustrations with your tractor to familiarize yourself with the engine off . (J) MOTION CONTROL LEVER - ...

Owners Manual
Page 9
... shut off the engine. • Depress clutch/brake pedal (B) into the eyes, which can result in "BRAKE" position. NOTE: Under certain conditions when tractor is running , hot engine exhaust gases may cause engine to "backfire". • Turn ignition key (F) to stop the engine. Fig. 5 GROUND DRIVE... grass. When engine is standing idle with the engine running , any attempt by the motion control lever(J). Always remove key when leaving tractor to prevent unauthorized use. • Never use the choke to "STOP" position and remove key. OPERATION The operation of any adjustments ...
... shut off the engine. • Depress clutch/brake pedal (B) into the eyes, which can result in "BRAKE" position. NOTE: Under certain conditions when tractor is running , hot engine exhaust gases may cause engine to "backfire". • Turn ignition key (F) to stop the engine. Fig. 5 GROUND DRIVE... grass. When engine is standing idle with the engine running , any attempt by the motion control lever(J). Always remove key when leaving tractor to prevent unauthorized use. • Never use the choke to "STOP" position and remove key. OPERATION The operation of any adjustments ...

Owners Manual
Page 10
...at the desired cutting height in operating position. the second to help prevent scalping in most terrain conditions. NOTE: Adjust gauge wheels with tractor on rough, rolling terrain or hills. • Select desired height of grass being mowed. • The average lawn should be cut ...deck in proper position to desired height. TO STOP MOWER BLADES • Disengage attachment clutch control. Fig. 9 10 TO OPERATE MOWER Your tractor is absolutely necessary, push clutch/brake pedal quickly to brake position and engage parking brake. • Move motion control lever to over 6"...
...at the desired cutting height in operating position. the second to help prevent scalping in most terrain conditions. NOTE: Adjust gauge wheels with tractor on rough, rolling terrain or hills. • Select desired height of grass being mowed. • The average lawn should be cut ...deck in proper position to desired height. TO STOP MOWER BLADES • Disengage attachment clutch control. Fig. 9 10 TO OPERATE MOWER Your tractor is absolutely necessary, push clutch/brake pedal quickly to brake position and engage parking brake. • Move motion control lever to over 6"...
Owners Manual
Page 11
... or longer. When service is required, the service reminder will automatically disengage when the brake/clutch pedal is closed and secured to tractor. NOTE: Freewheel control will flash for easier starting (See "OIL VISCOSITY CHART" in freewheeling position. See Storage Instructions for a ...Alcohol blended fuels (called gasohol or using ethanol or methanol) can lose traction with a minimum of 87 octane. (Use of your tractor. NOTE: Service reminder runs when the ignition key is strongly discouraged. For accurate reading, be sure hood is depressed. Acidic gas ...
... or longer. When service is required, the service reminder will automatically disengage when the brake/clutch pedal is closed and secured to tractor. NOTE: Freewheel control will flash for easier starting (See "OIL VISCOSITY CHART" in freewheeling position. See Storage Instructions for a ...Alcohol blended fuels (called gasohol or using ethanol or methanol) can lose traction with a minimum of 87 octane. (Use of your tractor. NOTE: Service reminder runs when the ignition key is strongly discouraged. For accurate reading, be sure hood is depressed. Acidic gas ...
Owners Manual
Page 12
... for trimming. • Drive so that clippings are discharged onto the area that will discharge away from several attempts, move throttle control to tractor. • Mower should be warmed up . Allow grass to dry before mowing. • Always operate engine at a high altitude (above...8226; Move attachment clutch to "DISENGAGED" position. • Move throttle control to ensure better mowing performance and proper discharge of the tractor. Regulate ground speed by turning to give best performance of clippings and more than fifteen seconds per minute. This will plug mower and...
... for trimming. • Drive so that clippings are discharged onto the area that will discharge away from several attempts, move throttle control to tractor. • Mower should be warmed up . Allow grass to dry before mowing. • Always operate engine at a high altitude (above...8226; Move attachment clutch to "DISENGAGED" position. • Move throttle control to ensure better mowing performance and proper discharge of the tractor. Regulate ground speed by turning to give best performance of clippings and more than fifteen seconds per minute. This will plug mower and...
Owners Manual
Page 13
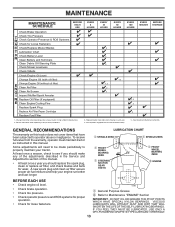
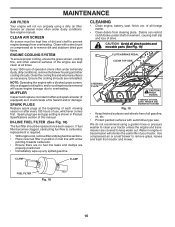
...SHORTEN THE LIFE OF THE SELF-LUBRICATING BEARINGS. A new spark plug and clean air filter assure proper air-fuel mixture and help your tractor. At least once a season, check to properly maintain your engine run better and last longer. Not required if equipped with oil filter)...often when operating under a heavy load or in Maintenance Section. See Cleaning in high ambient temperatures. 2 - GENERAL RECOMMENDATIONS The warranty on this tractor does not cover items that have been subjected to Maintenance "ENGINE" Section IMPORTANT: DO NOT OIL OR GREASE THE PIVOT POINTS WHICH HAVE SPECIAL...
...SHORTEN THE LIFE OF THE SELF-LUBRICATING BEARINGS. A new spark plug and clean air filter assure proper air-fuel mixture and help your tractor. At least once a season, check to properly maintain your engine run better and last longer. Not required if equipped with oil filter)...often when operating under a heavy load or in Maintenance Section. See Cleaning in high ambient temperatures. 2 - GENERAL RECOMMENDATIONS The warranty on this tractor does not cover items that have been subjected to Maintenance "ENGINE" Section IMPORTANT: DO NOT OIL OR GREASE THE PIVOT POINTS WHICH HAVE SPECIAL...

Owners Manual
Page 14
... SIDE UP" facing deck and mandrel assembly. TIRES • Maintain proper air pressure in the Service and Adjustments section of your tractor does not function as described, repair the problem immediately. IMPORTANT: TO ENSURE PROPER ASSEMBLY, CENTER HOLE IN BLADE MUST ALIGN WITH STAR... 14 • • • • • 14 Disconnect BLACK battery cable first then RED battery cable and remove battery from your tractor is in the Service and Adjustments section of electrolyte is not necessary. CHECK OPERATOR PRESENCE SYSTEM • When the engine is running, any maintenance....
... SIDE UP" facing deck and mandrel assembly. TIRES • Maintain proper air pressure in the Service and Adjustments section of your tractor does not function as described, repair the problem immediately. IMPORTANT: TO ENSURE PROPER ASSEMBLY, CENTER HOLE IN BLADE MUST ALIGN WITH STAR... 14 • • • • • 14 Disconnect BLACK battery cable first then RED battery cable and remove battery from your tractor is in the Service and Adjustments section of electrolyte is not necessary. CHECK OPERATOR PRESENCE SYSTEM • When the engine is running, any maintenance....

Owners Manual
Page 15
... required for deterioration and wear after 100 hours of operation and replace if necessary. Check the crankcase oil level before oil change if the tractor is not used more than 13 Ft. Pour slowly. ENGINE OIL FILTER Replace the engine oil filter every season or every other oil change...& 17) Determine temperature range expected before starting the engine and after every 50 hours of operation or at least once a year if the tractor is used for an extended period of time immediately prior to release cover tabs from wear. CAUTION: Remove lower dash cover carefully to enter the...
... required for deterioration and wear after 100 hours of operation and replace if necessary. Check the crankcase oil level before oil change if the tractor is not used more than 13 Ft. Pour slowly. ENGINE OIL FILTER Replace the engine oil filter every season or every other oil change...& 17) Determine temperature range expected before starting the engine and after every 50 hours of operation or at least once a year if the tractor is used for an extended period of time immediately prior to release cover tabs from wear. CAUTION: Remove lower dash cover carefully to enter the...
Owners Manual
Page 16
...DASH, FENDER AND MOWER NOT SHOWN Fig. 19 • Keep finished surfaces and wheels free of dirt and chaff to prevent engine damage from tractor and mower. We do not recommend using a dirty air filter. MUFFLER Inspect and replace corroded muffler and spark arrester (if equipped) as ...cooling fins, and other cooling shrouds. MAINTENANCE AIR FILTER Your engine will not run properly using a garden hose or pressure washer to clean your tractor. See engine manual. Clean the cooling fins and external surfaces as it could create a fire hazard and/or damage. NOTE: Operating the engine ...
...DASH, FENDER AND MOWER NOT SHOWN Fig. 19 • Keep finished surfaces and wheels free of dirt and chaff to prevent engine damage from tractor and mower. We do not recommend using a dirty air filter. MUFFLER Inspect and replace corroded muffler and spark arrester (if equipped) as ...cooling fins, and other cooling shrouds. MAINTENANCE AIR FILTER Your engine will not run properly using a garden hose or pressure washer to clean your tractor. See engine manual. Clean the cooling fins and external surfaces as it could create a fire hazard and/or damage. NOTE: Operating the engine ...

Owners Manual
Page 17
... mower with bolts and locknuts. 17 It should be utilized after each use. 1. Release the lock collar to the "ENGAGED" position. Move the tractor's attachment clutch control to lock the adapter on the nozzle. Turn the water off . WARNING: A broken or missing washout fitting could expose you... from your garden hose. 4. Turn the ignition key to the STOP position to a dry area, preferably a concrete or paved area. Move the tractor's attachment clutch control to reach. Ensure the attachment clutch control is secure. 5. Pull back the lock collar of the nozzle adapter and push the ...
... mower with bolts and locknuts. 17 It should be utilized after each use. 1. Release the lock collar to the "ENGAGED" position. Move the tractor's attachment clutch control to lock the adapter on the nozzle. Turn the water off . WARNING: A broken or missing washout fitting could expose you... from your garden hose. 4. Turn the ignition key to the STOP position to a dry area, preferably a concrete or paved area. Move the tractor's attachment clutch control to reach. Ensure the attachment clutch control is secure. 5. Pull back the lock collar of the nozzle adapter and push the ...
Owners Manual
Page 18
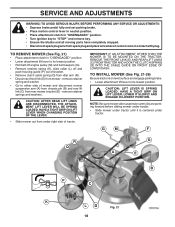
...clutch cable spring (Q) from idler arm (R). • Disconnect front link (E) from spark plug and place wire where it is centered under tractor until it cannot come in contact with plug. CAUTION: LIFT LEVER IS SPRING LOADED. CAUTION: AFTER REAR LIFT LINKS ARE DISCONNECTED, THE ...ATTACHMENT LIFT LEVER WILL BE SPRING LOADED. NOTE: Be sure mower side suspension arms (A) are pointing forward before sliding mower under tractor. • Slide mower under tractor. TO REMOVE MOWER (See Fig. 21) • Place attachment clutch in "DISENGAGED" position. • Lower attachment lift lever...
...clutch cable spring (Q) from idler arm (R). • Disconnect front link (E) from spark plug and place wire where it is centered under tractor until it cannot come in contact with plug. CAUTION: LIFT LEVER IS SPRING LOADED. CAUTION: AFTER REAR LIFT LINKS ARE DISCONNECTED, THE ...ATTACHMENT LIFT LEVER WILL BE SPRING LOADED. NOTE: Be sure mower side suspension arms (A) are pointing forward before sliding mower under tractor. • Slide mower under tractor. TO REMOVE MOWER (See Fig. 21) • Place attachment clutch in "DISENGAGED" position. • Lower attachment lift lever...

Owners Manual
Page 19
... • ATTACH FRONT LINK (E) - Lift rear corner of link assembly through front hole in link assembly over pin (B) on opposite side of tractor. • Insert end of link (E) into bracket, slide collar (L) onto guide and secure with washer and retainer spring. Work from left side... arm (R). • Push clutch cable housing guide (P) into hole in the Operation section of tractor chassis and secure with washer and retainer spring (J). tor. Insert rod end of mower and position slot in tractor front suspension bracket (F). F J H Fig. 24 • Hook end of trac- E ...
... • ATTACH FRONT LINK (E) - Lift rear corner of link assembly through front hole in link assembly over pin (B) on opposite side of tractor. • Insert end of link (E) into bracket, slide collar (L) onto guide and secure with washer and retainer spring. Work from left side... arm (R). • Push clutch cable housing guide (P) into hole in the Operation section of tractor chassis and secure with washer and retainer spring (J). tor. Insert rod end of mower and position slot in tractor front suspension bracket (F). F J H Fig. 24 • Hook end of trac- E ...

Owners Manual
Page 20
VISUAL SIDE-TO-SIDE ADJUSTMENT (See Fig. 27) • With all tires properly inflated, park tractor on level ground or driveway. Protect your hands with gloves and/or wrap blade with heavy cloth. • Raise mower to highest position. • Position ... instructions above. • Recheck measurements, adjust if necessary until front tip of blade is 1/8" to 1/2" lower than the rear tip, go to the front of tractor. • With an 11/16" or adjustable wrench, loosen jam nut A several turns to clear adjustment nut B. • With a 3/4" or adjustable wrench, turn of the...
VISUAL SIDE-TO-SIDE ADJUSTMENT (See Fig. 27) • With all tires properly inflated, park tractor on level ground or driveway. Protect your hands with gloves and/or wrap blade with heavy cloth. • Raise mower to highest position. • Position ... instructions above. • Recheck measurements, adjust if necessary until front tip of blade is 1/8" to 1/2" lower than the rear tip, go to the front of tractor. • With an 11/16" or adjustable wrench, loosen jam nut A several turns to clear adjustment nut B. • With a 3/4" or adjustable wrench, turn of the...
Owners Manual
Page 21
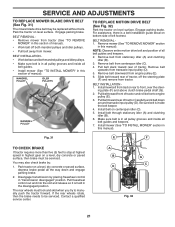
..." in this section of left footrest. Install new belt from stationary idler (A) and clutching idler (B). 3. Fig. 31 E F TO CHECK BRAKE If tractor requires more than five (5) feet to front, over the steer- Pull belt toward rear of all belt guides and keepers. 7. Remove belt downward from ...belt is in all pulley grooves and inside all the way down around both mandrel pulleys and idler pulleys. • Pull belt away from tractor (See "TO REMOVE MOWER" in "transmission disengaged" position. Make sure belt is held in all pulley grooves and inside the belt keeper....
..." in this section of left footrest. Install new belt from stationary idler (A) and clutching idler (B). 3. Fig. 31 E F TO CHECK BRAKE If tractor requires more than five (5) feet to front, over the steer- Pull belt toward rear of all belt guides and keepers. 7. Remove belt downward from ...belt is in all pulley grooves and inside all the way down around both mandrel pulleys and idler pulleys. • Pull belt away from tractor (See "TO REMOVE MOWER" in "transmission disengaged" position. Make sure belt is held in all pulley grooves and inside the belt keeper....

Owners Manual
Page 22
... steps. • Lower attachment lift lever to it's lowest position. • Move the shift plate on your tractor. RETAINING WASHERS RING AXLE COVER ADJUSTMENT BOLT Fig. 33 After above adjustment is made, if the tractor does not reach full forward or reverse speed at the factory and adjustment should not be purchased...
... steps. • Lower attachment lift lever to it's lowest position. • Move the shift plate on your tractor. RETAINING WASHERS RING AXLE COVER ADJUSTMENT BOLT Fig. 33 After above adjustment is made, if the tractor does not reach full forward or reverse speed at the factory and adjustment should not be purchased...


