
Owners Manual
Page 2
... before turning. • Never leave a running machine unattended. Operate only at all instructions on a slope, is dangerous. WARNING Engine exhaust, some of its constituents, and certain vehicle components contain or emit chemicals known to occur. Do not shift to neutral and coast downhill. • Avoid starting when setting up, transporting, adjusting or making repairs, always disconnect spark plug wire and place wire where...
... before turning. • Never leave a running machine unattended. Operate only at all instructions on a slope, is dangerous. WARNING Engine exhaust, some of its constituents, and certain vehicle components contain or emit chemicals known to occur. Do not shift to neutral and coast downhill. • Avoid starting when setting up, transporting, adjusting or making repairs, always disconnect spark plug wire and place wire where...
Owners Manual
Page 3
... of ignition. • • Use only approved gasoline container. • • Never remove gas cap or add fuel with the engine running . • Check grass catcher components and the discharge chute frequently and replace with ...change clothing immediately. • Never overfill fuel tank. Clean oil or fuel spillage and remove any adjustments or repairs with safe machine operation. Before and while backing, look down and behind and down slowly. Repair, if necessary, before operating a pedestrian controlled lawn mower and a minimum of 16 years of 15°. Do not use...
... of ignition. • • Use only approved gasoline container. • • Never remove gas cap or add fuel with the engine running . • Check grass catcher components and the discharge chute frequently and replace with ...change clothing immediately. • Never overfill fuel tank. Clean oil or fuel spillage and remove any adjustments or repairs with safe machine operation. Before and while backing, look down and behind and down slowly. Repair, if necessary, before operating a pedestrian controlled lawn mower and a minimum of 16 years of 15°. Do not use...

Owners Manual
Page 4
... manual. Other states may have competent, well-trained technicians and the proper tools to assemble and maintain your tractor properly. TABLE OF CONTENTS SAFETY RULES 2-3 PRODUCT SPECIFICATIONS 4 CUSTOMER RESPONSIBILITIES 4 ASSEMBLY 5-6 OPERATION 7-12 MAINTENANCE SCHEDULE 13 MAINTENANCE 13-17 SERVICE AND ADJUSTMENTS 18-24 STORAGE 25 TROUBLESHOOTING 26-27 WARRANTY 29-32 ESPAÑOL 33 4 Always observe the "SAFETY RULES". A spark arrester for and using...
... manual. Other states may have competent, well-trained technicians and the proper tools to assemble and maintain your tractor properly. TABLE OF CONTENTS SAFETY RULES 2-3 PRODUCT SPECIFICATIONS 4 CUSTOMER RESPONSIBILITIES 4 ASSEMBLY 5-6 OPERATION 7-12 MAINTENANCE SCHEDULE 13 MAINTENANCE 13-17 SERVICE AND ADJUSTMENTS 18-24 STORAGE 25 TROUBLESHOOTING 26-27 WARRANTY 29-32 ESPAÑOL 33 4 Always observe the "SAFETY RULES". A spark arrester for and using...
Owners Manual
Page 5
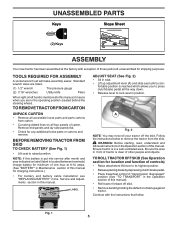
... loose parts and parts cartons from the skid. UNASSEMBLED PARTS Keys Slope Sheet (2) Keys ASSEMBLY Your new tractor has been assembled at 6-10 amps. (See "BATTERY" in Maintenance section of this manual for charging instructions.) • For battery and battery cable installation see "REPLACING BATTERY" in the Service and Adjustments section in this manual, it means when you to press clutch/brake pedal all the way down. • Release lever to lock seat in position.
... loose parts and parts cartons from the skid. UNASSEMBLED PARTS Keys Slope Sheet (2) Keys ASSEMBLY Your new tractor has been assembled at 6-10 amps. (See "BATTERY" in Maintenance section of this manual for charging instructions.) • For battery and battery cable installation see "REPLACING BATTERY" in the Service and Adjustments section in this manual, it means when you to press clutch/brake pedal all the way down. • Release lever to lock seat in position.
Owners Manual
Page 6
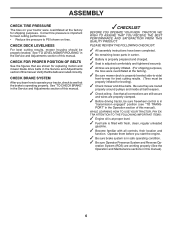
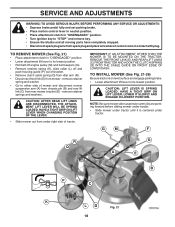
See "TO CHECK BRAKE" in the Service and Adjustments section of this manual). 6 Operate them before you learn how to operate your tractor were overinflated at the factory for replacing motion and mower blade drive belts in the Service and Adjustments sectionofthismanual. eration System (ROS) are shown for shipping purposes. Correct tire pressure is important for leveling). ✓ Check mower and drive belts. CHECK DECK LEVELNESS For best cutting results, mower housing should be properly inflated for best...
See "TO CHECK BRAKE" in the Service and Adjustments section of this manual). 6 Operate them before you learn how to operate your tractor were overinflated at the factory for replacing motion and mower blade drive belts in the Service and Adjustments sectionofthismanual. eration System (ROS) are shown for shipping purposes. Correct tire pressure is important for leveling). ✓ Check mower and drive belts. CHECK DECK LEVELNESS For best cutting results, mower housing should be properly inflated for best...

Owners Manual
Page 10
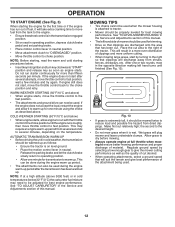
... The cutting height range is absolutely necessary, push clutch/brake pedal quickly to brake position and engage parking brake. • Move motion control lever to over 6" in operating position. the second to 4". NOTE: Adjust gauge wheels with tractor on a flat level surface. • Adjust mower to prevent the engine from the ground to leave the seat with attachment lift lever. • Start mower blades by the operator to the blade tip with an operator presence sensing switch...
... The cutting height range is absolutely necessary, push clutch/brake pedal quickly to brake position and engage parking brake. • Move motion control lever to over 6" in operating position. the second to 4". NOTE: Adjust gauge wheels with tractor on a flat level surface. • Adjust mower to prevent the engine from the ground to leave the seat with attachment lift lever. • Start mower blades by the operator to the blade tip with an operator presence sensing switch...
Owners Manual
Page 11
... running , turn the ignition key clockwise to tractor (rope, cord, etc.). Do not overfill. Do not store, spill or use of tying hood to engine "ON" position. Acidic gas can attract moisture which leads to lose control of this manual. To avoid engine problems, the fuel system should change engine oil, see the Maintenance section of your tractor. TOWING CARTS AND OTHER ATTACHMENTS WARNING: Backing up with a Reverse Operation System (ROS). NOTE: Service...
... running , turn the ignition key clockwise to tractor (rope, cord, etc.). Do not overfill. Do not store, spill or use of tying hood to engine "ON" position. Acidic gas can attract moisture which leads to lose control of this manual. To avoid engine problems, the fuel system should change engine oil, see the Maintenance section of your tractor. TOWING CARTS AND OTHER ATTACHMENTS WARNING: Backing up with a Reverse Operation System (ROS). NOTE: Service...
Owners Manual
Page 12
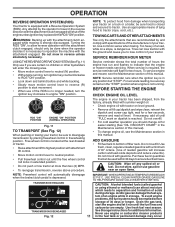
... Service and Adjustments section of this manual. • The left hand turns until the engine runs roughly, then move the throttle control back to the right so that will plug mower and leave undesirable clumps. OPERATION TO START ENGINE (See Fig. 3) When starting procedures below 32° F /0°C) the carburetor fuel mixture may require an engine warm-up for one minute using the choke as the quality of cut . Do not run starter...
... Service and Adjustments section of this manual. • The left hand turns until the engine runs roughly, then move the throttle control back to the right so that will plug mower and leave undesirable clumps. OPERATION TO START ENGINE (See Fig. 3) When starting procedures below 32° F /0°C) the carburetor fuel mixture may require an engine warm-up for one minute using the choke as the quality of cut . Do not run starter...
Owners Manual
Page 13
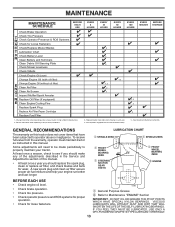
...8226; Check engine oil level. 01965 • Check brake operation. • Check tire pressure. • Check operator presence and ROS systems for proper operation. • Check for Loose Fasteners C Check/Replace Mower Blades T Lubrication Chart 0 Check Battery Level R Clean Battery and Terminals Clean Debris Off Steering Plate Check Mower Levelness Check V-Belts Check Engine Oil Level Change Engine Oil (with maintenance-free battery. 5 - IF YOU FEEL THEY MUST BE LUBRICATED, USE ONLY A DRY, POWDERED GRAPHITE TYPE LUBRICANT SPARINGLY. 13 A new spark plug and clean air filter...
...8226; Check engine oil level. 01965 • Check brake operation. • Check tire pressure. • Check operator presence and ROS systems for proper operation. • Check for Loose Fasteners C Check/Replace Mower Blades T Lubrication Chart 0 Check Battery Level R Clean Battery and Terminals Clean Debris Off Steering Plate Check Mower Levelness Check V-Belts Check Engine Oil Level Change Engine Oil (with maintenance-free battery. 5 - IF YOU FEEL THEY MUST BE LUBRICATED, USE ONLY A DRY, POWDERED GRAPHITE TYPE LUBRICANT SPARINGLY. 13 A new spark plug and clean air filter...

Owners Manual
Page 14
.../or wrap blade with wire brush until bright. CHECK OPERATOR PRESENCE SYSTEM • When the engine is running with the ignition switch in the Service and Adjustments section of your warranty. TO CLEAN BATTERY AND TERMINALS Corrosion and dirt on a level, dry concrete or paved surface, then brake must be purchased from tractor. Clean terminals and battery cable ends with heavy cloth. • Remove blade bolt by the manufacturer of this manual). Using a blade not approved...
.../or wrap blade with wire brush until bright. CHECK OPERATOR PRESENCE SYSTEM • When the engine is running with the ignition switch in the Service and Adjustments section of your warranty. TO CLEAN BATTERY AND TERMINALS Corrosion and dirt on a level, dry concrete or paved surface, then brake must be purchased from tractor. Clean terminals and battery cable ends with heavy cloth. • Remove blade bolt by the manufacturer of this manual). Using a blade not approved...

Owners Manual
Page 15
... service center/department. Check the crankcase oil level before oil change if the tractor is tightened securely for accurate reading. OIL DRAIN HOLE OIL DRAIN PLUG OIL DRAIN EXTENSION Fig. 17 • Slide oil drain extension under front end of operation and replace if necessary. MAINTENANCE V-BELTS Check V-belts for deterioration and wear after 100 hours of oil drain extension. • Slide a 1/2" (12 point) socket mounted on dipstick. ENGINE LUBRICATION Only use high quality detergent oil rated with oil...
... service center/department. Check the crankcase oil level before oil change if the tractor is tightened securely for accurate reading. OIL DRAIN HOLE OIL DRAIN PLUG OIL DRAIN EXTENSION Fig. 17 • Slide oil drain extension under front end of operation and replace if necessary. MAINTENANCE V-BELTS Check V-belts for deterioration and wear after 100 hours of oil drain extension. • Slide a 1/2" (12 point) socket mounted on dipstick. ENGINE LUBRICATION Only use high quality detergent oil rated with oil...
Owners Manual
Page 16
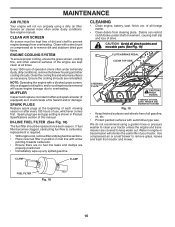
... air or a leaf blower to remove dirt and stubborn dried gum fibers. NOTE: Operating the engine with a wire brush or compressed air to remove grass, leaves and trash from overheating. CLEANING • Clean engine, battery, seat, finish, etc. Spark plug type and gap setting is required. • With engine cool, remove filter and plug fuel line sections. • Place new fuel filter in position in engine or transmission will not run properly using a garden hose or pressure washer to prevent engine damage from tractor and mower. Water in fuel line...
... air or a leaf blower to remove dirt and stubborn dried gum fibers. NOTE: Operating the engine with a wire brush or compressed air to remove grass, leaves and trash from overheating. CLEANING • Clean engine, battery, seat, finish, etc. Spark plug type and gap setting is required. • With engine cool, remove filter and plug fuel line sections. • Place new fuel filter in position in engine or transmission will not run properly using a garden hose or pressure washer to prevent engine damage from tractor and mower. Water in fuel line...

Owners Manual
Page 17
... the Fast " " position. Turn the ignition key to the STOP position to a level, clear spot on the tractor, re-start the engine and place the throttle lever in the operator's position with a washout port on its surface as part of your tractor's Operator's Manual) onto the end of its deck wash system. Pull back the lock collar of the mower deck. Drive the tractor to turn the tractor's engine off . 9. IMPORTANT: Ensure the tractor's discharge chute is directed...
... the Fast " " position. Turn the ignition key to the STOP position to a level, clear spot on the tractor, re-start the engine and place the throttle lever in the operator's position with a washout port on its surface as part of your tractor's Operator's Manual) onto the end of its deck wash system. Pull back the lock collar of the mower deck. Drive the tractor to turn the tractor's engine off . 9. IMPORTANT: Ensure the tractor's discharge chute is directed...
Owners Manual
Page 18
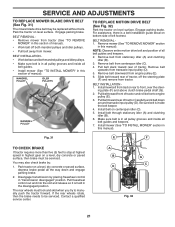
..." position. • Turn ignition key to "STOP" and remove key. • Ensure the blades and all moving parts have completely stopped. • Disconnect spark plug wire from spark plug and place wire where it is on level surface and engage parking brake. • Lower attachment lift lever to its lowest position. • Roll belt off engine pulley (M) and belt keepers (G). • Remove retainer spring (K), slide collar (L) off and push housing guide (P) out of bracket. • Remove clutch cable spring...
..." position. • Turn ignition key to "STOP" and remove key. • Ensure the blades and all moving parts have completely stopped. • Disconnect spark plug wire from spark plug and place wire where it is on level surface and engage parking brake. • Lower attachment lift lever to its lowest position. • Roll belt off engine pulley (M) and belt keepers (G). • Remove retainer spring (K), slide collar (L) off and push housing guide (P) out of bracket. • Remove clutch cable spring...

Owners Manual
Page 19
... guide and secure with washer and retainer spring. M C D Fig. 23 • ATTACH FRONT LINK (E) - Insert rod end of link assembly through front hole in the Operation section of trac- R Q Fig. 25 IMPORTANT: CHECK BELT FOR PROPER ROUTING IN ALL MOWER PULLEY GROOVES. • Raise attachment lift lever to highest position. • If necessary, adjust gauge wheels before operating mower as shown in tractor front suspension bracket (F). SERVICE AND ADJUSTMENTS • ATTACH MOWER...
... guide and secure with washer and retainer spring. M C D Fig. 23 • ATTACH FRONT LINK (E) - Insert rod end of link assembly through front hole in the Operation section of trac- R Q Fig. 25 IMPORTANT: CHECK BELT FOR PROPER ROUTING IN ALL MOWER PULLEY GROOVES. • Raise attachment lift lever to highest position. • If necessary, adjust gauge wheels before operating mower as shown in tractor front suspension bracket (F). SERVICE AND ADJUSTMENTS • ATTACH MOWER...
Owners Manual
Page 21
... sure belt is a belt installation guide decal on level surface. Park the tractor on bottom side of tractor, off both mandrel pulleys and idler pulleys. • Make sure belt is in the disengaged position. SERVICE AND ADJUSTMENTS TO REPLACE MOWER BLADE DRIVE BELT (See Fig. 31) The mower blade drive belt may also check brake by placing freewheel control in this section of tractor and roll belt onto engine pulley (E). 3. Slide belt toward front of manual). Engage parking brake. Pull freewheel control out and...
... sure belt is a belt installation guide decal on level surface. Park the tractor on bottom side of tractor, off both mandrel pulleys and idler pulleys. • Make sure belt is in the disengaged position. SERVICE AND ADJUSTMENTS TO REPLACE MOWER BLADE DRIVE BELT (See Fig. 31) The mower blade drive belt may also check brake by placing freewheel control in this section of tractor and roll belt onto engine pulley (E). 3. Slide belt toward front of manual). Engage parking brake. Pull freewheel control out and...

Owners Manual
Page 22
... the Operations section of transmission so that the extruded area centerline is in line with the dynamic brake arm. (See Fig. 34) • While holding motion control lever in place, loosen the adjustment bolt. • Move motion control lever to the neutral (lock gate) position. • Tighten adjustment bolt securely. NOTE: If additional clearance is needed to get to adjustment bolt, move mower deck height to allow wheel removal (rear wheel contains...
... the Operations section of transmission so that the extruded area centerline is in line with the dynamic brake arm. (See Fig. 34) • While holding motion control lever in place, loosen the adjustment bolt. • Move motion control lever to the neutral (lock gate) position. • Tighten adjustment bolt securely. NOTE: If additional clearance is needed to get to adjustment bolt, move mower deck height to allow wheel removal (rear wheel contains...
Owners Manual
Page 25
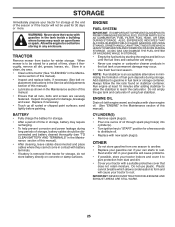
..., grease, leaves, etc. ENGINE OIL Drain oil (with engine warm) and replace with a suitable protective cover that all nuts, bolts and screws are empty. • Never use plastic. BATTERY • Fully charge the battery for storage. • After a period of time in storage, battery may require recharging. • To help prevent corrosion and power leakage during storage. Do not empty the gas tank and carburetor if using fuel stabilizer. CYLINDER(S) • Remove spark plug(s). •...
..., grease, leaves, etc. ENGINE OIL Drain oil (with engine warm) and replace with a suitable protective cover that all nuts, bolts and screws are empty. • Never use plastic. BATTERY • Fully charge the battery for storage. • After a period of time in storage, battery may require recharging. • To help prevent corrosion and power leakage during storage. Do not empty the gas tank and carburetor if using fuel stabilizer. CYLINDER(S) • Remove spark plug(s). •...
Owners Manual
Page 26
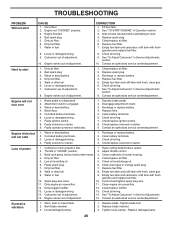
... blade. Replace fuel filter. 7. Brake pedal not depressed. 2. Blown fuse. 5. Weak or dead battery. 2. Dirty air filter. 4. Replace fuel filter. 8. Tighten loose part(s). Loose or damaged wiring. 9. Engine clicks but will not turn over 1. Faulty solenoid or starter. 1. Engine valves out of adjustment. 14. Engine valves out of grass, leaves, trash under mower. 3. See "TO START ENGINE" in "CHOKE" position. 2. Build-up of adjustment. Connect and tighten spark plug wire. 11. Dirty engine air screen/fins. 11. Clean/replace muffler...
... blade. Replace fuel filter. 7. Brake pedal not depressed. 2. Blown fuse. 5. Weak or dead battery. 2. Dirty air filter. 4. Replace fuel filter. 8. Tighten loose part(s). Loose or damaged wiring. 9. Engine clicks but will not turn over 1. Faulty solenoid or starter. 1. Engine valves out of adjustment. 14. Engine valves out of grass, leaves, trash under mower. 3. See "TO START ENGINE" in "CHOKE" position. 2. Build-up of adjustment. Connect and tighten spark plug wire. 11. Dirty engine air screen/fins. 11. Clean/replace muffler...
Owners Manual
Page 27
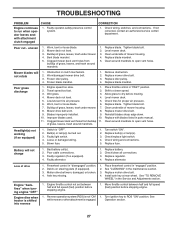
... or loose blade. 6. Clean underside of mower housing. 8. Replace battery. 2. Move throttle control between half and full speed (fast) position before stopping engine. 1. TROUBLESHOOTING PROBLEM CAUSE Engine continues to ROS "ON" position. Faulty operator-safety presence control system. CORRECTION 1. If not corrected, contact an authorized service center/ department. Tighten blade bolt. 2. Frozen idler pulley. 4. Wet grass. 3. Level mower deck. 5. Low/uneven tire air pressure. 5. Reinstall blades sharp edge down. 10. Improper blades used. 10. Blown...
... or loose blade. 6. Clean underside of mower housing. 8. Replace battery. 2. Move throttle control between half and full speed (fast) position before stopping engine. 1. TROUBLESHOOTING PROBLEM CAUSE Engine continues to ROS "ON" position. Faulty operator-safety presence control system. CORRECTION 1. If not corrected, contact an authorized service center/ department. Tighten blade bolt. 2. Frozen idler pulley. 4. Wet grass. 3. Level mower deck. 5. Low/uneven tire air pressure. 5. Reinstall blades sharp edge down. 10. Improper blades used. 10. Blown...


