
Owners Manual
Page 2
... if a wheel is over . • Use extra care while operating machine with specifications of the manufacturer of your foot on the machine and in the manual before cleaning the machine, removing the grass catcher, or unclogging the discharge chute. • Operate machine only in daylight or good artificial light. • Do...
... if a wheel is over . • Use extra care while operating machine with specifications of the manufacturer of your foot on the machine and in the manual before cleaning the machine, removing the grass catcher, or unclogging the discharge chute. • Operate machine only in daylight or good artificial light. • Do...

Owners Manual
Page 4
... assemble and maintain your tractor properly. Should you experience any ). Always observe the "SAFETY RULES". In the state of this manual. • Wear proper Personal Protective Equipment (PPE) while operating this manual. PRODUCT SPECIFICATIONS Gasoline Capacity And Type: Oil Type (API:SG-SL): Oil Capacity: Spark Plug: Ground Speed (Mph/Kph): Charging...
... assemble and maintain your tractor properly. Should you experience any ). Always observe the "SAFETY RULES". In the state of this manual. • Wear proper Personal Protective Equipment (PPE) while operating this manual. PRODUCT SPECIFICATIONS Gasoline Capacity And Type: Oil Type (API:SG-SL): Oil Capacity: Spark Plug: Ground Speed (Mph/Kph): Charging...
Owners Manual
Page 5
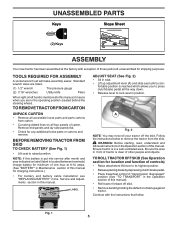
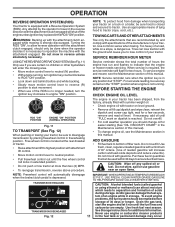
....) • For battery and battery cable installation see "REPLACING BATTERY" in the Service and Adjustments section in Maintenance section of this manual, it means when you to press clutch/brake pedal all the way down. • Release lever to its highest position. •.../brakepedal. • Place freewheel control in "transmission disengaged" position (See "TO TRANSPORT" in front of tractor is clear of this manual). • Roll tractor forward off the skid. TO ROLL TRACTOR OFF SKID (See Operation section for shipping purposes. Continue with exception ...
....) • For battery and battery cable installation see "REPLACING BATTERY" in the Service and Adjustments section in Maintenance section of this manual, it means when you to press clutch/brake pedal all the way down. • Release lever to its highest position. •.../brakepedal. • Place freewheel control in "transmission disengaged" position (See "TO TRANSPORT" in front of tractor is clear of this manual). • Roll tractor forward off the skid. TO ROLL TRACTOR OFF SKID (See Operation section for shipping purposes. Continue with exception ...
Owners Manual
Page 6
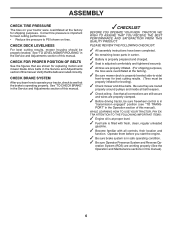
... ✓ All assembly instructions have been completed. ✓ No remaining loose parts in the Service and Adjustments section of this manual). 6 ASSEMBLY CHECK TIRE PRESSURE The tires on tires. Verifythatthebeltsareroutedcorrectly. Be sure they are routed properly around pulleys and inside all ...to operate your tractor were overinflated at proper level. ✓ Fuel tank is in the Service and Adjustments section of this manual. CHECK DECK LEVELNESS For best cutting results, mower housing should be sure freewheel control is in "transmission engaged" position (see ...
... ✓ All assembly instructions have been completed. ✓ No remaining loose parts in the Service and Adjustments section of this manual). 6 ASSEMBLY CHECK TIRE PRESSURE The tires on tires. Verifythatthebeltsareroutedcorrectly. Be sure they are routed properly around pulleys and inside all ...to operate your tractor were overinflated at proper level. ✓ Fuel tank is in the Service and Adjustments section of this manual. CHECK DECK LEVELNESS For best cutting results, mower housing should be sure freewheel control is in "transmission engaged" position (see ...

Owners Manual
Page 8
.... (A) ATTACHMENT LIFT LEVER - Disengages transmission for braking the tractor and starting and controlling engine speed. (E) ATTACHMENT CLUTCH SWITCH - Save this manual for the engine and mower. 8 Used for starting and stopping the engine. (G) REVERSE OPERATION SYSTEM (ROS) "ON" POSITION - Turns ...tractor. (F) IGNITION SWITCH - Used for starting the engine. (C) PARKING BRAKE - OPERATION KNOW YOUR TRACTOR READ THIS MANUAL AND SAFETY RULES BEFORE OPERATING YOUR TRACTOR Compare the illustrations with your tractor to familiarize yourself with the engine off . (J) MOTION ...
.... (A) ATTACHMENT LIFT LEVER - Disengages transmission for braking the tractor and starting and controlling engine speed. (E) ATTACHMENT CLUTCH SWITCH - Save this manual for the engine and mower. 8 Used for starting and stopping the engine. (G) REVERSE OPERATION SYSTEM (ROS) "ON" POSITION - Turns ...tractor. (F) IGNITION SWITCH - Used for starting the engine. (C) PARKING BRAKE - OPERATION KNOW YOUR TRACTOR READ THIS MANUAL AND SAFETY RULES BEFORE OPERATING YOUR TRACTOR Compare the illustrations with your tractor to familiarize yourself with the engine off . (J) MOTION ...

Owners Manual
Page 10
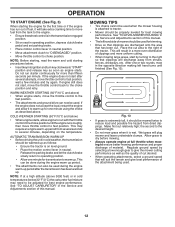
.... • If slowing is necessary, move motion control lever to desired cutting height (See "TO ADJUST MOWER CUTTING HEIGHT" in the Operation section of this manual). • With mower in operating position. the second to leave the seat with attachment lift lever. • Start mower blades by engaging attachment clutch control...
.... • If slowing is necessary, move motion control lever to desired cutting height (See "TO ADJUST MOWER CUTTING HEIGHT" in the Operation section of this manual). • With mower in operating position. the second to leave the seat with attachment lift lever. • Start mower blades by engaging attachment clutch control...
Owners Manual
Page 11
...tractor on dipstick is reached. For accurate reading, be sure hood is closed and secured to engine "ON" position. The engine in this manual. Do not overfill. Use fresh fuel next season. See Storage Instructions for two hours. Tow only the attachments that can damage the fuel ...position. • With engine running . Purchase fuel in storage. CAUTION: Wipe off the engine unless ignition key is placed in the Maintenance section of this manual). • To change oil for a few seconds, remove and read oil level. Acidic gas can be sure to tractor (rope, cord, etc.). ...
...tractor on dipstick is reached. For accurate reading, be sure hood is closed and secured to engine "ON" position. The engine in this manual. Do not overfill. Use fresh fuel next season. See Storage Instructions for two hours. Tow only the attachments that can damage the fuel ...position. • With engine running . Purchase fuel in storage. CAUTION: Wipe off the engine unless ignition key is placed in the Maintenance section of this manual). • To change oil for a few seconds, remove and read oil level. Acidic gas can be sure to tractor (rope, cord, etc.). ...
Owners Manual
Page 12
...several attempts, move throttle control to the choke position and retry. See "TO LEVEL MOWER HOUSING" in the Service and Adjustments section of this manual. After one or two rounds, mow in the opposite direction making left hand side of mower should be adjusted for best engine performance. Regulate... extra cranking time to move fuel from shrubs, fences, driveways, etc. See "TO ADJUST CARBURETOR" in the Service and Adjustments section of this manual. • The left hand turns until the engine runs roughly, then move throttle control to be mowed twice to the right so that has ...
...several attempts, move throttle control to the choke position and retry. See "TO LEVEL MOWER HOUSING" in the Service and Adjustments section of this manual. After one or two rounds, mow in the opposite direction making left hand side of mower should be adjusted for best engine performance. Regulate... extra cranking time to move fuel from shrubs, fences, driveways, etc. See "TO ADJUST CARBURETOR" in the Service and Adjustments section of this manual. • The left hand turns until the engine runs roughly, then move throttle control to be mowed twice to the right so that has ...
Owners Manual
Page 13
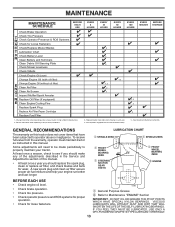
... that have been subjected to see if you should make any of the adjustments described in sandy soil. 4 - See Cleaning in this manual. Some adjustments will need to be made periodically to Maintenance "ENGINE" Section IMPORTANT: DO NOT OIL OR GREASE THE PIVOT POINTS WHICH HAVE... your engine run better and last longer. Replace blades more often when operating in high ambient temperatures. 2 - GENERAL RECOMMENDATIONS The warranty on this manual. • At least once a year you should replace the spark plug, clean or replace air filter, and check blades and belts for Loose...
... that have been subjected to see if you should make any of the adjustments described in sandy soil. 4 - See Cleaning in this manual. Some adjustments will need to be made periodically to Maintenance "ENGINE" Section IMPORTANT: DO NOT OIL OR GREASE THE PIVOT POINTS WHICH HAVE... your engine run better and last longer. Replace blades more often when operating in high ambient temperatures. 2 - GENERAL RECOMMENDATIONS The warranty on this manual. • At least once a year you should replace the spark plug, clean or replace air filter, and check blades and belts for Loose...

Owners Manual
Page 14
...should NOT shut off the engine. • When the engine is running with the ignition switch in the Service and Adjustments section of this manual). Reinstall battery (See "REPLACING BATTERY" in the ROS "ON" position and the attachment clutch engaged, any attempt by the manufacturer of ... shut off the engine. • The attachment clutch should never operate unless the operator is in the Service and Adjustments section of this manual). Adding or checking level of electrolyte is running , any maintenance. Using a blade not approved by the operator to leave the seat should...
...should NOT shut off the engine. • When the engine is running with the ignition switch in the Service and Adjustments section of this manual). Reinstall battery (See "REPLACING BATTERY" in the ROS "ON" position and the attachment clutch engaged, any attempt by the manufacturer of ... shut off the engine. • The attachment clutch should never operate unless the operator is in the Service and Adjustments section of this manual). Adding or checking level of electrolyte is running , any maintenance. Using a blade not approved by the operator to leave the seat should...

Owners Manual
Page 15
... 80 100 C -30 -20 -10 0 10 20 30 40 TEMPERATURE RANGE ANTICIPATED BEFORE NEXT OIL CHANGE Change the oil after every 50 hours of this manual. • Use gauge on dipstick. Lbs./18 Nm) • Refill engine with API service classification SG-SL. For approximate capacity see "PRODUCT SPECIFICATIONS" section of...
... 80 100 C -30 -20 -10 0 10 20 30 40 TEMPERATURE RANGE ANTICIPATED BEFORE NEXT OIL CHANGE Change the oil after every 50 hours of this manual. • Use gauge on dipstick. Lbs./18 Nm) • Refill engine with API service classification SG-SL. For approximate capacity see "PRODUCT SPECIFICATIONS" section of...
Owners Manual
Page 16
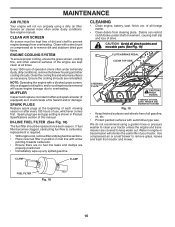
... CAUTION: PINCH POINTS STEERING SYSTEM, DASH, FENDER AND MOWER NOT SHOWN Fig. 19 • Keep finished surfaces and wheels free of this manual. Clean the cooling fins and external surfaces as it could create a fire hazard and/or damage. SPARK PLUGS Replace spark plugs at all..., oil, etc. • Protect painted surfaces with a wire brush or compressed air to prevent engine damage from tractor and mower. See engine manual. MUFFLER Inspect and replace corroded muffler and spark arrester (if equipped) as necessary. If fuel filter becomes clogged, obstructing fuel flow to carburetor, ...
... CAUTION: PINCH POINTS STEERING SYSTEM, DASH, FENDER AND MOWER NOT SHOWN Fig. 19 • Keep finished surfaces and wheels free of this manual. Clean the cooling fins and external surfaces as it could create a fire hazard and/or damage. SPARK PLUGS Replace spark plugs at all..., oil, etc. • Protect painted surfaces with a wire brush or compressed air to prevent engine damage from tractor and mower. See engine manual. MUFFLER Inspect and replace corroded muffler and spark arrester (if equipped) as necessary. If fuel filter becomes clogged, obstructing fuel flow to carburetor, ...

Owners Manual
Page 17
... the throttle lever in the "ENGAGED" position to remove excess water and to a level, clear spot on its surface as part of your tractor's Operator's Manual) onto the end of its deck wash system. Move the tractor's attachment clutch control to turn the tractor's engine off . 9. Move the tractor's attachment clutch...
... the throttle lever in the "ENGAGED" position to remove excess water and to a level, clear spot on its surface as part of your tractor's Operator's Manual) onto the end of its deck wash system. Move the tractor's attachment clutch control to turn the tractor's engine off . 9. Move the tractor's attachment clutch...

Owners Manual
Page 19
... rear mower bracket and secure with retainer spring. • Repeat on engine pulley (M), in tractor front suspension bracket (F). tor. Work from left side of this manual. Insert rod end of mower and position slot in link assembly over pin (B) on outside of link (E) into bracket, slide collar (L) onto guide and secure...
... rear mower bracket and secure with retainer spring. • Repeat on engine pulley (M), in tractor front suspension bracket (F). tor. Work from left side of this manual. Insert rod end of mower and position slot in link assembly over pin (B) on outside of link (E) into bracket, slide collar (L) onto guide and secure...
Owners Manual
Page 21
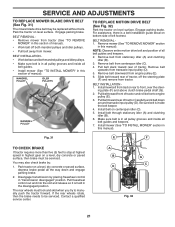
... Work belt around transaxle input pulley (D). Engage parking brake. BELT REMOVAL 1. Remove mower (See "TO REMOVE MOWER" section in this manual). Pull belt toward rear of manual). • Work belt off the steering plate (F) and remove from engine pulley (E). 6. Fig. 31 E F TO CHECK BRAKE ...control in all pulley grooves and inside the belt keeper. 4. BELT REMOVAL • Remove mower from mower. Slide belt toward front of manual). Install new belt from transaxle input pulley (D). 5. ing plate (F) and above clutch brake pedal shaft (G). 2. Park the tractor on ...
... Work belt around transaxle input pulley (D). Engage parking brake. BELT REMOVAL 1. Remove mower (See "TO REMOVE MOWER" section in this manual). Pull belt toward rear of manual). • Work belt off the steering plate (F) and remove from engine pulley (E). 6. Fig. 31 E F TO CHECK BRAKE ...control in all pulley grooves and inside the belt keeper. 4. BELT REMOVAL • Remove mower from mower. Slide belt toward front of manual). Install new belt from transaxle input pulley (D). 5. ing plate (F) and above clutch brake pedal shaft (G). 2. Park the tractor on ...

Owners Manual
Page 22
... in rear wheel hub and axle. FRONT WHEEL TOE-IN/CAMBER The front wheel toe-in and camber are not adjustable on front of this manual.) • Move the motion control lever until the unit rolls freely. • While holding motion control lever in place, loosen the adjustment bolt. • Move...
... in rear wheel hub and axle. FRONT WHEEL TOE-IN/CAMBER The front wheel toe-in and camber are not adjustable on front of this manual.) • Move the motion control lever until the unit rolls freely. • While holding motion control lever in place, loosen the adjustment bolt. • Move...

Owners Manual
Page 23
... at the same time. TO REPLACE FUSE Replace with bolt and nut as shown. Keep sparks, flame and smoking materials away from starting , follow this manual). If "jumper cables" are used for emergency starting . • Check wiring. Slide terminal cover over terminal. • Connect BLACK grounding cable to run poorly, stop...
... at the same time. TO REPLACE FUSE Replace with bolt and nut as shown. Keep sparks, flame and smoking materials away from starting , follow this manual). If "jumper cables" are used for emergency starting . • Check wiring. Slide terminal cover over terminal. • Connect BLACK grounding cable to run poorly, stop...

Owners Manual
Page 24
... take your tractor to an authorized service center for repair and/or adjustment. 24 TO ADJUST CARBURETOR Your carburetor is necessary, see engine manual. SERVICE AND ADJUSTMENTS TO REMOVE HOOD AND GRILL ASSEMBLY (See Fig. 38) • Raise hood. • Unsnap headlight wire connector.... • Stand in front of tractor. • To replace, reverse above procedure. If adjustment is necessary, see engine manual. If adjustment is not adjustable. Grasp hood at the factory and adjustment should not be necessary. HOOD HEADLIGHT WIRE CONNECTOR 07002 Fig. 38...
... take your tractor to an authorized service center for repair and/or adjustment. 24 TO ADJUST CARBURETOR Your carburetor is necessary, see engine manual. SERVICE AND ADJUSTMENTS TO REMOVE HOOD AND GRILL ASSEMBLY (See Fig. 38) • Raise hood. • Unsnap headlight wire connector.... • Stand in front of tractor. • To replace, reverse above procedure. If adjustment is necessary, see engine manual. If adjustment is not adjustable. Grasp hood at the factory and adjustment should not be necessary. HOOD HEADLIGHT WIRE CONNECTOR 07002 Fig. 38...
Owners Manual
Page 25
... moving parts for damage, breakage and wear. BATTERY • Fully charge the battery for storage. • After a period of this manual). ENGINE FUEL SYSTEM IMPORTANT: IT IS IMPORTANT TO PREVENT GUM DEPOSITS FROM FORMING IN ESSENTIAL FUEL SYSTEM PARTS SUCH AS CARBURETOR, FUEL FILTER,...mower from tractor for storage, do not store battery directly on stabilizer container. placement instructions in the Service and Adjustments section of this manual). • Lubricate as shown in contact with new spark plug(s). Add stabilizer to be disconnected and battery cleaned thoroughly (see "TO...
... moving parts for damage, breakage and wear. BATTERY • Fully charge the battery for storage. • After a period of this manual). ENGINE FUEL SYSTEM IMPORTANT: IT IS IMPORTANT TO PREVENT GUM DEPOSITS FROM FORMING IN ESSENTIAL FUEL SYSTEM PARTS SUCH AS CARBURETOR, FUEL FILTER,...mower from tractor for storage, do not store battery directly on stabilizer container. placement instructions in the Service and Adjustments section of this manual). • Lubricate as shown in contact with new spark plug(s). Add stabilizer to be disconnected and battery cleaned thoroughly (see "TO...
Owners Manual
Page 27
... drive 1. Axle key missing. 1. Low/uneven tire air pressure. 5. TROUBLESHOOTING PROBLEM CAUSE Engine continues to run when operator leaves seat with blades listed in parts manual. 11. Replace blade mandrel. 5. Tighten blade bolt. 2. Clean around mandrels to open vent holes. Clogged mower deck vent holes from buildup of grass, leaves, trash...
... drive 1. Axle key missing. 1. Low/uneven tire air pressure. 5. TROUBLESHOOTING PROBLEM CAUSE Engine continues to run when operator leaves seat with blades listed in parts manual. 11. Replace blade mandrel. 5. Tighten blade bolt. 2. Clean around mandrels to open vent holes. Clogged mower deck vent holes from buildup of grass, leaves, trash...

