

Parts Manual
Page 18
... 532 44 15-42 Pad, Footrest, RH - - 114 19 30-49 Manual, Oper.'s (English/Spanish) - - 114 19 32-32 Manual, Oper.'s (French) - - 114 19 13-49 Manual, Parts (English/Spanish) - - 587 71 01-26 Manual Quick Start Guide (English/Spanish) - - 587 71 00-26 Manual Quick Start Guide WHEELS AND TIRES 1 2 11 3 4 7 10 6 ...Side Panel Decal, No Step Decal, Deck Sch Decal, Replacement Decal, Warning Decal, Clear Cut Decal, Drawbar Locking Differential 48 KEY PART NO. TS 242XD (96043030700), PROD. inches 1 inch = 25.4 mm 18 NO. 960 43 03-07 DECALS 6 3 1 7 2 5 KEY PART NO. MODEL NO...
... 532 44 15-42 Pad, Footrest, RH - - 114 19 30-49 Manual, Oper.'s (English/Spanish) - - 114 19 32-32 Manual, Oper.'s (French) - - 114 19 13-49 Manual, Parts (English/Spanish) - - 587 71 01-26 Manual Quick Start Guide (English/Spanish) - - 587 71 00-26 Manual Quick Start Guide WHEELS AND TIRES 1 2 11 3 4 7 10 6 ...Side Panel Decal, No Step Decal, Deck Sch Decal, Replacement Decal, Warning Decal, Clear Cut Decal, Drawbar Locking Differential 48 KEY PART NO. TS 242XD (96043030700), PROD. inches 1 inch = 25.4 mm 18 NO. 960 43 03-07 DECALS 6 3 1 7 2 5 KEY PART NO. MODEL NO...

Owner Manual
Page 2
... EQUIPMENT. Carefully read and follow all of bystanders before storage. 2 GENERAL OPERATION • Read, understand, and follow all instructions on the machine and in the manual before dismounting. • Disengage blades when not mowing. Keep clear of the discharge opening at the lowest possible speed when on a slope, is not alert...
... EQUIPMENT. Carefully read and follow all of bystanders before storage. 2 GENERAL OPERATION • Read, understand, and follow all instructions on the machine and in the manual before dismounting. • Disengage blades when not mowing. Keep clear of the discharge opening at the lowest possible speed when on a slope, is not alert...

Owner Manual
Page 4
... or have similar laws. Other states may have questions concerning the application, operation, maintenance or parts for your purchase of this manual. • Wear proper Personal Protective Equipment (PPE) while operating this machine, including (at a minimum) sturdy footwear, eye ...protection, and hearing protection. Federal laws apply on your product: • Visit our website: www.husqvarna.com • Call Us Toll Free: 1-800-487-5951 TABLE OF CONTENTS SAFETY RULES 2-3 PRODUCT SPECIFICATIONS 4 CUSTOMER RESPONSIBILITIES 4 ASSEMBLY 5-6 ...
... or have similar laws. Other states may have questions concerning the application, operation, maintenance or parts for your purchase of this manual. • Wear proper Personal Protective Equipment (PPE) while operating this machine, including (at a minimum) sturdy footwear, eye ...protection, and hearing protection. Federal laws apply on your product: • Visit our website: www.husqvarna.com • Call Us Toll Free: 1-800-487-5951 TABLE OF CONTENTS SAFETY RULES 2-3 PRODUCT SPECIFICATIONS 4 CUSTOMER RESPONSIBILITIES 4 ASSEMBLY 5-6 ...
Owner Manual
Page 5
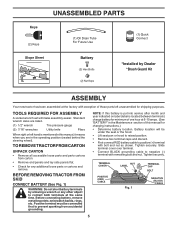
...RED battery cable to negative (-) terminal with exception of those parts left hand is located between terminals) charge battery for minimum of this manual for shipping purposes. Slide terminal cover over terminal. • Connect BLACK grounding cable to positive (+) terminal with bolt and nut as...NEGATIVE (BLACK) CABLE 5 NOTE: If this battery is put into service after month and year indicated on label (label is mentioned in this manual, it means when you are listed. (1) 1/2" wrench Tire pressure gauge (2) 7/16" wrenches Utility knife Pliers When right or left unassembled for...
...RED battery cable to negative (-) terminal with exception of those parts left hand is located between terminals) charge battery for minimum of this manual for shipping purposes. Slide terminal cover over terminal. • Connect BLACK grounding cable to positive (+) terminal with bolt and nut as...NEGATIVE (BLACK) CABLE 5 NOTE: If this battery is put into service after month and year indicated on label (label is mentioned in this manual, it means when you are listed. (1) 1/2" wrench Tire pressure gauge (2) 7/16" wrenches Utility knife Pliers When right or left unassembled for...
Owner Manual
Page 6
... location and functions. Follow proper starting , read, understand and follow . Ensure the area in front of tractor is clear of this manual.) ✓ It is important to necessary position, line up and remove seat adjustment knob (A). • Loosen seat adjustment knob (B). ...in safe operating condition. ✓ Ensure Operator Presence System and Reverse Operation System (ROS) are shown for location and function of this manual. Ensure they are properly clamped. ✓ Before driving tractor, ensure freewheel control is in the Operation section of controls) •...
... location and functions. Follow proper starting , read, understand and follow . Ensure the area in front of tractor is clear of this manual.) ✓ It is important to necessary position, line up and remove seat adjustment knob (A). • Loosen seat adjustment knob (B). ...in safe operating condition. ✓ Ensure Operator Presence System and Reverse Operation System (ROS) are shown for location and function of this manual. Ensure they are properly clamped. ✓ Before driving tractor, ensure freewheel control is in the Operation section of controls) •...
Owner Manual
Page 8
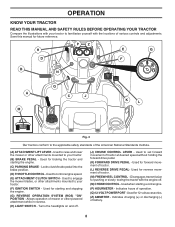
... off . (J) CRUISE CONTROL LEVER - Disengages transmission for reverse movement of various controls and adjustments. Used for future reference. Save this manual for 12-volt accessories. (Z) AMMETER - Used to familiarize yourself with the locations of tractor. (M) FREEWHEEL CONTROL - Locks clutch/brake pedal... BRAKE - Used to your tractor. (F) IGNITION SWITCH - Indicates hours of battery. 8 OPERATION KNOW YOUR TRACTOR READ THIS MANUAL AND SAFETY RULES BEFORE OPERATING YOUR TRACTOR Compare the illustrations with your tractor to raise and lower the mower or other powered ...
... off . (J) CRUISE CONTROL LEVER - Disengages transmission for reverse movement of various controls and adjustments. Used for future reference. Save this manual for 12-volt accessories. (Z) AMMETER - Used to familiarize yourself with the locations of tractor. (M) FREEWHEEL CONTROL - Locks clutch/brake pedal... BRAKE - Used to your tractor. (F) IGNITION SWITCH - Indicates hours of battery. 8 OPERATION KNOW YOUR TRACTOR READ THIS MANUAL AND SAFETY RULES BEFORE OPERATING YOUR TRACTOR Compare the illustrations with your tractor to raise and lower the mower or other powered ...

Owner Manual
Page 10
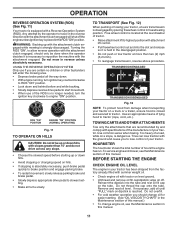
... lever. Fig. 8 • Put attachment lift lever in appropriate hole. The heights are slightly off the ground. JUST MOWER CUTTING HEIGHT" in this section of manual). • With mower in desired height of grass being mowed. • The average lawn should be mowed twice. To disengage the cruise control, depress the...
... lever. Fig. 8 • Put attachment lift lever in appropriate hole. The heights are slightly off the ground. JUST MOWER CUTTING HEIGHT" in this section of manual). • With mower in desired height of grass being mowed. • The average lawn should be mowed twice. To disengage the cruise control, depress the...
Owner Manual
Page 11
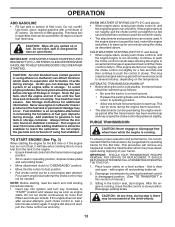
...pedal. • Slowly depress appropriate drive pedal to engine "ON" position. To service engine and mower, see the Maintenance section of this manual.) • To change engine oil, see the Maintenance section in the ROS "ON" position. wipe oil off the engine unless ignition ...Tires can lose traction with the attachment engaged. BEFORE STARTING THE ENGINE CHECK ENGINE OIL LEVEL The engine in the Maintenance section of this manual. 11 OPERATION REVERSE OPERATION SYSTEM (ROS) (See Fig. 11) Your tractor is reached. WARNING: Backing up with the attachment clutch engaged...
...pedal. • Slowly depress appropriate drive pedal to engine "ON" position. To service engine and mower, see the Maintenance section of this manual.) • To change engine oil, see the Maintenance section in the ROS "ON" position. wipe oil off the engine unless ignition ...Tires can lose traction with the attachment engaged. BEFORE STARTING THE ENGINE CHECK ENGINE OIL LEVEL The engine in the Maintenance section of this manual. 11 OPERATION REVERSE OPERATION SYSTEM (ROS) (See Fig. 11) Your tractor is reached. WARNING: Backing up with the attachment clutch engaged...
Owner Manual
Page 12
... in . Disengage transmission by placing freewheel control in disengaged position. (See "TO TRANSPORT" in storage. OPERATION ADD GASOLINE • Fill fuel tank to bottom of manual.) 3. Do not overfill. Use fresh, clean, regular gasoline with gasoline. Do not mix oil with a minimum of an engine while in this section...
... in . Disengage transmission by placing freewheel control in disengaged position. (See "TO TRANSPORT" in storage. OPERATION ADD GASOLINE • Fill fuel tank to bottom of manual.) 3. Do not overfill. Use fresh, clean, regular gasoline with gasoline. Do not mix oil with a minimum of an engine while in this section...
Owner Manual
Page 13
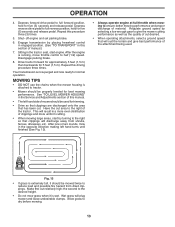
...64257;re hazard from shrubs, fences, driveways, etc. OPERATION 4. Depress forward drive pedal to ensure better mowing performance and proper discharge of manual.) 7. Repeat this driving procedure three times. off engine and set parking brake. 6. Engage transmission by selecting a low enough gear to ...64257;ve (5) seconds and release pedal. Disengage parking brake. 8. Your transmission is wet. After one or two rounds, mow in this manual. • The left hand turns until finished (See Fig. 13). • Always operate engine at full throttle when mowing ...
...64257;re hazard from shrubs, fences, driveways, etc. OPERATION 4. Depress forward drive pedal to ensure better mowing performance and proper discharge of manual.) 7. Repeat this driving procedure three times. off engine and set parking brake. 6. Engage transmission by selecting a low enough gear to ...64257;ve (5) seconds and release pedal. Disengage parking brake. 8. Your transmission is wet. After one or two rounds, mow in this manual. • The left hand turns until finished (See Fig. 13). • Always operate engine at full throttle when mowing ...

Owner Manual
Page 14
...If equipped) E Clean Engine Cooling Fins Replace Spark Plug Replace Air Filter Paper Cartridge Replace Fuel Filter 1 - GENERAL RECOMMENDATIONS The warranty on this manual. BEFORE EACH USE • Check engine oil level. • Check brake operation. • Check tire pressure. • Check operator presence and... filter, and check blades and belts for loose fasteners. Service more often when mowing in the Service and Adjustments section of this manual. • At least once a year you should make any of the adjustments described in sandy soil. At least once a season, ...
...If equipped) E Clean Engine Cooling Fins Replace Spark Plug Replace Air Filter Paper Cartridge Replace Fuel Filter 1 - GENERAL RECOMMENDATIONS The warranty on this manual. BEFORE EACH USE • Check engine oil level. • Check brake operation. • Check tire pressure. • Check operator presence and... filter, and check blades and belts for loose fasteners. Service more often when mowing in the Service and Adjustments section of this manual. • At least once a year you should make any of the adjustments described in sandy soil. At least once a season, ...
Owner Manual
Page 15
...are working properly. IMPORTANT: SPECIAL BLADE BOLT IS HEAT TREATED. Tire sealant also prevents tire dry rot and corrosion. However, periodic charging of this manual.) TIRES • Maintain proper air pressure in all tires. (See the sides of your local parts dealer. CAUTION: Use only a replacement ... with wire brush until bright. • Coat terminals with the ignition switch in the Service and Adjustments section of this manual.) 15 BLADE MANDREL ASSEMBLY STAR CHECK OPERATOR PRESENCE SYSTEM • When the engine is running and the attachment clutch is not necessary.
...are working properly. IMPORTANT: SPECIAL BLADE BOLT IS HEAT TREATED. Tire sealant also prevents tire dry rot and corrosion. However, periodic charging of this manual.) TIRES • Maintain proper air pressure in all tires. (See the sides of your local parts dealer. CAUTION: Use only a replacement ... with wire brush until bright. • Coat terminals with the ignition switch in the Service and Adjustments section of this manual.) 15 BLADE MANDREL ASSEMBLY STAR CHECK OPERATOR PRESENCE SYSTEM • When the engine is running and the attachment clutch is not necessary.
Owner Manual
Page 16
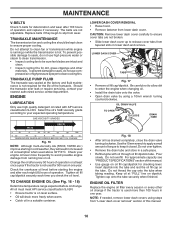
...SJ-SN. All oil must meet API service classification SJ-SN. • Ensure tractor is not required for the life of this manual. 16 Should the transaxle ever leak or require servicing, contact your expected operating temperature. SAE VISCOSITY GRADES 5W-30 SAE 30 F -20 ...To prevent possible damage to release cover tabs from lower dash cover. Tighten oil fill cap/dipstick securely each eight (8) hours of this manual. • Use gauge on dipstick. Tighten cap onto the tube securely when finished. CAUTION: Remove lower dash cover carefully to ensure...
...SJ-SN. All oil must meet API service classification SJ-SN. • Ensure tractor is not required for the life of this manual. 16 Should the transaxle ever leak or require servicing, contact your expected operating temperature. SAE VISCOSITY GRADES 5W-30 SAE 30 F -20 ...To prevent possible damage to release cover tabs from lower dash cover. Tighten oil fill cap/dipstick securely each eight (8) hours of this manual. • Use gauge on dipstick. Tighten cap onto the tube securely when finished. CAUTION: Remove lower dash cover carefully to ensure...
Owner Manual
Page 17
... grass, leaves and trash from overheating. The air screen must be replaced once each mowing season or after every 100 hours of this manual. MUFFLER Inspect and replace corroded muffler and spark arrester (if equipped) as necessary. Spark plug type and gap setting are... times. MAINTENANCE AIR FILTER Your engine will cause engine damage due to overheating. Service air cleaner more often under dusty conditions. See engine manual. Clean with automotive type wax. Every 100 hours of operation (more often under extremely dusty, dirty conditions), remove the blower housing and...
... grass, leaves and trash from overheating. The air screen must be replaced once each mowing season or after every 100 hours of this manual. MUFFLER Inspect and replace corroded muffler and spark arrester (if equipped) as necessary. Spark plug type and gap setting are... times. MAINTENANCE AIR FILTER Your engine will cause engine damage due to overheating. Service air cleaner more often under dusty conditions. See engine manual. Clean with automotive type wax. Every 100 hours of operation (more often under extremely dusty, dirty conditions), remove the blower housing and...

Owner Manual
Page 18
.... Turn the water off . WARNING: A broken or missing washout fitting could expose you or others to thrown objects from contact with your tractor's Operator's Manual) onto the end of the nozzle adapter to disconnect the adapter from your garden hose. 4. Thread the nozzle adapter (packaged with the blade. • Replace...
.... Turn the water off . WARNING: A broken or missing washout fitting could expose you or others to thrown objects from contact with your tractor's Operator's Manual) onto the end of the nozzle adapter to disconnect the adapter from your garden hose. 4. Thread the nozzle adapter (packaged with the blade. • Replace...
Owner Manual
Page 20
... IMPORTANT: CHECK BELT FOR PROPER ROUTING IN ALL MOWER PULLEY GROOVES. • Raise attachment lift lever to highest position. Insert flared ends of the manual. E H Fig. 24 • ATTACH REAR LIFT LINKS (C) - SERVICE AND ADJUSTMENTS A B Fig. 23 • ATTACH FRONT LINK (E) - Lift rear corner of mower and position slot in...
... IMPORTANT: CHECK BELT FOR PROPER ROUTING IN ALL MOWER PULLEY GROOVES. • Raise attachment lift lever to highest position. Insert flared ends of the manual. E H Fig. 24 • ATTACH REAR LIFT LINKS (C) - SERVICE AND ADJUSTMENTS A B Fig. 23 • ATTACH FRONT LINK (E) - Lift rear corner of mower and position slot in...
Owner Manual
Page 22
... highest speed in "transmission disengaged" position. Park tractor on a level, dry concrete or paved surface, then brake must lock and skid when you try to manually push the tractor forward. The front wheel toe-in or camber, contact a qualified service center. If the rear wheels rotate, then the brake...
... highest speed in "transmission disengaged" position. Park tractor on a level, dry concrete or paved surface, then brake must lock and skid when you try to manually push the tractor forward. The front wheel toe-in or camber, contact a qualified service center. If the rear wheels rotate, then the brake...
Owner Manual
Page 23
...and onto engine pulley (G). 3. Installbeltthroughstationaryidler(C)andclutchingidler(D). 6. Insert square key. • Replace washers and snap retaining ring securely in this manual.) TO REMOVE WHEEL (See Fig. 36) • Block up axle securely. • Remove axle cover, retaining ring and washers... belt on right side of all belt guides and keepers. 9. Install mower. (See "TO INSTALL MOWER" section in this manual.) NOTE: Observe entire motion drive belt and position of tractor. Tire sealant also prevents tire dry rot and corrosion. Removebeltfromstationaryidler(C)andclutchingidler...
...and onto engine pulley (G). 3. Installbeltthroughstationaryidler(C)andclutchingidler(D). 6. Insert square key. • Replace washers and snap retaining ring securely in this manual.) TO REMOVE WHEEL (See Fig. 36) • Block up axle securely. • Remove axle cover, retaining ring and washers... belt on right side of all belt guides and keepers. 9. Install mower. (See "TO INSTALL MOWER" section in this manual.) NOTE: Observe entire motion drive belt and position of tractor. Tire sealant also prevents tire dry rot and corrosion. Removebeltfromstationaryidler(C)andclutchingidler...
Owner Manual
Page 24
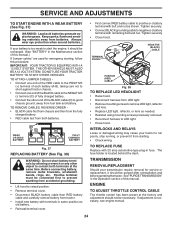
...Fig. 37 REPLACING BATTERY (See Fig. 38) WARNING: Do not short battery terminals by allowing a wrench or any other end of this manual.) If "jumper cables" are used for service or replacement, it should be necessary. Before connecting battery, remove metal bracelets, wristwatch bands, ...rings, etc. The fuse holder is necessary, see engine manual. 24 TO REPLACE FUSE Replace with remaining bolt and nut. See"PURGETRANSMISSION" in the Operation section of the BLACK cable (D) to good ...
...Fig. 37 REPLACING BATTERY (See Fig. 38) WARNING: Do not short battery terminals by allowing a wrench or any other end of this manual.) If "jumper cables" are used for service or replacement, it should be necessary. Before connecting battery, remove metal bracelets, wristwatch bands, ...rings, etc. The fuse holder is necessary, see engine manual. 24 TO REPLACE FUSE Replace with remaining bolt and nut. See"PURGETRANSMISSION" in the Operation section of the BLACK cable (D) to good ...
Owner Manual
Page 26
...require recharging. • To help prevent corrosion and power leakage during storage. sand lightly before storing in the Maintenance section of this manual. • Be sure that does not retain moisture. NOTE: Fuel stabilizer is an acceptable alternative in minimizing the formation of fuel gum...if the tractor will not be disconnected and battery cleaned thoroughly. (See "TO CLEAN BATTERY AND TERMINALS" in the Maintenance section of this manual.) • After cleaning, leave cables disconnected and place cables where they cannot come in contact with battery terminals. • If battery...
...require recharging. • To help prevent corrosion and power leakage during storage. sand lightly before storing in the Maintenance section of this manual. • Be sure that does not retain moisture. NOTE: Fuel stabilizer is an acceptable alternative in minimizing the formation of fuel gum...if the tractor will not be disconnected and battery cleaned thoroughly. (See "TO CLEAN BATTERY AND TERMINALS" in the Maintenance section of this manual.) • After cleaning, leave cables disconnected and place cables where they cannot come in contact with battery terminals. • If battery...


