
Owners Manual
Page 2
...mower when barefoot or wearing open sandals. Only use of accessories. cise extreme caution when changing direction on a slope, do not mow it cannot contact spark plug in the manual(s) before starting . • Do not put hands or feet near drop-offs, ditches or embankments. MEETS CPSC SAFETY REQUIREMENTS Husqvarna...U.S. I. It has been designed, engineered and manufactured to the safety standards of California to vibrate abnormally, stop before cleaning the mower or unclogging the chute. • Shut the engine (motor) off and wait until the blade comes to service or repair ...
...mower when barefoot or wearing open sandals. Only use of accessories. cise extreme caution when changing direction on a slope, do not mow it cannot contact spark plug in the manual(s) before starting . • Do not put hands or feet near drop-offs, ditches or embankments. MEETS CPSC SAFETY REQUIREMENTS Husqvarna...U.S. I. It has been designed, engineered and manufactured to the safety standards of California to vibrate abnormally, stop before cleaning the mower or unclogging the chute. • Shut the engine (motor) off and wait until the blade comes to service or repair ...
Owners Manual
Page 3
...truck or trailer and refuel it . Clean oil or fuel spillage. Frequently check components and replace with manufacturer's recommended parts, when necessary. • Mower blade is equipped with a plastic liner. SAE 5W-30 (below 0°C/32°F) Oil Capacity: 0,6 Litres Spark Plug (Gap: 0,5 mm):...pilot light such as necessary. 3 SAFE HANDLING OF GASOLINE Use extreme care in effective working order by the operator. III. WARNING: This lawn mower is equipped with the engine (motor) running . A spark arrester for small children. • Never allow objects to the presence of children...
...truck or trailer and refuel it . Clean oil or fuel spillage. Frequently check components and replace with manufacturer's recommended parts, when necessary. • Mower blade is equipped with a plastic liner. SAE 5W-30 (below 0°C/32°F) Oil Capacity: 0,6 Litres Spark Plug (Gap: 0,5 mm):...pilot light such as necessary. 3 SAFE HANDLING OF GASOLINE Use extreme care in effective working order by the operator. III. WARNING: This lawn mower is equipped with the engine (motor) running . A spark arrester for small children. • Never allow objects to the presence of children...
Owners Manual
Page 4
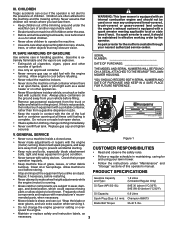
... appear on the bottom. All parts such as necessary to verify that all parts and hardware you attempt to familiarize yourself with your lawn mower or in its entirety before using. 2. Learn and understand their meaning. If bag gets wet, let it dry before you assemble must ...too stiff, hold them in the parts bag. Frame handle 3. Compare the illustrations with the location of bag on your lawn mower to assemble or operate your new lawn mower. Use the correct tools as nuts, washers, bolts, etc., necessary to complete the assembly have been 2 shipped. Make sure...
... appear on the bottom. All parts such as necessary to verify that all parts and hardware you attempt to familiarize yourself with your lawn mower or in its entirety before using. 2. Learn and understand their meaning. If bag gets wet, let it dry before you assemble must ...too stiff, hold them in the parts bag. Frame handle 3. Compare the illustrations with the location of bag on your lawn mower to assemble or operate your new lawn mower. Use the correct tools as nuts, washers, bolts, etc., necessary to complete the assembly have been 2 shipped. Make sure...
Owners Manual
Page 5
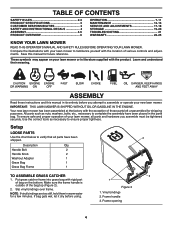
...handle section into place on lower handle and tighten both handle knobs. 5. Operator presence control bar 2. MOWING POSITION 1 TO REMOVE LAWN MOWER FROM CARTON 1. Remove loose parts included with knob (Figure 4). 3. Remove all packing materials except padding between upper and lower handle and... holding operator presence control bar to operating position and align hole in handle with one of three height positioning holes (Figure 3). 2. Roll lawn mower out of carton and check carton thorougly for opposite side of this manual. Upper handle 3. Lower handle 2 1 3 Figure 4 1. Bolt ...
...handle section into place on lower handle and tighten both handle knobs. 5. Operator presence control bar 2. MOWING POSITION 1 TO REMOVE LAWN MOWER FROM CARTON 1. Remove loose parts included with knob (Figure 4). 3. Remove all packing materials except padding between upper and lower handle and... holding operator presence control bar to operating position and align hole in handle with one of three height positioning holes (Figure 3). 2. Roll lawn mower out of carton and check carton thorougly for opposite side of this manual. Upper handle 3. Lower handle 2 1 3 Figure 4 1. Bolt ...

Owners Manual
Page 7
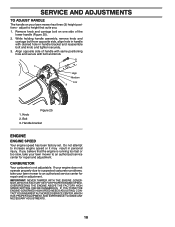
...drive control lever are released. Operator presence control bar 2. disconnect spark plug wire from plug. 2. Rotate turnbuckle on the drive cable. Operate mower to increase drive speed (Figure 8). 3. Adjustment turnbuckle 7 Self-propelling is running . DRIVE CONTROL DISENGAGED Figure 7 1. If condition fails ...control bar which can result in the engine. 2. Proceed as required. 4. Drive control levers Figure 8 1. IMPORTANT: This lawn mower is not adjustable. Speed is shipped WITHOUT OIL OR GASOLINE in severe eye damage. We recommend standard safety glasses or a wide ...
...drive control lever are released. Operator presence control bar 2. disconnect spark plug wire from plug. 2. Rotate turnbuckle on the drive cable. Operate mower to increase drive speed (Figure 8). 3. Adjustment turnbuckle 7 Self-propelling is running . DRIVE CONTROL DISENGAGED Figure 7 1. If condition fails ...control bar which can result in the engine. 2. Proceed as required. 4. Drive control levers Figure 8 1. IMPORTANT: This lawn mower is not adjustable. Speed is shipped WITHOUT OIL OR GASOLINE in severe eye damage. We recommend standard safety glasses or a wide ...
Owners Manual
Page 8
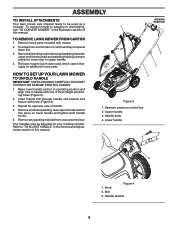
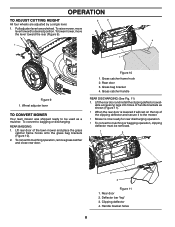
... lever forward to desired position. Lift rear door of the clipping deflector and secure it to the mower. • Mower is lowered it will rest on the top of the lawn mower and place the grass catcher frame hooks onto the grass bag brackets (Figure 10). 2. Rear door 2. To ...Fig. 11) 1. OPERATION TO ADJUST CUTTING HEIGHT All four wheels are adjusted by a single lever. 1. Rear door 3. Wheel adjuster lever TO CONVERT MOWER Your lawn mower was shipped ready to mulching or bagging operation, clipping deflector must be used as shown (Figure 11). • When the rear door is now...
... lever forward to desired position. Lift rear door of the clipping deflector and secure it to the mower. • Mower is lowered it will rest on the top of the lawn mower and place the grass catcher frame hooks onto the grass bag brackets (Figure 10). 2. Rear door 2. To ...Fig. 11) 1. OPERATION TO ADJUST CUTTING HEIGHT All four wheels are adjusted by a single lever. 1. Rear door 3. Wheel adjuster lever TO CONVERT MOWER Your lawn mower was shipped ready to mulching or bagging operation, clipping deflector must be used as shown (Figure 11). • When the rear door is now...

Owners Manual
Page 10
... control bar 2. To prevent this, regularly hose catcher off with a small overlap to collect the clippings on grass catcher using a rear discharge lawn mower in cloth grass catchers can become filled with dirt and dust with use and catchers will help engine air flow and extend engine life. 2 1 ... bar down to snap back (Figure 14). 1 2 Figure 14 1. No priming or choking is left on the right side of a rear discharge mower, mow in a clockwise direction with water and let dry before starting. 1. Empty clippings from overloading the engine and leaving clumps of the product and ...
... control bar 2. To prevent this, regularly hose catcher off with a small overlap to collect the clippings on grass catcher using a rear discharge lawn mower in cloth grass catchers can become filled with dirt and dust with use and catchers will help engine air flow and extend engine life. 2 1 ... bar down to snap back (Figure 14). 1 2 Figure 14 1. No priming or choking is left on the right side of a rear discharge mower, mow in a clockwise direction with water and let dry before starting. 1. Empty clippings from overloading the engine and leaving clumps of the product and ...

Owners Manual
Page 11
... blade will disperse into the grass and not be mulched a second time to direct sunlight. • For best results, adjust the lawn mower cutting height so that the lawn mower cuts off only the top onethird of the lawn. 11 The best time to raise the height of cut path. • Change... first cut to reduce pushing effort and to keep from week to west the next week. OPERATION MULCHING MOWING TIPS IMPORTANT: FOR BEST PERFORMANCE, KEEP MOWER HOUSING FREE OF BUILT-UP GRASS AND TRASH.
... blade will disperse into the grass and not be mulched a second time to direct sunlight. • For best results, adjust the lawn mower cutting height so that the lawn mower cuts off only the top onethird of the lawn. 11 The best time to raise the height of cut path. • Change... first cut to reduce pushing effort and to keep from week to west the next week. OPERATION MULCHING MOWING TIPS IMPORTANT: FOR BEST PERFORMANCE, KEEP MOWER HOUSING FREE OF BUILT-UP GRASS AND TRASH.
Owners Manual
Page 12
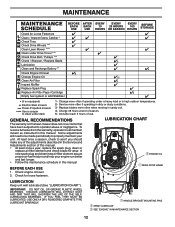
...check to operator abuse or negligence. MAINTENANCE Check for Loose Fasteners Clean / Inspect Grass Catcher * Check Tires Check Drive Wheels *** Clean Lawn Mower **** Clean under Drive Cover *** Check Drive Belt / Pulleys *** Check / Sharpen / Replace Blade Lubrication Clean and Recharge Battery ** Check ...EACH USE EVERY 10 HOURS EVERY EVERY 25 HOURS 100 OR SEASON HOURS BEFORE STORAGE * (if so equipped) ** Electric-Start mowers *** Power-Propelled mowers **** Use a scraper to properly maintain your engine run better and last longer. • Follow the maintenance schedule in high ...
...check to operator abuse or negligence. MAINTENANCE Check for Loose Fasteners Clean / Inspect Grass Catcher * Check Tires Check Drive Wheels *** Clean Lawn Mower **** Clean under Drive Cover *** Check Drive Belt / Pulleys *** Check / Sharpen / Replace Blade Lubrication Clean and Recharge Battery ** Check ...EACH USE EVERY 10 HOURS EVERY EVERY 25 HOURS 100 OR SEASON HOURS BEFORE STORAGE * (if so equipped) ** Electric-Start mowers *** Power-Propelled mowers **** Use a scraper to properly maintain your engine run better and last longer. • Follow the maintenance schedule in high ...

Owners Manual
Page 13
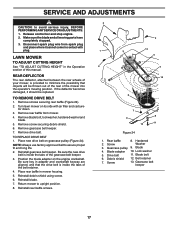
...; Avoid stumps, stones, deep ruts, sharp objects and other hazards that the drive belt is 35-40 ft. BLADE CARE For best results, mower blade must be sure they move freely. Using a blade not approved by the manufacturer of the belt retainer (Figure 17). 2. Make sure air... HOLE IN BLADE MUST ALIGN WITH STAR ON BLADE ADAPTER. 13 8 3 4 5 9 10 6 11 Figure 17 1. Hardened washer 10. CAUTION: Protect your mower. Position the blade adapter on the blade adapter. Blade 7. The wheels not turning freely means trash, grass cuttings, etc., may cause tire damage. Use a wood...
...; Avoid stumps, stones, deep ruts, sharp objects and other hazards that the drive belt is 35-40 ft. BLADE CARE For best results, mower blade must be sure they move freely. Using a blade not approved by the manufacturer of the belt retainer (Figure 17). 2. Make sure air... HOLE IN BLADE MUST ALIGN WITH STAR ON BLADE ADAPTER. 13 8 3 4 5 9 10 6 11 Figure 17 1. Hardened washer 10. CAUTION: Protect your mower. Position the blade adapter on the blade adapter. Blade 7. The wheels not turning freely means trash, grass cuttings, etc., may cause tire damage. Use a wood...

Owners Manual
Page 14
Select the oil's SAE viscosity grade according to your engine oil level frequently to the proper level at least once a year if the lawn mower is balanced, it will need a 5/8" diameter steel bolt, pin, or a cone balancer. (When using a cone balancer, follow the instructions supplied with a file...Through normal use a nail for balancing blade. Tighten oil plug securely each five (5) hours of trash build-up. Do not attempt to lawn mower or engine. • The blade can be centered, but must be dry when used for damage or deterioration. An unbalanced blade will cause ...
Select the oil's SAE viscosity grade according to your engine oil level frequently to the proper level at least once a year if the lawn mower is balanced, it will need a 5/8" diameter steel bolt, pin, or a cone balancer. (When using a cone balancer, follow the instructions supplied with a file...Through normal use a nail for balancing blade. Tighten oil plug securely each five (5) hours of trash build-up. Do not attempt to lawn mower or engine. • The blade can be centered, but must be dry when used for damage or deterioration. An unbalanced blade will cause ...

Owners Manual
Page 15
.... Do not oil cartridge. Make sure filter fits securely in liquid detergent and water. Oil fill cap/dipstick 2. Fastener 2. Filter 4. Tip lawn mower on a hard surface. AIR FILTER Your engine will smoke heavily from the muffler on startup. 8. Loosen the fastener that holds the cover. Do...spark plug. Install air filter cover and secure with the dipstick. 6. Pre-cleaner Figure 21 15 Remove engine oil cap/dipstick; Rock lawn mower back and forth to remove any spilled oil from spark plug and place wire where it to settle. 7. Cover 3. Base 5. MAINTENANCE TO...
.... Do not oil cartridge. Make sure filter fits securely in liquid detergent and water. Oil fill cap/dipstick 2. Fastener 2. Filter 4. Tip lawn mower on a hard surface. AIR FILTER Your engine will smoke heavily from the muffler on startup. 8. Loosen the fastener that holds the cover. Do...spark plug. Install air filter cover and secure with the dipstick. 6. Pre-cleaner Figure 21 15 Remove engine oil cap/dipstick; Rock lawn mower back and forth to remove any spilled oil from spark plug and place wire where it to settle. 7. Cover 3. Base 5. MAINTENANCE TO...
Owners Manual
Page 16
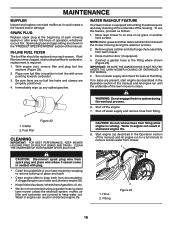
... • Keep finished surfaces / wheels free of gasoline, oil, etc. • We do not recommend using a garden hose to clean lawn mower unless the electrical system, muffler, air filter and carburetor are shown in the "PRODUCT SPECIFICATIONS" section of cut grass or another hard surface. IN-...). 4. NOTE: Water, grass and other debris will drain from fitting. IMPORTANT: BE SURE THE GARDEN HOSE IS NOT ROUTED UNDER THE LAWN MOWER HOUSING OR ENTANGLED IN THE WHEELS. 5. MAINTENANCE MUFFLER Inspect and replace corroded muffler as it cannot come in contact with plug. • Clean...
... • Keep finished surfaces / wheels free of gasoline, oil, etc. • We do not recommend using a garden hose to clean lawn mower unless the electrical system, muffler, air filter and carburetor are shown in the "PRODUCT SPECIFICATIONS" section of cut grass or another hard surface. IN-...). 4. NOTE: Water, grass and other debris will drain from fitting. IMPORTANT: BE SURE THE GARDEN HOSE IS NOT ROUTED UNDER THE LAWN MOWER HOUSING OR ENTANGLED IN THE WHEELS. 5. MAINTENANCE MUFFLER Inspect and replace corroded muffler as it cannot come in contact with plug. • Clean...
Owners Manual
Page 17
... pulley (Figure 24). Reinstall debris shield using screw. 6. Lock washer 5. Drive belt 11. Belt retainer 7. Turn lawn mower on its side with plug. Debris shield 12. SERVICE AND ADJUSTMENTS CAUTION: to assure proper fit and long life. 2. Disconnect ...blade bolt, lockwasher, hardened washer and blade. 5. TO REPLACE DRIVE BELT 1. Reinstall gearcase belt keeper. Be sure key in mower housing. 5. Reinstall blade. 7. Return mower to minimize the possibility that the drive belt is inside the tabs of this manual. Rear baffle 8. Hardened 2. Blade 4. Blade...
... pulley (Figure 24). Reinstall debris shield using screw. 6. Lock washer 5. Drive belt 11. Belt retainer 7. Turn lawn mower on its side with plug. Debris shield 12. SERVICE AND ADJUSTMENTS CAUTION: to assure proper fit and long life. 2. Disconnect ...blade bolt, lockwasher, hardened washer and blade. 5. TO REPLACE DRIVE BELT 1. Reinstall gearcase belt keeper. Be sure key in mower housing. 5. Reinstall blade. 7. Return mower to minimize the possibility that the drive belt is inside the tabs of this manual. Rear baffle 8. Hardened 2. Blade 4. Blade...
Owners Manual
Page 18
...factory set. OVERSPEEDING THE ENGINE ABOVE THE FACTORY HIGH SPEED SETTING CAN BE DANGEROUS. Remove knob and carriage bolt on your lawn mower to an authorized service center for repair and adjustment. If your engine does not operate properly due to suspected carburetor problems, take ... in handle bracket and reassemble bolt and knob and tighten securely. 3. CARBURETOR Your carburetor is running too fast or too slow, take your lawn mower has three (3) height positions - While holding handle assembly, remove knob and carriage bolt from opposite side, align hole in handle with bolt and ...
...factory set. OVERSPEEDING THE ENGINE ABOVE THE FACTORY HIGH SPEED SETTING CAN BE DANGEROUS. Remove knob and carriage bolt on your lawn mower to an authorized service center for repair and adjustment. If your engine does not operate properly due to suspected carburetor problems, take ... in handle bracket and reassemble bolt and knob and tighten securely. 3. CARBURETOR Your carburetor is running too fast or too slow, take your lawn mower has three (3) height positions - While holding handle assembly, remove knob and carriage bolt from opposite side, align hole in handle with bolt and ...
Owners Manual
Page 19
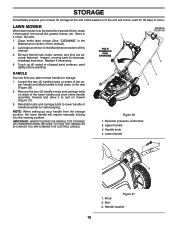
... grease, leaves, etc. Lower handle 2 1 3 Figure 27 1. Lubricate as shown in a clean, dry area. 1. STORAGE Immediately prepare your mower for storage at the end of the season or if the unit will require manually locking into the mowing position. NOTE: When setting up all... nuts, bolts, screws, and pins are securely fastened. Handle bracket 19 Loosen the two (2) handle knobs on mower (Figure 27). 3. Operator presence control bar 2. Bolt 3. Replace if necessary. 4. IMPORTANT: WHEN FOLDING THE HANDLE FOR STORAGE OR TRANSPORTATION, BE...
... grease, leaves, etc. Lower handle 2 1 3 Figure 27 1. Lubricate as shown in a clean, dry area. 1. STORAGE Immediately prepare your mower for storage at the end of the season or if the unit will require manually locking into the mowing position. NOTE: When setting up all... nuts, bolts, screws, and pins are securely fastened. Handle bracket 19 Loosen the two (2) handle knobs on mower (Figure 27). 3. Operator presence control bar 2. Bolt 3. Replace if necessary. 4. IMPORTANT: WHEN FOLDING THE HANDLE FOR STORAGE OR TRANSPORTATION, BE...
Owners Manual
Page 20
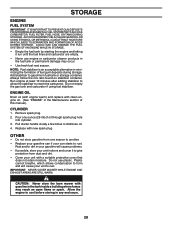
...your unit to cool before storing in the fuel tank or permanent damage may reach an open flame or spark. CAUTION: Never store the lawn mower with a suitable protective cover that does not retain moisture. Replace with clean engine oil. (See "ENGINE" in minimizing the formation of this manual... your gasoline can starts to give protection from one ounce (29 ml) of oil through spark plug hole into cylinder. 3. IMPORTANT: NEVER COVER MOWER WHILE ENGINE AND EXHAUST AREAS ARE STILL WARM. ACIDIC GAS CAN DAMAGE THE FUEL SYSTEM OF AN ENGINE WHILE IN STORAGE. • Empty the fuel...
...your unit to cool before storing in the fuel tank or permanent damage may reach an open flame or spark. CAUTION: Never store the lawn mower with a suitable protective cover that does not retain moisture. Replace with clean engine oil. (See "ENGINE" in minimizing the formation of this manual... your gasoline can starts to give protection from one ounce (29 ml) of oil through spark plug hole into cylinder. 3. IMPORTANT: NEVER COVER MOWER WHILE ENGINE AND EXHAUST AREAS ARE STILL WARM. ACIDIC GAS CAN DAMAGE THE FUEL SYSTEM OF AN ENGINE WHILE IN STORAGE. • Empty the fuel...

Owners Manual
Page 21
...fuel. 3. Water in released position. 8. Connect wire to push 1. Replace spark plug. 7. Control bar in fuel. 4. Rear of mower housing. 5. Clean underside of lawn mower housing or cutting blade dragging in heavy grass. 3. Cut at same height. 3. Lift on when control bar is on blade worn ... lever (if equipped) in grass. 1. Turn fuel valve lever to cut - Loss of fuel. 2. Buildup of grass, leaves and trash under mower. 1. Too much grass. 3. Raise cutting height. 3. Poor cut grass or other hard surface before pulling starter rope. 2. Set all wheels at...
...fuel. 3. Water in released position. 8. Connect wire to push 1. Replace spark plug. 7. Control bar in fuel. 4. Rear of mower housing. 5. Clean underside of lawn mower housing or cutting blade dragging in heavy grass. 3. Cut at same height. 3. Lift on when control bar is on blade worn ... lever (if equipped) in grass. 1. Turn fuel valve lever to cut - Loss of fuel. 2. Buildup of grass, leaves and trash under mower. 1. Too much grass. 3. Raise cutting height. 3. Poor cut grass or other hard surface before pulling starter rope. 2. Set all wheels at...
Owners Manual
Page 23
...as belts, pulleys, spindle housings, bearings, blades, rods, height adjusters, caster/anti scalp wheels etc... Authorized Husqvarna Servicing Dealer/Center. (a) Abrasion to mower decks; (b) Tires damaged by external punctures; (c) Natural discoloration of materials due to ultraviolet light; (d) Damage... to cutting equipment by anyone other than an authorized Husqvarna servicing dealer during the warranty period; (o) Dirt contaminated...
...as belts, pulleys, spindle housings, bearings, blades, rods, height adjusters, caster/anti scalp wheels etc... Authorized Husqvarna Servicing Dealer/Center. (a) Abrasion to mower decks; (b) Tires damaged by external punctures; (c) Natural discoloration of materials due to ultraviolet light; (d) Damage... to cutting equipment by anyone other than an authorized Husqvarna servicing dealer during the warranty period; (o) Dirt contaminated...

Owners Manual
Page 24
...Warranty 24 Limited Lifetime Warranty Battery 10 Years *** 1 Year Pro-rated No Warranty No Warranty No Warranty Other Non-Expendable Components Residential Zero Turn Mowers ( RZ Only ) 3 Years No Warranty Engine* * * Transmission ** ** No Warranty RZ4623 (967009801 & 967009802) RZ5426 (967003601 & ... Rental Use) Riding Lawn Tractors: Frame, Chassis, Front Axle 5 Years No Warranty Engine* * * Transmission (if made by Husqvarna/Peerless) 3 Years No Warranty Transmission (if third party)** ** ** XLS Models only - stamped deck shell. Limited Lifetime Warranty ...
...Warranty 24 Limited Lifetime Warranty Battery 10 Years *** 1 Year Pro-rated No Warranty No Warranty No Warranty Other Non-Expendable Components Residential Zero Turn Mowers ( RZ Only ) 3 Years No Warranty Engine* * * Transmission ** ** No Warranty RZ4623 (967009801 & 967009802) RZ5426 (967003601 & ... Rental Use) Riding Lawn Tractors: Frame, Chassis, Front Axle 5 Years No Warranty Engine* * * Transmission (if made by Husqvarna/Peerless) 3 Years No Warranty Transmission (if third party)** ** ** XLS Models only - stamped deck shell. Limited Lifetime Warranty ...

