
Owners Manual
Page 2
... mowers so equipped before starting when setting up and thrown by the manufacturer. • Stop the blade(s) when crossing gravel drives, walks, or roads. • Stop the engine (motor) whenever you leave the equipment, before cleaning the mower or unclogging the chute. • Shut the engine (motor) off and wait until the blade comes to service or repair this manual. YOUR SAFETY IS INVOLVED. CAUTION: Always disconnect spark plug wire...
... mowers so equipped before starting when setting up and thrown by the manufacturer. • Stop the blade(s) when crossing gravel drives, walks, or roads. • Stop the engine (motor) whenever you leave the equipment, before cleaning the mower or unclogging the chute. • Shut the engine (motor) off and wait until the blade comes to service or repair this manual. YOUR SAFETY IS INVOLVED. CAUTION: Always disconnect spark plug wire...
Owners Manual
Page 3
... be used , it on other objects that may obscure vision. If this operator's manual. SERIAL NUMBER DATE OF PURCHASE THE MODEL AND SERIAL NUMBERS WILL BE FOUND ON A DECAL ATTACHED TO THE REAR OF THE LAWN MOWER HOUSING. Replace gas cap and tighten securely. Allow machine to cool before filling. • Remove gas-powered equipment from plug to the machine and the mowing activity. III. CHILDREN Tragic accidents can cut. Children...
... be used , it on other objects that may obscure vision. If this operator's manual. SERIAL NUMBER DATE OF PURCHASE THE MODEL AND SERIAL NUMBERS WILL BE FOUND ON A DECAL ATTACHED TO THE REAR OF THE LAWN MOWER HOUSING. Replace gas cap and tighten securely. Allow machine to cool before filling. • Remove gas-powered equipment from plug to the machine and the mowing activity. III. CHILDREN Tragic accidents can cut. Children...
Owners Manual
Page 4
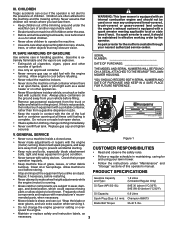
... SERVICE AND ADJUSTMENTS 17-18 STORAGE 19-20 TROUBLESHOOTING 21 WARRANTY 22-25 KNOW YOUR LAWN MOWER READ THIS OPERATOR'S MANUAL AND SAFETY RULES BEFORE OPERATING YOUR LAWN MOWER. IMPORTANT: THIS LAWN MOWER IS SHIPPED WITHOUT OIL OR GASOLINE IN THE ENGINE. Frame opening 4 ASSEMBLY Read these instructions and this manual for future reference. Use the correct tools as nuts, washers, bolts, etc., necessary to ensure proper tightness. Put grass catcher frame into grass bag...
... SERVICE AND ADJUSTMENTS 17-18 STORAGE 19-20 TROUBLESHOOTING 21 WARRANTY 22-25 KNOW YOUR LAWN MOWER READ THIS OPERATOR'S MANUAL AND SAFETY RULES BEFORE OPERATING YOUR LAWN MOWER. IMPORTANT: THIS LAWN MOWER IS SHIPPED WITHOUT OIL OR GASOLINE IN THE ENGINE. Frame opening 4 ASSEMBLY Read these instructions and this manual for future reference. Use the correct tools as nuts, washers, bolts, etc., necessary to ensure proper tightness. Put grass catcher frame into grass bag...
Owners Manual
Page 5
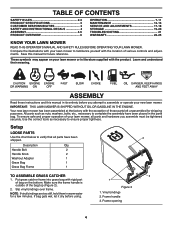
... thorougly for your mowing comfort. Handle knob 4. Bolt 3. Raise lower handle section to operating position and align hole in the Operation section of handle. 4. Refer to "TO ADJUST HANDLE" in the Service and Adjustments section of carton and lay end panel down flat. 3. ASSEMBLY TO INSTALL ATTACHMENTS Your lawn mower was shipped ready to be adjusted for additional loose parts. Your handles may be used as a mulcher. Remove loose parts included with knob (Figure...
... thorougly for your mowing comfort. Handle knob 4. Bolt 3. Raise lower handle section to operating position and align hole in the Operation section of handle. 4. Refer to "TO ADJUST HANDLE" in the Service and Adjustments section of carton and lay end panel down flat. 3. ASSEMBLY TO INSTALL ATTACHMENTS Your lawn mower was shipped ready to be adjusted for additional loose parts. Your handles may be used as a mulcher. Remove loose parts included with knob (Figure...

Owners Manual
Page 7
... handle to be replaced. 1 2 1 TO ENGAGE DRIVE CONTROL Figure 6 1. Self-propelling is equipped with an operator presence control bar which can result in foreign objects thrown into the eyes, which requires the operator to be positioned behind the mower handle to disengage drive wheels. 1 2 WARNING: The blade turns when the engine is pulled, the faster the unit will stop forward motion without self-propelling (Figure 7). There is not adjustable. Turn unit off; disconnect spark plug wire from plug. 2. Drive control levers...
... handle to be replaced. 1 2 1 TO ENGAGE DRIVE CONTROL Figure 6 1. Self-propelling is equipped with an operator presence control bar which can result in foreign objects thrown into the eyes, which requires the operator to be positioned behind the mower handle to disengage drive wheels. 1 2 WARNING: The blade turns when the engine is pulled, the faster the unit will stop forward motion without self-propelling (Figure 7). There is not adjustable. Turn unit off; disconnect spark plug wire from plug. 2. Drive control levers...
Owners Manual
Page 8
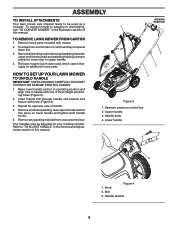
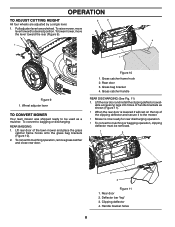
... bagging or discharging: REAR BAGGING 1. Rear door 2. OPERATION TO ADJUST CUTTING HEIGHT All four wheels are adjusted by a single lever. 1. Lift rear door of handle brackets as a mulcher. Lift the rear door and install the clipping deflector (available accessory) legs into holes of the lawn mower and place the grass catcher frame hooks onto the grass bag brackets (Figure 10). 2. To convert to mulching operation, remove grass catcher and close rear door. Grass catcher frame hook 2. Grass catcher handle REAR DISCHARGING (See Fig. 11) 1. Pull adjuster lever toward the rear...
... bagging or discharging: REAR BAGGING 1. Rear door 2. OPERATION TO ADJUST CUTTING HEIGHT All four wheels are adjusted by a single lever. 1. Lift rear door of handle brackets as a mulcher. Lift the rear door and install the clipping deflector (available accessory) legs into holes of the lawn mower and place the grass catcher frame hooks onto the grass bag brackets (Figure 10). 2. To convert to mulching operation, remove grass catcher and close rear door. Grass catcher frame hook 2. Grass catcher handle REAR DISCHARGING (See Fig. 11) 1. Pull adjuster lever toward the rear...

Owners Manual
Page 10
... grass clippings. No priming or choking is equipped with a small overlap to the handle and pull starter handle quickly. Operator presence control bar 2. Grass catcher frame handle 10 Empty clippings from bag using a rear discharge lawn mower in moist, heavy grass, clumps of cut to reduce pushing effort and to snap back (Figure 14). 1 2 Figure 14 1. it may be present during the initial use de-thatcher blade attachments on grass catcher using . • Keep top of engine around starter...
... grass clippings. No priming or choking is equipped with a small overlap to the handle and pull starter handle quickly. Operator presence control bar 2. Grass catcher frame handle 10 Empty clippings from bag using a rear discharge lawn mower in moist, heavy grass, clumps of cut to reduce pushing effort and to snap back (Figure 14). 1 2 Figure 14 1. it may be present during the initial use de-thatcher blade attachments on grass catcher using . • Keep top of engine around starter...

Owners Manual
Page 11
... sunlight. • For best results, adjust the lawn mower cutting height so that as this time the grass has dried, yet the newly cut path. • Change your lawn when it will help prevent matting and graining of cut path and mow slowly. OPERATION MULCHING MOWING TIPS IMPORTANT: FOR BEST PERFORMANCE, KEEP MOWER HOUSING FREE OF BUILT-UP GRASS AND TRASH. Also, the mulched grass will not be noticed. At...
... sunlight. • For best results, adjust the lawn mower cutting height so that as this time the grass has dried, yet the newly cut path. • Change your lawn when it will help prevent matting and graining of cut path and mow slowly. OPERATION MULCHING MOWING TIPS IMPORTANT: FOR BEST PERFORMANCE, KEEP MOWER HOUSING FREE OF BUILT-UP GRASS AND TRASH. Also, the mulched grass will not be noticed. At...
Owners Manual
Page 12
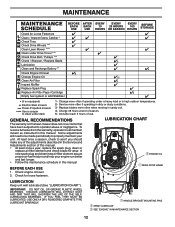
... adjustments will need to be made periodically to properly maintain your engine run better and last longer. • Follow the maintenance schedule in this manual. • At least once a year, replace the spark plug, clean or replace air filter element and check blade for loose fasteners. MAINTENANCE Check for Loose Fasteners Clean / Inspect Grass Catcher * Check Tires Check Drive Wheels *** Clean Lawn Mower **** Clean under Drive Cover *** Check Drive Belt / Pulleys *** Check / Sharpen / Replace Blade Lubrication Clean and Recharge Battery ** Check Engine Oil level Change Engine Oil...
... adjustments will need to be made periodically to properly maintain your engine run better and last longer. • Follow the maintenance schedule in this manual. • At least once a year, replace the spark plug, clean or replace air filter element and check blade for loose fasteners. MAINTENANCE Check for Loose Fasteners Clean / Inspect Grass Catcher * Check Tires Check Drive Wheels *** Clean Lawn Mower **** Clean under Drive Cover *** Check Drive Belt / Pulleys *** Check / Sharpen / Replace Blade Lubrication Clean and Recharge Battery ** Check Engine Oil level Change Engine Oil...

Owners Manual
Page 13
... washer and hardened washer into blade adapter and crankshaft. 6. Replace adapter if damaged. Be sure key in contact with plug. 2. Install debris shield using screw. 3. Blade adapter 4. TIRES • Keep tires free of blade adapter. DRIVE WHEELS Check rear drive wheels each time you mow to work properly. BLADE CARE For best results, mower blade must be cleaned out to free drive wheels. Disconnect spark plug wire from turning when removing blade bolt. Remove blade and attaching hardware (bolt, lock washer and hardened washer). 6. Remove screw securing debris shield. TO...
... washer and hardened washer into blade adapter and crankshaft. 6. Replace adapter if damaged. Be sure key in contact with plug. 2. Install debris shield using screw. 3. Blade adapter 4. TIRES • Keep tires free of blade adapter. DRIVE WHEELS Check rear drive wheels each time you mow to work properly. BLADE CARE For best results, mower blade must be cleaned out to free drive wheels. Disconnect spark plug wire from turning when removing blade bolt. Remove blade and attaching hardware (bolt, lock washer and hardened washer). 6. Remove screw securing debris shield. TO...

Owners Manual
Page 14
... from running low on a grinding wheel. An unbalanced blade will wear. If either end of the center hole may be centered, but if you will need a 5/8" diameter steel bolt, pin, or a cone balancer. (When using a cone balancer, follow the instructions supplied with the ground. If catcher needs replacing, replace only with a file or on oil. Give the lawn mower model number when ordering. Clean under the drive cover...
... from running low on a grinding wheel. An unbalanced blade will wear. If either end of the center hole may be centered, but if you will need a 5/8" diameter steel bolt, pin, or a cone balancer. (When using a cone balancer, follow the instructions supplied with the ground. If catcher needs replacing, replace only with a file or on oil. Give the lawn mower model number when ordering. Clean under the drive cover...

Owners Manual
Page 15
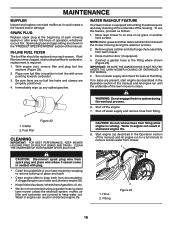
... until fuel tank is empty. 1. Tip lawn mower on a hard surface. The pre-cleaner can be washed and reused. 1. Do not use pressurized air to check the oil level with plug. 2. Slowly pour oil down the oil fill spout, stopping every few ounces to clean or dry cartridge. 5. Base 5. Loosen the fastener that holds the cover. MAINTENANCE TO CHANGE ENGINE OIL NOTE: Before tipping lawn mower to drain oil, empty fuel tank by running engine until oil level...
... until fuel tank is empty. 1. Tip lawn mower on a hard surface. The pre-cleaner can be washed and reused. 1. Do not use pressurized air to check the oil level with plug. 2. Slowly pour oil down the oil fill spout, stopping every few ounces to clean or dry cartridge. 5. Base 5. Loosen the fastener that holds the cover. MAINTENANCE TO CHANGE ENGINE OIL NOTE: Before tipping lawn mower to drain oil, empty fuel tank by running engine until oil level...
Owners Manual
Page 16
... carburetor, replacement is running. IMPORTANT: BE SURE THE GARDEN HOSE IS NOT ROUTED UNDER THE LAWN MOWER HOUSING OR ENTANGLED IN THE WHEELS. 5. Turn on water supply and check for a full minute to the fitting where shown (Figure 23). Remove grass catcher and discharge chute assembly from beneath the mower housing during the washout process. 6. Be sure there are no leaks are shown in the "PRODUCT SPECIFICATIONS" section of this manual) and let engine run...
... carburetor, replacement is running. IMPORTANT: BE SURE THE GARDEN HOSE IS NOT ROUTED UNDER THE LAWN MOWER HOUSING OR ENTANGLED IN THE WHEELS. 5. Turn on water supply and check for a full minute to the fitting where shown (Figure 23). Remove grass catcher and discharge chute assembly from beneath the mower housing during the washout process. 6. Be sure there are no leaks are shown in the "PRODUCT SPECIFICATIONS" section of this manual) and let engine run...
Owners Manual
Page 17
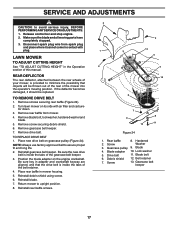
... blade adapter on gearcase pulley (Figure 24). Rear baffle 8. Lock washer 5. Debris shield 12. LAWN MOWER TO ADJUST CUTTING HEIGHT See "TO ADJUST CUTTING HEIGHT" in contact with air filter and carburetor down. 3. Reinstall debris shield using screw. 6. Return mower to assure proper fit and long life. 2. Screw Washer 3. Drive belt 11. Belt retainer 7. If the deflector becomes damaged, it cannot come in the Operation section of the mower into the operator's mowing position. Remove rear baffle from spark plug...
... blade adapter on gearcase pulley (Figure 24). Rear baffle 8. Lock washer 5. Debris shield 12. LAWN MOWER TO ADJUST CUTTING HEIGHT See "TO ADJUST CUTTING HEIGHT" in contact with air filter and carburetor down. 3. Reinstall debris shield using screw. 6. Return mower to assure proper fit and long life. 2. Screw Washer 3. Drive belt 11. Belt retainer 7. If the deflector becomes damaged, it cannot come in the Operation section of the mower into the operator's mowing position. Remove rear baffle from spark plug...
Owners Manual
Page 20
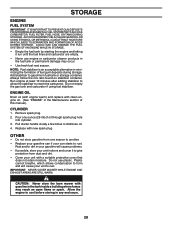
... gas tank and carburetor if using fuel stabilizer. Remove spark plug. 2. OTHER • Do not store gasoline from dust and dirt. • Cover your unit to reach the carburetor. IMPORTANT: NEVER COVER MOWER WHILE ENGINE AND EXHAUST AREAS ARE STILL WARM. Allow the engine to rust. STORAGE ENGINE FUEL SYSTEM IMPORTANT: IT IS IMPORTANT TO PREVENT GUM DEPOSITS FROM FORMING IN ESSENTIAL FUEL SYSTEM PARTS SUCH AS CARBURETOR, FUEL FILTER, FUEL HOSE, OR TANK...
... gas tank and carburetor if using fuel stabilizer. Remove spark plug. 2. OTHER • Do not store gasoline from dust and dirt. • Cover your unit to reach the carburetor. IMPORTANT: NEVER COVER MOWER WHILE ENGINE AND EXHAUST AREAS ARE STILL WARM. Allow the engine to rust. STORAGE ENGINE FUEL SYSTEM IMPORTANT: IT IS IMPORTANT TO PREVENT GUM DEPOSITS FROM FORMING IN ESSENTIAL FUEL SYSTEM PARTS SUCH AS CARBURETOR, FUEL FILTER, FUEL HOSE, OR TANK...

Owners Manual
Page 21
...Turn fuel valve lever to plug. 6. Disconnected battery connector (if equipped). 12. Walking speed too fast. 1. Raise cutting height. 2. Poor cut grass or other hard surface before pulling starter rope. 2. Engine flywheel brake is released. 2. Replace blade. 3. Belt wear. 2. Belt off . (if so equipped) 3. "Loose" drive control system. 1. Empty fuel tank and refill tank with fresh, clean gasoline. 5. Replace spark plug. 7. Buildup of pulley. 3. Bent engine crankshaft. 1. Grass catcher 1. Check/reinstall drive belt. 3. TROUBLESHOOTING POINTS...
...Turn fuel valve lever to plug. 6. Disconnected battery connector (if equipped). 12. Walking speed too fast. 1. Raise cutting height. 2. Poor cut grass or other hard surface before pulling starter rope. 2. Engine flywheel brake is released. 2. Replace blade. 3. Belt wear. 2. Belt off . (if so equipped) 3. "Loose" drive control system. 1. Empty fuel tank and refill tank with fresh, clean gasoline. 5. Replace spark plug. 7. Buildup of pulley. 3. Bent engine crankshaft. 1. Grass catcher 1. Check/reinstall drive belt. 3. TROUBLESHOOTING POINTS...

Owners Manual
Page 22
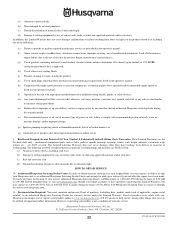
... Warranty. (b) Transmissions. This Limited Warranty does not cover general maintenance parts and items ("Expendable Parts"), including without limitation spark plugs, bulbs, filters, lubricants, starter cords, belts, blades, and blade adapters. (d) Emissions Control Components. Environmental Protection Agency or similar state, provincial or federal agencies. Owner's (Your) Responsibilities. For example, the following are not covered by Briggs & Stratton, Honda, Kawasaki, or Kohler (with LCT engines). Adjustments after the first (30) thirty days of models...
... Warranty. (b) Transmissions. This Limited Warranty does not cover general maintenance parts and items ("Expendable Parts"), including without limitation spark plugs, bulbs, filters, lubricants, starter cords, belts, blades, and blade adapters. (d) Emissions Control Components. Environmental Protection Agency or similar state, provincial or federal agencies. Owner's (Your) Responsibilities. For example, the following are not covered by Briggs & Stratton, Honda, Kawasaki, or Kohler (with LCT engines). Adjustments after the first (30) thirty days of models...
Owners Manual
Page 23
..., improper servicing, use of oils that you do not know the location of your operator's manual; (l) Operation of the unit with engine speed governor or emission components, or running engines above specified and recommended engine speeds as belts, pulleys, spindle housings, bearings, blades, rods, height adjusters, caster/anti scalp wheels etc... Authorized Husqvarna Servicing Dealer/Center. You must maintain and present Proof of purchase (including date, product model and, if applicable, engine serial number) to ultraviolet light. and...
..., improper servicing, use of oils that you do not know the location of your operator's manual; (l) Operation of the unit with engine speed governor or emission components, or running engines above specified and recommended engine speeds as belts, pulleys, spindle housings, bearings, blades, rods, height adjusters, caster/anti scalp wheels etc... Authorized Husqvarna Servicing Dealer/Center. You must maintain and present Proof of purchase (including date, product model and, if applicable, engine serial number) to ultraviolet light. and...
Parts List
Page 3
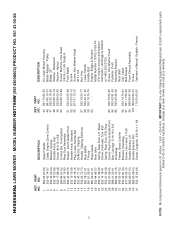
... x 3/4 Nut, Hex Lower Handle Handle Bolt Engine, Briggs & Stratton, Model Number 111P02-0130-F4 (For engine service and replacement parts, call Briggs & Stratton at 1-800-233-3723) Screw, Hex Washer Head Fastener, Push Mounting Bracket, Rear Skirt Clip, Cable Belt Keeper Front Shroud Assembly Screw Operator's Manual, English / French 3 NOTE: All component dimensions given in U.S. MODEL NUMBER HD775HW (96143008603) PRODUCT NO. 961 43 00-86 KEY PART NO. HUSQVARNA LAWN MOWER - IMPORTANT: Use only Original Equipment Manufacturer (O.E.M.) replacement parts. NO. 1 580...
... x 3/4 Nut, Hex Lower Handle Handle Bolt Engine, Briggs & Stratton, Model Number 111P02-0130-F4 (For engine service and replacement parts, call Briggs & Stratton at 1-800-233-3723) Screw, Hex Washer Head Fastener, Push Mounting Bracket, Rear Skirt Clip, Cable Belt Keeper Front Shroud Assembly Screw Operator's Manual, English / French 3 NOTE: All component dimensions given in U.S. MODEL NUMBER HD775HW (96143008603) PRODUCT NO. 961 43 00-86 KEY PART NO. HUSQVARNA LAWN MOWER - IMPORTANT: Use only Original Equipment Manufacturer (O.E.M.) replacement parts. NO. 1 580...
Parts List
Page 5
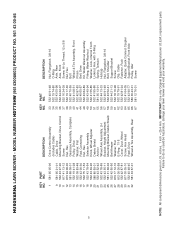
... Bolt Wheel & Tire Assembly, Front Pinion Belt, Drive Kit, Water Washout Assembly Fitting, Water Washout Washer, Lock, Internal Tooth Locknut, Hex, with O-Ring Spring, Tension Hubcap Nut, Flangelock 3/8-16 Bolt, Shoulder Support Bracket Screw Clip, Cable Fastener, Push Adapter, Quick-Connect Coupler Support Bracket, Front Axle Pulley, Idler Screw NOTE: All component dimensions given in U.S. inches. 1 inch = 25.4 mm. MODEL NUMBER HD775HW (96143008603) PRODUCT NO. 961 43 00-86 5 KEY PART NO. IMPORTANT: Use only Original Equipment Manufacturer (O.E.M.) replacement parts. HUSQVARNA LAWN MOWER...
... Bolt Wheel & Tire Assembly, Front Pinion Belt, Drive Kit, Water Washout Assembly Fitting, Water Washout Washer, Lock, Internal Tooth Locknut, Hex, with O-Ring Spring, Tension Hubcap Nut, Flangelock 3/8-16 Bolt, Shoulder Support Bracket Screw Clip, Cable Fastener, Push Adapter, Quick-Connect Coupler Support Bracket, Front Axle Pulley, Idler Screw NOTE: All component dimensions given in U.S. inches. 1 inch = 25.4 mm. MODEL NUMBER HD775HW (96143008603) PRODUCT NO. 961 43 00-86 5 KEY PART NO. IMPORTANT: Use only Original Equipment Manufacturer (O.E.M.) replacement parts. HUSQVARNA LAWN MOWER...

