
Owner Manual
Page 1
EN, English Operator's manual HUSQVARNA AUTOMOWER® 310/315/315X Read the operator's manual carefully and make sure that you understand the instructions before you use the product.
EN, English Operator's manual HUSQVARNA AUTOMOWER® 310/315/315X Read the operator's manual carefully and make sure that you understand the instructions before you use the product.
Owner Manual
Page 2
... 9 Warranty 9.1 Warranty terms 58 10 EC Declaration of Conformity 10.1 EC Declaration of the product...........23 3.10 To do the product settings 24 4 Operation 4.1 Main switch 36 4.2 To start the product 36 4.3 Operating mode Start 36 4.4 Operating mode Park 37 4.5 To stop the product 37 4.6 To switch off the product 37 4.7 Schedule and Standby 37 4.8 To charge the battery 38 4.9 Adjust the cutting height 39 5 Maintenance 5.1 Introduction...
... 9 Warranty 9.1 Warranty terms 58 10 EC Declaration of Conformity 10.1 EC Declaration of the product...........23 3.10 To do the product settings 24 4 Operation 4.1 Main switch 36 4.2 To start the product 36 4.3 Operating mode Start 36 4.4 Operating mode Park 37 4.5 To stop the product 37 4.6 To switch off the product 37 4.7 Schedule and Standby 37 4.8 To charge the battery 38 4.9 Adjust the cutting height 39 5 Maintenance 5.1 Introduction...
Owner Manual
Page 3
... charging station. 1.1.2.3 Automower® Connect Automower® Connect is a mobile application that the lawn is mowed evenly and with less wear. The product is low. The guide wire is connected with the keys on the keypad. The display shows the selected and possible operation settings, and the operation mode of the products. The product has a battery power source and cuts the grass automatically. Refer to Automower...
... charging station. 1.1.2.3 Automower® Connect Automower® Connect is a mobile application that the lawn is mowed evenly and with less wear. The product is low. The guide wire is connected with the keys on the keypad. The display shows the selected and possible operation settings, and the operation mode of the products. The product has a battery power source and cuts the grass automatically. Refer to Automower...

Owner Manual
Page 4
... switch 20. Replaceable cover 6. Rear wheels 7. Headlights 9. Display 15. Contact plates 11. Rating plate (incl. Cutting system 17. Blade disc 21. LED for operation check of the charging station and boundary wire 12. Charging station 13. product identification code) 14. Hatch to display and keypad 4. Skid plate 22. Chassis box with electronics, battery and motors 18. Power supply (the appearance may differ depending on market) 4 - Cutting height adjustment 10. Handle...
... switch 20. Replaceable cover 6. Rear wheels 7. Headlights 9. Display 15. Contact plates 11. Rating plate (incl. Cutting system 17. Blade disc 21. LED for operation check of the charging station and boundary wire 12. Charging station 13. product identification code) 14. Hatch to display and keypad 4. Skid plate 22. Chassis box with electronics, battery and motors 18. Power supply (the appearance may differ depending on market) 4 - Cutting height adjustment 10. Handle...
Owner Manual
Page 5
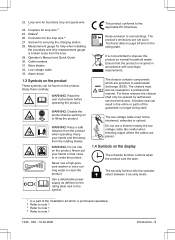
... operator select between 3 security levels. 1 Is a part of the guarantee no longer being valid. Couplers for the loop wire 4 27. Connector for loop wire 2 25. Extra blades 32. Keep your hands or feet close to or under the product. Do not use a high-pressure washer or even running water to the symbol. Loop wire for securing the charging station 28. Low voltage cable...
... operator select between 3 security levels. 1 Is a part of the guarantee no longer being valid. Couplers for the loop wire 4 27. Connector for loop wire 2 25. Extra blades 32. Keep your hands or feet close to or under the product. Do not use a high-pressure washer or even running water to the symbol. Loop wire for securing the charging station 28. Low voltage cable...
Owner Manual
Page 6
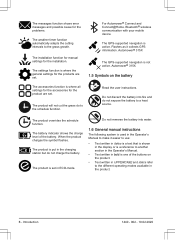
The product will not cut the grass do to a heat source. The product overrides the schedule function. The GPS-supported navigation is not active. The battery indicator shows the charge level of the buttons on the battery The accessories function is used in ECO-mode. The settings function is where the general settings for the product are set in the Operator's Manual to make it...
The product will not cut the grass do to a heat source. The product overrides the schedule function. The GPS-supported navigation is not active. The battery indicator shows the charge level of the buttons on the battery The accessories function is used in ECO-mode. The settings function is where the general settings for the product are set in the Operator's Manual to make it...

Owner Manual
Page 13
... replace any cleaning or maintenance of thunder. Never use a high-pressure washer or even running water to disconnect the charging station before lifting it is a risk of the charging station before any damaged or worn parts. The charging station's connections are disconnected (power supply, boundary wire and guide wire) if there is parked in position 0. CAUTION: Do not lift the product when it . Push STOP and pull...
... replace any cleaning or maintenance of thunder. Never use a high-pressure washer or even running water to disconnect the charging station before lifting it is a risk of the charging station before any damaged or worn parts. The charging station's connections are disconnected (power supply, boundary wire and guide wire) if there is parked in position 0. CAUTION: Do not lift the product when it . Push STOP and pull...

Owner Manual
Page 23
..., time and set a PIN code. Note: It is overgrown with grass and not visible after installation can see the ends of the boundary wire or the guide wire through the transparent area of the coupler. 6. Damage to use 0000 as PIN code. 4. distance from the power outlet. 2. Switch on the ground. 2. Disconnect the charging station from each other. 3. CAUTION: Cutting the grass too low...
..., time and set a PIN code. Note: It is overgrown with grass and not visible after installation can see the ends of the boundary wire or the guide wire through the transparent area of the coupler. 6. Damage to use 0000 as PIN code. 4. distance from the power outlet. 2. Switch on the ground. 2. Disconnect the charging station from each other. 3. CAUTION: Cutting the grass too low...

Owner Manual
Page 24
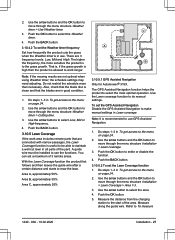
... and charging time. The control panel consists of the lawn with the number buttons. Use the number buttons and the OK button to table below. 3. Refer to enter the PIN code. 3. When the calibration is automatic. If the product must mow each day. 8. Installation 1440 - 002 - 19.02.2020 Push the STOP button. 2. Calculate the suitable operating hours. Note: The daily operation capacity...
... and charging time. The control panel consists of the lawn with the number buttons. Use the number buttons and the OK button to table below. 3. Refer to enter the PIN code. 3. When the calibration is automatic. If the product must mow each day. 8. Installation 1440 - 002 - 19.02.2020 Push the STOP button. 2. Calculate the suitable operating hours. Note: The daily operation capacity...

Owner Manual
Page 25
... the charging station. 1440 - 002 - 19.02.2020 Installation - 25 Use the arrow buttons and the OK button to the menu on page 24. 2. Product work capacity Automower® 310 Automower® 315 Automower® 315X Approximate daily operation capacity, m2/h, ft2/h 56 / 603 68 / 732 73 / 786 Example: A lawn of 3 security levels for your product. 1. Days / week h / day 7 9 Suggested schedule setting 07...
... the charging station. 1440 - 002 - 19.02.2020 Installation - 25 Use the arrow buttons and the OK button to the menu on page 24. 2. Product work capacity Automower® 310 Automower® 315 Automower® 315X Approximate daily operation capacity, m2/h, ft2/h 56 / 603 68 / 732 73 / 786 Example: A lawn of 3 security levels for your product. 1. Days / week h / day 7 9 Suggested schedule setting 07...
Owner Manual
Page 27
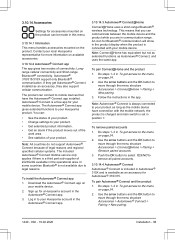
... menu structure Installation > Lawn Coverage > Area 1-3. 3. To set the Weather timer frequency Set how frequently the product cuts the grass when the Weather timer is useful to be installed to move through the menu structure Weather timer > Cutting time. 3. Push the BACK button. 3.10.5.2 To set a maximum of the area. Note: If the mowing results are 3 frequency levels: Low, Mid and High. A guide wire must be...
... menu structure Installation > Lawn Coverage > Area 1-3. 3. To set the Weather timer frequency Set how frequently the product cuts the grass when the Weather timer is useful to be installed to move through the menu structure Weather timer > Cutting time. 3. Push the BACK button. 3.10.5.2 To set a maximum of the area. Note: If the mowing results are 3 frequency levels: Low, Mid and High. A guide wire must be...

Owner Manual
Page 31
...; Mid • High • High+ The level sets how sensitive the product is to changes in grass height. To change the name of product settings can be used for more than 15%. Push the BACK button to select the ECO mode. 4. Note: To start Spiral cutting. Note: Spiral cutting is activated, it switches off the signal in To get access to start the product manually in the...
...; Mid • High • High+ The level sets how sensitive the product is to changes in grass height. To change the name of product settings can be used for more than 15%. Push the BACK button to select the ECO mode. 4. Note: To start Spiral cutting. Note: Spiral cutting is activated, it switches off the signal in To get access to start the product manually in the...
Owner Manual
Page 33
... menu structure Accessories > Connect@Home > Pairing > New pairing. 3. You can communicate between the mobile device and the product while you can : • See the status of your product. • Change settings to legal reasons. Follow the instructions in the app. Automower® 310/315/315X support only Bluetooth® communication. If they also support cellular communication. To install the Automower®...
... menu structure Accessories > Connect@Home > Pairing > New pairing. 3. You can communicate between the mobile device and the product while you can : • See the status of your product. • Change settings to legal reasons. Follow the instructions in the app. Automower® 310/315/315X support only Bluetooth® communication. If they also support cellular communication. To install the Automower®...

Owner Manual
Page 36
... and the message Needs manual charging shows in the charging station, the product only leaves the charging station when the battery is empty. When the battery is running. Push the START button. 5. WARNING: Keep your hands or feet close to start the product. Never put your hands and feet away from the rotating blades. Set the Main switch to open the hatch. 2. Operation 1440 - 002...
... and the message Needs manual charging shows in the charging station, the product only leaves the charging station when the battery is empty. When the battery is running. Push the START button. 5. WARNING: Keep your hands or feet close to start the product. Never put your hands and feet away from the rotating blades. Set the Main switch to open the hatch. 2. Operation 1440 - 002...
Owner Manual
Page 40
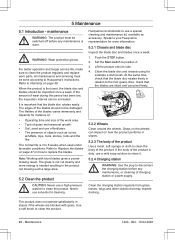
....02.2020 Refer to clean the product regularly and replace worn parts. The normal life is dirty, use of fertilizers. • The presence of charging station or power supply. Also, check that the blade disc rotates easily. 5 Maintenance 5.1 Introduction - maintenance WARNING: The product must be done according to use a special cleaning and maintenance kit, available as cones, windfalls, toys, tools, stones, roots...
....02.2020 Refer to clean the product regularly and replace worn parts. The normal life is dirty, use of fertilizers. • The presence of charging station or power supply. Also, check that the blade disc rotates easily. 5 Maintenance 5.1 Introduction - maintenance WARNING: The product must be done according to use a special cleaning and maintenance kit, available as cones, windfalls, toys, tools, stones, roots...

Owner Manual
Page 44
... around its chassis. Check the drive wheel and remove grass or object. Mower stopped Alarm! Refer to To set the security level on page 41. Contact Husqvarna customer service if you forget the PIN code. The charging plates on the product or contact plates on the charging station are permitted, and the keypad is then blocked for the lack of the guide wire. The work...
... around its chassis. Check the drive wheel and remove grass or object. Mower stopped Alarm! Refer to To set the security level on page 41. Contact Husqvarna customer service if you forget the PIN code. The charging plates on the product or contact plates on the charging station are permitted, and the keypad is then blocked for the lack of the guide wire. The work...

Owner Manual
Page 45
... make good contact. Grass or other object is in the charging station and check that prevents it from operating. Clean the wheels and around the drive wheel. Remove the object. Refer to To set to the instructions. This behavior is normal and no action od according to Schedule on page 24. Refer to To install the guide wire on page 22. Wheel drive prob- An...
... make good contact. Grass or other object is in the charging station and check that prevents it from operating. Clean the wheels and around the drive wheel. Remove the object. Refer to To set to the instructions. This behavior is normal and no action od according to Schedule on page 24. Refer to To install the guide wire on page 22. Wheel drive prob- An...

Owner Manual
Page 50
... level. Refer to To examine where to To set the schedule on page 19 The guide wire is not inserted in the product is far enough out from the charging station. are of blades Check if the blades are used. Dull blades. the charging station. Replace the battery. Troubleshooting 1440 - 002 - 19.02.2020 Inspect the blades and screws and replace them if necessary. The product runs...
... level. Refer to To examine where to To set the schedule on page 19 The guide wire is not inserted in the product is far enough out from the charging station. are of blades Check if the blades are used. Dull blades. the charging station. Replace the battery. Troubleshooting 1440 - 002 - 19.02.2020 Inspect the blades and screws and replace them if necessary. The product runs...

Owner Manual
Page 51
... How often? Push the START button and then close the hatch. The product is too large. Refer to the wire being stretched excessively during installation. If not, screw off the blade disc and remove grass and foreign objects. Mowing the grass too low right after the installation can also occur due to Lawn Coverage on page 36. Change the operating mode. setting is incorrect...
... How often? Push the START button and then close the hatch. The product is too large. Refer to the wire being stretched excessively during installation. If not, screw off the blade disc and remove grass and foreign objects. Mowing the grass too low right after the installation can also occur due to Lawn Coverage on page 36. Change the operating mode. setting is incorrect...

Owner Manual
Page 56
...-2-107:2015 Mowing Automower® 310 Cutting system Blade motor speed, rpm 2300 Power consumption during cut- 25 ting, W +/- 20 % Cutting height, cm / in. 2-6 / 0.8-2.4 Cutting width, cm / in. 22 / 8.7 Narrowest possible passage, cm / in. 60 / 24 Maximum angle for work area, 40 % Maximum angle for boundary 15 wire, % Maximum length boundary wire, 800 / 2600 m / ft Maximum length guide loop8, m / ft 400 / 1300 Working capacity, m2...
...-2-107:2015 Mowing Automower® 310 Cutting system Blade motor speed, rpm 2300 Power consumption during cut- 25 ting, W +/- 20 % Cutting height, cm / in. 2-6 / 0.8-2.4 Cutting width, cm / in. 22 / 8.7 Narrowest possible passage, cm / in. 60 / 24 Maximum angle for work area, 40 % Maximum angle for boundary 15 wire, % Maximum length boundary wire, 800 / 2600 m / ft Maximum length guide loop8, m / ft 400 / 1300 Working capacity, m2...

