
Owners Manual
Page 2
... electric drive motors or electric starting the engine (motor). 3. Failure to be used and remove all times, until refueling is to observe the following safety instructions could result in the manual(s) before unclogging the collector/impeller housing or discharge chute, and when making repairs. YOUR SAFETY IS INVOLVED. Caution should start to point out important safety precautions. Thoroughly inspect the area where the equipment is complete. Handle fuel...
... electric drive motors or electric starting the engine (motor). 3. Failure to be used and remove all times, until refueling is to observe the following safety instructions could result in the manual(s) before unclogging the collector/impeller housing or discharge chute, and when making repairs. YOUR SAFETY IS INVOLVED. Caution should start to point out important safety precautions. Thoroughly inspect the area where the equipment is complete. Handle fuel...
Owners Manual
Page 3
... is in any enclosure. 3. Disconnect the spark plug wire and keep a firm hold on the handles. Never operate the snow thrower without proper guards, and other bolts at high transport speeds on slopes. 9. Clean out snow and debris between the track components. SHUT THE ENGINE OFF! 2. Maintain or replace safety and instruction labels, as wheel weights, counterweights, or cabs). 15. Do not run . 16. exhaust fumes are present...
... is in any enclosure. 3. Disconnect the spark plug wire and keep a firm hold on the handles. Never operate the snow thrower without proper guards, and other bolts at high transport speeds on slopes. 9. Clean out snow and debris between the track components. SHUT THE ENGINE OFF! 2. Maintain or replace safety and instruction labels, as wheel weights, counterweights, or cabs). 15. Do not run . 16. exhaust fumes are present...
Owners Manual
Page 4
... retain this owner's manual. Always observe the "SAFETY RULES". SERIAL NUMBER DATE OF PURCHASE THE MODEL AND SERIAL NUMBERS WILL BE FOUND ON A DECAL ATTACHED TO THE REAR OF THE SNOW THROWER HOUSING. PRODUCT SPECIFICATIONS Gasoline Capacity 0.5 Gallons (1,89 Liters) and Type: Unleaded Regular only Oil Type (API SG-SL): SAE 30 (above 50°F) SAE 5W-30 or 10W-30 (32° to service or repair this...
... retain this owner's manual. Always observe the "SAFETY RULES". SERIAL NUMBER DATE OF PURCHASE THE MODEL AND SERIAL NUMBERS WILL BE FOUND ON A DECAL ATTACHED TO THE REAR OF THE SNOW THROWER HOUSING. PRODUCT SPECIFICATIONS Gasoline Capacity 0.5 Gallons (1,89 Liters) and Type: Unleaded Regular only Oil Type (API SG-SL): SAE 30 (above 50°F) SAE 5W-30 or 10W-30 (32° to service or repair this...
Owners Manual
Page 6
... shear bolts, nuts and multi-wrench provided in parts bag in assembly, operation and maintenance of those parts left unassembled for additional loose parts. Reading the entire manual will familiarize you with the unit, which will assist you attempt to lower handle. Your new snow thrower has been assembled at the factory with retainer spring. To ensure safe and proper operation of the belt cover. Remove the two (2) screws securing the auger housing...
... shear bolts, nuts and multi-wrench provided in parts bag in assembly, operation and maintenance of those parts left unassembled for additional loose parts. Reading the entire manual will familiarize you with the unit, which will assist you attempt to lower handle. Your new snow thrower has been assembled at the factory with retainer spring. To ensure safe and proper operation of the belt cover. Remove the two (2) screws securing the auger housing...
Owners Manual
Page 7
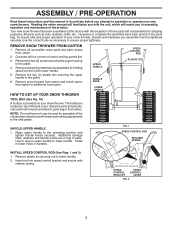
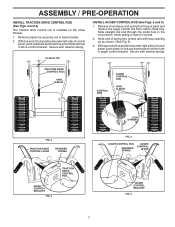
... side of parts and retrieve the auger control rod from carton chute tray. TRACTION DRIVE CONTROL ROD VINYL SLEEVE CONTROL ARM AUGER CONTROL ROD VINYL SLEEVE FIG. 3 TRACTION DRIVE CONTROL LEVER RETAINER SPRING DRIVE CONTROL BRACKET FIG. 4 TRACTION DRIVE CONTROL ROD LOOP OPENING UP FIG. 5 AUGER CONTROL ROD RETAINER SPRING AUGER CONTROL LEVER AUGER CONTROL BRACKET FIG. 6 7 PLASTIC TIE INSTALL AUGER CONTROL ROD (See Figs. 5 and 6) 1. ASSEMBLY / PRE-OPERATION INSTALL TRACTION DRIVE CONTROL ROD (See Figs. 3 and 4) The traction drive control rod is installed on rod...
... side of parts and retrieve the auger control rod from carton chute tray. TRACTION DRIVE CONTROL ROD VINYL SLEEVE CONTROL ARM AUGER CONTROL ROD VINYL SLEEVE FIG. 3 TRACTION DRIVE CONTROL LEVER RETAINER SPRING DRIVE CONTROL BRACKET FIG. 4 TRACTION DRIVE CONTROL ROD LOOP OPENING UP FIG. 5 AUGER CONTROL ROD RETAINER SPRING AUGER CONTROL LEVER AUGER CONTROL BRACKET FIG. 6 7 PLASTIC TIE INSTALL AUGER CONTROL ROD (See Figs. 5 and 6) 1. ASSEMBLY / PRE-OPERATION INSTALL TRACTION DRIVE CONTROL ROD (See Figs. 3 and 4) The traction drive control rod is installed on rod...

Owners Manual
Page 8
... SHOULDER BOLT 1/4-20 LOCKNUT SPRING CHUTE DEFLECTOR HOOK BETWEEN HEX NUTS ON CHUTE ROTATER HEAD 5/16-18 CARRIAGE BOLT CABLE EYELET PIN THREADED STUD CHUTE ALIGN BEFORE BRACKET TIGHTENING LOCKNUT FIG. 7 ROTATOR HEAD MOUNTING BRACKET REMOTE CABLE BRACKET 5/16-18 LOCKNUT FIG. 8 CHUTE DEFLECTOR CONTROL LEVER FIG. 9 8 Eyelet will be used to chute deflector with 5/16-18 carriage bolt and 5/16-18 locknut as shown. ASSEMBLY / PRE-OPERATION INSTALL DISCHARGE CHUTE / CHUTE ROTATOR HEAD...
... SHOULDER BOLT 1/4-20 LOCKNUT SPRING CHUTE DEFLECTOR HOOK BETWEEN HEX NUTS ON CHUTE ROTATER HEAD 5/16-18 CARRIAGE BOLT CABLE EYELET PIN THREADED STUD CHUTE ALIGN BEFORE BRACKET TIGHTENING LOCKNUT FIG. 7 ROTATOR HEAD MOUNTING BRACKET REMOTE CABLE BRACKET 5/16-18 LOCKNUT FIG. 8 CHUTE DEFLECTOR CONTROL LEVER FIG. 9 8 Eyelet will be used to chute deflector with 5/16-18 carriage bolt and 5/16-18 locknut as shown. ASSEMBLY / PRE-OPERATION INSTALL DISCHARGE CHUTE / CHUTE ROTATOR HEAD...
Owners Manual
Page 10
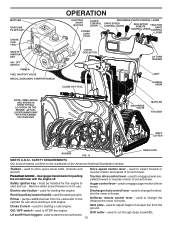
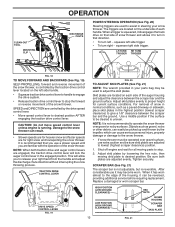
... engine. Electric start and run. Primer - Toolbox - used to cut through deep snowdrifts. 10 Drive speed control lever - Auger control lever - used to the standards of snow thrower. MUFFLER GASOLINE FILLER CAP CHOKE CONTROL SAFETY IGNITION KEY ON / OFF SWITCH PRIMER FUEL SHUT-OFF VALVE RECOIL (AUXILIARY) STARTER HANDLE OPERATION ELECTRIC START BUTTON AUGER CONTROL LEVER POWER CORD PLUG DISCHARGE CHUTE CONTROL LEVER DRIVE SPEED CONTROL LEVER CODNERTFRELMOELOCTLTEEOVRERTCROANCDTTRRIIOOVNEL LEVER CHUTE DEFLECTOR LH TURN TRIGGER CLEAN-OUT TOOL LIGHT HANDLE KNOB...
... engine. Electric start and run. Primer - Toolbox - used to cut through deep snowdrifts. 10 Drive speed control lever - Auger control lever - used to the standards of snow thrower. MUFFLER GASOLINE FILLER CAP CHOKE CONTROL SAFETY IGNITION KEY ON / OFF SWITCH PRIMER FUEL SHUT-OFF VALVE RECOIL (AUXILIARY) STARTER HANDLE OPERATION ELECTRIC START BUTTON AUGER CONTROL LEVER POWER CORD PLUG DISCHARGE CHUTE CONTROL LEVER DRIVE SPEED CONTROL LEVER CODNERTFRELMOELOCTLTEEOVRERTCROANCDTTRRIIOOVNEL LEVER CHUTE DEFLECTOR LH TURN TRIGGER CLEAN-OUT TOOL LIGHT HANDLE KNOB...
Owners Manual
Page 11
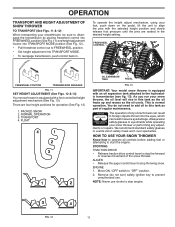
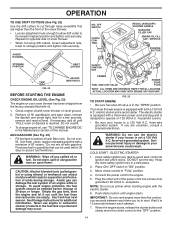
... model snow thrower is normal operation. The operation of any adjustments or repairs. ENGINE 1. Remove (do not need to add oil to start the engine. To operate the height adjust mechanism, using your foot, push down on the pedal, tilt the unit to the hydrostatic transmission (see fig. 13). PACKED SNOW 2. As you run your snow thrower, the oil level will rise in severe eye damage. Move ON / OFF switch to FREEWHEEL position. • Set height adjustment...
... model snow thrower is normal operation. The operation of any adjustments or repairs. ENGINE 1. Remove (do not need to add oil to start the engine. To operate the height adjust mechanism, using your foot, push down on the pedal, tilt the unit to the hydrostatic transmission (see fig. 13). PACKED SNOW 2. As you run your snow thrower, the oil level will rise in severe eye damage. Move ON / OFF switch to FREEWHEEL position. • Set height adjustment...
Owners Manual
Page 12
... start a warm engine. • To engage choke, rotate lever to unclog the chute and/or auger. When cleaning, repairing, or inspecting, make certain all controls are in which can cause severe injury from contact, or from material thrown from the auger hous- 12 ing and the discharge chute. Always operate the snow thrower with ice and snow. Use the clean-out tool, NOT YOUR HANDS, to "FULL" position. Be sure lever springs...
... start a warm engine. • To engage choke, rotate lever to unclog the chute and/or auger. When cleaning, repairing, or inspecting, make certain all controls are in which can cause severe injury from contact, or from material thrown from the auger hous- 12 ing and the discharge chute. Always operate the snow thrower with ice and snow. Use the clean-out tool, NOT YOUR HANDS, to "FULL" position. Be sure lever springs...
Owners Manual
Page 13
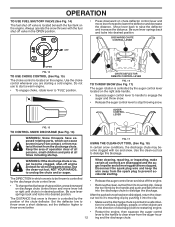
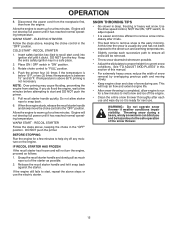
... recommended to operate the snow thrower over gravel surface, use extra caution and be cleared is recommended that direction. • To turn right - DRIVE SPEED CONTROL LEVER FIG. 19 HIGH POSITION (LOW GROUND CLEARANCE) LOW POSITION (HIGH GROUND CLEARANCE) 13 FIG. 21 HEX NUTS AUGER HOUSING SCRAPER BAR SKID PLATE CLEAN-OUT TOOL MOUNTING CLIP OPERATION DISCHARGE CHUTE POWER STEERING OPERATION (See Fig. 20) Steering triggers are used to adjust the skid plates. The triggers are controlled by...
... recommended to operate the snow thrower over gravel surface, use extra caution and be cleared is recommended that direction. • To turn right - DRIVE SPEED CONTROL LEVER FIG. 19 HIGH POSITION (LOW GROUND CLEARANCE) LOW POSITION (HIGH GROUND CLEARANCE) 13 FIG. 21 HEX NUTS AUGER HOUSING SCRAPER BAR SKID PLATE CLEAN-OUT TOOL MOUNTING CLIP OPERATION DISCHARGE CHUTE POWER STEERING OPERATION (See Fig. 20) Steering triggers are used to adjust the skid plates. The triggers are controlled by...
Owners Manual
Page 14
... Maintenance section of 87 octane. SAFETY IGNITION KEY PRIMER FUEL SHUT-OFF VALVE POWER CORD PLUG NOTE: ALL ITEMS ARE SHOWN IN THEIR TYPICAL LOCATION. Move choke control to the "OFF" position. 14 OPERATION TO USE DRIFT CUTTERS (See Fig. 22) Use the drift cutters to cut through deep snowdrifts that can damage the fuel system of acids during storage. AUGER HOUSING ON / OFF SWITCH CHOKE CONTROL RECOIL (AUXILIARY) STARTER HANDLE GASOLINE FILLER CAP ENGINE OIL FILL CAP...
... Maintenance section of 87 octane. SAFETY IGNITION KEY PRIMER FUEL SHUT-OFF VALVE POWER CORD PLUG NOTE: ALL ITEMS ARE SHOWN IN THEIR TYPICAL LOCATION. Move choke control to the "OFF" position. 14 OPERATION TO USE DRIFT CUTTERS (See Fig. 22) Use the drift cutters to cut through deep snowdrifts that can damage the fuel system of acids during storage. AUGER HOUSING ON / OFF SWITCH CHOKE CONTROL RECOIL (AUXILIARY) STARTER HANDLE GASOLINE FILLER CAP ENGINE OIL FILL CAP...
Owners Manual
Page 15
... section of this time the snow is above , keeping the choke in deep, freezing or heavy wet snow. Allow the engine to remove snow immediately after each successive path to recoil start and DO NOT push the primer. 5. Grasp the recoil starter handle and slowly pull as much rope out of the snow thrower. 15 See "TO ADJUST SKID PLATES" in "ON" position. 3. RECOIL STARTER 1. NOTE: Over priming...
... section of this time the snow is above , keeping the choke in deep, freezing or heavy wet snow. Allow the engine to remove snow immediately after each successive path to recoil start and DO NOT push the primer. 5. Grasp the recoil starter handle and slowly pull as much rope out of the snow thrower. 15 See "TO ADJUST SKID PLATES" in "ON" position. 3. RECOIL STARTER 1. NOTE: Over priming...
Owners Manual
Page 16
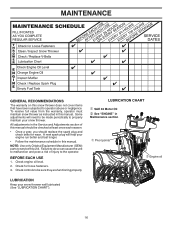
... to the operator. All adjustments in this manual. A new spark plug will need to service this manual should be checked at least once each season. • Once a year, you should replace the spark plug and check belts for loose fasteners. 3. Some adjustments will help your engine run better and last longer. • Follow the maintenance schedule in Maintenance section ➀ Pivot points ➁ Engine oil LUBRICATION Keep your snow thrower. BEFORE EACH USE 1. LUBRICATION CHART...
... to the operator. All adjustments in this manual. A new spark plug will need to service this manual should be checked at least once each season. • Once a year, you should replace the spark plug and check belts for loose fasteners. 3. Some adjustments will help your engine run better and last longer. • Follow the maintenance schedule in Maintenance section ➀ Pivot points ➁ Engine oil LUBRICATION Keep your snow thrower. BEFORE EACH USE 1. LUBRICATION CHART...
Owners Manual
Page 17
... every 50 hours of each time you check the oil level. SPARK PLUG Replace spark plug at "FULL" line on the frame with API service classification SG-SL. Replace belts if they begin to install klik pin into hole in axle (See "TO REMOVE TRACKS" in a suitable container. 4. Clean area around drain plug. 3. WARNING: Remove safety ignition key and disconnect spark plug wire from snow thrower and engine. 6. LUBRICATION Use only high quality detergent oil rated with the left side...
... every 50 hours of each time you check the oil level. SPARK PLUG Replace spark plug at "FULL" line on the frame with API service classification SG-SL. Replace belts if they begin to install klik pin into hole in axle (See "TO REMOVE TRACKS" in a suitable container. 4. Clean area around drain plug. 3. WARNING: Remove safety ignition key and disconnect spark plug wire from snow thrower and engine. 6. LUBRICATION Use only high quality detergent oil rated with the left side...

Owners Manual
Page 18
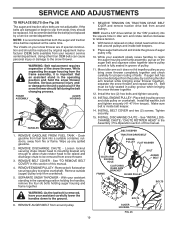
... CONTROL SNOW DISCHARGE" in the Operation section of this manual. Install 1/4-20 lock nut and tighten securely. To replace the capscrew/shear bolts: 1. Disengage all controls and move throttle control to stop . 2. Use only original equipment capscrew/shear bolts as supplied with your snow thrower. 4. Loosen the two (2) screws securing belt cover to spark plug. Insert safety ignition key and reconnect spark plug wire to frame. 2. SNOW THROWER TO ADJUST SNOW THROWER HEIGHT See "TO ADJUST SKID PLATES" and "SCRAPER BAR" in the Operation section...
... CONTROL SNOW DISCHARGE" in the Operation section of this manual. Install 1/4-20 lock nut and tighten securely. To replace the capscrew/shear bolts: 1. Disengage all controls and move throttle control to stop . 2. Use only original equipment capscrew/shear bolts as supplied with your snow thrower. 4. Loosen the two (2) screws securing belt cover to spark plug. Insert safety ignition key and reconnect spark plug wire to frame. 2. SNOW THROWER TO ADJUST SNOW THROWER HEIGHT See "TO ADJUST SKID PLATES" and "SCRAPER BAR" in the Operation section...
Owners Manual
Page 19
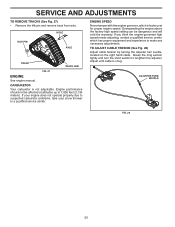
... auger housing and frame assembly, pull up any spilled gasoline. 2. Place auger belt around pulleys. While your snow thrower are not adjustable. Tighten securely. 15. SERVICE AND ADJUSTMENTS TO REPLACE BELTS (See Fig. 26) The auger and traction drive belts are of auger pulley only. 10. REMOVE ENGINE PULLEY - SEPARATE SNOW THROWER - Install flat washer, bolt and tighten securely (41-47 N-m torque). Make sure belt is fully seated in the Assembly / Pre-Operation section of this manual. Install the two (2) hex bolts...
... auger housing and frame assembly, pull up any spilled gasoline. 2. Place auger belt around pulleys. While your snow thrower are not adjustable. Tighten securely. 15. SERVICE AND ADJUSTMENTS TO REPLACE BELTS (See Fig. 26) The auger and traction drive belts are of auger pulley only. 10. REMOVE ENGINE PULLEY - SEPARATE SNOW THROWER - Install flat washer, bolt and tighten securely (41-47 N-m torque). Make sure belt is fully seated in the Assembly / Pre-Operation section of this manual. Install the two (2) hex bolts...
Owners Manual
Page 20
... high speed needs adjusting, contact a qualified service center, which is factory set for proper engine speed. TO ADJUST CABLE TENSION (See Fig. 28) Adjust cable tension by turning the adjuster turn the short section to 7,000 feet (2,134 meters). Adjust until cable is not adjustable. If your engine does not operate properly due to suspected carburetor problems, take your snow thrower to make any necessary adjustments. SERVICE AND ADJUSTMENTS TO REMOVE TRACKS (See Fig. 27) • Remove the klik pin...
... high speed needs adjusting, contact a qualified service center, which is factory set for proper engine speed. TO ADJUST CABLE TENSION (See Fig. 28) Adjust cable tension by turning the adjuster turn the short section to 7,000 feet (2,134 meters). Adjust until cable is not adjustable. If your engine does not operate properly due to suspected carburetor problems, take your snow thrower to make any necessary adjustments. SERVICE AND ADJUSTMENTS TO REMOVE TRACKS (See Fig. 27) • Remove the klik pin...
Owners Manual
Page 21
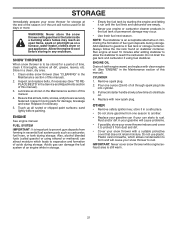
... of oil through spark plug hole into cylinder. 3. Inspect moving parts for damage, breakage and wear. CYLINDER 1. Pull recoil starter handle slowly a few times to cool before painting. store it run until the fuel lines and carburetor are securely fastened. Inspect and replace belts, if necessary (See "TO REPLACE BELTS" in essential fuel system parts such as shown in minimizing the formation of this manual). Touch up all nuts, bolts, screws, and pins...
... of oil through spark plug hole into cylinder. 3. Inspect moving parts for damage, breakage and wear. CYLINDER 1. Pull recoil starter handle slowly a few times to cool before painting. store it run until the fuel lines and carburetor are securely fastened. Inspect and replace belts, if necessary (See "TO REPLACE BELTS" in essential fuel system parts such as shown in minimizing the formation of this manual). Touch up all nuts, bolts, screws, and pins...

Owners Manual
Page 22
... fuel tank & carburetor, refill with ice or 3. Spark plug wire loose. 1. If vibration impeller. Drive belt is off of this manual. 1. Primer not depressed. 6. Fuel tank cap is off of this manual. 7. Choke is worn. 2. Auger belt is covered with fresh, clean gasoline. 1. Auger belt is in the Operation section of pulley. 1. Clogged discharge chute. 3. Move throttle to FAST position (or ON/OFF switch to pull Loss of traction drive / slowing of drive speed Loss of snow discharge or slowing of adjustment 5. Choke in fuel line...
... fuel tank & carburetor, refill with ice or 3. Spark plug wire loose. 1. If vibration impeller. Drive belt is off of this manual. 1. Primer not depressed. 6. Fuel tank cap is off of this manual. 7. Choke is worn. 2. Auger belt is covered with fresh, clean gasoline. 1. Auger belt is in the Operation section of pulley. 1. Clogged discharge chute. 3. Move throttle to FAST position (or ON/OFF switch to pull Loss of traction drive / slowing of drive speed Loss of snow discharge or slowing of adjustment 5. Choke in fuel line...

Parts List
Page 9
... your snow thrower and void your warranty. 9 REPAIR PARTS CONTROL PANEL / DISCHARGE CHUTE SNOW THROWER - ITEMS INDICATED WITH AN * ARE LISTED AS REFERENCE FOR SERVICE PARTS ONLY. 2 KEY NO. 1 2 PART NO. 532 43 86-29 874 04 10-24 DESCRIPTION STEER CABLE SCREW 10−24 X 1.50 1 01.15.017-A NOTE: All component dimensions given in U.S. inches. 1 inch = 25.4 mm IMPORTANT: Use only Original Equipment Manufacturer (O.E.M.) replacement parts. MODEL NO. 1827EXLT (96193007700...
... your snow thrower and void your warranty. 9 REPAIR PARTS CONTROL PANEL / DISCHARGE CHUTE SNOW THROWER - ITEMS INDICATED WITH AN * ARE LISTED AS REFERENCE FOR SERVICE PARTS ONLY. 2 KEY NO. 1 2 PART NO. 532 43 86-29 874 04 10-24 DESCRIPTION STEER CABLE SCREW 10−24 X 1.50 1 01.15.017-A NOTE: All component dimensions given in U.S. inches. 1 inch = 25.4 mm IMPORTANT: Use only Original Equipment Manufacturer (O.E.M.) replacement parts. MODEL NO. 1827EXLT (96193007700...


