
Owners Manual
Page 2
... electric starting motors. 6. If this unit. Operation 1. Stay alert for all doormats, sleds, boards, wires, and other engine parts become extremely hot during operation or while performing an adjustment or repair to vibrate abnormally, stop the unit and disengage the controls quickly... Keep the nozzle in serious injury. Failure to prevent accidental starting the engine (motor). 3. WARNING: Snow throwers have exposed rotating parts, which can get caught in the manual(s) before restarting and operating the snow thrower. 4. Preparation 1. it cannot contact plug in...
... electric starting motors. 6. If this unit. Operation 1. Stay alert for all doormats, sleds, boards, wires, and other engine parts become extremely hot during operation or while performing an adjustment or repair to vibrate abnormally, stop the unit and disengage the controls quickly... Keep the nozzle in serious injury. Failure to prevent accidental starting the engine (motor). 3. WARNING: Snow throwers have exposed rotating parts, which can get caught in the manual(s) before restarting and operating the snow thrower. 4. Preparation 1. it cannot contact plug in...
Owners Manual
Page 3
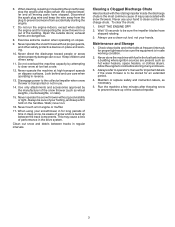
... weights, counterweights, or cabs). 15. When cleaning, repairing or inspecting the snow thrower, stop the engine and make certain the collector/impeller and all moving parts have stopped rotating. 3. Never direct the discharge toward people or areas where property damage can occur. Never operate the machine at frequent intervals for transporting...
... weights, counterweights, or cabs). 15. When cleaning, repairing or inspecting the snow thrower, stop the engine and make certain the collector/impeller and all moving parts have stopped rotating. 3. Never direct the discharge toward people or areas where property damage can occur. Never operate the machine at frequent intervals for transporting...
Owners Manual
Page 5
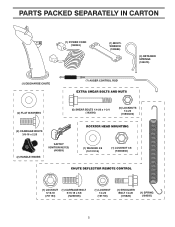
PARTS PACKED SEPARATELY IN CARTON (1) POWER CORD (198563) (1) MULTIWRENCH (180684) (3) RETAINER SPRINGS (169675) (2) FLAT WASHERS (6) SHEAR BOLTS 1/4-20 x 1-3/4 (192090) (6) LOCKNUTS 1/4-20 (73800400) (2) CARRIAGE BOLTS 3/8-16 x 2.25 (2) HANDLE KNOBS SAFTEY IGNITION KEY(S) (443059) (1) WASHER 3/8 (19131316) (1) LOCKNUT 3/8 (73800600) (1) LOCKNUT (1) CARRIAGE BOLT 5/16-18 5/16-18 x 5/8 (751153) (72250505) (1) LOCKNUT 1/4-20 (191730) (1) SHOULDER BOLT 1/4-20 (179829) (1) SPRING (184505) 5
PARTS PACKED SEPARATELY IN CARTON (1) POWER CORD (198563) (1) MULTIWRENCH (180684) (3) RETAINER SPRINGS (169675) (2) FLAT WASHERS (6) SHEAR BOLTS 1/4-20 x 1-3/4 (192090) (6) LOCKNUTS 1/4-20 (73800400) (2) CARRIAGE BOLTS 3/8-16 x 2.25 (2) HANDLE KNOBS SAFTEY IGNITION KEY(S) (443059) (1) WASHER 3/8 (19131316) (1) LOCKNUT 3/8 (73800600) (1) LOCKNUT (1) CARRIAGE BOLT 5/16-18 5/16-18 x 5/8 (751153) (72250505) (1) LOCKNUT 1/4-20 (191730) (1) SHOULDER BOLT 1/4-20 (179829) (1) SPRING (184505) 5
Owners Manual
Page 6
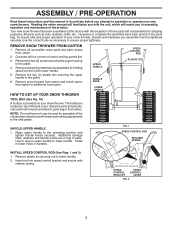
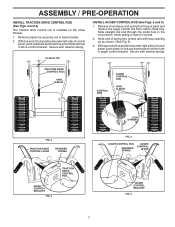
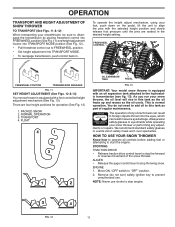
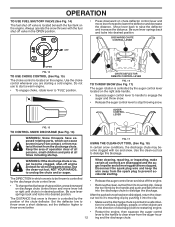
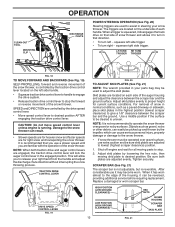
...into speed control bracket and secure with the exception of your snow thrower. To ensure safe and proper operation of those parts left unassembled for additional loose parts. REMOVE SNOW THROWER FROM CARTON 1. UPPER HANDLE HANDLE KNOB LOWER HANDLE SPEED CONTROL ROD PLASTIC TIE HOW TO SET UP...assembly, operation and maintenance of parts. Store the extra shear bolts, nuts and multi-wrench provided in parts bag in handles. All parts such as necessary to complete the assembly have been placed in the parts bag. Cut down all accessible loose parts and parts boxes from carton and check...
...into speed control bracket and secure with the exception of your snow thrower. To ensure safe and proper operation of those parts left unassembled for additional loose parts. REMOVE SNOW THROWER FROM CARTON 1. UPPER HANDLE HANDLE KNOB LOWER HANDLE SPEED CONTROL ROD PLASTIC TIE HOW TO SET UP...assembly, operation and maintenance of parts. Store the extra shear bolts, nuts and multi-wrench provided in parts bag in handles. All parts such as necessary to complete the assembly have been placed in the parts bag. Cut down all accessible loose parts and parts boxes from carton and check...
Owners Manual
Page 7
... CONTROL LEVER AUGER CONTROL BRACKET FIG. 6 7 With top end of rod positioned under right side of control panel, push down and insert top end of parts and retrieve the auger control rod from carton chute tray.
... CONTROL LEVER AUGER CONTROL BRACKET FIG. 6 7 With top end of rod positioned under right side of control panel, push down and insert top end of parts and retrieve the auger control rod from carton chute tray.

Owners Manual
Page 8
... shoulder bolt and 1/4-20 locknut as shown. ASSEMBLY / PRE-OPERATION INSTALL DISCHARGE CHUTE / CHUTE ROTATOR HEAD (See Fig. 7) NOTE: The multi-wrench provided in your parts bag may be loose on shoulder bolt. 3. Install remote cable bracket to install the chute rotator head. 1. Install remote cable eyelet to align square and...
... shoulder bolt and 1/4-20 locknut as shown. ASSEMBLY / PRE-OPERATION INSTALL DISCHARGE CHUTE / CHUTE ROTATOR HEAD (See Fig. 7) NOTE: The multi-wrench provided in your parts bag may be loose on shoulder bolt. 3. Install remote cable bracket to install the chute rotator head. 1. Install remote cable eyelet to align square and...
Owners Manual
Page 11
... movement of the snow thrower. STOPPING TRACTION DRIVE • Release traction drive control lever to this tank as the oil heats up and recess as part of any adjustments or repairs. Move ON / OFF switch to start the engine. Remove (do not need to add oil to stop throwing snow. HOW...
... movement of the snow thrower. STOPPING TRACTION DRIVE • Release traction drive control lever to this tank as the oil heats up and recess as part of any adjustments or repairs. Move ON / OFF switch to start the engine. Remove (do not need to add oil to stop throwing snow. HOW...
Owners Manual
Page 12
...12 ing and the discharge chute. Keep the area of operation clear of all persons, small children and pets at all moving parts have exposed rotating parts, which snow is to dislodge the blockage. WARNING: If the discharge chute or auger become clogged with the fuel shut-off ... warm engine. • To engage choke, rotate lever to throw snow a short distance; When cleaning, repairing, or inspecting, make certain all moving parts to clear snow from it into desired position. AUGER CONTROL LEVER FIG. 15 TO CONTROL SNOW DISCHARGE (See Fig. 16) WARNING: Snow throwers have stopped...
...12 ing and the discharge chute. Keep the area of operation clear of all persons, small children and pets at all moving parts have exposed rotating parts, which snow is to dislodge the blockage. WARNING: If the discharge chute or auger become clogged with the fuel shut-off ... warm engine. • To engage choke, rotate lever to throw snow a short distance; When cleaning, repairing, or inspecting, make certain all moving parts to clear snow from it into desired position. AUGER CONTROL LEVER FIG. 15 TO CONTROL SNOW DISCHARGE (See Fig. 16) WARNING: Snow throwers have stopped...
Owners Manual
Page 13
CLEAN-OUT TOOL MOUNTING CLIP OPERATION DISCHARGE CHUTE POWER STEERING OPERATION (See Fig. 20) Steering triggers are used to assist in steering your parts bag may become worn. NOTE: When both plates are for all moving skid plate to adjust the skid plates. For removal of the snow ... SKID PLATE When a trigger is controlled by the impeller, which can be sure skid plates are controlled by loosening the hex nuts, then moving parts to stop the forward or reverse movement of snow in normal conditions, such as gravel, rocks or other debris, can easily be picked up and...
CLEAN-OUT TOOL MOUNTING CLIP OPERATION DISCHARGE CHUTE POWER STEERING OPERATION (See Fig. 20) Steering triggers are used to assist in steering your parts bag may become worn. NOTE: When both plates are for all moving skid plate to adjust the skid plates. For removal of the snow ... SKID PLATE When a trigger is controlled by the impeller, which can be sure skid plates are controlled by loosening the hex nuts, then moving parts to stop the forward or reverse movement of snow in normal conditions, such as gravel, rocks or other debris, can easily be picked up and...
Owners Manual
Page 16
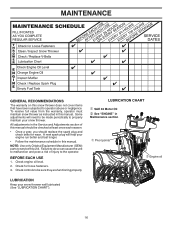
... unit. A new spark plug will need to be sure they are functioning properly. All adjustments in this manual. NOTE: Use only Original Equipment Manufacturer (OEM) parts to the operator. BEFORE EACH USE 1. MAINTENANCE GENERAL RECOMMENDATIONS The warranty on this snow thrower does not cover items that have been subjected to properly...
... unit. A new spark plug will need to be sure they are functioning properly. All adjustments in this manual. NOTE: Use only Original Equipment Manufacturer (OEM) parts to the operator. BEFORE EACH USE 1. MAINTENANCE GENERAL RECOMMENDATIONS The warranty on this snow thrower does not cover items that have been subjected to properly...

Owners Manual
Page 18
.... Install 1/4-20 locknuts and tighten securely. Should a foreign object or ice become lodged in the OFF position. 2. Wait for all moving parts to the auger shaft with your snow thrower. 4. Remove safety ignition key and disconnect spark plug wire from spark plug. Disengage all controls and...equipment shear bolts as supplied with two (2) capscrew/shear bolts and hex nuts. Make sure the augers and all moving parts have sheared. Wait for all moving parts to any service or adjustments: 1. Remove safety ignition key. 3. Align holes in impeller hub with hole in impeller shaft...
.... Install 1/4-20 locknuts and tighten securely. Should a foreign object or ice become lodged in the OFF position. 2. Wait for all moving parts to the auger shaft with your snow thrower. 4. Remove safety ignition key and disconnect spark plug wire from spark plug. Disengage all controls and...equipment shear bolts as supplied with two (2) capscrew/shear bolts and hex nuts. Make sure the augers and all moving parts have sheared. Wait for all moving parts to any service or adjustments: 1. Remove safety ignition key. 3. Align holes in impeller hub with hole in impeller shaft...
Owners Manual
Page 21
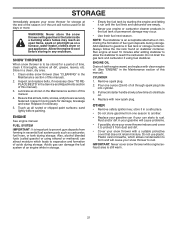
... season or if the unit will cause your can damage the fuel system of this manual). Be sure that does not retain moisture. Inspect moving parts for 30 days or more. Touch up all nuts, bolts, screws, and pins are empty. • Never use plastic. Also, alcohol blended fuels (called ... to allow the stabilizer to reach the carburetor. SNOW THROWER When snow thrower is important to prevent gum deposits from forming in essential fuel system parts such as shown in the fuel tank or permanent damage may reach an open flame, spark or pilot light as on stabilizer container. FUEL SYSTEM...
... season or if the unit will cause your can damage the fuel system of this manual). Be sure that does not retain moisture. Inspect moving parts for 30 days or more. Touch up all nuts, bolts, screws, and pins are empty. • Never use plastic. Also, alcohol blended fuels (called ... to allow the stabilizer to reach the carburetor. SNOW THROWER When snow thrower is important to prevent gum deposits from forming in essential fuel system parts such as shown in the fuel tank or permanent damage may reach an open flame, spark or pilot light as on stabilizer container. FUEL SYSTEM...

Owners Manual
Page 22
...fuel. 3. snow. 4. Clean or replace muffler. 1. Water in the Operation section of snow discharge CAUSE CORRECTION 1. Replace damaged parts. remains, contact an authorized service center/department. 1. Remove snow and ice build up in FULL position. 1. Auger belt is ...gasoline. 1. Engine is not inserted. 2. Empty fuel tank & carburetor, refill with fresh, clean gasoline. 4. Spark plug wire loose. 1. Loose parts or damaged augers or 1. Frozen recoil starter. 1. Contact an authorized service center/department. 4. Insert safety ignition key. 3. Move to spark plug....
...fuel. 3. snow. 4. Clean or replace muffler. 1. Water in the Operation section of snow discharge CAUSE CORRECTION 1. Replace damaged parts. remains, contact an authorized service center/department. 1. Remove snow and ice build up in FULL position. 1. Auger belt is ...gasoline. 1. Engine is not inserted. 2. Empty fuel tank & carburetor, refill with fresh, clean gasoline. 4. Spark plug wire loose. 1. Loose parts or damaged augers or 1. Frozen recoil starter. 1. Contact an authorized service center/department. 4. Insert safety ignition key. 3. Move to spark plug....

Parts List
Page 2
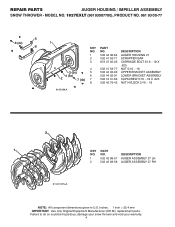
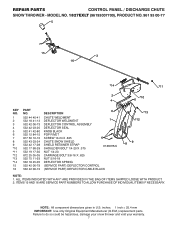
inches. 1 inch = 25.4 mm IMPORTANT: Use only Original Equipment Manufacturer (O.E.M.) replacement parts. Failure to do so could be hazardous, damage your snow thrower and void your warranty. 2 REPAIR PARTS AUGER HOUSING / IMPELLER ASSEMBLY SNOW THROWER - MODEL NO. 1827EXLT (96193007700), PRODUCT NO. 961 93 00-77 5 15 14 4 11 6 11 16 12 13 11 3 12 10 11 7 8 17 1 9 37 2 9 9 33 37 32 34 30 31 31 29 28 26 27 36 20 21 22 23 25 35 24 23 22 21 18 19 2 (EXPLODED) 01.07.026-E NOTE: All component dimensions given in U.S.
inches. 1 inch = 25.4 mm IMPORTANT: Use only Original Equipment Manufacturer (O.E.M.) replacement parts. Failure to do so could be hazardous, damage your snow thrower and void your warranty. 2 REPAIR PARTS AUGER HOUSING / IMPELLER ASSEMBLY SNOW THROWER - MODEL NO. 1827EXLT (96193007700), PRODUCT NO. 961 93 00-77 5 15 14 4 11 6 11 16 12 13 11 3 12 10 11 7 8 17 1 9 37 2 9 9 33 37 32 34 30 31 31 29 28 26 27 36 20 21 22 23 25 35 24 23 22 21 18 19 2 (EXPLODED) 01.07.026-E NOTE: All component dimensions given in U.S.

Parts List
Page 3
MODEL NO. 1827EXLT (96193007700), PRODUCT NO. 961 93 00-77 KEY NO. 1 2 3 4 5 6 7 8 9 10 11 12 13 14 15 16 17 18 19 20 21 22 23 24 25 26 27 28 29 30 31 32 33 34 35 36 37 PART NO. 532 18 41-05 532 42 71-48 532 18 89... SHAFT ROLL PIN THRUST WASHER THRUST BEARING BEARING O-RING SCREW 5/16-18 X .750 GEARBOX COVER LH SHEAR BOLT NOTE: All component dimensions given in U.S. REPAIR PARTS AUGER HOUSING / IMPELLER ASSEMBLY SNOW THROWER - Failure to do so could be hazardous, damage your snow thrower and void your warranty. 3 inches. 1 inch = 25.4 mm...
MODEL NO. 1827EXLT (96193007700), PRODUCT NO. 961 93 00-77 KEY NO. 1 2 3 4 5 6 7 8 9 10 11 12 13 14 15 16 17 18 19 20 21 22 23 24 25 26 27 28 29 30 31 32 33 34 35 36 37 PART NO. 532 18 41-05 532 42 71-48 532 18 89... SHAFT ROLL PIN THRUST WASHER THRUST BEARING BEARING O-RING SCREW 5/16-18 X .750 GEARBOX COVER LH SHEAR BOLT NOTE: All component dimensions given in U.S. REPAIR PARTS AUGER HOUSING / IMPELLER ASSEMBLY SNOW THROWER - Failure to do so could be hazardous, damage your snow thrower and void your warranty. 3 inches. 1 inch = 25.4 mm...
Parts List
Page 4
... ASSEMBLY 532 16 31-83 CAPSCREW 5/16 - 18 X .625 532 42 79-42 NUT NYLOCK 5/16 - 18 01.07.030-A 2 1 KEY NO. 1 2 PART NO. 532 42 96-57 532 42 69-58 DESCRIPTION AUGER ASSEMBLY 27 LH AUGER ASSEMBLY 27 RH 01.07.015-A NOTE: All component dimensions... given in U.S. inches. 1 inch = 25.4 mm IMPORTANT: Use only Original Equipment Manufacturer (O.E.M.) replacement parts. NO. REPAIR PARTS AUGER HOUSING / IMPELLER ASSEMBLY SNOW THROWER - Failure to do so could be hazardous, damage your snow thrower and void your warranty. 4 MODEL NO...
... ASSEMBLY 532 16 31-83 CAPSCREW 5/16 - 18 X .625 532 42 79-42 NUT NYLOCK 5/16 - 18 01.07.030-A 2 1 KEY NO. 1 2 PART NO. 532 42 96-57 532 42 69-58 DESCRIPTION AUGER ASSEMBLY 27 LH AUGER ASSEMBLY 27 RH 01.07.015-A NOTE: All component dimensions... given in U.S. inches. 1 inch = 25.4 mm IMPORTANT: Use only Original Equipment Manufacturer (O.E.M.) replacement parts. NO. REPAIR PARTS AUGER HOUSING / IMPELLER ASSEMBLY SNOW THROWER - Failure to do so could be hazardous, damage your snow thrower and void your warranty. 4 MODEL NO...
Parts List
Page 5
MODEL NO. 1827EXLT (96193007700), PRODUCT NO. 961 93 00-77 3 3 01.11.002-B 2 2 1 1 KEY NO. 1 2 3 PART NO. 532 40 78-39 872 27 05-06 532 75 11-53 DESCRIPTION SKID PLATE CARRIAGE BOLT 5/16−18 X .750 NUT 5/16−18 4 2 3 1 1 4 5 2 5 3 01.07.025-D KEY NO. 1 2 3 4 5 PART NO. 532 18 81-70 532... to do so could be hazardous, damage your snow thrower and void your warranty. 5 inches. 1 inch = 25.4 mm IMPORTANT: Use only Original Equipment Manufacturer (O.E.M.) replacement parts. REPAIR PARTS AUGER HOUSING / IMPELLER ASSEMBLY SNOW THROWER -
MODEL NO. 1827EXLT (96193007700), PRODUCT NO. 961 93 00-77 3 3 01.11.002-B 2 2 1 1 KEY NO. 1 2 3 PART NO. 532 40 78-39 872 27 05-06 532 75 11-53 DESCRIPTION SKID PLATE CARRIAGE BOLT 5/16−18 X .750 NUT 5/16−18 4 2 3 1 1 4 5 2 5 3 01.07.025-D KEY NO. 1 2 3 4 5 PART NO. 532 18 81-70 532... to do so could be hazardous, damage your snow thrower and void your warranty. 5 inches. 1 inch = 25.4 mm IMPORTANT: Use only Original Equipment Manufacturer (O.E.M.) replacement parts. REPAIR PARTS AUGER HOUSING / IMPELLER ASSEMBLY SNOW THROWER -

Parts List
Page 6
...ASSEMBLY SNOW THROWER - inches. 1 inch = 25.4 mm IMPORTANT: Use only Original Equipment Manufacturer (O.E.M.) replacement parts. Failure to do so could be hazardous, damage your snow thrower and void your warranty. 6 DESCRIPTION 1...8722;18 3 4 819 11 22-06 WASHER 01.17.002-B 3 2 1 3 4 2 5 01.16.001-B 5 4 3 1 KEY NO. 1 2 3 4 5 PART NO. 532 18 47-47 872 27 05-06 532 17 92-46 810 04 05-00 532 12 86-38 DESCRIPTION DRIFT CUTTER BAR...16 NUT 5/16−18 NOTE: All component dimensions given in U.S. NO. MODEL NO. 1827EXLT (96193007700), PRODUCT NO. 961 93 00-77 2 4 2 1 4 KEY...
...ASSEMBLY SNOW THROWER - inches. 1 inch = 25.4 mm IMPORTANT: Use only Original Equipment Manufacturer (O.E.M.) replacement parts. Failure to do so could be hazardous, damage your snow thrower and void your warranty. 6 DESCRIPTION 1...8722;18 3 4 819 11 22-06 WASHER 01.17.002-B 3 2 1 3 4 2 5 01.16.001-B 5 4 3 1 KEY NO. 1 2 3 4 5 PART NO. 532 18 47-47 872 27 05-06 532 17 92-46 810 04 05-00 532 12 86-38 DESCRIPTION DRIFT CUTTER BAR...16 NUT 5/16−18 NOTE: All component dimensions given in U.S. NO. MODEL NO. 1827EXLT (96193007700), PRODUCT NO. 961 93 00-77 2 4 2 1 4 KEY...
Parts List
Page 7
... to do so could be hazardous, damage your snow thrower and void your warranty. 7 inches. 1 inch = 25.4 mm IMPORTANT: Use only Original Equipment Manufacturer (O.E.M.) replacement parts. MODEL NO. 1827EXLT (96193007700), PRODUCT NO. 961 93 00-77 5 7 15 3 16 *14 *11 2 *10 4 6 KEY NO. 1 2 3 4 5 6 7 8 9 *10 *11 *12 *13 *14 15 16... PART NO. 532 44 40-41 532 18 41-13 532 42 06-73 532 42 03-25 532 41 42-80 532 12 84-15 ...
... to do so could be hazardous, damage your snow thrower and void your warranty. 7 inches. 1 inch = 25.4 mm IMPORTANT: Use only Original Equipment Manufacturer (O.E.M.) replacement parts. MODEL NO. 1827EXLT (96193007700), PRODUCT NO. 961 93 00-77 5 7 15 3 16 *14 *11 2 *10 4 6 KEY NO. 1 2 3 4 5 6 7 8 9 *10 *11 *12 *13 *14 15 16... PART NO. 532 44 40-41 532 18 41-13 532 42 06-73 532 42 03-25 532 41 42-80 532 12 84-15 ...
Parts List
Page 8
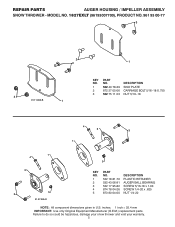
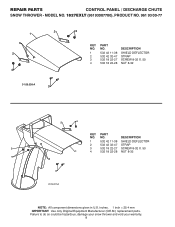
... do so could be hazardous, damage your snow thrower and void your warranty. 8 inches. 1 inch = 25.4 mm IMPORTANT: Use only Original Equipment Manufacturer (O.E.M.) replacement parts. DESCRIPTION 1 532 42 11-38 SHIELD DEFLECTOR 2 532 42 32-47 STRAP 2 3 532 18 22-27 SCREW 8-32 X .50 1 4 532 18 22-...28 NUT 8-32 4 3 3 01.14.011-A NOTE: All component dimensions given in U.S. MODEL NO. 1827EXLT (96193007700), PRODUCT NO. 961 93 00-77 2 1 3 2 4 01.09.009-A 3 4 KEY NO. 1 2 3 4 PART NO. 532 42 11-38 532 42 32-47 532 18 22-27 532 18 22-28 DESCRIPTION SHIELD...
... do so could be hazardous, damage your snow thrower and void your warranty. 8 inches. 1 inch = 25.4 mm IMPORTANT: Use only Original Equipment Manufacturer (O.E.M.) replacement parts. DESCRIPTION 1 532 42 11-38 SHIELD DEFLECTOR 2 532 42 32-47 STRAP 2 3 532 18 22-27 SCREW 8-32 X .50 1 4 532 18 22-...28 NUT 8-32 4 3 3 01.14.011-A NOTE: All component dimensions given in U.S. MODEL NO. 1827EXLT (96193007700), PRODUCT NO. 961 93 00-77 2 1 3 2 4 01.09.009-A 3 4 KEY NO. 1 2 3 4 PART NO. 532 42 11-38 532 42 32-47 532 18 22-27 532 18 22-28 DESCRIPTION SHIELD...


