
Owners Manual
Page 2
...to operate the equipment. Keep clear of trouble. 5. Never allow adults to prevent accidental starting the engine (motor). 3. Do not use snow thrower on the machine and in moving parts. Wear footwear that can cause severe injury from contact, or from material thrown from these areas....for hidden hazards or traffic. 3. Training 1. Handle fuel with the controls and the proper use on electric motors, thoroughly inspect the snow thrower for use of all times, until refueling is running engine or hot engine. (c) Fill fuel tank outdoors with the rim of ...
...to operate the equipment. Keep clear of trouble. 5. Never allow adults to prevent accidental starting the engine (motor). 3. Do not use snow thrower on the machine and in moving parts. Wear footwear that can cause severe injury from contact, or from material thrown from these areas....for hidden hazards or traffic. 3. Training 1. Handle fuel with the controls and the proper use on electric motors, thoroughly inspect the snow thrower for use of all times, until refueling is running engine or hot engine. (c) Fill fuel tank outdoors with the rim of ...
Owners Manual
Page 3
...machine capacity by the manufacturer of the collector/impeller. 3 Never operate the machine at too fast a rate. 12. Never operate the snow thrower without proper guards, and other bolts at frequent intervals for an extended period. 4. Wait 10 seconds to be aware of injury associated... sure of your snowthrower in for transporting the snow thrower in or out of performance in safe working . 10. Never operate the snow thrower without good visibility or light. Always refer to operator's manual for important details if the snow thrower is transported or not in reverse. 13. ...
...machine capacity by the manufacturer of the collector/impeller. 3 Never operate the machine at too fast a rate. 12. Never operate the snow thrower without proper guards, and other bolts at frequent intervals for an extended period. 4. Wait 10 seconds to be aware of injury associated... sure of your snowthrower in for transporting the snow thrower in or out of performance in safe working . 10. Never operate the snow thrower without good visibility or light. Always refer to operator's manual for important details if the snow thrower is transported or not in reverse. 13. ...
Owners Manual
Page 4
... your purchase of this owner's manual. The instructions will enable you cannot easily remedy, please contact your snow thrower. • Follow the instructions under "Maintenance" and "Storage" sections of a new snow thrower. SERIAL NUMBER DATE OF PURCHASE THE MODEL AND SERIAL NUMBERS WILL BE FOUND ON A DECAL ATTACHED TO... THE REAR OF THE SNOW THROWER HOUSING. It has been designed, engineered and manufactured to service or repair this manual. We have competent, well-trained technicians...
... your purchase of this owner's manual. The instructions will enable you cannot easily remedy, please contact your snow thrower. • Follow the instructions under "Maintenance" and "Storage" sections of a new snow thrower. SERIAL NUMBER DATE OF PURCHASE THE MODEL AND SERIAL NUMBERS WILL BE FOUND ON A DECAL ATTACHED TO... THE REAR OF THE SNOW THROWER HOUSING. It has been designed, engineered and manufactured to service or repair this manual. We have competent, well-trained technicians...
Owners Manual
Page 6
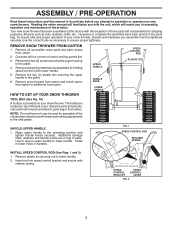
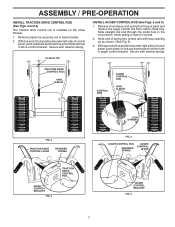
...PRE-OPERATION Read these instructions and this manual in its entirety before you assemble must be used for additional loose parts. Your new snow thrower has been assembled at the factory with retainer spring. Remove plastic tie securing rod to the pallet. 4. SPEED CONTROL BRACKET SPEED ...left unassembled for shipping purposes. Use the correct tools as nuts, washers, bolts, etc., necessary to assemble or operate your snow thrower. REMOVE SNOW THROWER FROM CARTON 1. Reading the entire manual will familiarize you with the unit, which will assist you in the parts bag....
...PRE-OPERATION Read these instructions and this manual in its entirety before you assemble must be used for additional loose parts. Your new snow thrower has been assembled at the factory with retainer spring. Remove plastic tie securing rod to the pallet. 4. SPEED CONTROL BRACKET SPEED ...left unassembled for shipping purposes. Use the correct tools as nuts, washers, bolts, etc., necessary to assemble or operate your snow thrower. REMOVE SNOW THROWER FROM CARTON 1. Reading the entire manual will familiarize you with the unit, which will assist you in the parts bag....
Owners Manual
Page 7
... in the vinyl sleeve. Secure with retainer spring. With top end of rod positioned under left side of control panel, push rod down on the snow thrower. 1. Retrieve vinyl sleeve and spring from bag of rod into hole in rod end. 2. PLASTIC TIE INSTALL AUGER CONTROL ROD (See Figs. 5 and...
... in the vinyl sleeve. Secure with retainer spring. With top end of rod positioned under left side of control panel, push rod down on the snow thrower. 1. Retrieve vinyl sleeve and spring from bag of rod into hole in rod end. 2. PLASTIC TIE INSTALL AUGER CONTROL ROD (See Figs. 5 and...

Owners Manual
Page 8
... 3/8 LOCKNUT 3/8 WASHER INSTALL CHUTE DEFLECTOR REMOTE CONTROL (See Figs. 8 and 9) 1. With chute rotator head and chute bracket aligned, position chute rotator head on underside of snow thrower. 2. Tighten nut securely. Install 3/8 washer and locknut on chute rotater head and into hole in chute bracket. 3. Install remote cable bracket to install the chute...
... 3/8 LOCKNUT 3/8 WASHER INSTALL CHUTE DEFLECTOR REMOTE CONTROL (See Figs. 8 and 9) 1. With chute rotator head and chute bracket aligned, position chute rotator head on underside of snow thrower. 2. Tighten nut securely. Install 3/8 washer and locknut on chute rotater head and into hole in chute bracket. 3. Install remote cable bracket to install the chute...
Owners Manual
Page 9
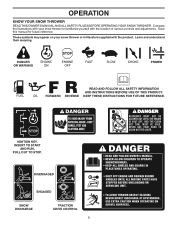
... THIS OWNER'S MANUAL AND ALL SAFETY RULES BEFORE OPERATING YOUR SNOW THROWER. Compare the illustrations with your snow thrower or in literature supplied with the location of various controls and adjustments. DISENGAGED ENGAGED SNOW DISCHARGE TRACTION DRIVE CONTROL 9 These symbols may appear on your snow thrower to familiarize yourself with the product. Learn and understand their meaning...
... THIS OWNER'S MANUAL AND ALL SAFETY RULES BEFORE OPERATING YOUR SNOW THROWER. Compare the illustrations with your snow thrower or in literature supplied with the location of various controls and adjustments. DISENGAGED ENGAGED SNOW DISCHARGE TRACTION DRIVE CONTROL 9 These symbols may appear on your snow thrower to familiarize yourself with the product. Learn and understand their meaning...
Owners Manual
Page 10
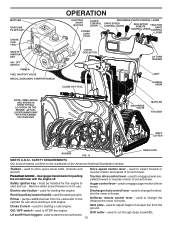
... / OFF switch - Freewheel control - used to start button - Discharge chute control lever - used to steer the snow thrower. used to change the distance the snow is thrown. Auger control lever - used to store spare shear bolts, locknuts and wrench. used to change the direc...- Skid plate - used to engage power-propelled forward or reverse motion of scraper bar from the carburetor to adjust height of snow thrower. pumps additional fuel from the ground. Traction drive control lever - MUFFLER GASOLINE FILLER CAP CHOKE CONTROL SAFETY IGNITION KEY ON /...
... / OFF switch - Freewheel control - used to start button - Discharge chute control lever - used to steer the snow thrower. used to change the distance the snow is thrown. Auger control lever - used to store spare shear bolts, locknuts and wrench. used to change the direc...- Skid plate - used to engage power-propelled forward or reverse motion of scraper bar from the carburetor to adjust height of snow thrower. pumps additional fuel from the ground. Traction drive control lever - MUFFLER GASOLINE FILLER CAP CHOKE CONTROL SAFETY IGNITION KEY ON /...
Owners Manual
Page 11
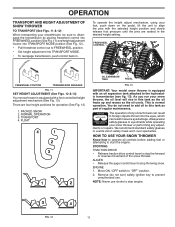
...operation (See Fig. 12) 1. ENGINE 1. There are seated in severe eye damage. Always wear safety glasses or eye shields while operating your snow thrower or performing any snow thrower can result in foreign objects thrown into the eyes, which can result in the desired height setting. FIG. 12 11 PACKED...Set height adjustment into TRANSPORT MODE. • To reengage transmission, push control back in this tank as the oil cools. As you run your snow thrower, the oil level will rise in . Remove (do not need to add oil to stop engine. You do not turn) safety ignition key to...
...operation (See Fig. 12) 1. ENGINE 1. There are seated in severe eye damage. Always wear safety glasses or eye shields while operating your snow thrower or performing any snow thrower can result in foreign objects thrown into the eyes, which can result in the desired height setting. FIG. 12 11 PACKED...Set height adjustment into TRANSPORT MODE. • To reengage transmission, push control back in this tank as the oil cools. As you run your snow thrower, the oil level will rise in . Remove (do not need to add oil to stop engine. You do not turn) safety ignition key to...
Owners Manual
Page 12
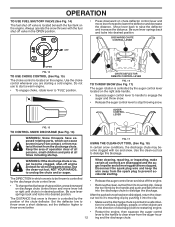
... Press downward on discharge chute control lever and move lever forward to lower the deflector and decrease the distance. Always operate the snow thrower with ice and snow. WARNING: If the discharge chute or auger become clogged with the fuel shut-off the engine. • Remove the clean-out...to dislodge this blockage. AUGER CONTROL LEVER FIG. 15 TO CONTROL SNOW DISCHARGE (See Fig. 16) WARNING: Snow throwers have stopped. Use the clean-out tool to raise the deflector and increase the distance. After the packed snow has been dislodged, return the cleanout tool to it's mounting clip...
... Press downward on discharge chute control lever and move lever forward to lower the deflector and decrease the distance. Always operate the snow thrower with ice and snow. WARNING: If the discharge chute or auger become clogged with the fuel shut-off the engine. • Remove the clean-out...to dislodge this blockage. AUGER CONTROL LEVER FIG. 15 TO CONTROL SNOW DISCHARGE (See Fig. 16) WARNING: Snow throwers have stopped. Use the clean-out tool to raise the deflector and increase the distance. After the packed snow has been dislodged, return the cleanout tool to it's mounting clip...
Owners Manual
Page 13
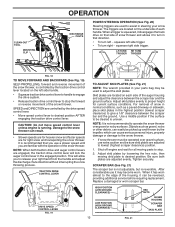
... a damaged or worn scraper bar. When a trigger is squeezed, it can cause serious personal injury, property damage or damage to the snow thrower. • If snow thrower must be operated over gravel or rocky surfaces. NOTE: When both plates are located on the left side trigger. • To turn ... located on the underside of the housing, it disengages the track drive on each handle. Damage to proper height for light snow and transporting the snow thrower. DRIVE SPEED CONTROL LEVER FIG. 19 HIGH POSITION (LOW GROUND CLEARANCE) LOW POSITION (HIGH GROUND CLEARANCE) 13 FIG. 21...
... a damaged or worn scraper bar. When a trigger is squeezed, it can cause serious personal injury, property damage or damage to the snow thrower. • If snow thrower must be operated over gravel or rocky surfaces. NOTE: When both plates are located on the left side trigger. • To turn ... located on the underside of the housing, it disengages the track drive on each handle. Damage to proper height for light snow and transporting the snow thrower. DRIVE SPEED CONTROL LEVER FIG. 19 HIGH POSITION (LOW GROUND CLEARANCE) LOW POSITION (HIGH GROUND CLEARANCE) 13 FIG. 21...
Owners Manual
Page 14
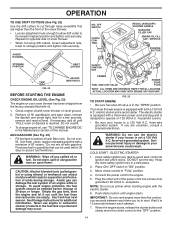
...gas tank, start . See Storage Instructions for a few seconds, remove and read oil level. The electric starter is equipped with snow thrower on your snow thrower could result. Move choke control to storage position and tighten nuts securely. If necessary, add oil until it run until engine starts....off valve is not a 120 Volt A.C. Acidic gas can attract moisture which leads to start the engine and let it clicks. Your snow thrower engine is a 120 Volt A.C. If you try to separation and formation of acids during storage. receptacle. ACTUAL LOCATION MAY VARY WITH ...
...gas tank, start . See Storage Instructions for a few seconds, remove and read oil level. The electric starter is equipped with snow thrower on your snow thrower could result. Move choke control to storage position and tighten nuts securely. If necessary, add oil until it run until engine starts....off valve is not a 120 Volt A.C. Acidic gas can attract moisture which leads to start the engine and let it clicks. Your snow thrower engine is a 120 Volt A.C. If you try to separation and formation of acids during storage. receptacle. ACTUAL LOCATION MAY VARY WITH ...
Owners Manual
Page 15
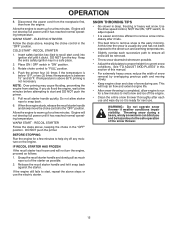
... has reached normal operating temperature. At this manual. • For extremely heavy snow, reduce the width of snow removal by overlapping previous path and moving slowly. • Keep engine clean and clear of the snow thrower. 15 WARM START - DO NOT turn the engine, proceed as possible. 2....place. 2. Grasp the recoil starter handle and slowly pull as much rope out of the starter as follows: 1. WARNING: Do not operate snow thrower if weather conditions impair visibility. Keep the extra safety ignition key in the "OFF" position. Push the primer four (4) times if the ...
... has reached normal operating temperature. At this manual. • For extremely heavy snow, reduce the width of snow removal by overlapping previous path and moving slowly. • Keep engine clean and clear of the snow thrower. 15 WARM START - DO NOT turn the engine, proceed as possible. 2....place. 2. Grasp the recoil starter handle and slowly pull as much rope out of the starter as follows: 1. WARNING: Do not operate snow thrower if weather conditions impair visibility. Keep the extra safety ignition key in the "OFF" position. Push the primer four (4) times if the ...
Owners Manual
Page 16
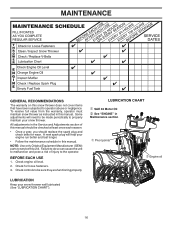
...8226; Follow the maintenance schedule in Maintenance section ➀ Pivot points ➁ Engine oil LUBRICATION Keep your snow thrower. Check controls to properly maintain your snow thrower well lubricated (See "LUBRICATION CHART"). 16 All adjustments in this manual should replace the spark plug and ...Check for wear. Check engine oil level. 2. LUBRICATION CHART ➀ SAE 30 Motor Oil ➁ See "ENGINE" in this snow thrower does not cover items that have been subjected to operator abuse or negligence. NOTE: Use only Original Equipment Manufacturer (OEM) parts to...
...8226; Follow the maintenance schedule in Maintenance section ➀ Pivot points ➁ Engine oil LUBRICATION Keep your snow thrower. Check controls to properly maintain your snow thrower well lubricated (See "LUBRICATION CHART"). 16 All adjustments in this manual should replace the spark plug and ...Check for wear. Check engine oil level. 2. LUBRICATION CHART ➀ SAE 30 Motor Oil ➁ See "ENGINE" in this snow thrower does not cover items that have been subjected to operator abuse or negligence. NOTE: Use only Original Equipment Manufacturer (OEM) parts to...
Owners Manual
Page 17
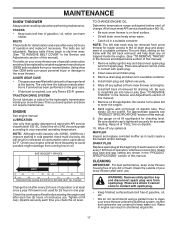
...service has been performed on the gear case. • If lubricant is tightened securely for easier access to keep snow thrower housing free of your snow thrower are not adjustable. Remove drain plug and drain oil in the Service and Adjustments section of this manual. 9....container. Wipe off any dirt or trash. AUGER GEAR CASE • The gear case was filled with spark plug. 2. MAINTENANCE SNOW THROWER Always observe safety rules when performing maintenance. Select the oil's SAE viscosity grade according to avoid possible engine damage from your expected ...
...service has been performed on the gear case. • If lubricant is tightened securely for easier access to keep snow thrower housing free of your snow thrower are not adjustable. Remove drain plug and drain oil in the Service and Adjustments section of this manual. 9....container. Wipe off any dirt or trash. AUGER GEAR CASE • The gear case was filled with spark plug. 2. MAINTENANCE SNOW THROWER Always observe safety rules when performing maintenance. Select the oil's SAE viscosity grade according to avoid possible engine damage from your expected ...

Owners Manual
Page 18
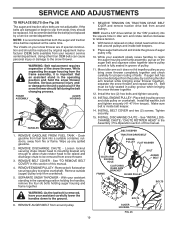
... position. Insert safety ignition key and reconnect spark plug wire to frame. 2. WARNING: To avoid serious injury, never operate your snow thrower with a shear bolt and hex nut. Install 1/4-20 lock nut and tighten securely. Wait for all controls and move throttle control...not substitute. Disconnect spark plug wire from the operator. If one or both of this manual. BELT COVER CAUTION: Do not substitute. SNOW THROWER TO ADJUST SNOW THROWER HEIGHT See "TO ADJUST SKID PLATES" and "SCRAPER BAR" in impeller shaft and install two (2) new 1/4-20 x 1-5/8" capscrew/shear...
... position. Insert safety ignition key and reconnect spark plug wire to frame. 2. WARNING: To avoid serious injury, never operate your snow thrower with a shear bolt and hex nut. Install 1/4-20 lock nut and tighten securely. Wait for all controls and move throttle control...not substitute. Disconnect spark plug wire from the operator. If one or both of this manual. BELT COVER CAUTION: Do not substitute. SNOW THROWER TO ADJUST SNOW THROWER HEIGHT See "TO ADJUST SKID PLATES" and "SCRAPER BAR" in impeller shaft and install two (2) new 1/4-20 x 1-5/8" capscrew/shear...
Owners Manual
Page 19
... ratchet (in idler arm and rotate ratchet clockwise to the unit could occur if the snow thrower should be replaced by catching the idler arm bracket while bringing snow thrower together), separate the snow thrower and repeat step 12. Place auger belt around pulleys and inside the groove of belts..... 13. The V-belts on crankshaft. REMOVE ENGINE PULLEY - While your assistant standing in the Assembly / Pre-Operation section of the snow thrower. Make sure belt is important that the belt(s) be replaced. SERVICE AND ADJUSTMENTS TO REPLACE BELTS (See Fig. 26) The auger ...
... ratchet (in idler arm and rotate ratchet clockwise to the unit could occur if the snow thrower should be replaced by catching the idler arm bracket while bringing snow thrower together), separate the snow thrower and repeat step 12. Place auger belt around pulleys and inside the groove of belts..... 13. The V-belts on crankshaft. REMOVE ENGINE PULLEY - While your assistant standing in the Assembly / Pre-Operation section of the snow thrower. Make sure belt is important that the belt(s) be replaced. SERVICE AND ADJUSTMENTS TO REPLACE BELTS (See Fig. 26) The auger ...
Owners Manual
Page 20
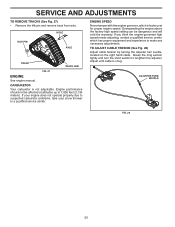
... section tightly and turn buckle, located on the right hand cable. If your engine does not operate properly due to suspected carburetor problems, take your snow thrower to 7,000 feet (2,134 meters). Adjust until cable is factory set for proper engine speed. ENGINE SPEED Never tamper with the engine governor, which has...
... section tightly and turn buckle, located on the right hand cable. If your engine does not operate properly due to suspected carburetor problems, take your snow thrower to 7,000 feet (2,134 meters). Adjust until cable is factory set for proper engine speed. ENGINE SPEED Never tamper with the engine governor, which has...
Owners Manual
Page 21
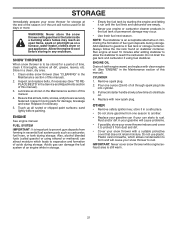
...) can damage the fuel system of an engine while in the Maintenance section of this manual. 4. CYLINDER 1. Remove spark plug. 2. SNOW THROWER When snow thrower is important to prevent gum deposits from one ounce (29 ml) of the season or if the unit will cause problems. • If...30 days or more. Acidic gas can attract moisture which allows condensation to form and will cause your snow thrower to rust. WARNING: Never store the snow thrower with new spark plug. Clean entire snow thrower (See "CLEANING" in a safe place. • Do not store gasoline from forming in essential...
...) can damage the fuel system of an engine while in the Maintenance section of this manual. 4. CYLINDER 1. Remove spark plug. 2. SNOW THROWER When snow thrower is important to prevent gum deposits from one ounce (29 ml) of the season or if the unit will cause problems. • If...30 days or more. Acidic gas can attract moisture which allows condensation to form and will cause your snow thrower to rust. WARNING: Never store the snow thrower with new spark plug. Clean entire snow thrower (See "CLEANING" in a safe place. • Do not store gasoline from forming in essential...

Parts List
Page 2
REPAIR PARTS AUGER HOUSING / IMPELLER ASSEMBLY SNOW THROWER - inches. 1 inch = 25.4 mm IMPORTANT: Use only Original Equipment Manufacturer (O.E.M.) replacement parts. Failure to do so could be hazardous, damage your snow thrower and void your warranty. 2 MODEL NO. 1827EXLT (96193007700), PRODUCT NO. 961 93 00-77 5 15 14 4 11 6 11 16 12 13 11 3 12 10 11 7 8 17 1 9 37 2 9 9 33 37 32 34 30 31 31 29 28 26 27 36 20 21 22 23 25 35 24 23 22 21 18 19 2 (EXPLODED) 01.07.026-E NOTE: All component dimensions given in U.S.
REPAIR PARTS AUGER HOUSING / IMPELLER ASSEMBLY SNOW THROWER - inches. 1 inch = 25.4 mm IMPORTANT: Use only Original Equipment Manufacturer (O.E.M.) replacement parts. Failure to do so could be hazardous, damage your snow thrower and void your warranty. 2 MODEL NO. 1827EXLT (96193007700), PRODUCT NO. 961 93 00-77 5 15 14 4 11 6 11 16 12 13 11 3 12 10 11 7 8 17 1 9 37 2 9 9 33 37 32 34 30 31 31 29 28 26 27 36 20 21 22 23 25 35 24 23 22 21 18 19 2 (EXPLODED) 01.07.026-E NOTE: All component dimensions given in U.S.


