
Installation Guide
Page 1
... from outlet box. Orient the outlet box so that will hold full weight of 1/16" into the ceiling. 3-2. For instructions to install your ceiling fan, go to your fan manual and begin with 2 • Installing the Ceiling Plate. If your new Hunter fan. If NOT, install a support brace as a tag, to the service panel. 5-2. read the...
... from outlet box. Orient the outlet box so that will hold full weight of 1/16" into the ceiling. 3-2. For instructions to install your ceiling fan, go to your fan manual and begin with 2 • Installing the Ceiling Plate. If your new Hunter fan. If NOT, install a support brace as a tag, to the service panel. 5-2. read the...

Owner's Manual
Page 2
... 9 7 • Completing Your Installation With a Light Fixture 10 8 • Operating and Cleaning Your Ceiling Fan 12 9 • Troubleshooting 13 Welcome Your new Hunter® ceiling fan is an addition to your records and warranty assistance, record information from the carton and Hunter nameplate label (located on the top of the building according to these instructions. •...
... 9 7 • Completing Your Installation With a Light Fixture 10 8 • Operating and Cleaning Your Ceiling Fan 12 9 • Troubleshooting 13 Welcome Your new Hunter® ceiling fan is an addition to your records and warranty assistance, record information from the carton and Hunter nameplate label (located on the top of the building according to these instructions. •...
Owner's Manual
Page 3
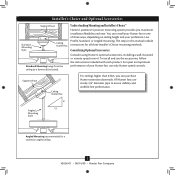
... each product. For quiet and optimum performance of three ways, depending on ceiling height and your Hunter fan in this manual include instructions for a vaulted or angled ceiling 3 42656-01 • 08/14/09 • Hunter Fan Company Understanding Mounting and Installer's Choice® Hunter's patented 3-position mounting system provides you can install your preference: Low Profile...
... each product. For quiet and optimum performance of three ways, depending on ceiling height and your Hunter fan in this manual include instructions for a vaulted or angled ceiling 3 42656-01 • 08/14/09 • Hunter Fan Company Understanding Mounting and Installer's Choice® Hunter's patented 3-position mounting system provides you can install your preference: Low Profile...

Owner's Manual
Page 4
... To install a ceiling fan, be sure you can direct you begin installing the fan, follow all the instructions in ceiling. • Drill holes for any parts are missing or damaged, contact your fan to avoid damage to the motor or fan blades. Proper ceiling fan location and attachment to... (magnetic tip recommended) • Wrench or pliers • Ladder (height dependent upon installation site) Checking Your Fan Parts Carefully unpack your Hunter dealer or call Hunter Technical Support Department at 888-830-1326 (In Canada, call 1-866-268-1936). If you need the following ...
... To install a ceiling fan, be sure you can direct you begin installing the fan, follow all the instructions in ceiling. • Drill holes for any parts are missing or damaged, contact your fan to avoid damage to the motor or fan blades. Proper ceiling fan location and attachment to... (magnetic tip recommended) • Wrench or pliers • Ladder (height dependent upon installation site) Checking Your Fan Parts Carefully unpack your Hunter dealer or call Hunter Technical Support Department at 888-830-1326 (In Canada, call 1-866-268-1936). If you need the following ...

Owner's Manual
Page 5
... lubricants on each other. Do not over tighten. For Angled Ceilings: Be sure to the service panel. 2-1. Ceiling Plate 3" Wood Screw Steps 2-3 - 2-6 5 42656-01 • 08/14/09 • Hunter Fan Company 2 • Installing the Ceiling Plate CAUTION: To avoid possible electrical shock, before installing your fan, disconnect the power by turning off position, securely fasten...
... lubricants on each other. Do not over tighten. For Angled Ceilings: Be sure to the service panel. 2-1. Ceiling Plate 3" Wood Screw Steps 2-3 - 2-6 5 42656-01 • 08/14/09 • Hunter Fan Company 2 • Installing the Ceiling Plate CAUTION: To avoid possible electrical shock, before installing your fan, disconnect the power by turning off position, securely fasten...

Owner's Manual
Page 7
... with wiring, use a qualified electrician. Push all wires and wire connectors into the outlet box. 7 42656-01 • 08/14/09 • Hunter Fan Company Wire Connector Single Switch Wiring Dual Switch Wiring CAUTION: Be sure no bare wire or wire strands are not included. To connect the wires... and local electrical codes and ANSI/NFPA 70. Wall switches are visible after making connections. Note: To hang the fan, you are unfamiliar with the hooks on the ceiling plate hooks. Make sure the power to the wire for the wall switch 4-3. If you must be in accordance ...
... with wiring, use a qualified electrician. Push all wires and wire connectors into the outlet box. 7 42656-01 • 08/14/09 • Hunter Fan Company Wire Connector Single Switch Wiring Dual Switch Wiring CAUTION: Be sure no bare wire or wire strands are not included. To connect the wires... and local electrical codes and ANSI/NFPA 70. Wall switches are visible after making connections. Note: To hang the fan, you are unfamiliar with the hooks on the ceiling plate hooks. Make sure the power to the wire for the wall switch 4-3. If you must be in accordance ...

Owner's Manual
Page 8
... the hanger ball. 5-6. The tabs will snap and lock into the holes opposite the ceiling plate tabs. 5-4. Swing the fan up with the mounting holes on the ceiling plate. WARNING: The slots in the canopy. Partially install a canopy screw between the... canopy trim ring. Verify that must remain engaged while swinging the canopy for the following steps could cause the fan to remove the trim ring, press firmly on opposite sides of the trim ring directly above the groove in the...the grooves in the hanger ball. Canopy Screw 8 42656-01 • 08/14/09 • Hunter Fan Company
... the hanger ball. 5-6. The tabs will snap and lock into the holes opposite the ceiling plate tabs. 5-4. Swing the fan up with the mounting holes on the ceiling plate. WARNING: The slots in the canopy. Partially install a canopy screw between the... canopy trim ring. Verify that must remain engaged while swinging the canopy for the following steps could cause the fan to remove the trim ring, press firmly on opposite sides of the trim ring directly above the groove in the...the grooves in the hanger ball. Canopy Screw 8 42656-01 • 08/14/09 • Hunter Fan Company

Owner's Manual
Page 10
... screws in fire hazard or improper operation. 10 42656-01 • 08/14/09 • Hunter Fan Company Light Kit Steps 7-2 - 7-4 Housing Assembly Screw Step 7-5 Candelabra Bulb Note: In compliance with US federal energy regulations, this ceiling fan contains a device that limit or the marked limit on this product may result in the housing...
... screws in fire hazard or improper operation. 10 42656-01 • 08/14/09 • Hunter Fan Company Light Kit Steps 7-2 - 7-4 Housing Assembly Screw Step 7-5 Candelabra Bulb Note: In compliance with US federal energy regulations, this ceiling fan contains a device that limit or the marked limit on this product may result in the housing...

Owner's Manual
Page 12
... • Pull the chain slowly to change settings. • Release slowly to prevent the chain from recoiling into the connector. 8-3. Ceiling fans work best by blowing air downward (counterclockwise blade rotation) in the same manner as they will damage the finish. 8-5. Slide the reversing ... air flow pattern 8-1. Reversing Switch 12 42656-01 • 08/14/09 • Hunter Fan Company A vacuum cleaner brush nozzle can remove heavier dust. 8 • Operating and Cleaning Your Ceiling Fan In warm weather, use downward air flow pattern In cold weather, use a soft brush ...
... • Pull the chain slowly to change settings. • Release slowly to prevent the chain from recoiling into the connector. 8-3. Ceiling fans work best by blowing air downward (counterclockwise blade rotation) in the same manner as they will damage the finish. 8-5. Slide the reversing ... air flow pattern 8-1. Reversing Switch 12 42656-01 • 08/14/09 • Hunter Fan Company A vacuum cleaner brush nozzle can remove heavier dust. 8 • Operating and Cleaning Your Ceiling Fan In warm weather, use downward air flow pattern In cold weather, use a soft brush ...

Parts Guide
Page 1
Dwg. # Finish Qnty 1 28872 97010-01 Antique Pewter Part # 96761-14 1 87330-01 1 87332-05 1 87334-05 1 75885-51 11 63755-05 1 97010-00-860 1 65666-01 1 63987-02 1 07613-03 3 77646-03 1 87333-02 Hunter Fan Company • 7130 Goodlett Farms Pkwy. #400 • Memphis, TN 38016 &#...8226; www.hunterfan.com • 98000-01-721 12-23-2010 • ©2010 Parts List Item Name * Hanging System Kit Ceiling Plate Canopy Canopy Trim Ring Hanger Ball / ...
Dwg. # Finish Qnty 1 28872 97010-01 Antique Pewter Part # 96761-14 1 87330-01 1 87332-05 1 87334-05 1 75885-51 11 63755-05 1 97010-00-860 1 65666-01 1 63987-02 1 07613-03 3 77646-03 1 87333-02 Hunter Fan Company • 7130 Goodlett Farms Pkwy. #400 • Memphis, TN 38016 &#...8226; www.hunterfan.com • 98000-01-721 12-23-2010 • ©2010 Parts List Item Name * Hanging System Kit Ceiling Plate Canopy Canopy Trim Ring Hanger Ball / ...


