
Operation Manual
Page 2
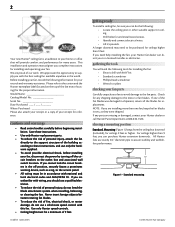
...a ceiling fan, be purchased for ceilings higher than 9 feet, you with this fan. Save these instructions. • Use only Hunter replacement parts. • To reduce the risk of personal injury, attach the fan directly to the support structure of your fan. 2 ® Your new Hunter® ceiling fan is... an addition to your home or office that will need the following tools for installing the fan: • Electric drill with 9/64" bit...
...a ceiling fan, be purchased for ceilings higher than 9 feet, you with this fan. Save these instructions. • Use only Hunter replacement parts. • To reduce the risk of personal injury, attach the fan directly to the support structure of your fan. 2 ® Your new Hunter® ceiling fan is... an addition to your home or office that will need the following tools for installing the fan: • Electric drill with 9/64" bit...

Operation Manual
Page 3
... above the floor and the ceiling is at least 9 feet high. • The fan blades have no obstructions to air flow, such as specified by the support brace manufacturer). • Outlet box secured to installing the fan. If you select the best location for your new Hunter fan. © 2005 Hunter Fan Company 41860-01 02/24...
... above the floor and the ceiling is at least 9 feet high. • The fan blades have no obstructions to air flow, such as specified by the support brace manufacturer). • Outlet box secured to installing the fan. If you select the best location for your new Hunter fan. © 2005 Hunter Fan Company 41860-01 02/24...
Operation Manual
Page 4
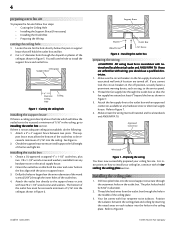
... associated wall switch location are unfamiliar with the installing the ceiling plate section. Check the support brace to Figure 8. © 2005 Hunter Fan Company Thread the lead wires from any hardware store or electrical supply house. For instructions on how to install your ceiling fan site. Position the isolators between two joists. See Figure 6. 2. Make...
... associated wall switch location are unfamiliar with the installing the ceiling plate section. Check the support brace to Figure 8. © 2005 Hunter Fan Company Thread the lead wires from any hardware store or electrical supply house. For instructions on how to install your ceiling fan site. Position the isolators between two joists. See Figure 6. 2. Make...
Operation Manual
Page 5
Note: The isolation pads should be flush against the ceiling. do not remove the downrod. © 2005 Hunter Fan Company 41860-01 02/24/2005 Feed the wires from unscrewing. Slots 5 assembling the fan installing the downrod 1. Place a flat washer on each of the two 3" screws and pass the screws through the canopy, the canopy...
Note: The isolation pads should be flush against the ceiling. do not remove the downrod. © 2005 Hunter Fan Company 41860-01 02/24/2005 Feed the wires from unscrewing. Slots 5 assembling the fan installing the downrod 1. Place a flat washer on each of the two 3" screws and pass the screws through the canopy, the canopy...

Operation Manual
Page 6
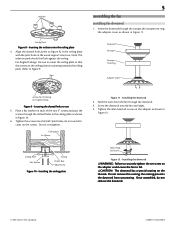
... fall if not assembled as shown in determining the direction to Figure 13. 2. Hanging the fan 41860-01 02/24/2005 © 2005 Hunter Fan Company Use the note and arrow engraved in the ceiling plate to assist in Figure 14. Figure 13 - 6 installing the adapter cover 1. Installing the adapter cover Hook Loop Figure...
... fall if not assembled as shown in determining the direction to Figure 13. 2. Hanging the fan 41860-01 02/24/2005 © 2005 Hunter Fan Company Use the note and arrow engraved in the ceiling plate to assist in Figure 14. Figure 13 - 6 installing the adapter cover 1. Installing the adapter cover Hook Loop Figure...
Operation Manual
Page 7
..., press firmly on the canopy trim ring. FFigure 15 - See Figure 18. 3. The tabs will snap and lock into place on the ceiling plate as shown in accordance with wiring, you are assembled, securely tighten all three screws are unfamiliar with national and local electrical codes and ANSI.../NFPA 70. Disconnect the power by turning off the circuit breakers to Figure 16. © 2005 Hunter Fan Company Canopy Press Here when Removing Press Here when Removing Canopy Trim Ring Tab Figure 18 - Power Black Wires in Figure 15. Rotating the...
..., press firmly on the canopy trim ring. FFigure 15 - See Figure 18. 3. The tabs will snap and lock into place on the ceiling plate as shown in accordance with wiring, you are assembled, securely tighten all three screws are unfamiliar with national and local electrical codes and ANSI.../NFPA 70. Disconnect the power by turning off the circuit breakers to Figure 16. © 2005 Hunter Fan Company Canopy Press Here when Removing Press Here when Removing Canopy Trim Ring Tab Figure 18 - Power Black Wires in Figure 15. Rotating the...
Operation Manual
Page 9
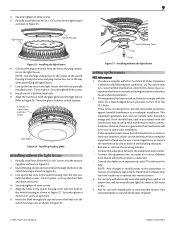
...occur in the light fixture with the limits for use only with the Hunter Original®. © 2005 Hunter Fan Company 41860-01 02/24/2005 For use with electrically reversible ceiling fans rated at 1.0 amp or less, and fan incandescent light kits rated at 300 watts or less. 4. Not recommended ... (1) This device may void one A15, 60 Watt Max bulb. 9. However, there is encouraged to try to correct the interference by Hunter Fan Company may not cause harmful interference, and (2) this remote control. 3. Connect the plug connector from that to which can radiate radio frequency ...
...occur in the light fixture with the limits for use only with the Hunter Original®. © 2005 Hunter Fan Company 41860-01 02/24/2005 For use with electrically reversible ceiling fans rated at 1.0 amp or less, and fan incandescent light kits rated at 300 watts or less. 4. Not recommended ... (1) This device may void one A15, 60 Watt Max bulb. 9. However, there is encouraged to try to correct the interference by Hunter Fan Company may not cause harmful interference, and (2) this remote control. 3. Connect the plug connector from that to which can radiate radio frequency ...
Operation Manual
Page 11
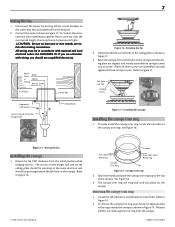
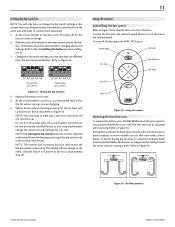
...not turn the power off . 11 using more than one remote controlled fan in the same area and want to control them up. Using the remote reversing the fan direction To reverse the airflow, press the REVERSE button. Ceiling fans work best by blowing air downward (counterclockwise blade rotation) in installing the ... the circuit breaker or fuse box, turn the power off the fan, press the FAN OFF button. Refer to the in warm weather to cool the room with a direct breeze. Refer to Figure 32. Air flow patterns © 2005 Hunter Fan Company 41860-01 02/24/2005 Refer to Figure 33. At ...
...not turn the power off . 11 using more than one remote controlled fan in the same area and want to control them up. Using the remote reversing the fan direction To reverse the airflow, press the REVERSE button. Ceiling fans work best by blowing air downward (counterclockwise blade rotation) in installing the ... the circuit breaker or fuse box, turn the power off the fan, press the FAN OFF button. Refer to the in warm weather to cool the room with a direct breeze. Refer to Figure 32. Air flow patterns © 2005 Hunter Fan Company 41860-01 02/24/2005 Refer to Figure 33. At ...
Operation Manual
Page 12
... Remove the shipping bumpers. 5. Change dip switch settings. Problem: Noisy operation. 1. Tighten the blade bracket screws until snug. 3. If your ceiling fan caring for finishes For cleaning, a soft brush or lint-free cloth should be used , but never use the enclosed balancing kit and instructions ... buttons for blades Wood finish blades should be cleaned with a furniture polishing cloth. Hunter Fan Company 2500 Frisco Avenue Memphis, Tennessee 38114 41860-01 02/24/2005 © 2005 Hunter Fan Company An artistic agent may be removed by press the UP LIGHT or DOWN LIGHT...
... Remove the shipping bumpers. 5. Change dip switch settings. Problem: Noisy operation. 1. Tighten the blade bracket screws until snug. 3. If your ceiling fan caring for finishes For cleaning, a soft brush or lint-free cloth should be used , but never use the enclosed balancing kit and instructions ... buttons for blades Wood finish blades should be cleaned with a furniture polishing cloth. Hunter Fan Company 2500 Frisco Avenue Memphis, Tennessee 38114 41860-01 02/24/2005 © 2005 Hunter Fan Company An artistic agent may be removed by press the UP LIGHT or DOWN LIGHT...


