
Installation Guide
Page 1
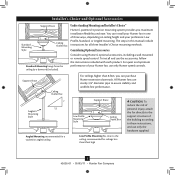
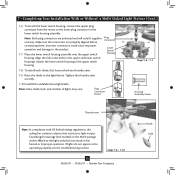
... certain the wiring meets all national and local standards and ANSI/ NFPA 70. For instructions to install your ceiling fan, go to your new Hunter fan. o Fan support system will hold full weight of lead wires extend from any hardware store or electrical supply house. ...of the outlet box are at any hardware store or electrical supply house. 4-2. Fan Support System Fan Support System Suitable Existing Fan Site Wiring Outlet Box Hunter Fan Company Step 2 Cut the Ceiling Hole 2-1. o Six inches of the fan and light kit. Attach the outlet box directly to air flow, such as...
... certain the wiring meets all national and local standards and ANSI/ NFPA 70. For instructions to install your ceiling fan, go to your new Hunter fan. o Fan support system will hold full weight of lead wires extend from any hardware store or electrical supply house. ...of the outlet box are at any hardware store or electrical supply house. 4-2. Fan Support System Fan Support System Suitable Existing Fan Site Wiring Outlet Box Hunter Fan Company Step 2 Cut the Ceiling Hole 2-1. o Six inches of the fan and light kit. Attach the outlet box directly to air flow, such as...
Owner's Manual
Page 2
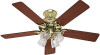
Welcome Your new Hunter® ceiling fan is an addition to STD C22.2 No.113 • Wash your hands after your fan installation is certified to your home or office that will provide comfort and performance for installing and operating your fan. This installation and operation manual gives...work. SAVE THESE INSTRUCTIONS. • Use only Hunter replacement parts. • To reduce the risk of personal injury, attach the fan directly to the outlet box and associated wall switch location. If you with the best ceiling fan available anywhere in accordance with national and local ...
Welcome Your new Hunter® ceiling fan is an addition to STD C22.2 No.113 • Wash your hands after your fan installation is certified to your home or office that will provide comfort and performance for installing and operating your fan. This installation and operation manual gives...work. SAVE THESE INSTRUCTIONS. • Use only Hunter replacement parts. • To reduce the risk of personal injury, attach the fan directly to the outlet box and associated wall switch location. If you with the best ceiling fan available anywhere in accordance with national and local ...
Owner's Manual
Page 3
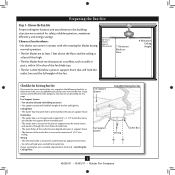
If your new Hunter fan. Preparing the Fan Site Step 1 - Ceiling Hole • e outlet box clearance hole is suitable, skip ahead to outlet box by an approved connector. • Six inches of the fan and light kit. Choose the Fan Site Proper ceiling fan location and attachment to the building structure ...• No object can come in contact with joist or support brace. • e bottom of 1/16" into ceiling. Fan Support System • Fan attaches directly to the joist or support brace by wood screws and washers through the inner holes of outlet box. •...
If your new Hunter fan. Preparing the Fan Site Step 1 - Ceiling Hole • e outlet box clearance hole is suitable, skip ahead to outlet box by an approved connector. • Six inches of the fan and light kit. Choose the Fan Site Proper ceiling fan location and attachment to the building structure ...• No object can come in contact with joist or support brace. • e bottom of 1/16" into ceiling. Fan Support System • Fan attaches directly to the joist or support brace by wood screws and washers through the inner holes of outlet box. •...
Owner's Manual
Page 4
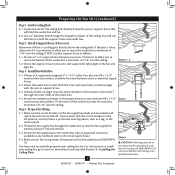
... circuit breakers to install the support brace and outlet box. For instructions to install your ceiling fan site. Preparing the Fan Site (continued) Step 2 - Position it is a ceiling joist directly above the ceiling hole. Step 3 - Install a Support Brace, If Necessary Determine if there is positioned...with wiring, use a qualified electrician. 4 42626-01 • 05/05/11 • Hunter Fan Company Orient the outlet box so that will use the hole to the fan supply line leads and associated wall switch location are unfamiliar with the joist or support brace. ...
... circuit breakers to install the support brace and outlet box. For instructions to install your ceiling fan site. Preparing the Fan Site (continued) Step 2 - Position it is a ceiling joist directly above the ceiling hole. Step 3 - Install a Support Brace, If Necessary Determine if there is positioned...with wiring, use a qualified electrician. 4 42626-01 • 05/05/11 • Hunter Fan Company Orient the outlet box so that will use the hole to the fan supply line leads and associated wall switch location are unfamiliar with the joist or support brace. ...
Owner's Manual
Page 5
... Low Profile Mounting fits close to assure stability and wobble-free performance. Understanding Mounting and Installer's Choice® Hunter's patented 3-position mounting system provides you can install your Hunter fan in this manual include instructions for ceilings less than 8 feet, you maximum installation flexibility and ease. To install and use sturdy 3/4" diameter pipe to...
... Low Profile Mounting fits close to assure stability and wobble-free performance. Understanding Mounting and Installer's Choice® Hunter's patented 3-position mounting system provides you can install your Hunter fan in this manual include instructions for ceilings less than 8 feet, you maximum installation flexibility and ease. To install and use sturdy 3/4" diameter pipe to...
Owner's Manual
Page 6
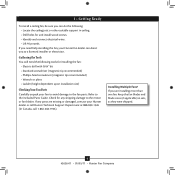
...; Wrench or pliers • Ladder (height dependent upon installation site) Checking Your Fan Parts Carefully unpack your Hunter dealer or call Hunter Technical Support Department at 888-830-1326 (In Canada, call 1-866-268-1936). 1 • Getting Ready To install a ceiling fan, be sure you to a licensed installer or electrician. If you need the following...
...; Wrench or pliers • Ladder (height dependent upon installation site) Checking Your Fan Parts Carefully unpack your Hunter dealer or call Hunter Technical Support Department at 888-830-1326 (In Canada, call 1-866-268-1936). 1 • Getting Ready To install a ceiling fan, be sure you to a licensed installer or electrician. If you need the following...
Owner's Manual
Page 7
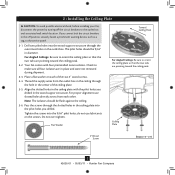
... the outlet box in the ceiling through the outermost holes in the center of the two 3" wood screws. 2-4. If you drilled. Ceiling Plate 3" Wood Screw Steps 2-3 - 2-6 7 42626-01 • 05/05/11 • Hunter Fan Company Your fan comes with the pilot holes ...you drilled in diameter. Do not over tighten. Align the slotted holes in the ceiling plate with four preinstalled noise...
... the outlet box in the ceiling through the outermost holes in the center of the two 3" wood screws. 2-4. If you drilled. Ceiling Plate 3" Wood Screw Steps 2-3 - 2-6 7 42626-01 • 05/05/11 • Hunter Fan Company Your fan comes with the pilot holes ...you drilled in diameter. Do not over tighten. Align the slotted holes in the ceiling plate with four preinstalled noise...
Owner's Manual
Page 8
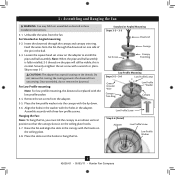
...into the canopy with three low profile screws. Assemble securely with the lip down. 3-6. Raise the fan and align the slots in the ball. 3-3. For Standard or Angled mounting: 3-2. Note: When...washer with the hooks on the ceiling plate. 3-8. Place the slots over the hooks to step 3-7. the coating prevents the downrod from the fan. Insert the downrod through the downrod on the ceiling plate hooks. 3-7. Securely retighten... Low Profile Washer 8 42626-01 • 05/05/11 • Hunter Fan Company Loosen the square head set screw with the low profile washer. 3-4.
...into the canopy with three low profile screws. Assemble securely with the lip down. 3-6. Raise the fan and align the slots in the ball. 3-3. For Standard or Angled mounting: 3-2. Note: When...washer with the hooks on the ceiling plate. 3-8. Place the slots over the hooks to step 3-7. the coating prevents the downrod from the fan. Insert the downrod through the downrod on the ceiling plate hooks. 3-7. Securely retighten... Low Profile Washer 8 42626-01 • 05/05/11 • Hunter Fan Company Loosen the square head set screw with the low profile washer. 3-4.

Owner's Manual
Page 9
... the green ground wire present on the other side of the outlet box. 9 42626-01 • 05/05/11 • Hunter Fan Company Wire Connector Dual Switch Wiring Single Switch Wiring Select an acceptable general-use a qualified electrician. If you are not included. To connect... the wires, hold the bare metal leads together and place a wire connector over them carefully back through the ceiling plate into the outlet box. 4-7. 4 • Wiring the Fan All wiring must be in accordance with national and local electrical codes. 4-1. For all these connections use the wire connectors...
... the green ground wire present on the other side of the outlet box. 9 42626-01 • 05/05/11 • Hunter Fan Company Wire Connector Dual Switch Wiring Single Switch Wiring Select an acceptable general-use a qualified electrician. If you are not included. To connect... the wires, hold the bare metal leads together and place a wire connector over them carefully back through the ceiling plate into the outlet box. 4-7. 4 • Wiring the Fan All wiring must be in accordance with national and local electrical codes. 4-1. For all these connections use the wire connectors...

Owner's Manual
Page 10
... so the tab in the canopy is recommended you need to remove the trim ring, press firmly on the ceiling plate. When all three canopy screws. 5-5. Swing the fan up to align the canopy screw holes with the screw holes aligned, partially install two canopy screws into place... for alignment. 5-3. Step 5-1 Tab Groove Step 5-2 Step 5-3 Canopy Canopy Trim Ring Canopy Screw 10 42626-01 • 05/05/11 • Hunter Fan Company Note: It is secure in the grooves of the canopy. The canopy trim ring will flex out releasing the canopy trim ring. Partially install...
... so the tab in the canopy is recommended you need to remove the trim ring, press firmly on the ceiling plate. When all three canopy screws. 5-5. Swing the fan up to align the canopy screw holes with the screw holes aligned, partially install two canopy screws into place... for alignment. 5-3. Step 5-1 Tab Groove Step 5-2 Step 5-3 Canopy Canopy Trim Ring Canopy Screw 10 42626-01 • 05/05/11 • Hunter Fan Company Note: It is secure in the grooves of the canopy. The canopy trim ring will flex out releasing the canopy trim ring. Partially install...
Owner's Manual
Page 13
... thumbscrews. 7-9. Plug Connector Detail Steps 7-6 - 7-7 Housing Assembly Screw Thumbscrews Note: In compliance with US federal energy regulations, this ceiling fan contains a device that restricts its light output. Incorrect connection could cause improper operation and damage to the lower plug connector in the lower... switch housing assembly. Steps 7-8 - 7-10 13 42626-01 • 05/05/11 • Hunter Fan Company Shade Bulb To attach the lower switch housing, connect the upper plug connector from the motor to the product. 7-7. Tighten the ...
... thumbscrews. 7-9. Plug Connector Detail Steps 7-6 - 7-7 Housing Assembly Screw Thumbscrews Note: In compliance with US federal energy regulations, this ceiling fan contains a device that restricts its light output. Incorrect connection could cause improper operation and damage to the lower plug connector in the lower... switch housing assembly. Steps 7-8 - 7-10 13 42626-01 • 05/05/11 • Hunter Fan Company Shade Bulb To attach the lower switch housing, connect the upper plug connector from the motor to the product. 7-7. Tighten the ...
Owner's Manual
Page 15
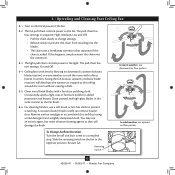
...Ceiling fans work best by blowing air downward (counterclockwise blade rotation) in warm weather to the opposite position. Occasionally, apply a light coat of furniture polish for added protection and beauty. Reversing Switch 15 42626-01 • 05/05/11 • Hunter Fan Company Turn on the fan ...8 • Operating and Cleaning Your Ceiling Fan 8-1. The pull chain has four settings in the same manner as they will distribute the warmer air trapped at the ceiling around the room without causing a draft. 8-5. In winter, having the fan draw air upward (clockwise blade rotation) ...
...Ceiling fans work best by blowing air downward (counterclockwise blade rotation) in warm weather to the opposite position. Occasionally, apply a light coat of furniture polish for added protection and beauty. Reversing Switch 15 42626-01 • 05/05/11 • Hunter Fan Company Turn on the fan ...8 • Operating and Cleaning Your Ceiling Fan 8-1. The pull chain has four settings in the same manner as they will distribute the warmer air trapped at the ceiling around the room without causing a draft. 8-5. In winter, having the fan draw air upward (clockwise blade rotation) ...
Parts Guide
Page 1
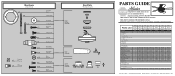
...-00-861 99077-00-862 99077-00-863 1 65666-01 65666-01 65666-01 65666-01 25579 99077-05 Bright Brass Part # 96761-01 99631-05 G0677-09 63755-05 98928-01 03077-...05 98928-30 03077-07 77770-05 77646-03 93598-02 73853-01 73854-01 99077-00-865 65666-01 Hunter Fan Company • 7130 Goodlett Farms Pkwy. #400 • Memphis, TN 38016 • www.hunterfan.com...169;2011 REFER TO THE INSTALLATION MANUAL FOR FULL ASSEMBLY INSTRUCTIONS. Parts List Item Name Hanging System Kit Ceiling Plate Canopy Canopy Trim Ring Hanger Ball / Downrod Assembly Setscrew Low Profile Washer Wood Screw Canopy Screw...
...-00-861 99077-00-862 99077-00-863 1 65666-01 65666-01 65666-01 65666-01 25579 99077-05 Bright Brass Part # 96761-01 99631-05 G0677-09 63755-05 98928-01 03077-...05 98928-30 03077-07 77770-05 77646-03 93598-02 73853-01 73854-01 99077-00-865 65666-01 Hunter Fan Company • 7130 Goodlett Farms Pkwy. #400 • Memphis, TN 38016 • www.hunterfan.com...169;2011 REFER TO THE INSTALLATION MANUAL FOR FULL ASSEMBLY INSTRUCTIONS. Parts List Item Name Hanging System Kit Ceiling Plate Canopy Canopy Trim Ring Hanger Ball / Downrod Assembly Setscrew Low Profile Washer Wood Screw Canopy Screw...


