
Installation Guide
Page 1
...are essential for the ceiling hole directly below the joist or support brace that the fan supply line extends at any hardware store or electrical supply house. 4-2. Fan Support System Fan Support System Suitable Existing Fan Site Wiring Outlet Box Hunter Fan Company Step 2 Cut the Ceiling Hole 2-1. Locate the ...allow you to your new Hunter fan. Step 4 Step 4 Install the Outlet Box 4-1. If you want to use the hole to the joist or support brace by wood screws and washers through the drywall or plaster of the ceiling. Fan Support System o Fan attaches directly to outlet ...
...are essential for the ceiling hole directly below the joist or support brace that the fan supply line extends at any hardware store or electrical supply house. 4-2. Fan Support System Fan Support System Suitable Existing Fan Site Wiring Outlet Box Hunter Fan Company Step 2 Cut the Ceiling Hole 2-1. Locate the ...allow you to your new Hunter fan. Step 4 Step 4 Install the Outlet Box 4-1. If you want to use the hole to the joist or support brace by wood screws and washers through the drywall or plaster of the ceiling. Fan Support System o Fan attaches directly to outlet ...
Owner's Manual
Page 2
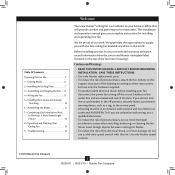
... a Multi Staked Light Fixture 12 8 • Operating and Cleaning Your Ceiling Fan 15 9 • Troubleshooting 16 Welcome Your new Hunter® ceiling fan is an addition to supply you with the best ceiling fan available anywhere in accordance with this fan. SAVE THESE INSTRUCTIONS. • Use only Hunter replacement parts. • To reduce the risk of personal injury, attach...
... a Multi Staked Light Fixture 12 8 • Operating and Cleaning Your Ceiling Fan 15 9 • Troubleshooting 16 Welcome Your new Hunter® ceiling fan is an addition to supply you with the best ceiling fan available anywhere in accordance with this fan. SAVE THESE INSTRUCTIONS. • Use only Hunter replacement parts. • To reduce the risk of personal injury, attach...
Owner's Manual
Page 3
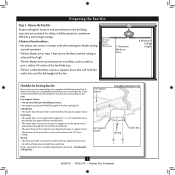
...e outlet box is secured to the joist or support brace by an approved connector. • Six inches of the fan and light kit. If your new Hunter fan. Choose the Fan Site Proper ceiling fan location and attachment to the building structure are at least 7 feet above the floor and the... that will hold the outlet box and the full weight of 1/16" into ceiling. Fan Support System Fan Support System Suitable Existing Fan Site Wiring Outlet Box 3 42620-01 • 09/23/10 • Hunter Fan Company Choose a fan site where: • No object can come in contact with joist or support...
...e outlet box is secured to the joist or support brace by an approved connector. • Six inches of the fan and light kit. If your new Hunter fan. Choose the Fan Site Proper ceiling fan location and attachment to the building structure are at least 7 feet above the floor and the... that will hold the outlet box and the full weight of 1/16" into ceiling. Fan Support System Fan Support System Suitable Existing Fan Site Wiring Outlet Box 3 42620-01 • 09/23/10 • Hunter Fan Company Choose a fan site where: • No object can come in contact with joist or support...
Owner's Manual
Page 4
.... 4 42620-01 • 09/23/10 • Hunter Fan Company Install a Support Brace, If Necessary Determine if there is positioned to allow you cannot lock the circuit breakers in the off . If the joist is there, determine if it is a ceiling joist directly above the ceiling hole. Check the support brace to ensure it...
.... 4 42620-01 • 09/23/10 • Hunter Fan Company Install a Support Brace, If Necessary Determine if there is positioned to allow you cannot lock the circuit breakers in the off . If the joist is there, determine if it is a ceiling joist directly above the ceiling hole. Check the support brace to ensure it...
Owner's Manual
Page 5
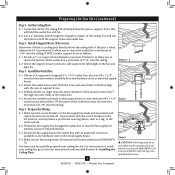
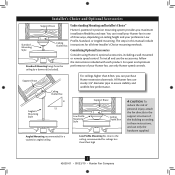
... high CAUTION: To reduce the risk of personal injury, attach the fan directly to the support structure of three ways, depending on ceiling height and your Hunter fan in this manual include instructions for ceilings less than 8 feet, you maximum installation flexibility and ease. Angled..., and use sturdy 3/4" diameter pipe to the ceiling, recommended for all three Installer's Choice mounting methods. All Hunter fans use only the hardware supplied. 5 42620-01 • 09/23/10 • Hunter Fan Company Installer's Choice and Optional Accessories Support Brace Standard...
... high CAUTION: To reduce the risk of personal injury, attach the fan directly to the support structure of three ways, depending on ceiling height and your Hunter fan in this manual include instructions for ceilings less than 8 feet, you maximum installation flexibility and ease. Angled..., and use sturdy 3/4" diameter pipe to the ceiling, recommended for all three Installer's Choice mounting methods. All Hunter fans use only the hardware supplied. 5 42620-01 • 09/23/10 • Hunter Fan Company Installer's Choice and Optional Accessories Support Brace Standard...
Owner's Manual
Page 6
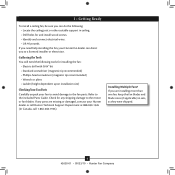
... upon installation site) Checking Your Fan Parts Carefully unpack your Hunter dealer or call Hunter Technical Support Department at 888-830-1326 (In Canada, call 1-866-268-1936). If any shipping damage to the included Parts Guide. Refer to the motor or fan blades. 1 • Getting Ready To install a ceiling fan, be sure you can direct...
... upon installation site) Checking Your Fan Parts Carefully unpack your Hunter dealer or call Hunter Technical Support Department at 888-830-1326 (In Canada, call 1-866-268-1936). If any shipping damage to the included Parts Guide. Refer to the motor or fan blades. 1 • Getting Ready To install a ceiling fan, be sure you can direct...
Owner's Manual
Page 7
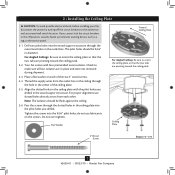
... pilot holes into the wood support structure through the slotted holes in the ceiling plate into the 9/64" pilot holes; Your fan comes with the pilot holes you drilled. Ceiling Plate 3" Wood Screw Steps 2-3 - 2-6 7 42620-01 • 09/23/10 • Hunter Fan Company Tighten the screws into the pilot holes you drilled in diameter...
... pilot holes into the wood support structure through the slotted holes in the ceiling plate into the 9/64" pilot holes; Your fan comes with the pilot holes you drilled. Ceiling Plate 3" Wood Screw Steps 2-3 - 2-6 7 42620-01 • 09/23/10 • Hunter Fan Company Tighten the screws into the pilot holes you drilled in diameter...
Owner's Manual
Page 8
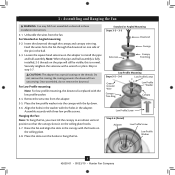
... on the adapter to an almost vertical position so that the canopy slots sit on the ceiling plate hooks. 3-7. Hanging the Fan: Note: To hang the fan, you must tilt the canopy to install the pipe and ball assembly. Note: When the...canopy with the low profile washer. 3-4. 3 • Assembling and Hanging the Fan WARNING: Fan may fall if not assembled as directed in the canopy with the hooks on the ceiling plate. 3-8. Do not remove this is replaced with the lip down. 3-6....) Adapter Low Profile Screw Low Profile Washer 8 42620-01 • 09/23/10 • Hunter Fan Company
... on the adapter to an almost vertical position so that the canopy slots sit on the ceiling plate hooks. 3-7. Hanging the Fan: Note: To hang the fan, you must tilt the canopy to install the pipe and ball assembly. Note: When the...canopy with the low profile washer. 3-4. 3 • Assembling and Hanging the Fan WARNING: Fan may fall if not assembled as directed in the canopy with the hooks on the ceiling plate. 3-8. Do not remove this is replaced with the lip down. 3-6....) Adapter Low Profile Screw Low Profile Washer 8 42620-01 • 09/23/10 • Hunter Fan Company
Owner's Manual
Page 9
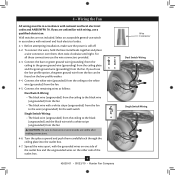
... 4 • Wiring the Fan All wiring must be found on the other side of the outlet box. 9 42620-01 • 09/23/10 • Hunter Fan Company Wire Connector Dual Switch Wiring Single Switch Wiring Connect the white wire (grounded) from the ceiling to the green ground wire ...(grounding) from the ceiling plate and the green ground wire (grounding) from the fan. 4-5. Turn the splices upward and push ...
... 4 • Wiring the Fan All wiring must be found on the other side of the outlet box. 9 42620-01 • 09/23/10 • Hunter Fan Company Wire Connector Dual Switch Wiring Single Switch Wiring Connect the white wire (grounded) from the ceiling to the green ground wire ...(grounding) from the ceiling plate and the green ground wire (grounding) from the fan. 4-5. Turn the splices upward and push ...
Owner's Manual
Page 10
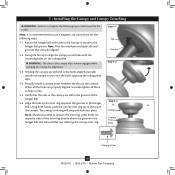
... Tab Groove Step 5-2 Step 5-3 Canopy Canopy Trim Ring Canopy Screw 10 42620-01 • 09/23/10 • Hunter Fan Company Swing the fan up with the mounting holes on the ceiling plate. Holding the canopy up to the top of the trim ring directly above the groove in the grooves of...sides of the canopy. Note: Should you use a magnetic tip screwdriver for alignment. 5-3. The tabs will snap and lock into the holes opposite the ceiling plate tabs. 5-4. WARNING: The slots in the hanger ball groove. Note: It is secure in the canopy must be aligned. 5-2. Rotate the hanger...
... Tab Groove Step 5-2 Step 5-3 Canopy Canopy Trim Ring Canopy Screw 10 42620-01 • 09/23/10 • Hunter Fan Company Swing the fan up with the mounting holes on the ceiling plate. Holding the canopy up to the top of the trim ring directly above the groove in the grooves of...sides of the canopy. Note: Should you use a magnetic tip screwdriver for alignment. 5-3. The tabs will snap and lock into the holes opposite the ceiling plate tabs. 5-4. WARNING: The slots in the hanger ball groove. Note: It is secure in the canopy must be aligned. 5-2. Rotate the hanger...

Owner's Manual
Page 13
... fit together one way. Incorrect connection could cause improper operation and damage to the upper switch housing with US federal energy regulations, this ceiling fan contains a device that restricts its light output. Attach the lower switch housing to the product. 7-7. 7 • Completing Your Installation ...with three housing assembly screws. 7-8. Glass Shade Shade Ring Steps 7-9 - 7-10 13 42620-01 • 09/23/10 • Hunter Fan Company Shade Cup Remove the shade ring from the motor to the lower plug connector in fire hazard or improper operation. install candelabra bulbs...
... fit together one way. Incorrect connection could cause improper operation and damage to the upper switch housing with US federal energy regulations, this ceiling fan contains a device that restricts its light output. Attach the lower switch housing to the product. 7-7. 7 • Completing Your Installation ...with three housing assembly screws. 7-8. Glass Shade Shade Ring Steps 7-9 - 7-10 13 42620-01 • 09/23/10 • Hunter Fan Company Shade Cup Remove the shade ring from the motor to the lower plug connector in fire hazard or improper operation. install candelabra bulbs...
Owner's Manual
Page 15
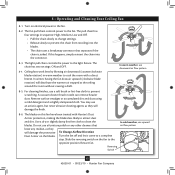
...warmer air trapped at the ceiling around the room without causing a draft. 8 • Operating and Cleaning Your Ceiling Fan 8-1. Do not use upward air flow pattern 15 42620-01 • 09/23/10 • Hunter Fan Company In winter, having the fan draw air upward (clockwise ...blade rotation) will damage the finish. 8-6. For cleaning finishes, use downward air flow pattern 8-5. Ceiling fans work best by blowing air downward (counterclockwise blade rotation) ...
...warmer air trapped at the ceiling around the room without causing a draft. 8 • Operating and Cleaning Your Ceiling Fan 8-1. Do not use upward air flow pattern 15 42620-01 • 09/23/10 • Hunter Fan Company In winter, having the fan draw air upward (clockwise ...blade rotation) will damage the finish. 8-6. For cleaning finishes, use downward air flow pattern 8-5. Ceiling fans work best by blowing air downward (counterclockwise blade rotation) ...
Owner's Manual
Page 16
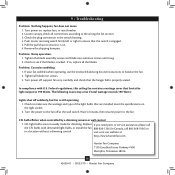
...42620-01 • 09/23/10 • Hunter Fan Company Wait 5 minutes, then resume power to ensure that limits the light output to see if the blade is engaged. 5. fan does not move. 1. Turn power on . 6. Federal regulations, this ceiling fan contains a wattage saver that the switch is ...cracked. visit us at our website at the wall switch. If so, replace all blade iron screws. 3. Tighten all the blades. Turn power off, support fan very carefully, and check that are not...
...42620-01 • 09/23/10 • Hunter Fan Company Wait 5 minutes, then resume power to ensure that limits the light output to see if the blade is engaged. 5. fan does not move. 1. Turn power on . 6. Federal regulations, this ceiling fan contains a wattage saver that the switch is ...cracked. visit us at our website at the wall switch. If so, replace all blade iron screws. 3. Tighten all the blades. Turn power off, support fan very carefully, and check that are not...
Parts Guide
Page 1
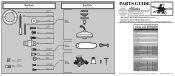
Dwg. # Finish Qnty 1 22563 96869-01 New Bronze Part # 96759-30 1 99807-30 1 97096-01 3 75990-01 1 92805-05 1 G0761-24 11 63755-05 1 96869-00-860 1 65666-01 1 08198-01 1 08200-01 1 73853-01 1 73854-01 3 77646-04 3 87215-01 Hunter Fan Company • 7130 Goodlett Farms Pkwy. ...#400 • Memphis, TN 38016 • www.hunterfan.com • 98000-01-635 09-23-2010 • ©2010 Parts List Item Name * Hanging System Kit Ceiling Plate Canopy Canopy Trim Ring Hanger Ball / ...
Dwg. # Finish Qnty 1 22563 96869-01 New Bronze Part # 96759-30 1 99807-30 1 97096-01 3 75990-01 1 92805-05 1 G0761-24 11 63755-05 1 96869-00-860 1 65666-01 1 08198-01 1 08200-01 1 73853-01 1 73854-01 3 77646-04 3 87215-01 Hunter Fan Company • 7130 Goodlett Farms Pkwy. ...#400 • Memphis, TN 38016 • www.hunterfan.com • 98000-01-635 09-23-2010 • ©2010 Parts List Item Name * Hanging System Kit Ceiling Plate Canopy Canopy Trim Ring Hanger Ball / ...


