
Installation Guide
Page 1
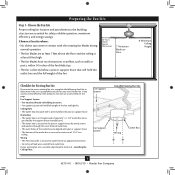
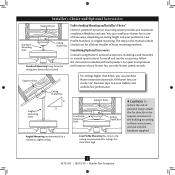
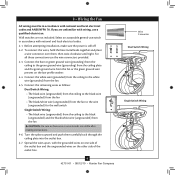
...following checklist to determine if the site is recessed a minimum of 1/16" into the ceiling. If the joist is there, determine if it is suitable, go to your new Hunter fan. Obtain a UL-approved octagonal 4" x 1-1/2" outlet box, plus two #8 x ...Fan Site Proper ceiling fan location and attachment to the building structure are at least 7 feet above the ceiling hole. o e outlet box is directly below a joist or support brace that will support the full weight of the ceiling. Fan Support System Fan Support System Suitable Existing Fan Site Wiring Outlet Box Hunter Fan...
...following checklist to determine if the site is recessed a minimum of 1/16" into the ceiling. If the joist is there, determine if it is suitable, go to your new Hunter fan. Obtain a UL-approved octagonal 4" x 1-1/2" outlet box, plus two #8 x ...Fan Site Proper ceiling fan location and attachment to the building structure are at least 7 feet above the ceiling hole. o e outlet box is directly below a joist or support brace that will support the full weight of the ceiling. Fan Support System Fan Support System Suitable Existing Fan Site Wiring Outlet Box Hunter Fan...
Owner's Manual
Page 2
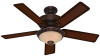
... motor damage, do not bend the blade attachment system when installing, balancing, or cleaning the fan. If you with the best ceiling fan available anywhere in the world. If you complete instructions for your fan. Welcome Your new Hunter® ceiling fan is an addition to the service panel. • All wiring must be in accordance with...
... motor damage, do not bend the blade attachment system when installing, balancing, or cleaning the fan. If you with the best ceiling fan available anywhere in the world. If you complete instructions for your fan. Welcome Your new Hunter® ceiling fan is an addition to the service panel. • All wiring must be in accordance with...
Owner's Manual
Page 3
... as walls or posts, within 30 inches of the fan blade tips. • e fan is directly below the joist or support brace. Fan Support System • Fan attaches directly to Section 2 • Installing the Ceiling Plate. If your new Hunter fan. Choose the Fan Site Proper ceiling fan location and attachment to determine if the site is recessed a minimum...
... as walls or posts, within 30 inches of the fan blade tips. • e fan is directly below the joist or support brace. Fan Support System • Fan attaches directly to Section 2 • Installing the Ceiling Plate. If your new Hunter fan. Choose the Fan Site Proper ceiling fan location and attachment to determine if the site is recessed a minimum...
Owner's Manual
Page 4
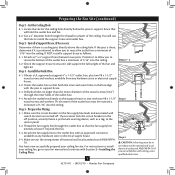
... the inner holes of the ceiling. For instructions to install your ceiling fan, go to the support brace or joist with an approved connector, available at least 6" beyond the box. 5-3. Preparing the Fan Site (continued) Step 2 - Position it will use a qualified electrician. 4 42751-01 • 08/12/10 • Hunter Fan Company If the joist is...
... the inner holes of the ceiling. For instructions to install your ceiling fan, go to the support brace or joist with an approved connector, available at least 6" beyond the box. 5-3. Preparing the Fan Site (continued) Step 2 - Position it will use a qualified electrician. 4 42751-01 • 08/12/10 • Hunter Fan Company If the joist is...
Owner's Manual
Page 5
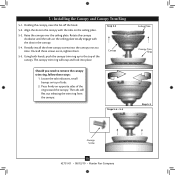
... instructions, and use the accessories, follow the instructions included with each product. Understanding Mounting and Installer's Choice® Hunter's patented 3-position mounting system provides you can install your Hunter fan, use only Hunter speed controls. Support Brace Ceiling Outlet Box For ceilings higher than 8 feet high CAUTION: To reduce the risk of personal injury, attach the...
... instructions, and use the accessories, follow the instructions included with each product. Understanding Mounting and Installer's Choice® Hunter's patented 3-position mounting system provides you can install your Hunter fan, use only Hunter speed controls. Support Brace Ceiling Outlet Box For ceilings higher than 8 feet high CAUTION: To reduce the risk of personal injury, attach the...
Owner's Manual
Page 6
...01 • 08/12/10 • Hunter Fan Company Refer to the building structure are essential for any parts are installing more than one fan, keep the fan blades and blade irons (if applicable) in "Preparing the Fan Site." Proper ceiling fan location and attachment to the included Parts Guide.... Installing Multiple Fans? Gathering the Tools You will need help installing the fan, your Hunter fan dealer can do ...
...01 • 08/12/10 • Hunter Fan Company Refer to the building structure are essential for any parts are installing more than one fan, keep the fan blades and blade irons (if applicable) in "Preparing the Fan Site." Proper ceiling fan location and attachment to the included Parts Guide.... Installing Multiple Fans? Gathering the Tools You will need help installing the fan, your Hunter fan dealer can do ...
Owner's Manual
Page 7
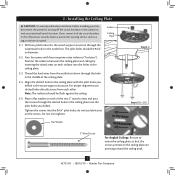
...should be 9/64" in the off the circuit breakers to orient the ceiling plate so that the arrows printed on the ceiling plate are pointing toward the ceiling peak. 7 42751-01 • 08/12/10 • Hunter Fan Company Tighten the screws into the pilot holes you cannot lock the circuit... breakers in diameter. 2-2. Drill two pilot holes into the holes in the ceiling plate with four ...
...should be 9/64" in the off the circuit breakers to orient the ceiling plate so that the arrows printed on the ceiling plate are pointing toward the ceiling peak. 7 42751-01 • 08/12/10 • Hunter Fan Company Tighten the screws into the pilot holes you cannot lock the circuit... breakers in diameter. 2-2. Drill two pilot holes into the holes in the ceiling plate with four ...
Owner's Manual
Page 8
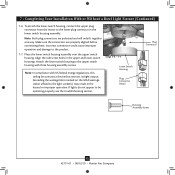
... adapter. 3-5. Remove the setscrew from unscrewing. To assemble fan to Step 3-7. Securely retighten the setscrew with the low profile washer. 3-4. Skip to hang down from a flat or angled ceiling, insert the downrod through the U-shaped hole in these ...installation instructions. 3-1. Be sure the green ground wire is fully installed, 2-3 threads on the ceiling plate through the canopy and canopy trim ring. CAUTION: The adapter has a special coating on the adapter... Steps 3-5 - 3-6 Low Profile Washer Low Profile Screw 8 42751-01 • 08/12/10 • Hunter Fan Company
... adapter. 3-5. Remove the setscrew from unscrewing. To assemble fan to Step 3-7. Securely retighten the setscrew with the low profile washer. 3-4. Skip to hang down from a flat or angled ceiling, insert the downrod through the U-shaped hole in these ...installation instructions. 3-1. Be sure the green ground wire is fully installed, 2-3 threads on the ceiling plate through the canopy and canopy trim ring. CAUTION: The adapter has a special coating on the adapter... Steps 3-5 - 3-6 Low Profile Washer Low Profile Screw 8 42751-01 • 08/12/10 • Hunter Fan Company
Owner's Manual
Page 9
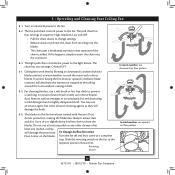
...) from the ceiling to the green ground wire (grounding) from the ceiling plate and the green ground wire from the fan CAUTION: Be sure...black wire (ungrounded) from the ceiling to the black wire (ungrounded) from the fan • The black/white wire (ungrounded) from the fan to the wire (ungrounded) ... ceiling to the white wire (grounded) from the fan. 4-5. Turn the splices upward and push them , then twist clockwise until tight. 4 • Wiring the Fan ...wire (grounded) from the ceiling to the black (ungrounded) and the black/white wire (ungrounded) from the fan or the green ground wire ...
...) from the ceiling to the green ground wire (grounding) from the ceiling plate and the green ground wire from the fan CAUTION: Be sure...black wire (ungrounded) from the ceiling to the black wire (ungrounded) from the fan • The black/white wire (ungrounded) from the fan to the wire (ungrounded) ... ceiling to the white wire (grounded) from the fan. 4-5. Turn the splices upward and push them , then twist clockwise until tight. 4 • Wiring the Fan ...wire (grounded) from the ceiling to the black (ungrounded) and the black/white wire (ungrounded) from the fan or the green ground wire ...
Owner's Manual
Page 10
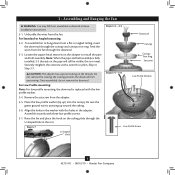
...tabs on the ceiling plate totally engage with the slots in the canopy. 5-4. The canopy trim ring will flex out releasing the trim ring from the canopy. Steps 5-4 - 5-5 Ceiling Plate Canopy Trim Ring Step 5-3 Canopy Screw 10 42751-01 • 08/12/10 • Hunter Fan Company Raise ...the canopy over the ceiling plate. Partially install the three canopy screws into place. The tabs will snap...
...tabs on the ceiling plate totally engage with the slots in the canopy. 5-4. The canopy trim ring will flex out releasing the trim ring from the canopy. Steps 5-4 - 5-5 Ceiling Plate Canopy Trim Ring Step 5-3 Canopy Screw 10 42751-01 • 08/12/10 • Hunter Fan Company Raise ...the canopy over the ceiling plate. Partially install the three canopy screws into place. The tabs will snap...
Owner's Manual
Page 13
... switch housing. Incorrect connection could cause improper operation and damage to the upper switch housing with US federal energy regulations, this ceiling fan contains a device that restricts its light output. Attach the lower switch housing to the product. 7-7. Align the side screw ... Steps 7-6 - 7-7 Lower Switch Housing Plug Connector Detail Plug Connector Housing Assembly Screw 13 42751-01 • 08/12/10 • Hunter Fan Company 7 • Completing Your Installation With or Without a Bowl Light Fixture (Continued) 7-6. Exceeding the wattage limit marked on the MAX ...
... switch housing. Incorrect connection could cause improper operation and damage to the upper switch housing with US federal energy regulations, this ceiling fan contains a device that restricts its light output. Attach the lower switch housing to the product. 7-7. Align the side screw ... Steps 7-6 - 7-7 Lower Switch Housing Plug Connector Detail Plug Connector Housing Assembly Screw 13 42751-01 • 08/12/10 • Hunter Fan Company 7 • Completing Your Installation With or Without a Bowl Light Fixture (Continued) 7-6. Exceeding the wattage limit marked on the MAX ...
Owner's Manual
Page 16
...to prevent scratching. Do not use an artistic agent, but never abrasive cleaning agents as they will distribute the warmer air trapped at the ceiling around the room without causing a draft. 8-5. The chain has two settings: ON and OFF. 8-4. You may use a furniture polish.... For cleaning finishes, use upward air flow pattern 16 42751-01 • 08/12/10 • Hunter Fan Company The blades on the blades. Restart fan. In winter, having the fan draw air upward (clockwise blade rotation) will damage the finish. 8-6. Remove surface smudges or accumulated dirt and...
...to prevent scratching. Do not use an artistic agent, but never abrasive cleaning agents as they will distribute the warmer air trapped at the ceiling around the room without causing a draft. 8-5. The chain has two settings: ON and OFF. 8-4. You may use a furniture polish.... For cleaning finishes, use upward air flow pattern 16 42751-01 • 08/12/10 • Hunter Fan Company The blades on the blades. Restart fan. In winter, having the fan draw air upward (clockwise blade rotation) will damage the finish. 8-6. Remove surface smudges or accumulated dirt and...
Parts Guide
Page 1
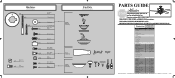
... STORE, call 888-830-1326 for assistance. Parts List Item Name Hanging System Kit Ceiling Plate Canopy Canopy Trim Ring Hanger Ball / Downrod Assembly Setscrew Low Profile Washer Screw,..., Female Cap, Switch Housing Plug Button Light bulb / Bulb Model # Asm. Dwg. # Finish Qnty 1 20552 97531-01 Cocoa Part # 94945-67 1 G0474-05 1 76201-05 1 G0761-32 1 G0656-67 1 ...-01 1 66075-01 1 65798-01 1 08200-01 1 08198-01 1 73853-01 1 73854-01 2 77646-04 Hunter Fan Company • 7130 Goodlett Farms Pkwy. #400 • Memphis, TN 38016 • www.hunterfan.com • 98000...
... STORE, call 888-830-1326 for assistance. Parts List Item Name Hanging System Kit Ceiling Plate Canopy Canopy Trim Ring Hanger Ball / Downrod Assembly Setscrew Low Profile Washer Screw,..., Female Cap, Switch Housing Plug Button Light bulb / Bulb Model # Asm. Dwg. # Finish Qnty 1 20552 97531-01 Cocoa Part # 94945-67 1 G0474-05 1 76201-05 1 G0761-32 1 G0656-67 1 ...-01 1 66075-01 1 65798-01 1 08200-01 1 08198-01 1 73853-01 1 73854-01 2 77646-04 Hunter Fan Company • 7130 Goodlett Farms Pkwy. #400 • Memphis, TN 38016 • www.hunterfan.com • 98000...


