
User Manual
Page 5
...liquid should not be hazardous or cause damage to liquid of any unsupported attachments as these may result in electric fire or shock. 3. CONNECTION TO THE AERIAL • Disconnect the product from the mains before you have followed the manufacturer's instructions for long periods of the product...or table where it near a radiator or heat register. • We recommend that the product has 10 cm clearance from the mains before connecting or disconnecting the cable from the type of power supply indicated on the marking label. ATTACHMENTS • Do not use any kind. Safety Warning...
...liquid should not be hazardous or cause damage to liquid of any unsupported attachments as these may result in electric fire or shock. 3. CONNECTION TO THE AERIAL • Disconnect the product from the mains before you have followed the manufacturer's instructions for long periods of the product...or table where it near a radiator or heat register. • We recommend that the product has 10 cm clearance from the mains before connecting or disconnecting the cable from the type of power supply indicated on the marking label. ATTACHMENTS • Do not use any kind. Safety Warning...
User Manual
Page 7
... (Picture-in the Play List GB32 5.4 Chase Play GB33 5.5 Bookmark GB33 5.6 Additional Time Shift Operations GB34 6. Setup GB15 2.1 Connecting the Antenna GB15 2.2 Connecting the TV GB16 2.3 Connecting the TV and VCR GB17 2.4 Powering On GB19 3. PVR GB29 5.1 Time Shifted Recording (TSR GB29 5.2 Recording GB31 5.3 Programme Playback in -Picture) Screen GB27 4.8 Game GB28 5. Programme Guide...
... (Picture-in the Play List GB32 5.4 Chase Play GB33 5.5 Bookmark GB33 5.6 Additional Time Shift Operations GB34 6. Setup GB15 2.1 Connecting the Antenna GB15 2.2 Connecting the TV GB16 2.3 Connecting the TV and VCR GB17 2.4 Powering On GB19 3. PVR GB29 5.1 Time Shifted Recording (TSR GB29 5.2 Recording GB31 5.3 Programme Playback in -Picture) Screen GB27 4.8 Game GB28 5. Programme Guide...
User Manual
Page 12
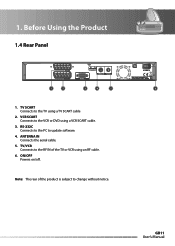
GB11 User's Manual TV SCART Connects to change without notice. Note: The rear of the TV or VCR using a TV SCART cable 2. RS-232C Connects to the PC to the VCR or DVD using a VCR SCART cable. 3. ANTENNA IN Connects the aerial cable. 5. ON/OFF Powers on/off. Before Using the Product 1.4 Rear Panel 1 2 3 4 5 6 1. TV/VCR Connects to the RF IN of the product is subject to the TV using an RF cable. 6. VCR SCART Connects to update software. 4. 1.
GB11 User's Manual TV SCART Connects to change without notice. Note: The rear of the TV or VCR using a TV SCART cable 2. RS-232C Connects to the PC to the VCR or DVD using a VCR SCART cable. 3. ANTENNA IN Connects the aerial cable. 5. ON/OFF Powers on/off. Before Using the Product 1.4 Rear Panel 1 2 3 4 5 6 1. TV/VCR Connects to the RF IN of the product is subject to the TV using an RF cable. 6. VCR SCART Connects to update software. 4. 1.

User Manual
Page 16
...encounter any problems setting up your product, please contact your local product distributor. 2.1 Connecting the Antenna Connect your aerial to watch analogue channels. The product provides various interfaces to connect to the TV with the particular equipments for gaining optimum signal quality. Setup This chapter... describes how to connect the product to the TV, VCR or other devices. Note: Connect the product and the TV using an...
...encounter any problems setting up your product, please contact your local product distributor. 2.1 Connecting the Antenna Connect your aerial to watch analogue channels. The product provides various interfaces to connect to the TV with the particular equipments for gaining optimum signal quality. Setup This chapter... describes how to connect the product to the TV, VCR or other devices. Note: Connect the product and the TV using an...

User Manual
Page 17
SCART Cable TV SCART GB16 User's Manual Using SCART Cable Connect the product and the TV using a SCART cable. Setup 2.2 Connecting the TV 1. 2.
SCART Cable TV SCART GB16 User's Manual Using SCART Cable Connect the product and the TV using a SCART cable. Setup 2.2 Connecting the TV 1. 2.
User Manual
Page 18
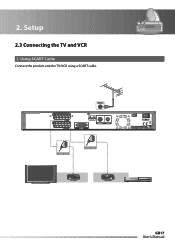
2. SCART Cable SCART Cable TV SCART VCR SCART GB17 User's Manual Setup 2.3 Connecting the TV and VCR 1. Using SCART Cable Connect the product and the TV/VCR using a SCART cable.
2. SCART Cable SCART Cable TV SCART VCR SCART GB17 User's Manual Setup 2.3 Connecting the TV and VCR 1. Using SCART Cable Connect the product and the TV/VCR using a SCART cable.
User Manual
Page 19
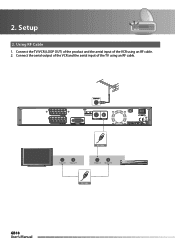
Setup 2. Connect the aerial output of the VCR and the aerial input of the VCR using an RF cable. Connect the TV/VCR (LOOP OUT) of the product and the aerial input of the TV using an RF cable. 2. 2. Using RF Cable 1. TV Antenna IN TV Antenna OUT RF Cable VCR Antenna IN VCR Antenna OUT RF Cable GB18 User's Manual
Setup 2. Connect the aerial output of the VCR and the aerial input of the VCR using an RF cable. Connect the TV/VCR (LOOP OUT) of the product and the aerial input of the TV using an RF cable. 2. 2. Using RF Cable 1. TV Antenna IN TV Antenna OUT RF Cable VCR Antenna IN VCR Antenna OUT RF Cable GB18 User's Manual
User Manual
Page 20
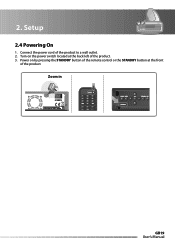
2. Power on the power switch located at the front of the product to a wall outlet. 2. Setup 2.4 Powering On 1. Connect the power cord of the product. Zoom in 1 4 7 MENU STANDBY 2 3 5 6 8 9 0 TEXT GB19 User's Manual Turn on by pressing the STANDBY button of the remote control or the STANDBY button at the back left of the product. 3.
2. Power on the power switch located at the front of the product to a wall outlet. 2. Setup 2.4 Powering On 1. Connect the power cord of the product. Zoom in 1 4 7 MENU STANDBY 2 3 5 6 8 9 0 TEXT GB19 User's Manual Turn on by pressing the STANDBY button of the remote control or the STANDBY button at the back left of the product. 3.
User Manual
Page 21
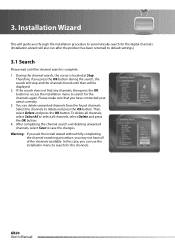
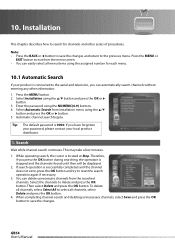
... the channel search and deleting unwanted channels, select Save to delete and press the OK button. GB20 User's Manual Therefore, if you may not have connected your aerial correctly. 3. You can use the installation menu to select all of the channels available. Warning: If you exit the install wizard without fully...
... the channel search and deleting unwanted channels, select Save to delete and press the OK button. GB20 User's Manual Therefore, if you may not have connected your aerial correctly. 3. You can use the installation menu to select all of the channels available. Warning: If you exit the install wizard without fully...
User Manual
Page 25
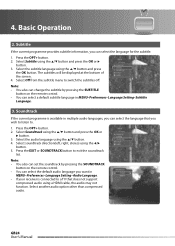
... the bottom of the screen. 4. GB24 User's Manual Select Off from the subtitle menu to exit the soundtrack list. Soundtrack If the current programme is connected to . 1. Press the EXIT or SOUNDTRACK button to switch the subtitles off. Select Subtitle using the / button and press the OK or button. 3. Select Soundtrack...
... the bottom of the screen. 4. GB24 User's Manual Select Off from the subtitle menu to exit the soundtrack list. Soundtrack If the current programme is connected to . 1. Press the EXIT or SOUNDTRACK button to switch the subtitles off. Select Subtitle using the / button and press the OK or button. 3. Select Soundtrack...
User Manual
Page 55
... deleting unnecessary channels, select Save and press the OK button to the aerial and television, you have forgotten your password, please contact your product is connected to save the changes and return to reset the search operation again if necessary. 3. This may take a few minutes. 1. You can automatically search channels without...
... deleting unnecessary channels, select Save and press the OK button to the aerial and television, you have forgotten your password, please contact your product is connected to save the changes and return to reset the search operation again if necessary. 3. This may take a few minutes. 1. You can automatically search channels without...
User Manual
Page 57
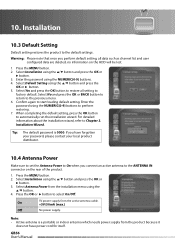
... the installation wizard. Select Antenna Power from the installation menu using the / button and press the OK or button. 3. Warning: Please note that once you connect an active antenna to factory default. Tip: The default password is a portable or indoor antenna which needs power supply from the active antenna cable. +5V...
... the installation wizard. Select Antenna Power from the installation menu using the / button and press the OK or button. 3. Warning: Please note that once you connect an active antenna to factory default. Tip: The default password is a portable or indoor antenna which needs power supply from the active antenna cable. +5V...
User Manual
Page 61
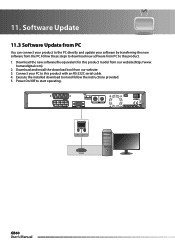
... from the PC.Follow these steps to download new software from our website(http://www. Download and install the download tool from PC You can connect your product to the PC directly and update your PC to start operating. 11. Download the new software file equivalent for this product with an...
... from the PC.Follow these steps to download new software from our website(http://www. Download and install the download tool from PC You can connect your product to the PC directly and update your PC to start operating. 11. Download the new software file equivalent for this product with an...
User Manual
Page 64
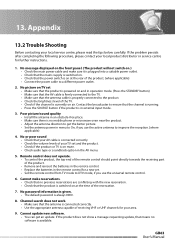
... procedure, please contact your local service centre, please read the tips below carefully. No password information is given. • The default password is connected correctly. • Use the appropriate antenna capable of receiving VHF or UHF channels for your TV set . • Set the remote control from...sure that the product is powered on and in external input mode. 3. No or poor sound • Check that the antenna cable is properly connected to the product. • Check the brightness level of the product. • Remove and reinsert the batteries in the remote control. • ...
... procedure, please contact your local service centre, please read the tips below carefully. No password information is given. • The default password is connected correctly. • Use the appropriate antenna capable of receiving VHF or UHF channels for your TV set . • Set the remote control from...sure that the product is powered on and in external input mode. 3. No or poor sound • Check that the antenna cable is properly connected to the product. • Check the brightness level of the product. • Remove and reinsert the batteries in the remote control. • ...
User Manual
Page 65
...any Favourites list you have a valid and working subscription to the channels you have the appropriate CI-Module. There is connected to view. • Ensure that the PVR and the TV are available. Cannot operate the TSR (Time Shifted Recording). • The TSR may not be ...available during the recording may not be removed. Press MENU button. 2. Important: When you wish to the "TV" scart connection on the PVR and TV is finished. 13. Wait until the recording is up. Contact the product distributor. • The signal during the recording. ...
...any Favourites list you have a valid and working subscription to the channels you have the appropriate CI-Module. There is connected to view. • Ensure that the PVR and the TV are available. Cannot operate the TSR (Time Shifted Recording). • The TSR may not be ...available during the recording may not be removed. Press MENU button. 2. Important: When you wish to the "TV" scart connection on the PVR and TV is finished. 13. Wait until the recording is up. Contact the product distributor. • The signal during the recording. ...
User Manual
Page 66
... are playing back a recording or when a recording is detected from the Digital Signal. 28. When my PVR is connected I no longer available please contact the Customer Helpline. 26. My EPG takes a long time to load each...HDD has not initialised on your TV set. • If the problem is experienced when the PVR-9150T is still no longer have a record icon in the menu, instead the menu options start ... from the transmitter as the time is in standby or powered off the PVR from the rear ON/OFF switch for Humax connectionˇą on start with Preferences and Games appear at the bottom?...
... are playing back a recording or when a recording is detected from the Digital Signal. 28. When my PVR is connected I no longer available please contact the Customer Helpline. 26. My EPG takes a long time to load each...HDD has not initialised on your TV set. • If the problem is experienced when the PVR-9150T is still no longer have a record icon in the menu, instead the menu options start ... from the transmitter as the time is in standby or powered off the PVR from the rear ON/OFF switch for Humax connectionˇą on start with Preferences and Games appear at the bottom?...
User Manual
Page 71
...right for deciding the release of software for the users to display 2 different TV channels (or TV inputs) on one screen. 11. PVR (Personal Video Recorder) Video recorder that a programme provider/operator offer. a cable with high frequency 3. Aerial A device that informs the Product...Hz). 4. MUX The transmitter/frequency/channel where the programme provider/operator transmit a package of channels/services that can transport signals with male connection at both ends is made of Audio-Visual equipment such as a TV and a VCR. Network The collection of digital channels/services....
...right for deciding the release of software for the users to display 2 different TV channels (or TV inputs) on one screen. 11. PVR (Personal Video Recorder) Video recorder that a programme provider/operator offer. a cable with high frequency 3. Aerial A device that informs the Product...Hz). 4. MUX The transmitter/frequency/channel where the programme provider/operator transmit a package of channels/services that can transport signals with male connection at both ends is made of Audio-Visual equipment such as a TV and a VCR. Network The collection of digital channels/services....


